Tag Archives: Announcements

Talk shop with Google Open Source

Hello world! The Google Open Source team is ringing in the new year by launching accounts on Twitter, Facebook, and Google+ to engage more with the community and keep folks up to date.
Free and open source software (FOSS) is fundamental to computing, the internet, and Google. Since 2004, Google Open Source has helped Googlers get code in and out of Google and supported FOSS through student programs and financial support. One thing is clear after 14 years: FOSS is all about community.

We’re part of that community, seeing people at events, on mailing lists, and in the trenches of code repositories. And few things are more enjoyable and productive than talking with people in the community…

… so we thought we’d start doing more of that. We want to:
We hope you’ll come along and let us know. You’ll find us at @GoogleOSS and +GoogleOpenSource, as well as on Facebook and YouTube.

By Josh Simmons, Google Open Source

Simplify Cloud VPC firewall management with service accounts


Firewalls provide the first line of network defense for any infrastructure. On Google Cloud Platform (GCP), Google Cloud VPC firewalls do just that—controlling network access to and between all the instances in your VPC. Firewall rules determine who's allowed to talk to whom and more importantly who isn’t. Today, configuring and maintaining IP-based firewall rules is a complex and manual process that can lead to unauthorized access if done incorrectly. That’s why we’re excited to announce a powerful new management feature for Cloud VPC firewall management: support for service accounts.

If you run a complex application on GCP, you’re probably already familiar with service accounts in Cloud Identity and Access Management (IAM) that provide an identity to applications running on virtual machine instances. Service accounts simplify the application management lifecycle by providing mechanisms to manage authentication and authorization of applications. They provide a flexible yet secure mechanism to group virtual machine instances with similar applications and functions with a common identity. Security and access control can subsequently be enforced at the service account level.


Using service accounts, when a cloud-based application scales up or down, new VMs are automatically created from an instance template and assigned the correct service account identity. This way, when the VM boots up, it gets the right set of permissions and within the relevant subnet, so firewall rules are automatically configured and applied.

Further, the ability to use Cloud IAM ACLs with service accounts allows application managers to express their firewall rules in the form of intent, for example, allow my “application x” servers to access my “database y.” This remediates the need to manually manage Server IP Address lists while simultaneously reducing the likelihood of human error.
This process is leaps-and-bounds simpler and more manageable than maintaining IP address-based firewall rules, which can neither be automated nor templated for transient VMs with any semblance of ease.

Here at Google Cloud, we want you to deploy applications with the right access controls and permissions, right out of the gate. Click here to learn how to enable service accounts. And to learn more about Cloud IAM and service accounts, visit our documentation for using service accounts with firewalls.

Seeking open source projects for Google Summer of Code 2018

Do you lead or represent a free or open source software organization? Are you seeking new contributors? (Who isn’t?) Do you enjoy the challenge and reward of mentoring new developers? Apply to be a mentor organization for Google Summer of Code 2018!

We are seeking open source projects and organizations to participate in the 14th annual Google Summer of Code (GSoC). GSoC is a global program that gets student developers contributing to open source. Each student spends three months working on a project, with the support of volunteer mentors, for participating open source organizations.

Last year 1,318 students worked with 198 open source organizations. Organizations include individual projects and umbrella organizations that serve as fiscal sponsors, such as Apache Software Foundation or the Python Software Foundation.

You can apply starting today. The deadline to apply is January 23 at 16:00 UTC. Organizations chosen for GSoC 2018 will be posted on February 12.

Please visit the program site for more information on how to apply, a detailed timeline of important deadlines and general program information. We also encourage you to check out the Mentor Guide and join the discussion group.

Best of luck to all of the applicants!

By Josh Simmons, Google Open Source

With Google Kubernetes Engine regional clusters, master nodes are now highly available


We introduced highly available masters for Google Kubernetes Engine earlier this fall with our alpha launch of regional clusters. Today, regional clusters are in beta and ready to use at scale in Kubernetes Engine.

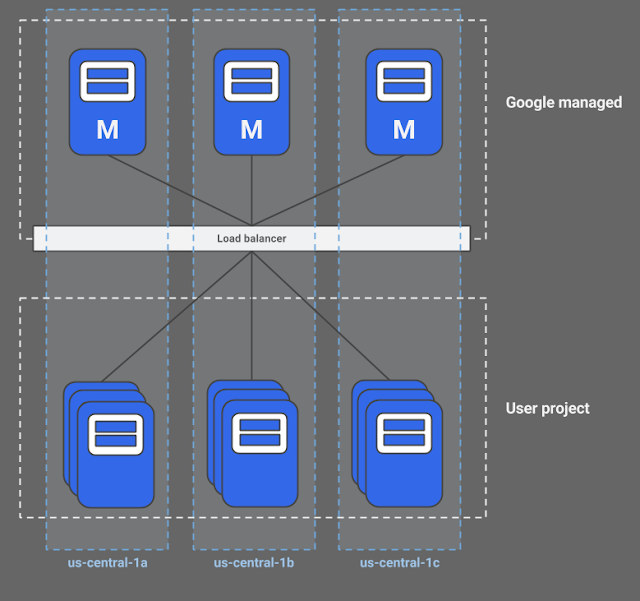
Regional clusters allow you to create a Kubernetes Engine cluster with a multi-master, highly available control plane that helps ensure higher cluster uptime. With regional clusters in Kubernetes Engine, you gain:
  • Resilience from single zone failure - Because your masters and nodes are available across a region rather than a single zone, your Kubernetes cluster is still fully functional if a zone goes down.
  • No downtime during master upgrades - Kubernetes Engine minimizes downtime during all Kubernetes master upgrades, but with a single master, some downtime is inevitable. By using regional clusters, the control plane remains online and available, even during upgrades.

How regional clusters work


When you create a regional cluster, Kubernetes Engine spreads your masters and nodes across three zones in a region, ensuring that you can experience a zonal failure and still remain online.

By default, Kubernetes Engine creates three nodes in each zone (giving you nine total nodes), but you can change the number of nodes in your cluster with the --num-nodes flag.
Creating a Kubernetes Engine regional cluster is simple. Let’s create a regional cluster with two nodes in each zone.

$ gcloud beta container clusters create my-regional-cluster --region=us-central1 --num-nodes=2

Or you can use the Cloud Console to create a regional cluster:
For a more detailed explanation of the regional clusters feature along with additional flags you can use, check out the documentation.

Kubernetes Engine regional clusters are offered at no additional charge during the beta period. We will announce pricing as part of general availability. Until then, please send any feedback to [email protected].


Meet the Kubernetes Engine team at #KubeCon


This week the Kubernetes community gathers in Austin for the annual #KubeCon conference. The Google Cloud team will host various activities throughout the week. Join us for parties, workshops, and more than a dozen talks by experts. More info and ways to RSVP at g.co/kubecon.

Manage Google Kubernetes Engine from Cloud Console dashboard, now generally available


There are two main ways to manage Google Kubernetes Engine: the kubectl command line interface and Cloud Console, a web-based dashboard. Cloud Console for Kubernetes Engine is now generally available, and includes several new and exciting features to help you understand the state of your app, troubleshoot it and perform fixes.

Troubleshoot your app


To walk you through these new features, we’d like to introduce you to Alice, a DevOps admin running her environment on Kubernetes Engine. Alice logs into Cloud Console to see the status of her apps. She starts by looking at the unified Workloads view where she can inspect all her apps, no matter which cluster they run on. This is especially handy for Alice, as her team has different clusters for different environments. In this example she spots an issue with one of the frontends – its status is showing up red.
(click to enlarge)

By clicking on the name of the workload, Alice sees a detailed view where she can start debugging. Here she sees graphs for CPU, memory and disk utilization and spots a sudden spike in the resource usage.
(click to enlarge)

Before she starts to investigate the root cause, Alice decides to turn on Horizontal Pod Autoscaling to mitigate the application outage. The autoscale action is available from the menu at the top of the Cloud Console page. She increases the number of maximum replicas to 15 and enables autoscaling.
(click to enlarge)

Now that the service is scaling up and and can handle user traffic again, Alice decides to investigate the root cause of the increased CPU usage. She starts by investigating one of the pods and sees that it has high CPU usage. To look into this further she opens the Logs tab to browse the recent logs for the offending pod.
(click to enlarge)
The logs indicate that the problem is with the frontend’s http server. With this insight, Alice decides to connect to the running pod to debug it further. She opens Cloud Shell directly from Cloud Console and attaches to the selected pod. Alice does not need to worry about remembering the exact commands, finding the right credentials and setting kubectl context—the correct command is fully populated when Cloud Shell loads.

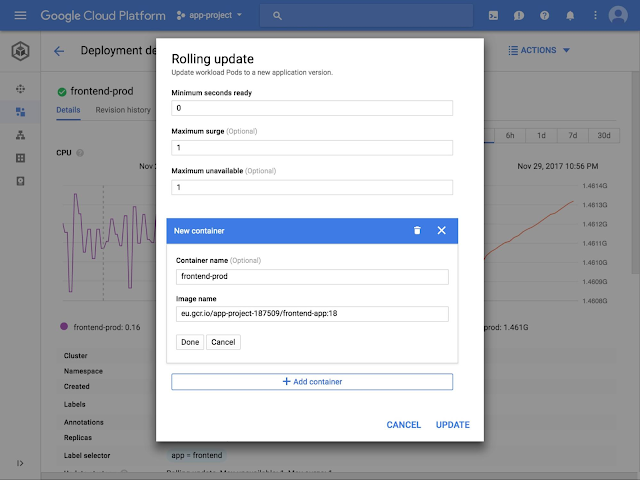
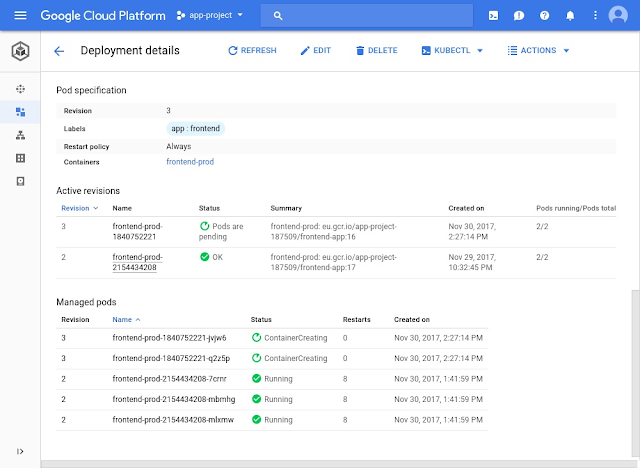
By running the linux "top" command, Alice can see that the http server process is the culprit behind the spiking CPU. She can now investigate the code, find the bug and fix it using her favorite tools. Once the new code is ready, Alice comes back to the UI to perform a rolling update. Again, she finds the rolling update action in the top of the UI, and updates the image version. Cloud Console then performs the rolling update, displays its progress and highlights any problems that might have occurred during the update.
(click to enlarge)
(click to enlarge)
Alice now inspects resource usage charts, status and logs for the frontend deployment to verify that it is working correctly. She can also perform the same rolling update action on a similar frontend deployment on a different cluster, without having to context-switch and provide new credentials.

Kubernetes Engine Cloud Console comes with other features to assist Kubernetes administrators with their daily routines. For example, it includes a YAML editor to modify Kubernetes objects, or service visualizations that aggregate its related resources like pods or load balancers. You can learn more about those features through the Kubernetes Engine dashboards documentation.

Manage Kubernetes Engine clusters


Kubernetes Engine’s new Cloud Console experience also offers improvements for cluster administrators. Bob works in the same company as Alice and is responsible for administering the cluster where the frontend app lives.

While investigating the the list of nodes in the cluster Bob notices that all the nodes are running close to full utilization and that there's not enough capacity left in the cluster to schedule other workloads. He clicks on one of the nodes to investigate what’s happening with the pods scheduled there. He quickly realizes that due to Alice turning on the Horizontal Pod Autoscaler there are now multiple replicas of the frontend pods that take up all the space in the cluster.

Bob decides to edit the the cluster right from Cloud Console and turn on cluster autoscaling. After a couple of minutes to scale up the cluster, everything starts to work again.

These are just some of the things that you can do from the Kubernetes Engine Cloud Console dashboard. To get started, simply login to Cloud Console and click on the Kubernetes Engine tab. Let us know how you like it by clicking on the feedback button in the upper righthand corner of the UI.

Meet the Kubernetes Engine team at #KubeCon


This week the Kubernetes community gathers in Austin for the annual #KubeCon conference. The Google Cloud team will host various activities throughout the week. Join us for parties, workshops, and more than a dozen talks by experts. More info and ways to RSVP at g.co/kubecon.

Introducing an easy way to deploy containers on Google Compute Engine virtual machines


Containers are a popular way to deploy software thanks to their lightweight size and resource requirements, dependency isolation and portability. Today, we’re introducing an easy way to deploy and run containers on Google Compute Engine virtual machines and managed instance groups. This feature, which is currently in beta, allows you to take advantage of container deployment consistency while staying in your familiar IaaS environment.

Now you can easily deploy containers wherever you may need them on Google Cloud: Google Kubernetes Engine for multi-workload, microservice friendly container orchestration, Google App Engine flexible environment, a fully managed application platform, and now Compute Engine for VM-level container deployment.

Running containers on Compute Engine instances is handy in a number of scenarios: when you need to optimize CI/CD pipeline for applications running on VMs, finetune VM shape and infrastructure configuration for a specialized workload, integrate a containerized application into your existing IaaS infrastructure or launch a one-off instance of an application.

To run your container on a VM instance, or a managed instance group, simply provide an image name and specify your container runtime options when creating a VM or an instance template. Compute Engine takes care of the rest including supplying an up-to-date Container-Optimized OS image with Docker and starting the container upon VM boot with your runtime options.

You can now easily use containers without having to write startup scripts or learn about container orchestration tools, and can migrate to full container orchestration with Kubernetes Engine when you’re ready. Better yet, standard Compute Engine pricing applies VM instances running containers cost the same as regular VMs.

How to deploy a container to a VM


To see the new container deployment method in action, let’s deploy an NGINX HTTP server to a virtual machine. To do this, you only need to configure three settings when creating a new instance:
  • Check Deploy a container image to this VM instance.
  • Provide Container image name. 
  • Check Allow HTTP traffic so that the VM instance can receive HTTP requests on port 80. 
Here's how the flow looks in Google Cloud Console:

Run a container from the gcloud command line

You can run a container on a VM instance with just one gcloud command:

gcloud beta compute instances create-with-container nginx-vm \
  --container-image gcr.io/cloud-marketplace/google/nginx1:1.12 \
  --tags http-server

Then, create a firewall rule to allow HTTP traffic to the VM instance so that you can see the NGINX welcome page:

gcloud compute firewall-rules create allow-http \
  --allow=tcp:80 --target-tags=http-server

To update such a container is just as easy:

gcloud beta compute instances update-container nginx-vm \
  --container-image gcr.io/cloud-marketplace/google/nginx1:1.13

Run a container on a managed instance group

With managed instance groups, you can take advantage of VM-level features like autoscaling, automatic recreation of unhealthy virtual machines, rolling updates, multi-zone deployments and load balancing. Running containers on managed instance groups is just as easy as on individual VMs and takes only two steps: (1) create an instance template and (2) create a group.

Let’s deploy the same NGINX server to a managed instance group of three virtual machines.

Step 1: Create an instance template with a container.

gcloud beta compute instance-templates create-with-container nginx-it \
  --container-image gcr.io/cloud-marketplace/google/nginx1:1.12 \
  --tags http-server

The http-server tag allows HTTP connections to port 80 of the VMs, created from the instance template. Make sure to keep the firewall rule from the previous example.

Step 2: Create a managed instance group.

gcloud compute instance-groups managed create nginx-mig \
  --template nginx-it \
  --size 3

The group will have three VM instances, each running the NGINX container.

Get started!

Interested in deploying containers on Compute Engine VM instances or managed instance groups? Take a look at the detailed step-by-step instructions and learn how to configure a range of container runtime options including environment variables, entrypoint command with parameters and volume mounts. Then, help us help you make using containers on Compute Engine even easier! Send your feedback, questions or requests to [email protected].

Sign up for Google Cloud today and get $300 in credits to try out running containers directly on Compute Engine instances.

Cutting cluster management fees on Google Kubernetes Engine


Today, we're excited to announce that we have eliminated the cluster management fee for Google Kubernetes Engine, our managed Kubernetes service.

We founded the Kubernetes open-source project in 2014, and have remained the leading contributor to it. Internally at Google, we’ve been running globally scaled, production workloads in containers for over a decade. Kubernetes and Kubernetes Engine include the best of what we have learned, including the advanced cluster management features that web-scale production applications require. Today’s announcement makes Kubernetes Engine’s cluster management available at no charge, for any size cluster, effective immediately.

To put this pricing update in context, Kubernetes Engine has always provided a managed master at no charge for clusters of fewer than six nodes. For larger clusters we also provided the managed master at no charge, however we charged a flat fee of $0.15 per hour to manage the cluster. This flat fee is now eliminated for all cluster sizes. At Google, we’ve found that larger clusters are more efficient  especially when running multiple workloads. So if you were hesitating to create larger clusters worry no more and scale freely!


Nodes in the cluster
Older Pricing
New Pricing
(effective immediately)
Cluster Management Fee
0 to 5 nodes
0
0
6+ nodes
$0.15 / hour
0


That’s great news, but some of you may be wondering what all is included in cluster management? In the context of Google Kubernetes Engine, every cluster includes a master VM that acts as its control plane. Kubernetes Engine’s cluster management includes the following capabilities among others:


A useful point of comparison is the cost of managing your Kubernetes cluster yourself, either on Google Compute Engine or on another cloud. In a self-managed cluster, you pay for the VM that hosts the master and any resources you need for monitoring, logging and storing its state. Depending on the size of your cluster, moving to Kubernetes Engine could save a decent fraction of your total bill just by saving the cost of the master.

Of course while dollar savings are nice, we have invested Google engineering in automating cluster management with Kubernetes Engine to you save time and headaches as well. In a self-managed cluster, you're responsible for scaling the master as your cluster grows, and for backing up etcd. You have to keep an eye out for security patches and apply them. To access new Kubernetes features, you have to upgrade the master and cluster yourself. And most likely cluster repair and scaling is manual. With Google Kubernetes Engine, on the other hand, we take care of all of this complexity at no charge so you can focus on your business.
“[Google Kubernetes Engine] gives us elasticity and scalable performance for our Kubernetes clusters. It’s fully supported and managed by Google, which makes it more attractive to us than elastic container services from other cloud providers”  
 Arya Asemanfar, Engineering Manager at Mixpanel
We’re committed to raising the bar on Kubernetes’ reliability, cost-effectiveness, ease-of-use and enterprise readiness, and continue to add advanced management capabilities into Kubernetes Engine. For a preview of what’s next we invite you to join an early access program for node auto-provisioning, a new cluster management feature that provisions the right type of nodes in your auto-scaling cluster based on the observed behavior of your workloads. To join the early access program, fill out this form.

Google Code-in contest for teenagers starts today!

Today marks the start of the 8th consecutive year of Google Code-in (GCI). It’s the biggest contest ever and we hope you’ll come along for the ride!

The Basics

What is Google Code-in?

Our global, online contest introducing students to open source development. The contest runs for 7 weeks until January 17, 2018.

Who can register?

Pre-university students ages 13-17 that have their parent or guardian’s permission to register for the contest.

How do students register?

Students can register for the contest beginning today at g.co/gci. Once students have registered and the parental consent form has been submitted, students can choose which task they want to work on first. Students choose the task they find interesting from a list of hundreds of available tasks created by 25 participating open source organizations. Tasks take an average of 3-5 hours to complete. The task categories are:
  • Coding
  • Documentation/Training
  • Outreach/Research
  • Quality Assurance
  • User Interface

Why should students participate?

Students not only have the opportunity to work on a real open source software project, thus gaining invaluable experience, but they also have the opportunity to be a part of the open source community. Mentors are readily available to help answer their questions while they work through the tasks.

Google Code-in is a contest so there are prizes! Complete one task and receive a digital certificate. Three completed tasks and you’ll also get a fun Google t-shirt. Finalists get a hoodie. Grand Prize winners receive an all expense paid trip to Google headquarters in California!

Details

Over the last 7 years, more than 4,500 students from 99 countries have successfully completed over 23,000 tasks in GCI. Intrigued? Learn more about GCI by checking out our rules and FAQs. And please visit our contest site and read the Getting Started Guide.

Teachers, if you are interested in getting your students involved in Google Code-in we have resources available to help you get started.

By Stephanie Taylor, Google Open Source