Posted by Ted White and Ofer Naaman, Staff Research Scientists, Google Quantum AI 
The Google Quantum AI team is building quantum computers with superconducting microwave circuits, but much like a classical computer the superconducting processor at the heart of these computers is only part of the story. An entire technology stack of peripheral hardware is required to make the quantum computer work properly. In many cases these parts must be custom designed, requiring extensive research and development to reach the highest levels of performance.
In this post, we highlight one aspect of this supplemental hardware: our superconducting microwave amplifiers. In “Readout of a Quantum Processor with High Dynamic Range Josephson Parametric Amplifiers”, published in Applied Physics Letters, we describe how we increased the maximum output power of our superconducting microwave amplifiers by a factor of over 100x. We discuss how this work can pave the way for the operation of larger quantum processor chips with improved performance.
Why microwave amplifiers?
One of the challenges of operating a superconducting quantum processor is measuring the state of a qubit without disturbing its operation. Fundamentally, this comes down to a microwave engineering problem, where we need to be able to measure the energy inside the qubit resonator without exposing it to noisy or lossy wiring. This can be accomplished by adding an additional microwave resonator to the system that is coupled to the qubit, but far from the qubit’s resonance frequency. The resonator acts as a filter that isolates the qubit from the control lines but also picks up a state-dependent frequency shift from the qubit. Just like in the binary phase shift keying (BPSK) encoding technique, the digital state of the qubit (0 or 1) is translated into a phase for a probe tone (microwave signal) reflecting off of this auxiliary resonator. Measuring the phase of this probe tone allows us to infer the state of the qubit without directly interfacing with the qubit itself.
While this sounds simple, the qubit actually imposes a severe cap on how much power can be used for this probe tone. In normal operation, a qubit should be in the 0 state or the 1 state or some superposition of the two. A measurement pulse should collapse the qubit into one of these two states, but using too much power can push it into a higher excited state and corrupt the computation. A safe measurement power is typically around -125 dBm, which amounts to only a handful of microwave photons interacting with the processor during the measurement. Typically, small signals are measured using microwave amplifiers, which increase the signal level, but also add their own noise. How much noise is acceptable? If the measurement process takes too long, the qubit state can change due to energy loss in the circuit. This means that these very small signals must be measured in just a few hundred nanoseconds with very high (>99%) fidelity. We therefore cannot afford to average the signal over a longer time to reduce the noise. Unfortunately, even the best semiconductor low-noise amplifiers are still almost a factor of 10 too noisy.
The solution is to design our own custom amplifiers based on the same circuit elements as the qubits themselves. These amplifiers typically consist of Josephson junctions to provide a tunable inductance wired into a superconducting resonant circuit. By constructing a resonant circuit out of these elements, you can create a parametric amplifier where amplification is achieved by modulating the tunable inductance at twice the frequency you want to amplify. Additionally, because all of the wiring is made of lossless superconductors, these devices operate near the quantum limit of added noise, where the only noise in the signal is coming from amplification of the zero point quantum voltage fluctuations.
The one downside to these devices is that the Josephson junctions constrain the power of the signals we can measure. If the signal is too large, the drive current can approach the junction critical current and degrade the amplifier performance. Even if this limit was sufficient to measure a single qubit, our goal was to increase efficiency by measuring up to six qubits at a time using the same amplifier. Some groups get around this limit by making traveling wave amplifiers, where the signals are distributed across thousands of junctions. This increases the saturation power, but the amplifiers get very complicated to produce and take up a lot of space on the chip. Our goal was to create an amplifier that could handle as much power as a traveling wave amplifier but with the same simple and compact design we were used to.
Results
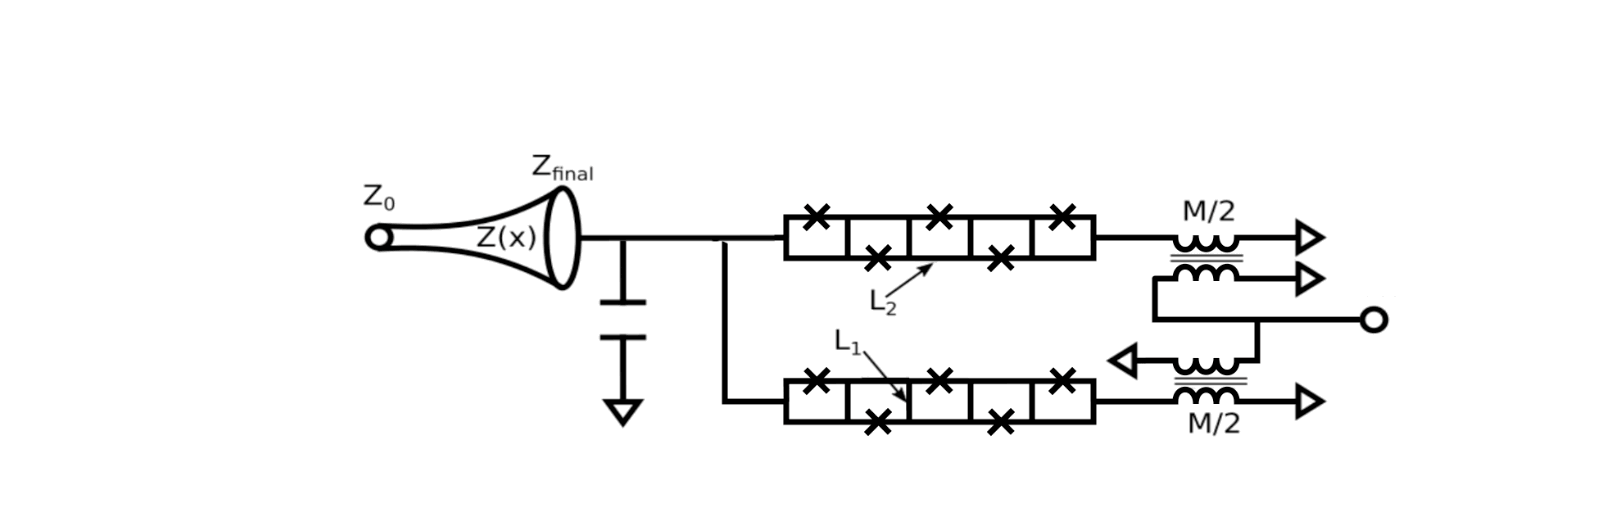
The critical current of each Josephson junction limits our amplifier’s power handling. However, increasing this critical current also changes the inductance and, thus, the operating frequency of the amplifier. To avoid these constraints, we replaced a standard 2-junction DC SQUID with a nonlinear tunable inductor made up of two RF-SQUID arrays in parallel, which we call a snake inductor. Each RF-SQUID consists of a Josephson junction and geometric inductances L1 and L2, and each array contains 20 RF-SQUIDs. In this case, each junction of a standard DC SQUID is replaced by one of these RF-SQUID arrays. While the critical current of each RF-SQUID is much higher, we chain them together to keep the inductance and operating frequency the same. While this is a relatively modest increase in device complexity, it enables us to increase the power handling of each amplifier by roughly a factor of 100x. It is also fully compatible with existing designs that use impedance matching circuits to provide large measurement bandwidth.
 |
| Circuit diagram of our superconducting microwave amplifier. A split bias coil allows both DC and RF modulation of the snake inductor, while a shunt capacitor sets the frequency range. The flow of current is illustrated in the animation where an applied current (blue) on the bias line causes a circulating current (red) in the snake. A tapered impedance transformer lowers the loaded Q of the device. Since the Q is defined as frequency divided by bandwidth, lowering the Q with a constant frequency increases the bandwidth of the amplifier. Example circuit parameters used for a real device are Cs=6.0 pF, L1=2.6 pH, L2=8.0 pH, Lb=30 pH, M=50 pH, Z0 = 50 Ohms, and Zfinal = 18 ohms. The device operation is illustrated with a small signal (magenta) reflecting off the input of the amplifier. When the large pump tone (blue) is applied to the bias port, it generates amplified versions of the signal (gold) and a secondary tone known as an idler (also gold). |
We measure this performance improvement by measuring the saturation power of the amplifier, or the point at which the gain is compressed by 1 dB. We also measure this power value vs. frequency to see how it scales with amplifier gain and distance from the center of the amplifier bandwidth. Since the amplifier gain is symmetric about its center frequency we measure this in terms of absolute detuning, which is just the absolute value of the difference between the center frequency of the amplifier and the probe tone frequency.
 |
| Input and output saturation power (1-dB gain compression point), calibrated using a superconducting quantum processor vs. absolute detuning from the amplifier center frequency. |
Conclusion and future directions
The new microwave amplifiers represent a big step forward for our qubit measurement system. They will allow us to measure more qubits using a single device, and enable techniques that require higher power for each measurement tone. However, there are still quite a few areas we would like to explore. For example, we are currently investigating the application of snake inductors in amplifiers with advanced impedance matching techniques, directional amplifiers, and non-reciprocal devices like microwave circulators.
Acknowledgements
We would like to thank the Quantum AI team for the infrastructure and support that enabled the creation and measurement of our microwave amplifier devices. Thanks to our cohort of talented Google Research Interns that contributed to the future work mentioned above: Andrea Iorio for developing algorithms that automatically tune amplifiers and provide a snapshot of the local parameter space, Ryan Kaufman for measuring a new class of amplifiers using multi-pole impedance matching networks, and Randy Kwende for designing and testing a range of parametric devices based on snake inductors. With their contributions, we are gaining a better understanding of our amplifiers and designing the next generation of parametrically-driven devices.


 Answering people’s most commonly asked questions about Google ads and privacy.