Tag Archives: Web payments

When to step-up your Google Pay transactions as a PSP

Posted by Dominik Mengelt, Developer Relations Engineer, Google Pay and Nick Alteen, Technical Writer, Engineering, Wallet

What is step-up authentication?

When processing payments, step-up authentication (or simply “step-up”) is the practice of requiring additional authentication measures based on user activity and certain risk signals. For example, redirecting the user to 3D Secure to authenticate a transaction. This can help to reduce potential fraud and chargebacks. The following graphic shows the high-level flow of a transaction to determine what's to be done if step-up is needed.

graphic showing the high-level flow of a transaction
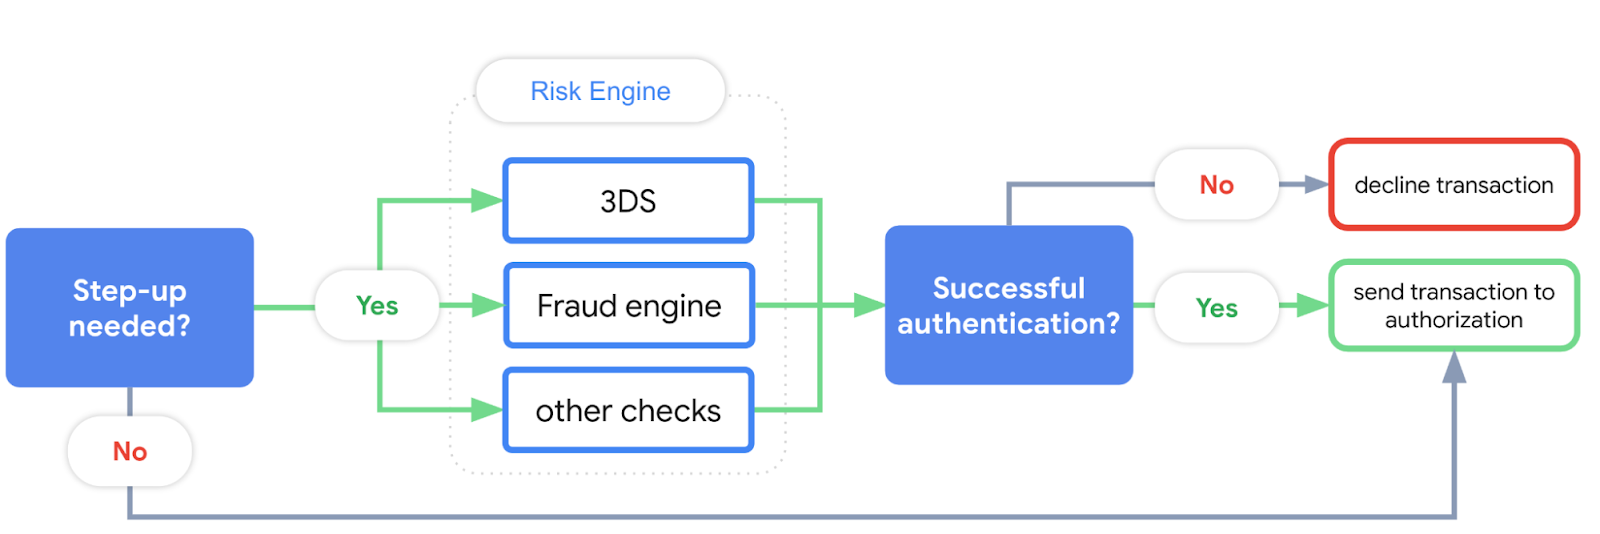
Figure 1: Trigger your Risk Engine before sending the transaction to authorization if step-up is needed

It depends! When making a transaction, the Google Pay API response will return one of the following:

  • An authenticated payload that can be processed without any further step-up or challenge. For example, when a user adds a payment card to Google Wallet. In this case, the user has already completed identity verification with their issuing bank.
  • A primary account number (PAN) that requires additional authentication measures, such as 3D Secure. For example, a user making a purchase with a payment card previously stored through Chrome Autofill.

You can use the allowedAuthMethods parameter to indicate which authentication methods you want to support for Google Pay transactions:

"allowedAuthMethods": [
    "CRYPTOGRAM_3DS",
    "PAN_ONLY"

]


In this case, you’re asking Google Pay to display the payment sheet for both types. For example, if the user selects a PAN_ONLY card (a card not tokenized, not enabled for contactless) from the payment sheet during checkout, step-up is needed. Let's have a look at two concrete scenarios:


In the first scenario, the Google Pay sheet shows a card previously added to Google Wallet. The card art and name of the user's issuing bank are displayed. If the user selects this card during the checkout process, no step-up is required because it would fall under the CRYPTOGRAM_3DS authentication method.

On the other hand, the sheet in the second scenario shows a generic card network icon. This indicates a PAN_ONLY authentication method and therefore needs step-up.

PAN_ONLY vs. CRYPTOGRAM_3DS

Whether or not you decide to accept both forms of payments is your decision. For CRYPTOGRAM_3DS, the Google Pay API additionally returns a cryptogram and, depending on the network, an eciIndicator. Make sure to use those properties when continuing with authorization.

PAN_ONLY

This authentication method is associated with payment cards from a user’s Google Account. Returned payment data includes the PAN with the expiration month and year.

CRYPTOGRAM_3DS

This authentication method is associated with cards stored as Android device tokens provided by the issuers. Returned payment data includes a cryptogram generated on the device.

When should you step-up Google Pay transactions?

When calling the loadPaymentData method, the Google Pay API will return an encrypted payment token (paymentData.paymentMethodData.tokenizationData.token). After decryption, the paymentMethodDetails object contains a property, assuranceDetails, which has the following format:

"assuranceDetails": {
    "cardHolderAuthenticated": true,
    "accountVerified": true
}

Depending on the values of cardHolderAuthenticated and accountVerified, step-up authentication may be required. The following table indicates the possible scenarios and when Google recommends step-up authentication for a transaction:

cardHolderAuthenticated

accountVerified

Step-up needed

true

true

No

false

true

Yes

Step-up can be skipped only when both cardHolderAuthenticated and accountVerified return true.

Next steps

If you are not using assuranceDetails yet, consider doing so now and make sure to step-uptransactions if needed. Also, make sure to check out our guide on Strong Customer Authentication (SCA) if you are processing payments within the European Economic Area (EEA). Follow @GooglePayDevs on Twitter for future updates. If you have questions, mention @GooglePayDevs and include #AskGooglePayDevs in your tweets.

Google Pay introduces a Flutter plugin for payments

Posted by Jose Ugia, Developer Programs Engineer, Google Pay and Anthony Panissidi, Technical Writer, Google Developer Studio

Flutter and Firebase logos

We made it easier than ever to integrate Google Pay in Flutter apps!

Our open source Flutter plugin simplifies the addition of payments to Flutter apps on iOS and Android.

The plugin gives you the ability to add functionality to your apps across platforms with a single and familiar codebase written in Dart.

It adapts common steps required to facilitate payments that adhere to how Flutter constructs components, works with the user interface of the app, and exchanges information between the native and Dart ends.

Now, as a Flutter developer, you can easily reap the benefits of Google Pay, which lets you provide users with a secure and fast checkout experience that increases conversions, and frees you from the need to manage credit cards and payments.

How it works

To use the plugin, add pay as a dependency in your pubspec.yaml file. For more information, see Adding a package dependency to an app.

To configure a payment, load a payment profile with the desired configuration, either with a local file or one retrieved from a remote server. For a complete list of all configuration options, see the PaymentDataRequest object.

Here's an example of a JSON file that defines payment options:

sample_payment_configuration.json

{
"provider": "google_pay",
"data": {
"environment": "TEST",
"apiVersion": 2,
"apiVersionMinor": 0,
"allowedPaymentMethods": [{
"type": "CARD",
"tokenizationSpecification": {
"type": "PAYMENT_GATEWAY",
"parameters": {
"gateway": "example",
"gatewayMerchantId": "gatewayMerchantId"
}
},
"parameters": {
"allowedCardNetworks": ["VISA", "MASTERCARD"],
"allowedAuthMethods": ["PAN_ONLY", "CRYPTOGRAM_3DS"],
"billingAddressRequired": true,
"billingAddressParameters": {
"format": "FULL",
"phoneNumberRequired": true
}
}
}],
"merchantInfo": {
"merchantId": "01234567890123456789",
"merchantName": "Example Merchant Name"
},
"transactionInfo": {
"countryCode": "US",
"currencyCode": "USD"
}
}
}

For more examples of JSON files that define payment options, take a look at the example/assets/ folder.

Now you can use this configuration to add the Google Pay button to your app and forward the payment method selected by your users.

Here's an example of a Dart file:

import 'package:pay/pay.dart';

const _paymentItems = [
PaymentItem(
label: 'Total',
amount: '99.99',
status: PaymentItemStatus.final_price,
)
];

// In your Widget build() method
GooglePayButton(
paymentConfigurationAsset: 'sample_payment_configuration.json',
paymentItems: _paymentItems,
style: GooglePayButtonStyle.black,
type: GooglePayButtonType.pay,
onPaymentResult: onGooglePayResult,
),


// In your Stateless Widget class or State
void onGooglePayResult(paymentResult) {
// Send the resulting Google Pay token to your server or PSP
}

How to use it

The best part of this news is that you can use the plugin today. To get started with it, check out the pay package on pub.dev. We also want to hear your thoughts and feature requests, and look forward to your contributions on GitHub.

Learn more

Want to learn more about Google Pay? Here's what you can do:

Google Pay integration patterns that drive conversions on Android

Posted by Jose Ugia, Developer Relations Engineer, Google Pay & Anthony Panissidi, Technical Writer, Google Developer Studio

How to drive conversions with Google Pay for Android

What do Gilt, MTS, Panera Bread, and SpotHero have in common?

At first glance, you probably only see four totally different businesses:

  • Gilt is an online shopping and lifestyle website.
  • MTS is a mobile network operator with 80 million users in Armenia, Belarus, and Russia.
  • Panera Bread is a chain of more than 2,000 fast-casual bakery-cafe restaurants in the US and Canada.
  • SpotHero is a digital parking marketplace that lets drivers reserve and pay for parking spots in more than 300 cities in the US and Canada.

However, all four businesses partnered with us to identify and adopt integration patterns that drive the most conversions on Google Pay for Android. In this blog post, we share these proven integration practices so that you can get the most out of Google Pay in your Android apps, as well as additional security tips that you can use to further secure your payment flows.

UI and UX patterns

Take a look at the following strategies to improve user experience in your app:

  • Payment-method selection
  • Express checkout
  • Guest checkout
  • Payment notifications

Payment-method selection

If you set Google Pay as a default payment option for ready-to-pay users, your users only need to click or tap twice to complete their transactions, so they enjoy a more-seamless payment experience and they're less likely to abandon their carts.

Phone with Gilt user interface

Our partners who implemented this pattern reported a significant increase in their success metrics. For example, at Gilt, 34% of total Google Pay checkouts were net-new Gilt member conversions and 57% of total Google Pay checkouts were reactivations of lapsed Gilt members.

Gilt member conversions increase

Express checkout

This feature lets your users purchase an item directly from the item's detail page without adding it to a cart, which shortens their path to purchase completion.

For example, Gilt integrated this feature into their checkout process so its users can complete the checkout process with only a few clicks or taps. The Google Pay button on their product page lets users move directly to checkout with Google Pay set as a default payment option.

Gilt Google Pay Integration

Guest checkout

This feature makes it easier for your users to complete purchases and convert, and more likely to create an account and engage again later.

To enable guest checkout, add Google Pay as an option to continue with the payment process alongside your account-creation elements.

For example, Panera Bread enabled guest checkout, and found a 7% increase in order value and 30% increase in wallet share.

Panera increase in order value and wallet share

As another example, SpotHero enabled guest checkout, and found that its sales funnel increased by 20 times while 87% of total checkouts were completed with Google Pay.

SpotHero increase in sales and total checkouts

Payment notifications

This feature lets your users pay directly from notifications, which reduces friction in the payment process and further increases conversions.

Users sometimes receive payment notifications that they expect, such as after they abandon carts, make donations, or need to add credit to a prepaid card. They typically find these transactions simple and familiar, so they're ready to pay quickly with a little nudge.

MTS credit adding option interface

MTS adopted this pattern to let their customers add credit to their accounts directly from notifications and experienced a 80% increase in conversions.

MTS users in Russia and increase in conversions

Learn more

For more information about how to implement these UI and UX patterns, see our sample open source app and developer documentation.

Security tips

Before we go, we also want to share these security tips to further secure your payment flows:

  • Use SSL for all connections between your apps and backend services over the public internet.
  • Do not collect or store payment data, or any other sensitive information in the clear within your app.
  • Order price can be calculated on the client side to show it in your UI and keep the user informed, but only allow for payments with calculations applied in your backend services.
Security Basics

Learn more

Want to learn more about Google Pay? Here's what you can do:

Updated Google Pay app offers more consumer touchpoints

Posted by Soc Sieng, Developer Advocate, Payments & Ola Ben Har, Payments DevRel Lead

What's new in Google Pay header

We redesigned the Google Pay app to boost user engagement with your business.

The redesigned app makes it easy for users to find your business and provides you with a branded surface that lets you build relationships with your customers at scale.

The app is available in the App Store and Google Play Store in the US, India, and Singapore with availability in more markets on the way. In this blog post, we focus on features available in the US version of the app.

New in Google Pay

The Google Pay app focuses on users' relationships with people, businesses, and other everyday essentials.

Centers around your relationships

The app lets users send money, save money, and see spending insights.

Understand and organize money

It makes it easy for users to save money at their favorite businesses and discover new ones.

Save money and discover businesses

It also provides your brand with another surface to initiate meaningful reengagement with your customers. The branded experience is automatically created when customers check out with Google Pay or a Google Pay-enrolled card in the app, in stores, or online. This dedicated space for your business is also where customers can redeem offers, sign up for loyalty rewards, and view their transaction histories.

Branded experience

How it works

Google Pay's new features are only part of the story.

Behind the scenes, we worked on the Google Pay APIs and developer tools to enable those experiences, help you acquire new customers, and better serve existing ones.

Google Pay APIs for Web and Android

Google Pay APIs for Web and Android enable your transaction history within your branded experience on Google Pay in addition to contactless payments in store. After a user makes a purchase with Google Pay or a Google Pay-enrolled card, they can search for your brand and view their transaction history in Google Pay.

Two phones showing inside your app and inside google pay

When you integrate with the Google Pay APIs, you're not only providing a convenient and secure checkout option in your app or on your website, but you also let your users track their transactions, independent of the channel, in one central place. Your brand becomes searchable for millions of active Google Pay users, which provides you with more reengagement opportunities.

Loyalty Enrollment and Sign-in API

The Loyalty Enrollment and Sign-in API lets users discover, and sign up or sign in to your loyalty program from your branded experience with a few taps in Google Pay.

Loyalty enrollment and sign-in API

When users sign up, they provide their consent and Google Pay securely shares sign-up details with your loyalty program’s sign-up process. They can use information that they already saved to their Google Accounts, which makes the sign-up process a snap. Afterward, users can easily access their loyalty passes at checkout.

4 phones

That does it for now, but these updates are only the beginning, so stay tuned for more news in this space!

Learn more

Want to learn more about Google Pay? Here's what you can do:

Updated Google Pay button increases click-through rates

Posted by Soc Sieng, Developer Advocate, Google Pay

Google Pay header

An improved Google Pay button works wonders for click-through rates and the checkout experience.

The updated Google Pay button displays a user's card information, which makes the user 30% more likely to use it and increases conversions by 3.6%.

The display of the card's type and last four digits reminds the user that they already saved a payment card to their Google Account, which makes them more likely to opt for the quick and easy checkout process that Google Pay provides.

How it works

If a user configured an eligible payment method in their Google Account at the time of purchase, the Google Pay button displays the type and last four digits of their most-recently used card.

Dynamic Google Pay button

Figure 1. An example of the Google Pay button with the additional information.

Buy with Google Pay button

Figure 2. An example of the Google Pay button without the additional information.

How to enable card information

If you use the createButton API with default button options, your Google Pay button is automatically updated to include the user's card network and last four digits.

If you customized the createButton API and set buttonType to plain or short, set it to buy to make your Google Pay button display the user's card information.

If you haven’t integrated with the createButton API yet, consider doing so now so that the user knows that their payment details are a click away.

See it in action

To test the Google Pay button with other button options, check out this button-customization tool:

Next steps

To get started with Google Pay, visit Google Pay's Business Console. Make sure to use the createButton API to benefit from the new features. If you have any questions, tweet @GooglePayDevs on Twitter and use #AskGooglePayDevs.