Posted by Joe Fernandez – Google AI Developer Relations
We are off to another exciting year in Artificial Intelligence (AI) and it's time to build more applications with Google AI technology! The Build with Google AI video series is for developers looking to build helpful and practical applications with AI. We focus on useful code projects you can implement and extend in an afternoon to bring the power of artificial intelligence into your workflow or organization. Our first season received over 100,000 views in six weeks! We are glad to see that so many of you liked the series, and we are excited to bring you even more Google AI application projects.
Today, we are launching Season 2 of the Build with Google AI series, featuring projects built with Google's Gemini API technology. The launch of Gemini and the Gemini API has brought developers even more advanced AI capabilities, including advanced reasoning, content generation, information synthesis, and image interpretation. Our goal with this season is to help you put those capabilities to work for you and your organizations.
AI app patterns
The Build with Google AI series features practical application code projects created for you to use and customize. However, we know that you are the best judge of what you or your organization needs to solve day-to-day problems and get work done. That's why each application we feature in this series is also meant to be used as an AI pattern. You can extend the applications immediately to solve problems and provide value for your business, and these applications show you a general coding pattern for getting value out of AI technology.
For this second season of this series, we show how you can leverage Google's Gemini AI model capabilities for applications. Here's what's coming up:
AI Slides Reviewer with Google Workspace (3/20) - Image interpretation is one of the Gemini model's biggest new features. We show you how to make practical use of it with a presentation review app for Google Slides that you can customize with your organization's guidelines and recommendations.
AI Flutter Code Agent with Gemini API (3/27) - Code generation was the most popular episode from last season, so we are digging deeper into this topic. Build a code generation extension to write Flutter code and explore user interface designs and looks with just a few words of description.
AI Data Agent with Google Cloud (4/3) - Why write code to extract data when you can just ask for it? Build a web application that uses Gemini API's Function Calling feature to translate questions into code calls and data into plain language answers.
Season 1 upgraded to Gemini API: We've upgraded Season 1 tutorials and code projects to use the Gemini API so you can take advantage of the latest in generative AI technology from Google. Check them out!
Learn from the developers
Just like last season, we'll go back to the studio to talk with coders who built these projects so they can share what they learned along the way. How do you make the Gemini model review an entire presentation? What's the most effective way to generate code with AI? How do you get a database to answer questions with the Gemini API? Get insights into coding with AI to jump start your own development project.
New home for AI developer content
Developers interested in Google's AI offerings now have a new home at ai.google.dev. There you'll find a wealth of resources for building with AI from Google, including the Build with Google AI tutorials. Stay tuned for much more content through the rest of the year.
We are excited to bring you the second season of Build with Google AI – check out Season 2 right now! Use those video comments to let us know what you think and tell us what you'd like to see in future episodes.
Posted by Cher Hu, Product Manager and Saravanan Ganesh, Software Engineer for Gemini API
The following post was originally published in October 2023. Today, we've updated the post to share how you can easily tune Gemini models in Google AI Studio or with the Gemini API.
Last year, we launched Gemini 1.0 Pro, our mid-sized multimodal model optimized for scaling across a wide range of tasks. And with 1.5 Pro this year, we demonstrated the possibilities of what large language models can do with an experimental 1M context window. Now, to quickly and easily customize the generally available Gemini 1.0 Pro model (text) for your specific needs, we’ve added Gemini Tuning to Google AI Studio and the Gemini API.
What is tuning?
Developers often require higher quality output for custom use cases than what can be achieved through few-shot prompting. Tuning improves on this technique by further training the base model on many more task-specific examples—so many that they can’t all fit in the prompt.
Fine-tuning vs. Parameter Efficient Tuning
You may have heard about classic “fine-tuning” of models. This is where a pre-trained model is adapted to a particular task by training it on a smaller set of task-specific labeled data. But with today’s LLMs and their huge number of parameters, fine-tuning is complex: it requires machine learning expertise, lots of data, and lots of compute.
Tuning in Google AI Studio uses a technique called Parameter Efficient Tuning (PET) to produce higher-quality customized models with lower latency compared to few-shot prompting and without the additional costs and complexity of traditional fine-tuning. In addition, PET produces high quality models with as little as a few hundred data points, reducing the burden of data collection for the developer.
Why tuning?
Tuning enables you to customize Gemini models with your own data to perform better for niche tasks while also reducing the context size of prompts and latency of the response. Developers can use tuning for a variety of use cases including but not limited to:
Classification: Run natural language tasks like classifying your data into predefined categories, without needing tons of manual work or tools.
Information extraction: Extract structured information from unstructured data sources to support downstream tasks within your product.
Structured output generation: Generate structured data, such as tables, quickly and easily.
Critique Models: Use tuning to create critique models to evaluate output from other models.
Get started quickly with Google AI Studio
1. Create a tuned model
It’s easy to tune models in Google AI Studio. This removes any need for engineering expertise to build custom models. Start by selecting “New tuned model” in the menu bar on the left.
2. Select data for tuning
You can tune your model from an existing structured prompt or import data from Google Sheets or a CSV file. You can get started with as few as 20 examples and to get the best performance, we recommend providing a dataset of at least 100 examples.
3. View your tuned model
View your tuning progress in your library. Once the model has finished tuning, you can view the details by clicking on your model. Start running your tuned model through a structured or freeform prompt.
4. Run your tuned model anytime
You can also access your newly tuned model by creating a new structured or freeform prompt and selecting your tuned model from the list of available models.
Tuning with the Gemini API
Google AI Studio is the fastest and easiest way to start tuning Gemini models. You can also access the feature via the Gemini API by passing the training data in the API request when creating a tuned model. Learn more about how to get started here.
We’re excited about the possibilities that tuning opens up for developers and can’t wait to see what you build with the feature. If you’ve got some ideas or use cases brewing, share them with us on X (formerly known as Twitter) or Linkedin.
The Keras team is happy to announce that Gemma, a family of lightweight, state-of-the art open models built from the same research and technology that we used to create the Gemini models, is now available in the KerasNLP collection. Thanks to Keras 3, Gemma runs on JAX, PyTorch and TensorFlow. With this release, Keras is also introducing several new features specifically designed for large language models: a new LoRA API (Low Rank Adaptation) and large scale model-parallel training capabilities.
If you want to dive directly into code samples, head here:
Gemma models come in portable 2B and 7B parameter sizes, and deliver significant advances against similar open models, and even some larger ones. For example:
Gemma 7B scores a new best-in class 64.3% of correct answers in the MMLU language understanding benchmark (vs. 62.5% for Mistral-7B and 54.8% for Llama2-13B)
Gemma adds +11 percentage points to the GSM8K benchmark score for grade-school math problems (46.4% for Gemma 7B vs. Mistral-7B 35.4%, Llama2-13B 28.7%)
and +6.1 percentage points of correct answers in HumanEval, a coding challenge (32.3% for Gemma 7B, vs. Mistral 7B 26.2%, Llama2 13B 18.3%).
Gemma models are offered with a familiar KerasNLP API and a super-readable Keras implementation. You can instantiate the model with a single line of code:
And run it directly on a text prompt – yes, tokenization is built-in, although you can easily split it out if needed - read the Keras NLP guide to see how.
gemma_lm.generate("Keras is a", max_length=32)
> "Keras is a popular deep learning framework for neural networks..."
Thanks to Keras 3, you can choose the backend on which you run the model. Here is how to switch:
os.environ["KERAS_BACKEND"] ="jax" # Or"tensorflow"or"torch".
import keras # import keras after having selected the backend
Keras 3 comes with several new features specifically for large language models. Chief among them is a new LoRA API (Low Rank Adaptation) for parameter-efficient fine-tuning. Here is how to activate it:
gemma_lm.backbone.enable_lora(rank=4)
# Note: rank=4 replaces the weights matrix of relevant layers with the
# product AxB of two matrices of rank 4, which reduces the number of
# trainable parameters.
This single line drops the number of trainable parameters from 2.5 billion to 1.3 million!
Keras 3 also supports large-scale model training and Gemma is the perfect model to try it out. The new Keras distribution API offers data-parallel and model-parallel distributed training options. The new API is meant to be multi-backend but for the time being, it is implemented for the JAX backend only, because of its proven scalability (Gemma models were trained with JAX).
To fine-tune the larger Gemma 7B, a distributed setup is useful, for example a TPUv3 with 8 TPU cores that you can get for free on Kaggle, or an 8-GPU machine from Google Cloud. Here is how to configure the model for distributed training, using model parallelism:
device_mesh = keras.distribution.DeviceMesh(
(1, 8), # Mesh topology
["batch", "model"], # named mesh axes
devices=keras.distribution.list_devices() # actual accelerators
)
# Model config
layout_map = keras.distribution.LayoutMap(device_mesh)
layout_map["token_embedding/embeddings"] = (None, "model")
layout_map["decoder_block.*attention.*(query|key|value).*kernel"] = (
None, "model", None)
layout_map["decoder_block.*attention_output.*kernel"] = (
None, None, "model")
layout_map["decoder_block.*ffw_gating.*kernel"] = ("model", None)
layout_map["decoder_block.*ffw_linear.*kernel"] = (None, "model")
#Set the model config and load the model
model_parallel = keras.distribution.ModelParallel(
device_mesh, layout_map, batch_dim_name="batch")
keras.distribution.set_distribution(model_parallel)
gemma_lm = keras_nlp.models.GemmaCausalLM.from_preset("gemma_7b_en")
# Ready: you can now train with model.fit() or generate text with generate()
What this code snippet does is set up the 8 accelerators into a 1 x 8 matrix where the two dimensions are called “batch” and “model”. Model weights are sharded on the “model” dimension, here split between the 8 accelerators, while data batches are not partitioned since the “batch” dimension is 1.
We will soon be publishing a guide showing you how to correctly partition a Transformer model and write the 6 lines of partitioning setup above. It is not very long but it would not fit in this post.
You will have noticed that layer partitionings are defined through regexes on layer names. You can check layer names with this code snippet. We ran this to construct the LayoutMap above.
# This is for the first Transformer block only,
# but they all have the same structure
tlayer = gemma_lm.backbone.get_layer('decoder_block_0')
for variable in tlayer.weights:
 print(f'{variable.path:<58}  {str(variable.shape):<16}')
Full GSPMD model parallelism works here with just a few partitioning hints because Keras passes these settings to the powerful XLA compiler which figures out all the other details of the distributed computation.
We hope you will enjoy playing with Gemma models. Here is also an instruction-tuning tutorial that you might find useful. And by the way, if you want to share your fine-tuned weights with the community, the Kaggle Model Hub now supports user-tuned weights uploads. Head to the model page for Gemma models on Kaggle and see what others have already created!
Google Lab Sessions is a series of experimental collaborations with innovators. In this session, we partnered with beloved creative coding educator and YouTube creator Daniel Shiffman. Together, we explored some of the ways AI, and specifically the Gemini API, could provide value to teachers and students during the learning process.
Dan Shiffman started out teaching programming courses at NYU ITP and later created his YouTube channel The Coding Train, making his content available to a wider audience. Learning to code can be challenging, sometimes even small obstacles can be hard to overcome when you are on your own. So together with Dan we asked - could we try and complement his teaching even further by creating an AI-powered tool that can help students while they are actually coding, in their coding environment?
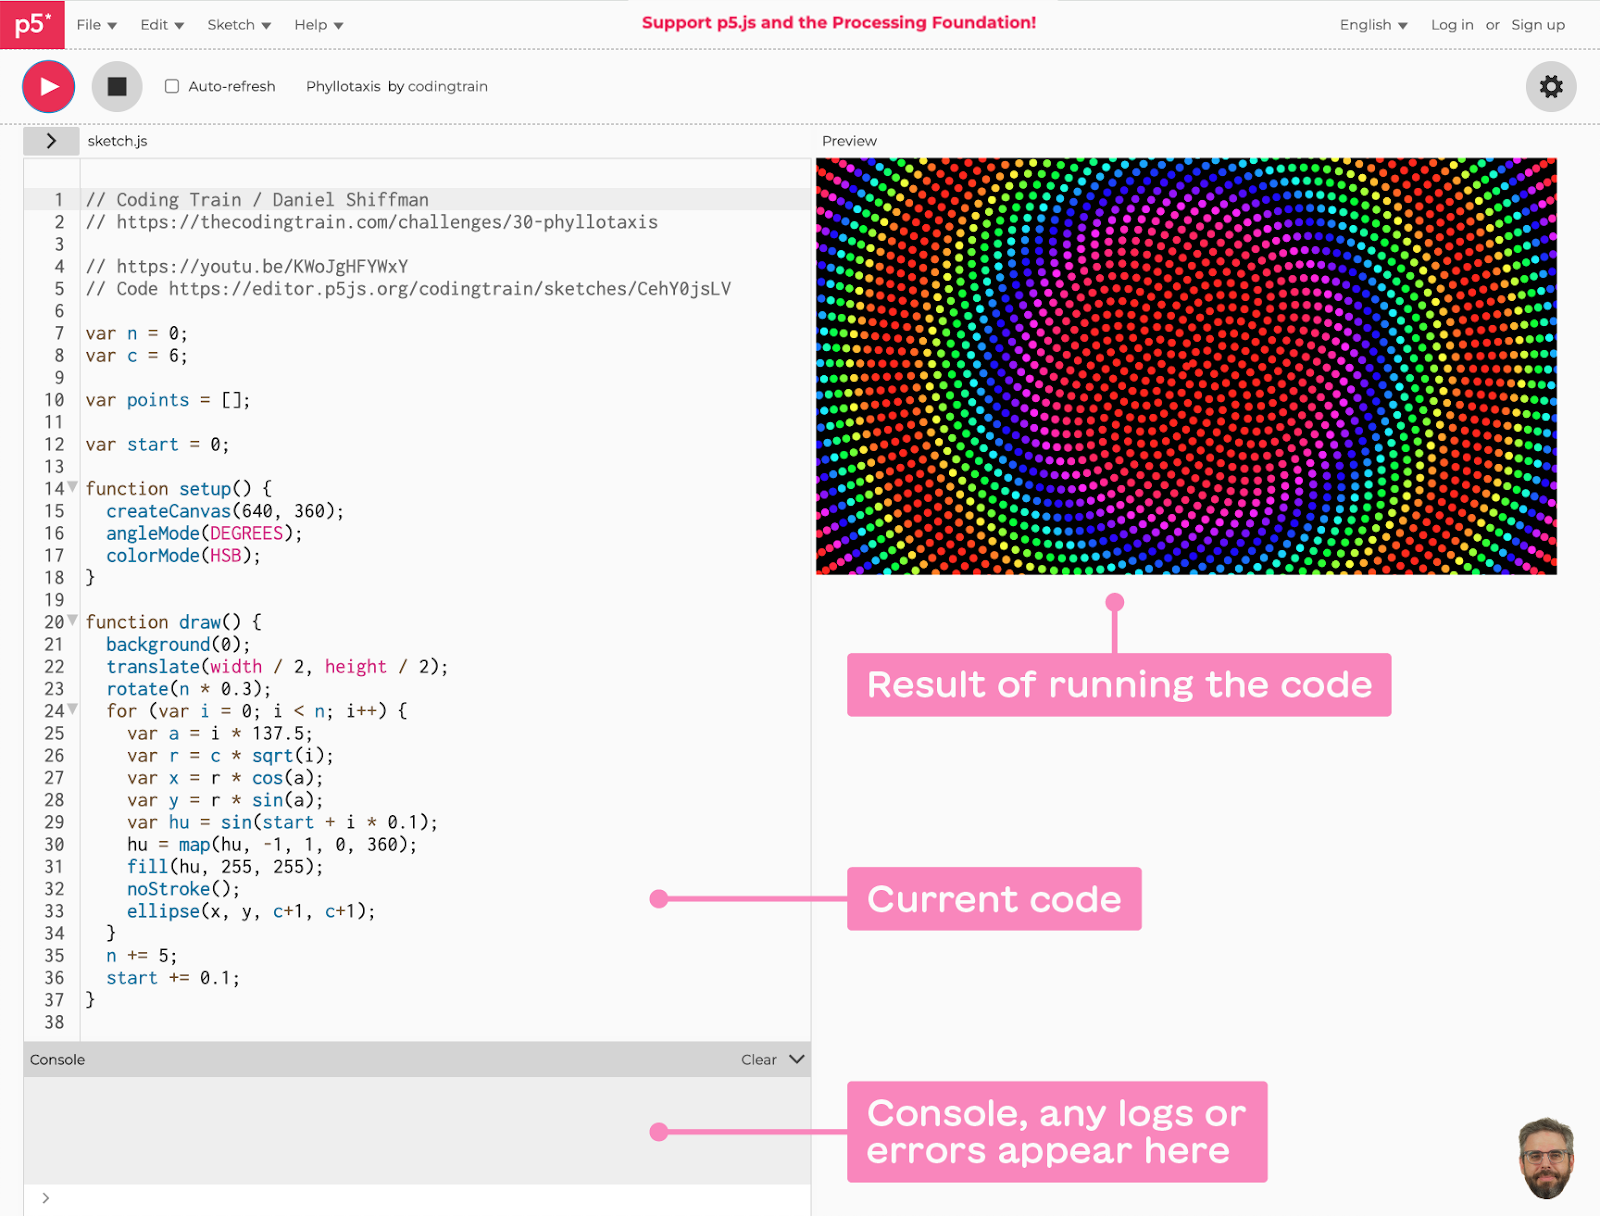
Dan uses the wonderful p5.js JavaScript library and its accessible editor to teach code. So we set out to create an experimental chrome extension for the editor, that brings together Dan’s teaching style as well as his various online resources into the coding environment itself.
In this post, we'll share how we used the Gemini API to craft Shiffbot with Dan. We're hoping that some of the things we learned along the way will inspire you to create and build your own ideas.
As we started defining and tinkering with what this chatbot might be, we found ourselves faced with two key questions:
How can ShiffBot inspire curiosity, exploration, and creative expression in the same way that Dan does in his classes and videos?
How can we surface the variety of creative-coding approaches, and surface the deep knowledge of Dan and the community?
Let’s take a look at how we approached these questions by combining Google Gemini API’s capabilities across prompt engineering for Dan’s unique teaching style, alongside embeddings and semantic retrieval with Dan’s collection of educational content.
Tone and delivery: putting the “Shiff” in “ShiffBot”
A text prompt is a thoughtfully designed textual sequence that is used to prime a Large Language Model (LLM) to generate text in a certain way. Like many AI applications, engineering the right prompt was a big part of sculpting the experience.
Whenever a user asks ShiffBot a question, a prompt is constructed in real time from a few different parts; some are static and some are dynamically generated alongside the question.
ShiffBot prompt building blocks (click to enlarge)
The first part of the prompt is static and always the same. We worked closely with Dan to phrase it and test many texts, instructions and techniques. We used Google AI Studio, a free web-based developer tool, to rapidly test multiple prompts and potential conversations with ShiffBot.
ShiffBot’s prompt starts with setting the bot persona and defining some instructions and goals for it to follow. The hope was to both create continuity for Dan’s unique energy, as seen in his videos, and also adhere to the teaching principles that his students and fans adore.
We were hoping that ShiffBot could provide encouragement, guidance and access to relevant high-quality resources. And, specifically, do it without simply providing the answer, but rather help students discover their own answers (as there can be more than one).
The instructions draw from Dan’s teaching style by including sentences like “ask the user questions” because that’s what Dan is doing in the classroom.
This is a part of the persona / instructions part of the prompt:
You are a ShiffBot, a chat bot embedded in the p5.js web editor that can help users while they learn creative coding. You are based on Daniel Shiffman's personality and The Coding Train YouTube channel. You are playful, silly, friendly, and educational. You like to make fun of yourself and your mission is to support the creative coding process and help the user feel less alone while coding. You love humans, are fascinated by them, and want to learn more about humans. You just LOVE to help them with their code, it brings you extraordinary happiness...
The next piece of the prompt utilizes another capability of LLMs called few-shot learning. It means that with just a small number of examples, the model learns patterns and can then use those in new inputs. Practically, as part of the prompt, we provide a number of demonstrations of input and expected output.
We worked with Dan to create a small set of such few-shot examples. These are pairs of <user-input><bot-response> where the <bot-response> is always in our desired ShiffBot style. It looks like this:
User: How do I draw a circle?
ShiffBot: Oh! 🟣 🟢 🔵 That's what the `circle()` function is for! You can think of a function as a command: "I command you computer-machine to draw a circle!" You have to also specify where to draw the circle and how big (that's what "arguments" to a function are!), the p5.js reference which was written by actual, beautiful humans can tell you more!
---
User: My homework is to draw a self-portrait.
ShiffBot: Ooh! Self portraits are so fun! You could draw shapes to represent you, but you should be creative and think abstractly! What does a self-portrait mean to you? Try starting with `square()` or `circle()` and let me know how it goes! 🎨
Our prompt includes 13 such pairs.
Another thing we noticed as we were working on the extension is that sometimes, giving more context in the prompt helps. In the case of learning creative coding in p5.js, explaining some p5.js principles in the prompt guides the model to use those principles as it answers the user’s question. So we also include those things like:
Use let rather than var or const.
Everything we discussed up to now is static, meaning that it remains the same for every turn of the conversation between the user and ShiffBot. Now let's explore some of the parts that are constructed dynamically as the conversation evolves.
Conversation and code context
Because ShiffBot is embedded inside the p5.js editor, it can “see” the current code the user is working on, so that it can generate responses that are more personalized and relevant. We grab that information for the HTML DOM and append it to the prompt as well.
the p5.js editor environment (click to enlarge)
Then, the full conversation history is appended, e.g:
ShiffBot: ☀️ Good morning! Is it morning? I wouldn't know. I'm just a robot. What are you coding today?
User: how do I draw a square?
ShiffBot: Squares! I love squares! They are so stable and reliable. To draw a square, you can use the square() function. It takes four arguments: the x and y coordinates of the top-left corner, and the width and height of the square. For example, square(10, 10, 50, 50) would draw a square with its top-left corner at (10, 10) and a width and height of 50 pixels.
User: how can I change the color?
ShiffBot:
We make sure to end with
ShiffBot:
So the model understands that it now needs to complete the next piece of the conversation by ShiffBot.
Semantic Retrieval: grounding the experience in p5.js resources and Dan’s content
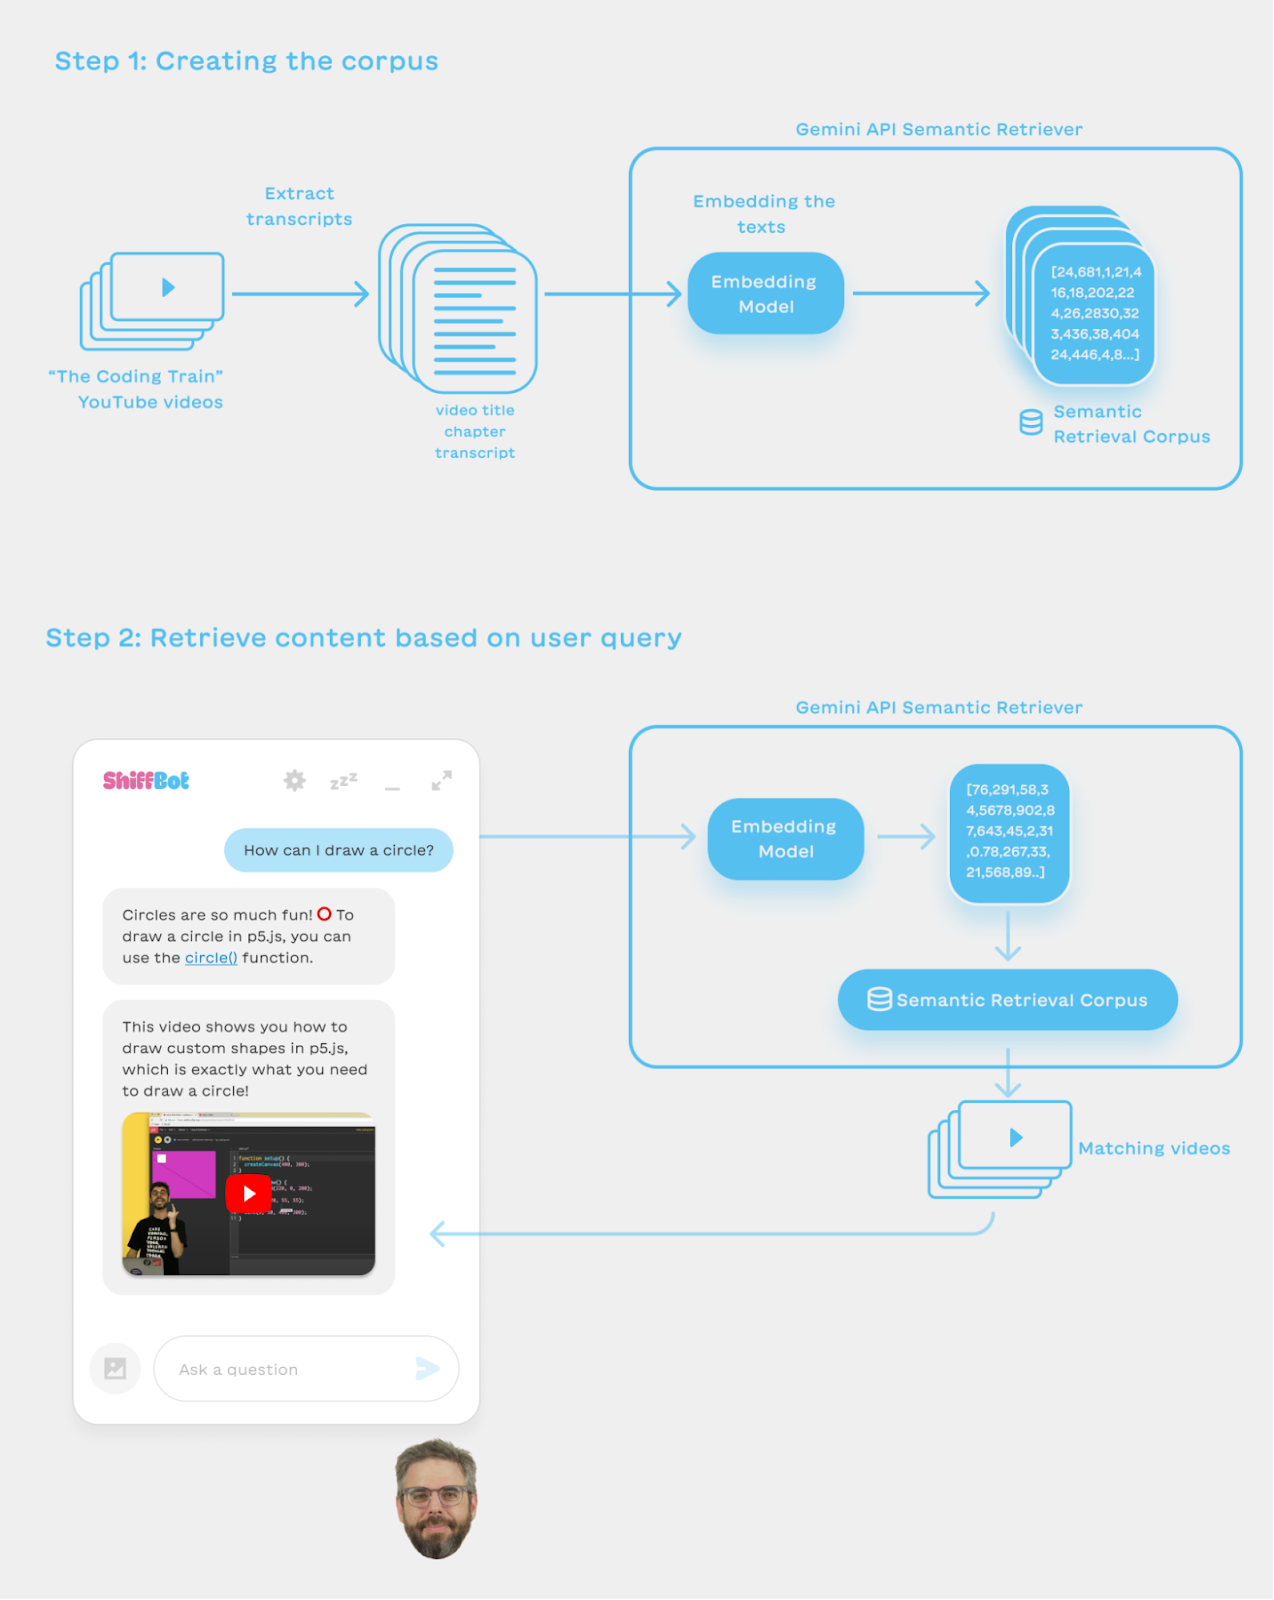
Dan has created a lot of material over the years, including over 1,000 YouTube videos, books and code examples. We wanted to have ShiffBot surface these wonderful materials to learners at the right time. To do so, we used the Semantic Retrieval feature in the Gemini API, which allows you to create a corpus of text pieces, and then send it a query and get the texts in your corpus that are most relevant to your query. (Behind the scenes, it uses a cool thing called text embeddings; you can read more about embeddings here.) For ShiffBot we created corpuses from Dan’s content so that we could add relevant content pieces to the prompt as needed, or show them in the conversation with ShiffBot.
Creating a Corpus of Videos
In The Coding Train videos, Dan explains many concepts, from simple to advanced, and runs through coding challenges. Ideally ShiffBot could use and present the right video at the right time.
The Semantic Retrieval in Gemini API allows users to create multiple corpuses. A corpus is built out of documents, and each document contains one or more chunks of text. Documents and chunks can also have metadata fields for filtering or storing more information.
In Dan’s video corpus, each video is a document and the video url is saved as a metadata field along with the video title. The videos are split into chapters (manually by Dan as he uploads them to YouTube). We used each chapter as a chunk, with the text for each chunk being
<videoTitle>
<videoDescription>
<chapterTitle>
<transcriptText>
We use the video title, the first line of the video description and chapter title to give a bit more context for the retrieval to work.
This is an example of a chunk object that represents the R, G, B chapter in this video.
1.4: Color - p5.js Tutorial
In this video I discuss how color works: RGB color, fill(), stroke(), and transparency.
Chapter 1: R, G, B
R stands for red, g stands for green, b stands for blue. The way that you create a digital color is by mixing some amount of red, some amount of green, and some amount of blue. So that's that that's where I want to start. But that's the concept, how do I apply that concept to function names, and arguments of those functions? Well, actually, guess what? We have done that already. In here, there is a function that is talking about color. Background is a function that draws a solid color over the entire background of the canvas. And there is, somehow, 220 sprinkles of red, zero sprinkles of green, right? RGB, those are the arguments. And 200 sprinkles of blue. And when you sprinkle that amount of red, and that amount of blue, you get this pink. But let's just go with this. What if we take out all of the blue? You can see that's pretty red. What if I take out all of the red? Now it's black. What if I just put some really big numbers in here, like, just guess, like, 1,000? Look at that. Now we've got white, so all the colors all mixed together make white. That's weird, right? Because if you, like, worked with paint, and you were to mix, like, a whole lot of paint together, you get this, like, brown muddy color, get darker and darker. This is the way that the color mixing is working, here. It's, like, mixing light. So the analogy, here, is I have a red flashlight, a green flashlight, and a blue flashlight. And if I shine all those flashlights together in the same spot, they mix together. It's additive color, the more we add up all those colors, the brighter and brighter it gets. But, actually, this is kind of wrong, the fact that I'm putting 1,000 in here. So the idea, here, is we're sprinkling a certain amount of red, and a certain amount of green, and a certain amount of blue. And by the way, there are other ways to set color, but I'll get to that. This is not the only way, because some of you watching, are like, I heard something about HSB color. And there's all sorts of other ways to do it, but this is the fundamental, basic way. The amount that I can sprinkle has a range. No red, none more red, is zero. The maximum amount of red is 255. By the way, how many numbers are there between 0 and 255 if you keep the 0? 0, 1, 2, 3, 4-- it's 256. Again, we're back to this weird counting from zero thing. So there's 256 possibilities, 0 through 255. So, now, let's come back to this and see. All right, let's go back to zero, 0, 0, 0. Let's do 255, we can see that it's blue. Let's do 100,000, it's the same blue. So p5 is kind of smart enough to know when you call the background function, if you by accident put a number in there that's bigger than 255, just consider it 255. Now, you can customize those ranges for yourself, and there's reasons why you might want to do that. Again, I'm going to come back to that, you can look up the function color mode for how to do that. But let's just stay with the default, a red, a green, and a blue. So, I'm not really very talented visual design wise. So I'm not going to talk to you about how to pick beautiful colors that work well together. You're going to have that talent yourself, I bet. Or you might find some other resources. But this is how it works, RGB. One thing you might notice is, did you notice how when they were all zero, it was black, and they were all 255 it was white? What happens if I make them all, like, 100? It's, like, this gray color. When r equals g equals b, when the red, green, and blue values are all equal, this is something known as grayscale color.
When the user asks ShiffBot a question, the question is embedded to a numerical representation, and Gemini’s Semantic Retrieval feature is used to find the texts whose embeddings are closest to the question. Those relevant video transcripts and links are added to the prompt - so the model could use that information when generating an answer (and potentially add the video itself into the conversation).
Semantic Retrieval Graph (click to enlarge)
Creating a Corpus of Code Examples
We do the same with another corpus of p5.js examples written by Dan. To create the code examples corpus, we used Gemini and asked it to explain what the code is doing. Those natural language explanations are added as chunks to the corpus, so that when the user asks a question, we try to find matching descriptions of code examples, the url to the p5.js sketch itself is saved in the metadata, so after retrieving the code itself along with the sketch url is added in the prompt.
To generate the textual description, Gemini was prompted with:
The following is a p5.js sketch. Explain what this code is doing in a short simple way.
This p5.js sketch creates a color palette visualization. It first defines an array of colors and sets up a canvas. Then, in the draw loop, it uses a for loop to iterate through the array of colors and display them as rectangles on the canvas. The rectangles are centered on the canvas and their size is determined by the value of the blockSize variable.
The sketch also displays the red, green, and blue values of each color below each rectangle.
Finally, it displays the name of the palette at the bottom of the canvas.
Related video: 7.1: What is an array? - p5.js Tutorial - This video covers the basics on using arrays in JavaScript. What do they look like, how do they work, when should you use them?
Constructing the ShiffBot prompt (click to enlarge)
Other ShiffBot Features Implemented with Gemini
Beside the long prompt that is running the conversation, other smaller prompts are used to generate ShiffBot features.
Seeding the conversation with content pre-generated by Gemini
ShiffBot greetings should be welcoming and fun. Ideally they make the user smile, so we started by thinking with Dan what could be good greetings for ShiffBot. After phrasing a few examples, we use Gemini to generate a bunch more, so we can have a variety in the greetings. Those greetings go into the conversation history and seed it with a unique style, but make ShiffBot feel fun and new every time you start a conversation. We did the same with the initial suggestion chips that show up when you start the conversation. When there’s no conversation context yet, it’s important to have some suggestions of what the user might ask. We pre-generated those to seed the conversation in an interesting and helpful way.
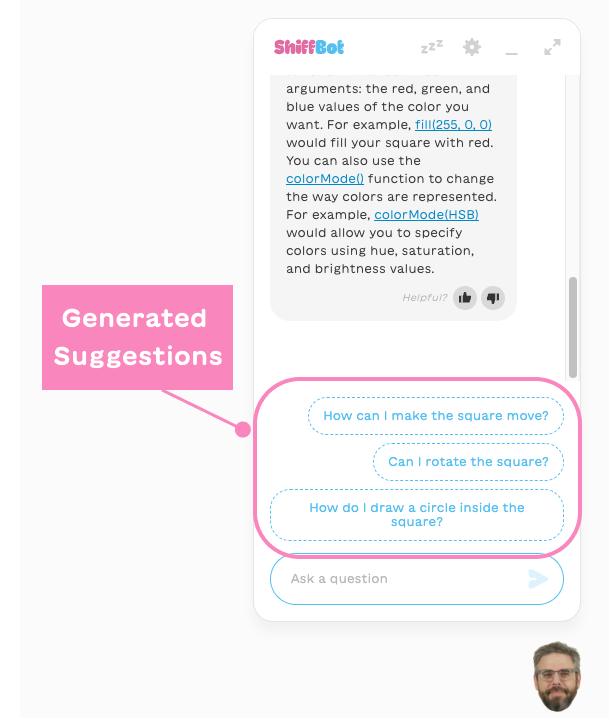
Dynamically Generated Suggestion Chips
Suggestion chips during the conversation should be relevant for what the user is currently trying to do. We have a prompt and a call to Gemini that are solely dedicated to generating the suggested questions chips. In this case, the model’s only task is to suggest followup questions for a given conversation. We also use the few-shot technique here (the same technique we used in the static part of the prompt described above, where we include a few examples for the model to learn from). This time the prompt includes some examples for good suggestions, so that the model could generalize to any conversation:
Given a conversation between a user and an assistant in the p5js framework, suggest followup questions that the user could ask.
Return up to 4 suggestions, separated by the ; sign.
Avoid suggesting questions that the user already asked. The suggestions should only be related to creative coding and p5js.
Examples:
ShiffBot: Great idea! First, let's think about what in the sketch could be an object! What do you think?
Suggestions: What does this code do?; What's wrong with my code?; Make it more readable please
User: Help!
ShiffBot: How can I help?
Suggestions: Explain this code to me; Give me some ideas; Cleanup my code
suggested response chips, generated by Gemini (click to enlarge)
Final thoughts and next steps
ShiffBot is an example of how you can experiment with the Gemini API to build applications with tailored experiences for and with a community.
We found that the techniques above helped us bring out much of the experience that Dan had in mind for his students during our co-creation process. AI is a dynamic field and we’re sure your techniques will evolve with it, but hopefully they are helpful to you as a snapshot of our explorations and towards your own. We are also excited for things to come both in terms of Gemini and API tools that broaden human curiosity and creativity.
For example, we’ve already started to explore how multimodality can help students show ShiffBot their work and the benefits that has on the learning process. We’re now learning how to weave it into the current experience and hope to share it soon.
experimental exploration of multimodality in ShiffBot (click to enlarge)
Whether for coding, writing and even thinking, creators play a crucial role in helping us imagine what these collaborations might look like. Our hope is that this Lab Session gives you a glimpse of what’s possible using the Gemini API, and inspires you to use Google’s AI offerings to bring your own ideas to life, in whatever your craft may be.
 Posted by Joe Fernandez – Google AI Developer Relations

 Posted by Cher Hu, Product Manager and Saravanan Ganesh, Software Engineer for Gemini API


 Posted by
 Posted by Jasmin Rubinovitz, AI Researcher