Tag Archives: Containers & Kubernetes

Introducing Network Policy support for Google Container Engine, with Project Calico and Tigera


[Editor’s Note: Today we announced the beta of Kubernetes Network Policy in Google Container Engine, a feature we implemented in close collaboration with our partner Tigera, the company behind Project Calico. Read on for more details from Tigera co-founder and vice president of product, Andy Randall.]

When it comes to network policy, a lot has changed. Back in the day, we protected enterprise data centers with a big expensive network appliance called a firewall that allowed you to define rules about what traffic to allow in and out of the data center. In the cloud world, virtual firewalls provide similar functionality for virtual machines. For example, Google Compute Engine allows you to configure firewall rules on VPC networks.

In a containerized microservices environment such as Google Container Engine, network policy is particularly challenging. Traditional firewalls provide great perimeter security for intrusion from outside the cluster (i.e. “north-south” traffic), but aren’t designed for “east-west” traffic within the cluster at a finer-grained level. And while Container Engine automates the creation and destruction of containers (each with its own IP address), not only do you have many more IP endpoints than you used to, the automated create-run-destroy life-cycle of a container can result in churn up to 250x that of virtual machines.

Traditional firewall rules are no longer sufficient for containerized environments; we need a more dynamic, automated approach that is integrated with the orchestrator. (For those interested in why we can’t just continue with traditional virtual network / firewall approaches, see Christopher Liljenstolpe’s blog post, Micro-segmentation in the Cloud Native World.)


We think the Kubernetes Network Policy API and the Project Calico implementation present a solution to this challenge. Given Google’s leadership role in the community, and its commitment to running Container Engine on the latest Kubernetes release, it’s only natural that they would be the first to include this capability in their production hosted Kubernetes service, and we at Tigera are delighted to have helped support this effort.


Kubernetes Network Policy 1.0

What exactly does Kubernetes Network Policy let you do? Kubernetes Network Policy allows you to easily specify the connectivity allowed within your cluster, and what should be blocked. (It is a stable API as of Kubernetes v1.7.)

You can find the full API definition in the Kubernetes documentation but the key points are as follows:
  • Network policies are defined by the NetworkPolicy resource type. These are applied  to the Kubernetes API server like any other resource (e.g., kubectl apply -f my-network-policy.yaml).
  • By default, all pods in a namespace allow unrestricted access. That is, they can accept incoming network connections from any source.
  • A NetworkPolicy object contains a selector expression (“podSelector”) that selects a set of pods to which the policy applies, and the rules about which incoming connections will be allowed (“ingress” rules). Ingress rules can be quite flexible, including their own namespace selector or pod selector expressions.
  • Policies apply to a namespace. Every pod in that namespace selected by the policy’s podSelector will have the ingress rules applied, so any connection attempts that are not explicitly allowed are rejected. Calico enforces this policy extremely efficiently using iptables rules programmed into the underlying host’s kernel. 


Here is an example NetworkPolicy resource to give you a sense of how this all fits together:

apiVersion: networking.k8s.io/v1
kind: NetworkPolicy
metadata:
  name: test-network-policy
spec:
  podSelector:
    matchLabels:
      role: db
  ingress:
  - from:
    - namespaceSelector:
        matchLabels:
          project: myproject
    - podSelector:
        matchLabels:
          role: frontend
    ports:
    - protocol: TCP
      port: 6379


In this case, the policy is called “test-network-policy” and applies to the default namespace. It restricts inbound connections to every pod in the default namespace that has the label “role: db” applied. The selectors are disjunctive, i.e., either can be true. That means that connections can come from any pod in a namespace with label “project: myproject”, OR any pod in the default namespace with the label “role: frontend”. Further, these connections must be on TCP port 6379 (the standard port for Redis).

As you can see, Network Policy is an intent-based policy model, i.e., you specify your desired end-state and let the system ensure it happens. As pods are created and destroyed, or a label (such as “role: db”) is applied or deleted from existing pods, you don’t need to update anything: Calico automatically takes care of things behind the scenes and ensures that every pod on every host has the right access rules applied.

As you can imagine, that’s quite a computational challenge at scale, and Calico’s policy engine contains a lot of smarts to meet Container Engine’s production performance demands. The good news is that you don’t need to worry about that. Just apply your policies and Calico takes care of the rest.


Enabling Network Policy in Container Engine

For new and existing clusters running at least Kubernetes v1.7.6, you can enable network policy on Container Engine via the UI, CLI or API. For new clusters, simply set the flag (or check the box in the UI) when creating the cluster. For existing clusters there is a two-step process:
  1. Enable the network policy add-on on the master.
  2. Enable network policy for the entire cluster’s node-pools.
Here’s how to do that during cluster creation:

# Create a cluster with Network Policy Enabled
gcloud beta container clusters create <CLUSTER> --project=<PROJECT_ID> 
--zone=&ltZONE> --enable-network-policy --cluster-version=1.7.6


Here’s how to do it for existing clusters:
# Create a cluster with Network Policy Enabled

# Enable the addon
gcloud beta container clusters update <CLUSTER> --project=<PROJECT_ID> 
--zone=<ZONE>--update-addons=NetworkPolicy=ENABLE

# Enable on nodes (This re-creates the node pools)
gcloud beta container clusters update <CLUSTER> --project=<PROJECT_ID> 
--zone=<ZONE> --enable-network-policy

Looking ahead 

Environments running Kubernetes 1.7 can use the NetworkPolicy API capabilities that we discussed above, essentially ingress rules defined by selector expressions. However, you can imagine wanting to do more, such as:

  • Applying egress rules (restricting which outbound connections a pod can make) 
  • Referring to IP addresses or ranges within rules 

The good news is that the new Kubernetes 1.8 includes these capabilities, and Google and Tigera are working together to make them available in Container Engine. And, beyond that, we are working on even more advanced policy capabilities. Watch this space!

Attend our joint webinar! 

Want to learn more? Google Product Manager Matt DeLio will join Casey Davenport, the Kubernetes Networking SIG leader and a software engineer at Tigera, to talk about best practices and design patterns for securing your applications with network policy. Register here for the October 5th webinar.

Going Hybrid with Kubernetes on Google Cloud Platform and Nutanix


Recently, we announced a strategic partnership with Nutanix to help remove friction from hybrid cloud deployments for enterprises. You can find the announcement blog post here.

Hybrid cloud allows organizations to run a variety of applications either on-premise or in the public cloud. With this approach, enterprises can:
  • Increase the speed at which they're releasing products and features
  • Scale applications to meet customer demand
  • Move applications to the public cloud at their own pace
  • Reduce time spent on infrastructure and increase time spent on writing code
  • Reduce cost by improving resource utilization and compute efficiency
The vast majority of organizations have a portfolio of applications with varying needs. In some cases, data sovereignty and compliance requirements force a jurisdictional deployment model where an application and its data must reside in an on-premises environment or within a country’s boundaries. Alternatively, mobile and IoT applications are characterized with unpredictable consumption models that make the on-demand, pay-as-you-go cloud model the best deployment target for these applications.

Hybrid cloud deployments can help deliver the security, compliance and compute power you require with the agility, flexibility and scale you need. Our hybrid cloud example will encompass three key components:
  1. On-premise: Nutanix infrastructure
  2. Public cloud: Google Cloud Platform (GCP)
  3. Open source: Kubernetes and Containers
Containers provide an immutable and highly portable infrastructure that enables developers to predictably deploy apps across any environment where the container runtime engine can run. This makes it possible to run the same containerized application on bare metal, private cloud or public cloud. However, as developers move towards microservice architectures, they must solve a new set of challenges such as scaling, rolling updates, discovery, logging, monitoring and networking connectivity.

Google’s experience running our own container-based internal systems inspired us to create Kubernetes, and Google Container Engine, an open source and Google Cloud managed platform for running containerized applications across a pool of compute resources. Kubernetes abstracts away the underlying infrastructure, and provides a consistent experience for running containerized applications. Kubernetes introduces the concept of a declarative deployment model. In this model, an ops person supplies a template that describes how the application should run, and Kubernetes ensures the application’s actual state is always equal to the desired state. Kubernetes also manages container scheduling, scaling, health, lifecycle, load balancing, data persistence, logging and monitoring.

In a first phase, the Google Cloud-Nutanix partnership focuses on easing hybrid operations using Nutanix Calm as a single control plane for workload management across both on-premises Nutanix and GCP environments, using Kubernetes as the container management layer across the two. Nutanix Calm was recently announced at Nutanix .NEXT conference and once publicly available, will be used to automate provisioning and lifecycle operations across hybrid cloud deployments. Nutanix Enterprise Cloud OS supports a hybrid Kubernetes environment running on Google Compute Engine in the cloud and a Kubernetes cluster on Nutanix on-premises. Through this, customers can deploy portable application blueprints that run on both an on-premises Nutanix environment as well as in GCP.

Let’s walk through the steps involved in setting up a hybrid environment using Nutanix and GCP.

The steps involved are as follows:
  1. Provision an on premise 4-node Kubernetes cluster using a Nutanix Calm blueprint
  2. Provision a Google Compute Engine 4-node Kubernetes cluster using the same Nutanix Calm Kubernetes blueprint, configured for Google Cloud
  3. Use Kubectl to manage both on premise and Google Cloud Kubernetes clusters
  4. Using Helm, we’ll deploy the same Wordpress chart on both on premise and Google Cloud Kubernetes clusters

Provisioning an on-premise Kubernetes cluster using a Nutanix Calm blueprint

You can use Nutanix Calm to provision a Kubernetes cluster on premise, and Nutanix Prism, an infrastructure management solution for virtualized data centers, to bootstrap a cluster of virtualized compute and storage. This results in a Nutanix managed pool of compute and storage that's now ready to be orchestrated by Nutanix Calm, for one-click deployment of popular commercial and open source packages.
The tools used to deploy the Nutanix and Google hybrid cloud stacks.
You can then select the Kubernetes blueprint to target the Nutanix on-premise environment.

The Calm Kubernetes blueprint pictured below configures a four-node Kubernetes cluster that includes all the base software on all the nodes and the master. We’ve also customized our Kubernetes blueprint to configure Helm Tiller on the cluster, so you can use Helm to deploy a Wordpress chart. Calm blueprints also allow you to create workflows so that configuration tasks can take place in a specified order, as shown below with the “create” action.
Now, launch the Kubernetes Blueprint:
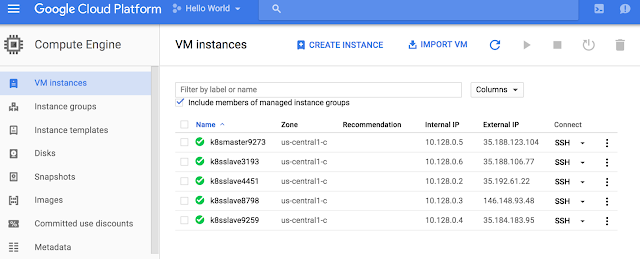
After a couple of minutes, the Kubernetes cluster is up and running with five VMs (one master node and four worker nodes):

Provisioning a Kubernetes cluster on Google Compute Engine with the same Nutanix Calm Kubernetes blueprint

Using Nutanix Calm, you can now deploy the Kubernetes blueprint onto GCP. The Kubernetes cluster is up and running on Compute Engine within a couple of minutes, again with five VMs (one master node + four worker nodes):


You’re now ready to deploy workloads across the hybrid environment. In this example, you'll deploy a containerized WordPress stack.

Using Kubectl to manage both on-premise and Google Cloud Kubernetes clusters

Kubectl is a command line interface tool that comes with Kubernetes to run commands against Kubernetes clusters.

You can now target each Kubernetes cluster across the hybrid environment and use kubectl to run basic commands. First, ssh into your on-premise environment and run a few commands.

# List out the nodes in the cluster

$ kubectl get nodes

NAME          STATUS    AGE
10.21.80.54   Ready     16m
10.21.80.59   Ready     16m
10.21.80.65   Ready     16m
10.21.80.67   Ready     16m

# View the cluster config

$ kubectl config view

apiVersion: v1
clusters:
- cluster:
    server: http://10.21.80.66:8080
  name: default-cluster
contexts:
- context:
    cluster: default-cluster
    user: default-admin
  name: default-context
current-context: default-context
kind: Config
preferences: {}
users: []

# Describe the storageclass configured. This is the Nutanix storage volume plugin for Kubernetes

$ kubectl get storageclass

NAME      KIND
silver    StorageClass.v1.storage.k8s.io

$ kubectl describe storageclass silver

Name:  silver
IsDefaultClass: No
Annotations: storageclass.kubernetes.io/is-default-class=true
Provisioner: kubernetes.io/nutanix-volume

Using Helm, you can deploy the same WordPress chart on both on-premise and Google Cloud Kubernetes clusters

This example uses Helm, a package manager used to install and manage Kubernetes applications. In this example, the Calm Kubernetes blueprint includes Helm as part of the cluster setup. The on-premise Kubernetes cluster is configured with Nutanix Acropolis, a storage provisioning system, which automatically creates Kubernetes persistent volumes for the WordPress pods.

Let’s deploy WordPress on-premise and on Google Cloud:

# Deploy wordpress

$ helm install wordpress-0.6.4.tgz

NAME:   quaffing-crab
LAST DEPLOYED: Sun Jul  2 03:32:21 2017
NAMESPACE: default
STATUS: DEPLOYED

RESOURCES:
==> v1/Secret
NAME                     TYPE    DATA  AGE
quaffing-crab-mariadb    Opaque  2     1s
quaffing-crab-wordpress  Opaque  3     1s

==> v1/ConfigMap
NAME                   DATA  AGE
quaffing-crab-mariadb  1     1s

==> v1/PersistentVolumeClaim
NAME                     STATUS   VOLUME  CAPACITY  ACCESSMODES  STORAGECLASS  AGE
quaffing-crab-wordpress  Pending  silver  1s
quaffing-crab-mariadb    Pending  silver  1s

==> v1/Service
NAME                     CLUSTER-IP     EXTERNAL-IP  PORT(S)                     AGE
quaffing-crab-mariadb    10.21.150.254         3306/TCP                    1s
quaffing-crab-wordpress  10.21.150.73       80:32376/TCP,443:30998/TCP  1s

==> v1beta1/Deployment
NAME                     DESIRED  CURRENT  UP-TO-DATE  AVAILABLE  AGE
quaffing-crab-wordpress  1        1        1           0          1s
quaffing-crab-mariadb  


Then, you can run a few kubectl commands to browse the on-premise deployment.

# Take a look at the persistent volume claims 

$ kubectl get pvc

NAME                      STATUS    VOLUME                                                                               CAPACITY   ACCESSMODES   AGE
quaffing-crab-mariadb     Bound     94d90daca29eaafa7439b33cc26187536e2fcdfc20d78deddda6606db506a646-nutanix-k8-volume   8Gi        RWO           1m
quaffing-crab-wordpress   Bound     764e5462d809a82165863af8423a3e0a52b546dd97211dfdec5e24b1e448b63c-nutanix-k8-volume   10Gi       RWO           1m

# Take a look at the running pods

$ kubectl get po

NAME                                      READY     STATUS    RESTARTS   AGE
quaffing-crab-mariadb-3339155510-428wb    1/1       Running   0          3m
quaffing-crab-wordpress-713434103-5j613   1/1       Running   0          3m

# Take a look at the services exposed

$ kubectl get svc

NAME                      CLUSTER-IP      EXTERNAL-IP   PORT(S)                      AGE
kubernetes                10.254.0.1              443/TCP                      16d
quaffing-crab-mariadb     10.21.150.254           3306/TCP                     4m
quaffing-crab-wordpress   10.21.150.73    #.#.#.#     80:32376/TCP,443:30998/TCP   4m


This on-premise environment did not have a load balancer provisioned, so we used the cluster IP to browse the WordPress site. The Google Cloud WordPress deployment automatically assigned a load balancer to the WordPress service along with an external IP address.

Summary

  • Nutanix Calm provided a one-click consistent deployment model to provision a Kubernetes cluster on both Nutanix Enterprise Cloud and Google Cloud.
  • Once the Kubernetes cluster is running in a hybrid environment, you can use the same tools (Helm, kubectl) to deploy containerized applications targeting the respective environment. This represents a “write once deploy anywhere” model. 
  • Kubernetes abstracts away the underlying infrastructure constructs, making it possible to consistently deploy and run containerized applications across heterogeneous cloud environments

Next steps


Building lean containers using Google Cloud Container Builder


Building a Java application requires a lot of files — source code, application libraries, build systems, build system dependencies and of course, the JDK. When you containerize an application, these files sometimes get left in, causing bloat. Over time, this bloat costs you both time and money by storing and moving unnecessary bits between your Docker registry and your container runtime.

A better way to help ensure your container is as small as possible is to separate the building of the application (and the tools needed to do so) from the assembly of the runtime container. Using Google Cloud Container Builder, we can do just that, allowing us to build significantly leaner containers. These lean containers load faster and save on storage costs.

Container layers

Each line in a Dockerfile adds a new layer to a container. Let’s look at an example:

FROM busybox
 
COPY ./lots-of-data /data
 
RUN rm -rf /data
 
CMD ["/bin/sh"]


In this example, we copy the local directory, "lots-of-data", to the "data" directory in the container, and then immediately delete it. You might assume such an operation is harmless, but that's not the case.

The reason is because of Docker’s “copy-on-write” strategy, which makes all previous layers read-only. If each successive command generates data that's not needed at container runtime, nor deleted in the same command, that space cannot be reclaimed.


Spinnaker containers

Spinnaker is an open source, cloud-focused continuous delivery tool created by Netflix. Spinnaker is actively maintained by a community of partners, including Netflix and Google. It has a microservice architecture, with each component written in Groovy and Java, and uses Gradle as its build tool.

Spinnaker publishes each microservice container on Quay.io. Each service has nearly identical Dockerfiles, so we’ll use the Gate service as the example. Previously, we had a Dockerfile that looked like this:

FROM java:8

COPY . workdir/

WORKDIR workdir

RUN GRADLE_USER_HOME=cache ./gradlew buildDeb -x test

RUN dpkg -i ./gate-web/build/distributions/*.deb

CMD ["/opt/gate/bin/gate"]

With Spinnaker, Gradle is used to do the build, which in this case builds a Debian package. Gradle is a great tool, but it downloads a large number of libraries in order to function. These libraries are essential to the building of the package, but aren’t needed at runtime. All of the runtime dependencies are bundled up in the package itself.

As discussed before, each command in the Dockerfile creates a new layer in the container. If data is generated in that layer and not deleted in the same command, that space cannot be recovered. In this case, Gradle is downloading hundreds of megabytes of libraries to the "cache" directory in order to perform the build, but we're not deleting those libraries.

A more efficient way to perform this build is to merge the two “RUN” commands, and remove all of the files (including the source code) when complete:

FROM java:8
 
COPY . workdir/
 
WORKDIR workdir
 
RUN GRADLE_USER_HOME=cache ./gradlew buildDeb -x test && \
  dpkg -i ./gate-web/build/distributions/*.deb && \
  cd .. && \
  rm -rf workdir
 
CMD ["/opt/gate/bin/gate"]

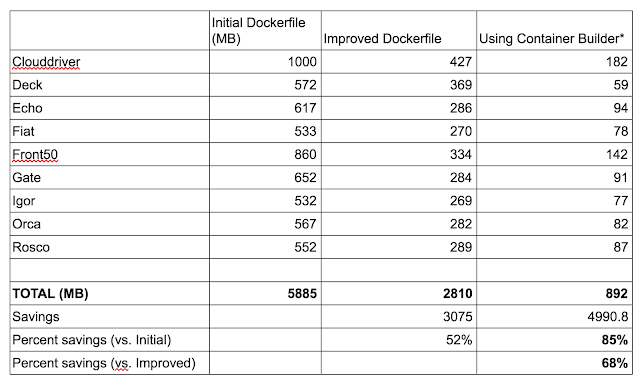
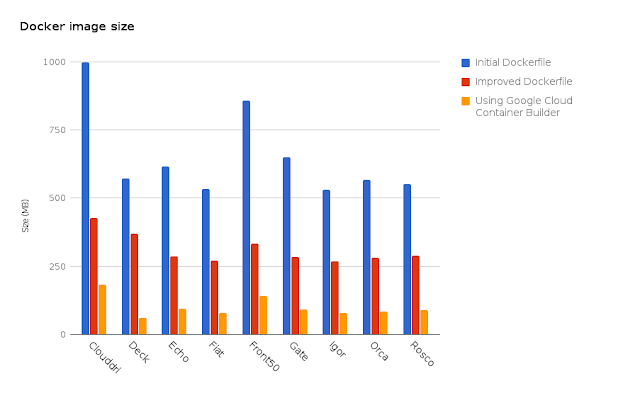
This took the final container size down from 652MB to 284MB, a savings of 56%. But can we do even better?

Enter Container Builder

Using Container Builder, we're able to further separate building the application from building its runtime container.

The Container Builder team publishes and maintains a series of Docker containers with common developer tools such as git, docker and the gcloud command line interface. Using these tools, we’ll define a "cloudbuild.yaml" file with one step to build the application, and another to assemble its final runtime environment.

Here's the "cloudbuild.yaml" file we'll use:
steps:
- name: 'java:8'
  env: ['GRADLE_USER_HOME=cache']
  entrypoint: 'bash'
  args: ['-c', './gradlew gate-web:installDist -x test']
- name: 'gcr.io/cloud-builders/docker'
  args: ['build', 
         '-t', 'gcr.io/$PROJECT_ID/$REPO_NAME:$COMMIT_SHA', 
         '-t', 'gcr.io/$PROJECT_ID/$REPO_NAME:latest',
         '-f', 'Dockerfile.slim', '.']
 
images:
- 'gcr.io/$PROJECT_ID/$REPO_NAME:$COMMIT_SHA'
- 'gcr.io/$PROJECT_ID/$REPO_NAME:latest'

Let’s go through each step and explore what is happening.

Step 1: Build the application

- name: 'java:8'
  env: ['GRADLE_USER_HOME=cache']
  entrypoint: 'bash'
  args: ['-c', './gradlew gate-web:installDist -x test']

Our lean runtime container doesn’t contain "dpkg", so we won't use the "buildDeb" Gradle task. Instead, we use a different task, "installDist", which creates the same directory hierarchy for easy copying.

Step 2: Assemble the runtime container

- name: 'gcr.io/cloud-builders/docker'
  args: ['build', 
         '-t', 'gcr.io/$PROJECT_ID/$REPO_NAME:$COMMIT_SHA',
         '-t', 'gcr.io/$PROJECT_ID/$REPO_NAME:latest', 
         '-f', 'Dockerfile.slim', '.']


Next, we invoke the Docker build to assemble the runtime container. We'll use a different file to define the runtime container, named "Dockerfile.slim". Its contents are below:
FROM openjdk:8u111-jre-alpine
 
COPY ./gate-web/build/install/gate /opt/gate
 
RUN apk --nocache add --update bash
 
CMD ["/opt/gate/bin/gate"]

The output of the "installDist" Gradle task from Step 1 already has the directory hierarchy we want (i.e. "gate/bin/", "gate/lib/", etc), so we can simply copy it into our target container.

One of the major savings is the choice of the Alpine Linux base layer, "openjdk:8u111-jre-alpine". Not only is this layer incredibly lean, but we also choose to only include the JRE, instead of the bulkier JDK that was necessary to build the application.


Step 3: Publish the image to the registry

images:
- 'gcr.io/$PROJECT_ID/$REPO_NAME:$COMMIT_SHA'
- 'gcr.io/$PROJECT_ID/$REPO_NAME:latest'

Lastly, we tag the container with the commit hash and crown it as the "latest" container. We then push this container to our Google Cloud Container Registry (grc.io) with these tags.

Conclusion

In the end, using Container Builder resulted in a final container size of 91.6MB, which is 85% smaller than our initial Dockerfile and even 68% smaller than our improved version.
*The major savings comes from separating the build and runtime environments, and from choosing a lean base layer for the final container.
Applying this approach across each microservice yielded similar results; our sum total container footprint shrunk from almost 6GB down to less than 1GB.

Guest post: Supercharging container pipelines with Codefresh and Google Cloud


[Editor’s note: Today we hear from Codefresh, which makes a Docker-native continuous integration/continuous delivery (CI/CD) platform. Read on to learn how Codefresh’s recent integrations with Kubernetes and Google Container Registry will make it easier for you to build, test and deploy your cloud-native applications to Google Cloud, including Container Engine and Kubernetes.]

Traditional pipelines weren’t designed with containers and cloud services in mind. At Codefresh, we’ve built our platform specifically around Docker and cloud services to simplify the entire pipeline and make it easier to build, test and deploy web apps. We recently partnered with Google Cloud to add two key features into our platform: an embedded registry (powered by Google’s own Container Registry) and one-click deploy to Google Container Engine.

Advantages of an embedded registry

Codefresh’s embedded registry doesn’t replace production registries but rather provides a developer-focused registry for testing and development. The production registry becomes a single source of truth for production grade images, while Codefresh’s embedded registry maintains the images needed for development.

This approach has a couple of other big advantages:
  • Image quality control is higher since it’s built right into the test flow
  • Build-assist images (for example, those used with Java and other compiled languages) stay nicely organized in the dev space
  • Codefresh extends the images with valuable metadata (e.g., test results, commit info, build SHA, logs, issue id, etc.), creating a sandbox-like registry for developers
  • Build speed is faster since the embedded registry is "closer" to the build machines
The embedded registry also allows developers to call images by tag and extended metadata from the build flow. For example, if you want to test a service based on how it works with different versions of another service, you can reference images based on their git commit ID (build SHA).

To try out the embedded registry, you’ll need to join the beta.

One-click deploy to Kubernetes

We manage the Codefresh production environment with Kubernetes running on Container Engine. Because we use Codefresh to build, test and deploy Codefresh itself, we wanted to make sure there was a simple way to deploy to Kubernetes. To do that, we’re adding Kubernetes deployment images to Codefresh, available both in the UI and Codefresh YAML. The deploy images contain a number of scripts that make pushing new images a simple matter of passing credentials. This makes it easy to automate the deployments, and when paired with branch permissions, makes it easy for anyone authorized to approve and push code to production.

To try this feature in Codefresh, just select the deploy script in the pipeline editor and add the needed build arguments. For more information checkout our documentation on deploying to Kubernetes.

Or add this code to your Codefresh.yml

deploy-to-kubernetes-staging:
    image: codefreshio/kubernetes-deployer:master
    tag: latest
    working-directory: ${{initial-clone}}
commands:
      - /deploy/bin/deploy.sh ./root
    environment:
      - ENVIRONMENT=${{ENVIRONMENT}}
      - KUBERNETES_USER=${{KUBERNETES_USER}}
      - KUBERNETES_PASSWORD=${{KUBERNETES_PASSWORD}}
      - KUBERNETES_SERVER=${{KUBERNETES_SERVER}}
      - DOCKER_IMAGE_TAG=${{CF_REVISION}}

Migrating to Google Cloud’s Container Engine

For those migrating to Container Engine or another Kubernetes environment, the Codefresh deploy images simplify everything. Pushing to Kubernetes is cloud agnostic  just point it at your Kubernetes deployment, and you’re good to go.

About Codefresh, CI/CD for Docker

Codefresh is CI for Docker used by open source and business. We automatically deploy and scale build and test infrastructure for each Docker image. We also deploy shareable environments for every code branch. Check it out https://codefresh.io/ and join the embedded registry beta.

Google Container Engine fires up Kubernetes 1.6


Today we started to make Kubernetes 1.6 available to Google Container Engine customers. This release emphasizes significant scale improvements and additional scheduling and security options, making the running of a Kubernetes clusters on Container Engine easier than ever before.

There were over 5,000 commits in Kubernetes 1.6 with dozens of major updates that are now available to Container Engine customers. Here are just a few highlights from this release:
  • Increase in number of supported nodes by 2.5 times: We’ve made great effort to support your workload no matter how large your needs. Container Engine now supports cluster sizes of up to 5,000 nodes, up from 2,000, while still maintaining our strict SLO for cluster performance. We've already had some of the world's most popular apps hosted on Container Engine (such as Pokémon GO) and the increase in scale can handle more of the largest workloads.
  • Fully Managed Nodes: Container Engine has always helped keep your Kubernetes master in a healthy state; we're now adding the option to fully manage your Kubernetes nodes as well. With Node Auto-Upgrade and Node Auto-Repair, you can optionally have Google automatically update your cluster to the latest version, and ensure your cluster’s nodes are always operating correctly. You can read more about both features here.
  • General Availability of Container-Optimized OS: Container Engine was designed to be a secure and reliable way to run Kubernetes. By using Container-Optimized OS, a locked down operating system specifically designed for running containers on Google Cloud, we provide a default experience that's more secure, highly performant and reliable, helping ensure your containerized workloads can run great. Read more details about Container-Optimized OS in this in-depth post here.
Over the past year, Kubernetes adoption has accelerated and we could not be more proud to host so many mission critical applications on the platform for our customers. Some recent highlights include:

Customers

  • eBay uses Google Cloud technologies including Container Engine, Cloud Machine Learning and AI for its ShopBot, a personal shopping bot on Facebook Messenger.
  • Smyte participated in the Google Cloud startup program and protects millions of actions a day on websites and mobile applications. Smyte recently moved from self-hosted Kubernetes to Container Engine.
  • Poki, a game publisher startup, moved to Google Cloud Platform (GCP) for greater flexibility, empowered by the openness of Kubernetes. A theme we covered at our Google Cloud Next conference, showing that open source technology gives customers the freedom to come and go as they choose. Read more about their decision to switch here.
While Kubernetes did nudge us in the direction of GCP, we’re more cloud agnostic than ever because Kubernetes can live anywhere.”  — Bas Moeys, Co-founder and Head of Technology at Poki

To help shape the future of Kubernetes — the core technology Container Engine is built on — join the open Kubernetes community and participate via the kubernetes-users-mailing list or chat with us on the kubernetes-users Slack channel.

We’re the first cloud to offer users the newest Kubernetes release, and with our generous 12 month free trial of $300 credits, it’s never been simpler to get started, try the latest release today.


Toward better node management with Kubernetes and Google Container Engine


Using our Google Container Engine managed service is a great way to run a Kubernetes cluster with a minimum of management overhead. Now, we’re making it even easier to manage Kubernetes clusters running in Container Engine, with significant improvements to upgrading and maintaining your nodes.

Automated Node Management

In the past, while we made it easy to spin up a cluster, keeping nodes up-to-date and healthy were still the user’s responsibility. To ensure your cluster was in a healthy, current state, you needed to track Kubernetes releases, set up your own tooling and alerting to watch nodes that drifted into an unhealthy node, and then develop a process for repairing that node. While we take care of keeping the master healthy, with the nodes that make up a cluster (particularly large ones), this could be a significant amount of work. Our goal is to provide an end-to-end automated management experience that minimizes how much you need to worry about common management tasks. To that end, we're proud to introduce two new features that help ease these management burdens.

Node Auto-Upgrades


Rather than having to manually execute node upgrades, you can choose to have the nodes automatically upgrade when the latest release has been tested and confirmed to be stable by Google engineers.

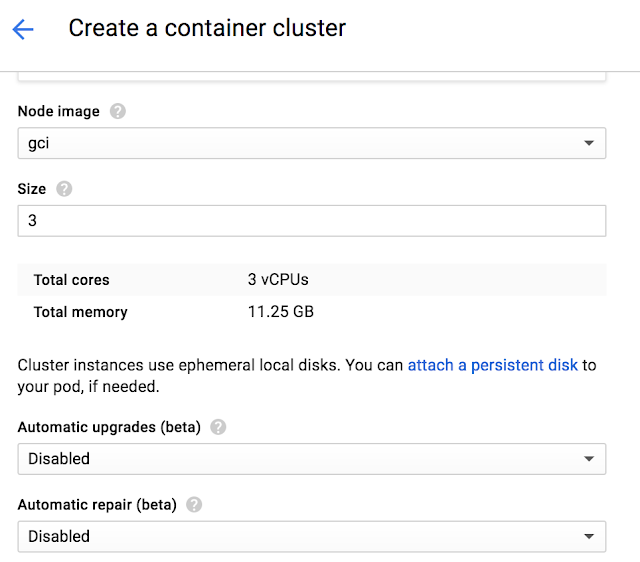
You can enable it in the UI during new Cluster and Node Pool creation by enabling the “Auto upgrades”.
To enable it in the CLI add the “--enable-autoupgrade” flag.

gcloud beta container clusters create CLUSTER --zone ZONE --enable-autoupgrade

gcloud beta container node-pools create NODEPOOL --cluster CLUSTER --zone ZONE --enable-autoupgrade

Once enabled, each node in the selected node pool will have its workloads gradually drained, shut down and a new node will be created and joined to the cluster. The node will be confirmed to be healthy before moving onto the next node.

To learn more see Node Auto-Upgrades on Container Engine.

Node Auto-Repairs

Like any production system, cluster resources must be monitored to detect issues (crashing Kubernetes binaries, workloads triggering kernel bugs and out-of-disk issues, etc.) and repair them if they're out of specification. A node that goes unhealthy will decrease the scheduling capacity of your cluster and as the capacity reduces your workloads will stop getting scheduled.

Google already monitors and repairs your Kubernetes master in case of these issues. With our new Node-Auto Repair feature, we'll also monitor to each node in the node pool.

You can enable Auto Repairs during new Cluster and Node Pool Creation.

To enable it in the UI:


To enable it in the CLI:

gcloud beta container clusters create CLUSTER --zone ZONE --enable-autorepair

gcloud beta container node-pools create NODEPOOL --cluster CLUSTER --zone ZONE --enable-autorepair

Once enabled, Container Engine will monitor several signals, including the node health status as seen by the cluster master and the VM state from the managed instance group backing the node. Too many consecutive health check failures (around 10 minutes) will trigger a re-creation of the node VM.

To learn more see Node Auto-Repair on Container Engine.

Improving Node Upgrades


In order to achieve both these features, we had to do some significant work under the hood. Previously, Container Engine node upgrades did not consider a node’s health status and did not ensure that it was ready to be upgraded. Ideally a node should be drained prior to taking it offline, and health-checked once the VM has successfully booted up. Without observing these signals, Container Engine could begin upgrading the next node in the cluster before the previous node was ready, potentially impacting workloads in smaller clusters.

In the process of building Auto Node Upgrades and Auto Node Repair, we’ve made several architectural improvements. We redesigned our entire upgrade logic with an emphasis on making upgrades as non-disruptive as possible. We also added proper support for cordoning and draining of nodes prior to taking them offline, controlled via podTerminationGracePeriod. If these pods are backed by a controller (e.g. ReplicaSet or Deployment) they're automatically rescheduled onto other nodes (capacity permitting). Finally, we added additional steps after each node upgrade to verify that the node is healthy and can be scheduled, and we retry upgrades if a node is unhealthy. These improvements have significantly reduced the disruptive nature of upgrades.


Cancelling, Continuing and Rolling Back Upgrades

Additionally, we wanted to make upgrades more than a binary operation. Frequently, particularly with large clusters, upgrades need to be halted, paused or cancelled altogether (and rolled back). We're pleased to announce that Container Engine now supports cancelling, rolling back and continuing upgrades.

If you cancel an upgrade, it impacts the process in the following way:

  • Nodes that have not been upgraded remain at their current version
  • Nodes that are in-flight proceed to completion
  • Nodes that have already been upgraded remain at the new version


An identical upgrade (roll-forward) issued after a cancellation or a failure will pick up the upgrade from where it left off. For example, if the initial upgrade completes three out of five nodes, the roll-forward will only upgrade the remaining two nodes; nodes that have been upgraded are not upgraded again.

Cancelled and failed node upgrades can also be rolled back to the previous state. Just like in a roll-forward, nodes that hadn’t been upgraded are not rolled-back. For example, if the initial upgrade completed three out of five nodes, a rollback is performed on the three nodes, and the remaining two nodes are not affected. This makes the upgrade significantly cleaner.

Note: A node upgrade still requires the VM to be recreated which destroys any locally stored data. Rolling back and rolling forward does not restore that local data.


Node Condition\Action
Cancellation
Rolling forward
Rolling back
In Progress
Proceed to completion
N/A
N/A
Upgraded
Untouched
Untouched
Rolled back
Not Upgraded
Untouched
Upgraded
Untouched


Try it

These improvements extend our commitment in making Container Engine the easiest way to use Kubernetes. With Container Engine you get pure open source Kubernetes experience along with the powerful benefits of Google Cloud Platform (GCP): friendly per-minute billing, a global load balancer, IAM integration, and all fully managed by Google reliability engineers ensuring your cluster is available and up-to-date.

With our new generous 12-month free trial that offers a $300 credit, it’s never been simpler to get started. Try Container Engine today.

Container-Optimized OS from Google is generally available


It's not news to anyone in IT that container technology has become one of the fastest growing areas of innovation. We're excited about this trend and are continuously enhancing Google Cloud Platform (GCP) to make it a great place to run containers.

There are many great OSes available today for hosting containers, and we’re happy that customers have so many choices. Many people have told us that they're also interested in using the same image that Google uses, even when they’re launching their own VMs, so they can benefit from all the optimizations that Google services receive.

Last spring, we released the beta version of Container-Optimized OS (formerly Container-VM Image), optimized for running containers on GCP. We use Container-Optimized OS to run some of our own production services (such as Google Cloud SQL, Google Container Engine, etc.) on GCP.

Today, we’re announcing the general availability of Container-Optimized OS. This means that if you're a Compute Engine user, you can now run your Docker containers “out of the box” when you create a VM instance with Container-Optimized OS (see the end of this post for examples).

Container-Optimized OS represents the best practices we've learned over the past decade running containers at scale:
  • Controlled build/test/release cycles: The key benefit of Container-Optimized OS is that we control the build, test and release cycles, providing GCP customers (including Google’s own services) enhanced kernel features and managed updates. Releases are available over three different release channels (dev, beta, stable), each with different levels of early access and stability, enabling rapid iterations and fast release cycles.
  • Container-ready: Container-Optimized OS comes pre-installed with the Docker container runtime and supports Kubernetes for large-scale deployment and management (also known as orchestration) of containers.
  • Secure by design: Container-Optimized OS was designed with security in mind. Its minimal read-only root file system reduces the attack surface, and includes file system integrity checks. We also include a locked-down firewall and audit logging.
  • Transactional updates: Container-Optimized OS uses an active/passive root partition scheme. This makes it possible to update the operating system image in its entirety as an atomic transaction, including the kernel, thereby significantly reducing update failure rate. Users can opt-in for automatic updates.
It’s easy to create a VM instance running Container-Optimized OS on Compute Engine. Either use the Google Cloud Console GUI or the gcloud command line tool as shown below:

gcloud compute instances create my-cos-instance \
    --image-family cos-stable \
    --image-project cos-cloud

Once the instance is created, you can run your container right away. For example, the following command runs an Nginx container in the instance just created:

gcloud compute ssh my-cos-instance -- "sudo docker run -p 80:80 nginx"

You can also log into your instance with the command:

gcloud compute ssh my_cos_instance --project my_project --zone us-east1-d

Here's another simple example that uses Container Engine (which uses Container-Optimized OS as its OS) to run your containers. This example comes from the Google Container Engine Quickstart page.

gcloud container clusters create example-cluster
kubectl run hello-node --image=gcr.io/google-samples/node-hello:1.0 \
   --port=8080
kubectl expose deployment hello-node --type="LoadBalancer"
kubectl get service hello-node
curl 104.196.176.115:8080

We invite you to setup your own Container-Optimized OS instance and run your containers on it. Documentation for Container-Optimized OS is available here, and you can find the source code on the Chromium OS repository. We'd love to hear about your experience with Container-Optimized OS; you can reach us at StackOverflow with questions tagged google-container-os.

ASP.NET Core containers run great on GCP


With the recent release of ASP.NET Core, the .NET community has a cross-platform, open-source option that allows you to run Docker containers on Google App Engine and manage containerized ASP.NET Core apps with Kubernetes. In addition, we announced beta support for ASP.NET Core on App Engine flexible environment last week at Google Cloud Next. In this post, you’ll learn more about that as well as about support for Container Engine and how we integrate this support into Visual Studio and into Stackdriver!

ASP.NET Core on App Engine Flexible Environment

Support for ASP.NET Core on App Engine means that you can publish your ASP.NET Core app to App Engine (running on Linux inside a Docker container). To do so, you’ll need an app.yaml  that looks like this:

runtime: aspnetcore
env: flex

Use the “runtime” setting of “aspnetcore” to get a Google-maintained and supported ASP.NET Core base Docker image. The new ASP.NET Core runtime also provides Stackdriver Logging for any messages that are routed to standard error or standard output. You can use this runtime to deploy your ASP.NET Core apps to App Engine or to Google Container Engine.

Assuming you have your app.yaml file at the root of your project, you can publish to App Engine flexible environment with the following commands:

dotnet restore
dotnet publish -c Release
copy app.yaml .\bin\Release\netcoreapp1.0\publish\app.yaml
gcloud beta app deploy .\bin\Release\netcoreapp1.0\publish\app.yaml
gcloud app browse

In fact, you don’t even need that last command to publish that app  it just shows it once it’s been published.

ASP.NET Core on Container Engine

To publish this same app to Container Engine, you need a Kubernetes cluster and the corresponding credentials cached on your local machine:

gcloud container clusters create cluster-1
gcloud container clusters get-credentials cluster-1

To deploy your ASP.NET Core app to your cluster, you must first package it in a Docker container. You can do that with Google Cloud Container Builder, a service that builds container images in the cloud without having to have Docker installed. Instead, create a new file in the root of your project called cloudbuild.yaml with the following content:

steps:
- name: 'gcr.io/gcp-runtimes/aspnetcorebuild-1.0:latest'
- name: gcr.io/cloud-builders/docker:latest
args: [ 'build', '-t', 'gcr.io/&ltprojectid&gt/app:0.0.1', '--no-cache', '--pull', '.' ]
images:
['gcr.io/&ltprojectid&gt/app:0.0.1']

This file takes advantage of the same ASP.NET Core runtime that we used for App Engine. Replace each with the project ID where you want to run your app. To build the Docker image for your published ASP.NET Core app, run the following commands:


dotnet restore
dotnet publish -c Release
gcloud container builds submit --config=cloudbuild.yaml
.\bin\release\netcoreapp1.0\publish\

Once this is finished, you'll have an image called gcr.io/<projectid>/app:latest that you can deploy to Container Engine with the following commands:

kubectl run  --image=gcr.io//app:latest --replicas=2 
--port=8080

kubectl expose deployment  --port=80 --target-port=8080 
--type=LoadBalancer

kubectl get services

Replace <MYSERVICE> with the desired name for your service and these two commands will deploy the image to Container Engine, ensure that there are two running replicas of your service and expose an internet-facing service that load-balances requests between replicas. The final command provides the external IP address of your newly deployed ASP.NET Core service so that you can see it in action.


GCP ASP.NET Core runtime in Visual Studio

Being able to deploy from the command line is great for automated CI/CD processes. For more interactive usage, we’ve also built full support for deploying to both App Engine and Container Engine from Visual Studio via the Cloud Tools for Visual Studio extension. Once it’s installed, simply right-click on your ASP.NET Core project in the Solution Explorer, choose Publish to Google Cloud and choose where to run your code:
If you deploy to App Engine, you can choose App Engine-specific options without an app.yaml file:
Likewise, if you choose Container Engine, you receive Kubernetes-specific options that also don’t require any configuration files:
The same underlying commands are executed regardless of whether you deploy from the command line or from within Visual Studio (not counting differences between App Engine and Container Engine, of course). Choose the option that works best for you.

For more details about deploying from Visual Studio to App Engine and to Container Engine, check out the documentation. And if you’d like some help choosing between App Engine and Container Engine, the computing and hosting services section of the GCP overview provides some good guidance.


App Engine in Google Cloud Explorer

If you deploy to App Engine, the App Engine node in Cloud Explorer provides additional information about running services and versions inside Visual Studio.

The Google App Engine node lists all of the services running in your project. You can drill down into each service and see all of the versions deployed for that service, their traffic allocation and their serving status. You can perform most common operations directly from Visual Studio by right-clicking on the service, or version, including managing the service in the Cloud Console, browsing to the service or splitting traffic between versions of the service.

For more information about App Engine support for ASP.NET Core, I recommend the App Engine documentation for .NET.


Client Libraries for ASP.NET Core

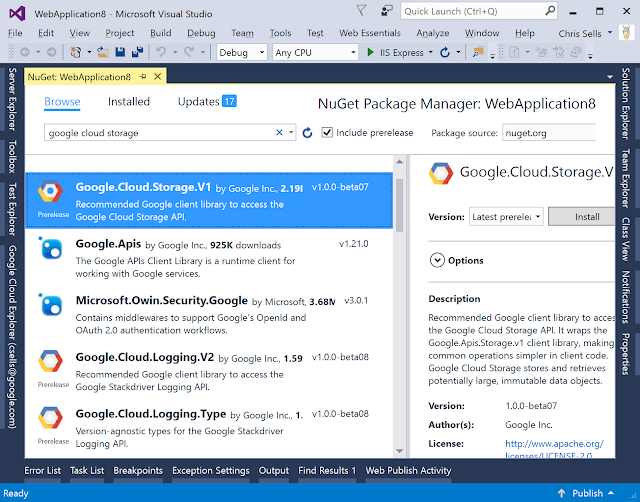
There are more than 100 Google APIs available for .NET in NuGet, which means that it’s easy to get to them from the command line or from Visual Studio:
These same libraries work for both ASP.NET and ASP.NET Core, so feel free to use them from your container-based apps on GCP.


Stackdriver support for ASP.NET Core

Some of the most important libraries for you to use in your app are going to be those associated with what happens to your app once it’s running in production. As I already mentioned, simply using the ASP.NET Core runtime for GCP with your App Engine or Container Engine apps automatically routes the standard and error output to Stackdriver Logging. However, for more structured log statements, you can also use the Stackdriver logging API for ASP.NET Core directly:


using Google.Cloud.Diagnostics.AspNetCore;
...
public void Configure(ILoggerFactory loggerFactory) {
    loggerFactory.AddGoogle("<projectid>");
}
...
public void LogMessage(ILoggerFactory loggerFactory) {
    var logger = loggerFactory.CreateLogger("[My Logger Name]");
    logger.LogInformation("This is a log message.");
}


To see your log entries, go to the Stackdriver Logging page. If you want to track unhandled exceptions from your ASP.NET Core app so that they show up in Stackdriver Error Reporting, you can do that too:

public void Configure(IApplicationBuilder app) {
    string projectId = "";
    string serviceName = "";
    string version = "";
    app.UseGoogleExceptionLogging(projectId, serviceName, version);
}


To see unhandled exceptions, go to Stackdriver Error Reporting. Finally, if you want to trace the performance of incoming HTTP requests to ASP.NET Core, you can set that up like so:

public void ConfigureServices(IServiceCollection services) {
    services.AddGoogleTrace("");
}
...
public void Configure(IApplicationBuilder app) {
    app.UseGoogleTrace();
}

To see how your app performs, go to the Stackdriver Trace page for detailed reports. For example, this report shows a timeline of how a frontend interacted with a backend and how the backend interacted with Datastore:
Stackdriver integration into ASP.NET Core lets you use Logging, Error Reporting and Trace to monitor how well your app is doing in production quickly and easily. For more details, check out the documentation for Google.Cloud.Diagnostics.AspNetCore.

Where are we?

As containers become more central to app packaging and deployment, the GCP ASP.NET Core runtime lets you bring your ASP.NET skills, processes and assets to GCP. You get a Google-supported and maintained runtime and unstructured logging out of the box, as well as easy integration into Stackdriver Logging, Error Reporting and Trace. Further, you get all of the Google APIs in NuGet that support ASP.NET Core apps. And finally, you can choose between automated deployment processes from the command line, or interactive deployment and resource management from inside of Visual Studio.

Combine that with Google’s deep expertise in containers exposed via App Engine flexible environment and Google Container Engine (our hosted Kubernetes offering), and you get a great place to run your ASP.NET Core apps and services.

Google Cloud Container Builder: a fast and flexible way to package your software


At Google everything runs in containers, from Gmail to YouTube to Search. With Google Cloud Platform (GCP) we're bringing the scale and developer efficiencies we’ve seen with containers to our customers. From cluster management on Google Container Engine, to image hosting on Google Container Registry, to our contributions to Spinnaker (an OSS release management tool), we’re always working to bring you the best, most open experience for working with containers in the cloud.

Furthering that mission, today we're happy to announce the general availability of Google Cloud Container Builder, a stand-alone tool for building container images regardless of deployment environment.

Whether you're a large enterprise or a small startup just starting out with containers, you need a fast, reliable, and consistent way to package your software into containers as part of an automated workflow. Container Builder enables you to build your Docker containers on GCP. This helps empower a tighter release process for teams, more reliable build environment across workspaces and frees you from having to manage your own scalable infrastructure for running builds.

Back in March, 2016, we began using Container Builder as the build-and-package engine behind “gcloud app deploy” for the App Engine flexible environment. Most App Engine flexible environment customers didn’t notice, but some who did commented that deploying code was faster and more reliable. Today we’re happy to extend that same speed and reliability to all container users. With its command-line interface, automated build triggers and build steps  a container-based approach to executing arbitrary build commands  we think you’ll find that Container Builder is remarkably flexible as well.

We invite you to try out our “Hello, World!” and to incorporate Container Builder into your release workflow. Contact us at [email protected] or by using the “google-container-registry” tag on Stackoverflow and we look forward to your feedback.

Interacting with Container Builder

REST API and Cloud SDK

Container Builder provides a REST API for programmatically creating and managing builds as well as a gcloud command line interface for working with builds from the CLI. Our online documentation includes examples using the Cloud SDK and curl that will help enable you to integrate Container Builder into your workflows however you like.

UI and automated build triggers

Container Builder enables two new UIs in the Google Cloud Console under Container Registry, build history and build triggers. Build history shows all your builds with details for each including logs. Build triggers lets you set up automated CI/CD workflows that start new builds on source code changes. Triggers work with Cloud Source Repository, Github, and Bitbucket on pushes to your repository based on branch or tag.

Getting started: “Hello, world!”

Our Quickstarts walk you through the complete setup needed to get started with your first build. Once you’ve enabled the Google Container Builder API and authenticated with the Cloud SDK, you can execute a simple cloud build from the command line.

Let’s run a “Hello, World!” Docker build using one of our examples in GitHub. In an empty directory, execute these commands in your terminal:

git clone \
    https://github.com/GoogleCloudPlatform/cloud-builders.git
cd cloud-builders/go/examples/hello_world_app
gcloud container builds submit --config=cloudbuild.yaml .

This last command will push the local source in your current directory (specified by “.”) to Container Builder, which will then execute your build based on the Dockerfile. Your build logs will stream to the terminal as your build executes, finishing with a hello-app image being pushed to Google Container Registry.

The README.md file explains how to test your image locally if you have Docker installed. To deploy your image on Google App Engine, run this command, substituting your project id for <project-id>:

gcloud app deploy \
    --image-url=gcr.io/<project-id>/hello-app app.yaml

Using the gcloud container builds submit command, you can easily experiment with running any of your existing Dockerfile-based builds on Container Builder. Images can be deployed to any Docker runtime, such as App Engine or Google Container Engine.

Beyond Docker builds

Container Builder is not just a Docker builder, but rather a composable ecosystem that allows you to use any build steps that you wish. We have open-sourced builders for common languages and tasks like npm, git, go and the gcloud command line interface. Many images on DockerHub like Maven, Gradle and Bazel work out of the box. By composing your custom build steps, you can run unit tests with your build, reduce the size of your final image by rebaking your built image onto a leaner base image and removing build and test tooling and much more.

In fact, our build steps will let you run any Docker image as part of your build, so you can easily package the tools of your choice to move your existing builds onto GCP. While you may want to package your builds into containers to take advantage of other GCP offerings, there's no requirement that your build produce a container as output.

For example, here’s a "Hello, world" example in Go that defines two build steps in a cloudbuild.yaml: the first step does a standard Go build, and the second uploads the built application into a Cloud Storage bucket. You can arbitrarily compose build steps that can do anything that you can do in a Docker container.

Pricing

Container Builder includes 120 free build minutes per day per billing account. Most of our alpha program users found they were able to move their builds onto Container Builder in that time allotment at no cost. Over 120 minutes, builds cost $.0034 per minute. For full details on pricing and quota limitations, please see our pricing documentation.

Why we migrated Orbitera to managed Kubernetes on Google Cloud Platform


Google Cloud acquired Orbitera last fall, and already we’ve hit a key milestone: completing the migration of the multi-cloud commerce platform from AWS to Google Container Engine, our managed Kubernetes environment.

This is a real testament to the maturity of Kubernetes and Container Engine, which in less than two years, has emerged as the most popular managed container orchestrator service on the market, powering Google Cloud’s own services as well as customers such as Niantic with Pokemon Go.

Founded in 2012, Orbitera originally built its service on an extensive array of AWS services including EC2, S3, RDS and RedShift, and weighed the pros and cons of migrating to various Google Cloud compute platforms  Google Compute Engine, Google App Engine or Container Engine. Ultimately, migrating to Container Engine presented Orbitera with the best opportunity to modernize its service and move from a monolithic architecture running on virtual machines to a microservices-based architecture based on containers.

The resulting service allows Orbitera ISV partners to easily sell their software in the cloud, by managing the testing, provisioning and ongoing billing management of their applications across an array of public cloud providers.

Running on Container Engine is proving to be a DevOps management boon for the Orbitera service. With Container Engine, Orbitera now runs in multiple zones with three replicas in each zone, for better availability. Container Engine also makes it easy to scale component microservices up and down on demand as well as deploy to new regions or zones. Operators roll out new application builds regularly to individual Kubernetes pods, and easily roll them back if the new build behaves unexpectedly.

Meanwhile, as a native Google Cloud service, the container management service integrates with multiple Google Cloud Platform (GCP) services such as Cloud SQL load balancers, and Google Stackdriver, whose alerts and dashboards allow Orbitera to respond to issues more quickly and more efficiently.

Going forward, running on Container Engine positions Orbitera to take advantage of more modular microservices and APIs and rapidly build out new services and capabilities for customers. That’s a win for enterprises who depend on Orbitera to provide a seamless, consistent and easy way to manage software running across multiple clouds, including Amazon Web Services and Microsoft Azure.

Stay tuned for a technical deep dive from the engineering team that performed the migration, where they'll share lessons learned, and tips and tricks for performing a successful migration to Container Engine yourself. In the meantime, if you have questions about Container Engine, you can find us on our Slack channel.