Tag Archives: Compute

Getting more value from your Stackdriver logs with structured data


Logs contain some of the most valuable data available to developers, DevOps practitioners, Site Reliability Engineers (SREs) and security teams, particularly when troubleshooting an incident. It’s not always easy to extract and use, though. One common challenge is that many log entries are blobs of unstructured text, making it difficult to extract the relevant information when you need it. But structured log data is much more powerful, and enables you to extract the most valuable data from your logs. Google Stackdriver Logging just made it easier than ever to send and analyze structured log data.

We’ve just announced new features so you can better use structured log data. You’ve told us that you’d like to be able to customize which fields you see when searching through your logs. You can now add custom fields in the Logs Viewer in Stackdriver. It’s also now easier to generate structured log data using the Stackdriver Logging agent.

Why is structured logging better?
Using structured log data has some key benefits, including making it easier to quickly parse and understand your log data. The chart below shows the differences between unstructured and structured log data. 

You can see here how much more detail is available at a glance:


Unstructured log data
Structured log data
Example from custom logs
...
textPayload: A97A7743 purchased 4 widgets.
...
...
jsonPayload: {
 "customerIDHash": “A97A7743”
 "action": “purchased”
 "quantity": “4”
 "item": “widgets”
}
...
Example from Nginx logs—now available as structured data through the Stackdriver logging agent
textPayload: 127.0.0.1 10.21.7.112 - [28/Feb/2018:12:00:00 +0900] "GET / HTTP/1.1" 200 777 "-" "Chrome/66.0"
time:
1362020400 (28/Feb/2018:12:00:00 +0900)

jsonPayload: {
 "remote" : "127.0.0.1",
 "host"   : "10.21.7.112",
 "user"   : "-",
 "method" : "GET",
 "path"   : "/",
 "code"   : "200",
 "size"   : "777",
 "referer": "-",
 "agent"  : "Chrome/66.0"
}


Making structured logs work for you
You can send both structured and unstructured log data to Stackdriver Logging. Most logs Google Cloud Platform (GCP) services generate on your behalf, such as Cloud Audit Logging, Google App Engine logs or VPC Flow Logs, are sent to Stackdriver automatically as structured log data.

Since Stackdriver Logging also passes the structured log data through export sinks, sending structured logs makes it easier to work with the log data downstream if you’re processing it with services like BigQuery and Cloud Pub/Sub.

Using structured log data also makes it easier to alert on log data or create dashboards from your logs, particularly when creating a label or extracting a value with a distribution metric, both of which apply to a single field. (See our previous post on techniques for extracting values from Stackdriver logs for more information.)

Try Stackdriver Logging for yourself
To start using Stackdriver structured logging today, you’ll just need to install (or reinstall) the Stackdriver logging agent with the --structured flag. This also enables automatic parsing of common log formats, such as syslog, Nginx and Apache.

curl -sSO "https://dl.google.com/cloudagents/install-logging-agent.sh"
sudo bash ./install-logging-agent.sh --structured

For more information on installation and options, check out the Stackdriver structured logging installation documentation.

To test Stackdriver Logging and see the power of structured logs for yourself, you can try one of our most asked-for Qwiklab courses, Creating and alerting on logs-based metrics, for free, using a special offer of 15 credits. This offer is good through the end of May 2018. Or try our new structured logging features out on your existing GCP project by checking out our documentation.

Exploring container security: Isolation at different layers of the Kubernetes stack


Editor’s note: This is the seventh in a series of blog posts on container security at Google.

To conclude our blog series on container security, today’s post covers isolation, and when containers are appropriate for actually, well... containing. While containers bring great benefits to your development pipeline and provide some resource separation, they were not designed to provide a strong security boundary.

The fact is, there are some cases where you might want to run untrusted code in your environment. Untrusted code lives on a spectrum. On one end you have known bad malware that an engineer is trying to examine and reverse-engineer; and on the other end you might just have a third-party application or tool that you haven't audited yourself. Maybe it’s a project that historically had vulnerabilities and you aren’t quite ready to let it loose in your environment yet. In each of these cases, you don’t want the code to affect the security of your own workloads.

With that said, let’s take a look at what kind of security isolation containers do provide, and, in the event that it’s not enough, where to look for stronger isolation.

Hypervisors provide a security boundary for VMs
Traditionally, you might have put this untrusted code in its own virtual machine, relying on the security of the hypervisor to prevent processes from escaping or affecting other processes. A hypervisor provides a relatively strong security boundary—that is, we don’t expect code to be able to easily cross it by breaking out of a VM. At Google, we use the KVM hypervisor, and put significant effort into ensuring its security.

The level of trust you require for your code is all relative. The more sensitive the data you process, the more you need to be able to trust the software that accesses it. You don’t treat code that doesn’t access user data (or other critical data) the same way you treat code that does—or that’s in the serving path of active user sessions, or that has root cluster access. In a perfect world, you access your most critical data with code you wrote, reviewed for security issues, and ran some security checks against (such as fuzzing). You then verify that all these checks passed before you deploy it. Of course, you may loosen these requirements based on where the code runs, or what it does—the same open-source tool might be insufficiently trusted in a hospital system to examine critical patient information, but sufficiently trusted in a test environment for a game app you’re developing in your spare time.

A ‘trust boundary’ is the point at which your code changes its level of trust (and hence its security requirements), and a ‘security boundary’ is how you enforce these trust boundaries. A security boundary is a set of controls, managed together across all surfaces, to prevent a process from one trust level from elevating its trust level and affecting more trusted processes or access other users’ data. A container is one such security boundary, albeit not a very strong one. This is because, compared to a hypervisor, a native OS container is a larger, more complex security boundary, with more potential vulnerabilities. On the other hand, containers are meant to be run on a minimal OS, which limits the potential surface area for an attack at the OS level. At Google, we aim to protect all trust boundaries with at least two different security boundaries that each need to fail in order to cross a trust boundary.

Layers of isolation in Kubernetes
Kubernetes has several nested layers, each of which provides some level of isolation and security. Building on the container, Kubernetes layers provide progressively stronger isolation— you can start small and upgrade as needed. Starting from the smallest unit and moving outwards, here are the layers of a Kubernetes environment:

  • Container (not specific to Kubernetes): A container provides basic management of resources, but does not isolate identity or the network, and can suffer from a noisy neighbor on the node for resources that are not isolated by cgroups. It provides some security isolation, but only provides a single layer, compared to our desired double layer.
  • Pod: A pod is a collection of containers. A pod isolates a few more resources than a container, including the network. It does so with micro-segmentation using Kubernetes Network Policy, which dictates which pods can speak to one another. At the moment, a pod does not have a unique identity, but the Kubernetes community has made proposals to provide this. A pod still suffers from noisy neighbors on the same host.
  • Node: This is a machine, either physical or virtual. A node includes a collection of pods, and has a superset of the privileges of those pods. A node leverages a hypervisor or hardware for isolation, including for its resources. Modern Kubernetes nodes run with distinct identities, and are authorized only to access the resources required by pods that are scheduled to the node. There can still be attacks at this level, such as convincing the scheduler to assign sensitive workloads to the node. You can use firewall rules to restrict network traffic to the node.
  • Cluster: A cluster is a collection of nodes and a control plane. This is a management layer for your containers. Clusters offer stronger network isolation with per-cluster DNS.
  • Project: A GCP project is a collection of resources, including Kubernetes Engine clusters. A project provides all of the above, plus some additional controls that are GCP-specific, like project-level IAM for Kubernetes Engine and org policies. Resource names, and other resource metadata, are visible up to this layer.
There’s also the Kubernetes Namespace, the fundamental unit for authorization in Kubernetes. A namespace can contain multiple pods. Namespaces provide some control in terms of authorization, via namespace-level RBAC, but don’t try to control resource quota, network, or policies. Namespaces allow you to easily allocate resources to certain processes; these are meant to help you manage how you use your resources, not necessarily prevent a malicious process from escaping and accessing another process’ resources.

Diagram 1: Isolation provided by layer of Kubernetes

Recently, Google also announced the open-source gVisor project, which provides stronger isolation at the pod level.

Sample scenario: Multi-tenant SaaS workload
In practice, it can be hard to decide what isolation requirements you should have for your workload, and how to enforce them—there isn’t a one-size-fits-all solution. Time to do a little threat modeling.

A common scenario we hear, is a developer building a multi-tenant SaaS application running in Kubernetes Engine, in order to help manage and scale their application as needed to meet demand. In this scenario, let’s say we have a SaaS application running its front-end and back-end on Kubernetes Engine, with a back-end database for transaction data, and a back-end database for payment data; plus some open-source code for critical functions such as DNS and secret management.

You might be worried about a noisy (or nosy!) neighbor—that someone else is monopolizing resources you need, and you’re unable to serve your app. Cryptomining is a trendy attack vector these days, and being able to stay up and running even if one part of your infrastructure is affected is important to you. In cases like these, you might want to isolate certain critical workloads at the node layer.

You might be worried about information leaking between your applications. Of course Spacely Sprockets knows that you have other customers, but it shouldn’t be able to find out that Cogswell’s Cogs is also using your application—they’re competitors. In this case, you might want to be careful with your naming, and take care to block access to unauthenticated node ports (with NetworkPolicy), or isolate at the cluster level.

You might also be concerned that critical data, like customer payment data, is sufficiently segmented from access by less trusted workloads. Customer payment data should require different trust levels to access than user-submitted jobs. In this case, you might want to isolate at the cluster level, or run these each in their own sandbox.

So all together, you might have your entire application running in a single project, with different clusters for each environment, and place any highly trusted workload in its own cluster. In addition, you’ll need to make careful resource sharing decisions at the node and pod layers to isolate different customers.

Another common multi-tenant scenario we hear is one where you’re running entirely untrusted code. For example, your users may give you arbitrary code that you run on their behalf. In this case, for a multi-tenant cluster you'll want to investigate sandboxing solutions.

In the end
If you’ve learned one thing from this blog post, it’s that there’s no one right way to configure a Kubernetes environment—the right security isolation settings depend on what you are running, where, who is accessing the data, and how. We hope you enjoyed this series on container security! And while this is the last installment, you can look forward to more information about security best practices, as we continue to make Google Cloud, including Kubernetes Engine, the best place to run containers.

Using Jenkins on Google Compute Engine for distributed builds


Continuous integration has become a standard practice across a lot of software development organizations, automatically detecting changes that were committed to your software repositories, running them through unit, integration and functional tests, and finally creating an artifact (JAR, Docker image, or binary). Among continuous integration tools, Jenkins is one of the most popular, and so we created the Compute Engine Plugin, helping you to provision, configure and scale Jenkins build environments on Google Cloud Platform (GCP).

With Jenkins, you define your build and test process, then run it continuously against your latest software changes. But as you scale up your continuous integration practice, you may need to run builds across fleets of machines rather than on a single server. With the Compute Engine Plugin, your DevOps teams can intuitively manage instance templates and launch build instances that automatically register themselves with Jenkins. When Jenkins needs to run jobs but there aren’t enough available nodes, it provisions instances on-demand based on your templates. Once work in the build system has slowed down, the plugin automatically deletes your unused instances, so that you only pay for the instances you need. This autoscaling functionality is an important feature of a continuous build system, which gets a lot of use during primary work hours, and less when developers are off enjoying themselves. For further cost savings, you can also configure the Compute Engine Plugin to create your build instances as Preemptible VMs, which can save you up to 80% on per-second pricing of your builds.

Security is another concern with continuous integration systems. A compromise of this key organizational system can put the integrity of your software at risk. The Compute Engine Plugin uses the latest and most secure version of the Jenkins Java Network Launch Protocol (JNLP) remoting protocol. When bootstrapping the build instances, the Compute Engine Plugin creates a one-time SSH key and injects it into each build instance. That way, the impact of those credentials being compromised is limited to a single instance.

The Compute Engine Plugin lets you configure your build instances how you like them, including the networking. For example, you can:

  • Disable external IPs so that worker VMs are not publicly accessible
  • Use Shared VPC networks for greater isolation in your GCP projects
  • Apply custom network tags for improved placement in firewall rules


The plugin also allows you to attach accelerators like GPUs and Local SSDs to your instances to run your builds faster. You can also configure the plugin to use our wide variety of machine types which match the CPU and memory requirements of your build instance to the workload, for better utilization. Finally, the plugin allows you to configure arbitrary startup scripts for your instance templates, where you can do the final configuration of your base images before your builds are run.

If you use Jenkins on-premises, you can use the Compute Engine Plugin to create an ephemeral build farm in Compute Engine while keeping your Jenkins master and other necessary build dependencies behind your firewall. You can then use this extension of your build farm when you can’t meet demand for build capacity, or as a way to transition your workloads to the cloud in a practical and low-risk way.

Here is an example of the configuration page for an instance template:

Below is a high-level architecture of a scalable build system built with the Jenkins Compute Engine and Google Cloud Storage plugins. The Jenkins administrator configures an IAM service account that Jenkins uses to provision your build instances. Once builds are run, it can upload artifacts to Cloud Storage to archive them (and move them to cheaper storage after a given time threshold).
Jenkins and continuous integration are powerful tools for modern software development shops, and we hope this plugin makes it easier for you to use Jenkins on GCP. For instructions on getting this set up in your Google Cloud project, follow our solution guide.

Music in motion: a Firebase and IoT story


One of the best parts about working at Google is the incredible diversity of interests. By day, I’m a Developer Advocate focused on IoT paid to write code to show you how easy it is to develop solutions with Google technology. By night, I’m an amateur musician. This is the true story of how I combined those two interests.

It turns out I’m not unique; a lot of folks here at Google play music on top of their day job. Before I started working here, a Googler decided that we needed a place to jam, and thus was born one of our legendary Google perks: Sound City, a soundproof room in the middle of our San Francisco office. It’s an incredible space to jam, with one catch. You can’t book the room during the day. Anyone can go in and play at any time.

This was done for two reasons: to give everyone an opportunity and to foster the magic that sometimes happens when a random set of musicians ends up in the room at the same time, resulting in a jam of epic proportions.

Some of us, however, are not yet the musical gods we aspire to become. I picked up accordion recently. Finding time to practice at home is tough as it’s not the kind of instrument you can practice after the kids go to sleep. Having access to a soundproof music room in which to practice is awesome, but I don’t necessarily want to play when other people are in the room. I don’t want to subject anyone else to my learning of the accordion. That would just be cruel.

I brought this up to the folks that run the room, and suggested putting in a camera so we can see what’s going on in the room. They said that this came up usually once a year. Folks pushed back, because no one wanted to be watched while in the room. Sound detection in the room has the same problem. If something can pick up sound, it could theoretically record sound so folks vetoed it.

Being one of the IoT device folks at Google, I asked if anyone had considered just setting up motion sensors, and having it update a page that folks could look at. A lot of staring and blinking later, my idea was passed around to the folks that run Sound City and I got a thumbs up to go for it. So now I just needed to create a motion sensor, and build a quickie webpage that monitors the state of motion in the room for folks to access.

The setup 

This little project allowed me to tick all kinds of fun boxes. First, I 3d printed the case for the Raspberry Pi + Passive Infrared sensor (PIR). I took an existing model from Tinkercad, and modified it to fit my design. Using their tools I cut out an extra circle to expose the PIR, and extruded the whole case model. The end result worked great. I had plenty of room for the Pi + PIR (and added an LED to show when motion is detected to make it easier for me to debug).

The next step was to set up my data destination. For ease of setup and use, I decided to build this on Firebase, which makes it super easy to set up a real-time database. Like all things popular and open, there are several Python libraries for connecting and interacting with Firebase, including the Google supported Firebase Admin SDK. From a previous project, I had experience using a library called pyrebase, so I stuck with what I knew.

Creating a Firebase project is easy: from the console literally just add a project, give it a name and POOF, you’re done. Note that if you already have a GCP project, you can totally just use that. Just select the project from the dropdown in the Add Project dialog instead. I went ahead and created a project for the music room.

There’s a lot of fun stuff in here to play around with if you haven’t looked at Firebase before. For my purposes, I wanted to use the real-time database. First things first, I grabbed the JSON web config to work with my project. Clicking the “Add Firebase to your web app” button from the project overview home page gave me a hunk of code like so:

<script src="https://www.gstatic.com/firebasejs/4.10.0/firebase.js"></script>
<script>
    // Initialize Firebase
    var config = {
        apiKey: "<super sekret API key>",
        authDomain: "my-project-2e534.firebaseapp.com",
        databaseURL: "https://my-project-2e534.firebaseio.com",
        projectId: "my-project-2e534",
        storageBucket: "my-project-2e534.appspot.com",
        messagingSenderId: "<numerical sender id>"
        };
    firebase.initializeApp(config);
</script>
I copied that to the clipboard; I will need it later.

Next up, I needed to protect the database properly. By default, the read/write rules require a user to be authenticated to interact with the database. This was perfect for ensuring that only my device could write to the database, but I also wanted to read the state from my webpage without having to authenticate with the database. I clicked the Database on the left to get started and then clicked the Rules tab to see the default rules for the database:

{
"rules": {
    ".read": "auth != null",
    ".write": "auth != null"
    }
}
To allow anyone to read from my database (important safety tip, do NOT do this if the data is at all sensitive), I changed the rules to the following:

{
"rules": {
    ".read": true,
    ".write": "auth != null"
    }
}
Firebase supports a bunch of rules you can apply to database permissions; click here if you’re curious.

Next up, authentication! There are a few different ways I could have managed this. Firebase allows for email/password authentication, but if I did it that way, then everything is tied to an email, and that becomes unwieldy from a user-management perspective if someone else needs to administer things, or make changes.

Another approach is to use GCP service accounts, which Firebase honors. Now, I won’t lie, service accounts are not the easiest things to wrap your head around as there are a LOT of knobs you can turn permissions-wise in GCP/Firebase. Here’s a good primer on service accounts if you’re interested in knowing more. I may need to write or find a good blog about service accounts at some point too. If you do go down this route, when you create the service account, be sure to check the box that says “Furnish a new private key”. There may be a message saying “You don’t have permission to furnish a private key.” Ignore that. Just be sure when you’re creating the service account, that you don’t give it full owner privileges on the entire project. You want to limit its access. For mine, I just set “Project->Editor” permissions. Even this is probably too wide open for most production uses. For this project, which is limited in scope and isolated network-wise, I wasn’t too concerned.

Once I created my service account and got my private key (JSON format), I copied and moved the key onto my Pi. So now auth with Firebase was (in theory) all set from a file standpoint.

The code

Next up, code! As a reminder, there were two things I wanted out of the data:

  1. To know if there was anyone in the room
  2. To view occupancy over time

So, funny story. PIR sensors are notoriously finicky. Like, for funsies, do a search for “PIR false positive”. You’ll find a TON of references to people trying to solve the problem of PIR sensors inexplicably triggering even when encased in a freakin lead box. In my case, the motion triggering came like clockwork. Almost every minute (+/- a couple of seconds) came a spike of motion. After an incredible amount of debugging and troubleshooting, it SEEMED like it might be power related, as I could fool it into not happening with some creative wiring, but no combination pull-up, pull-down, capacitor, resistor fixed the problem permanently. Realizing the absurdity of continuing to bang my head against a hardware problem, I just solved it in software with some code around ignoring regular pings of motion. But I’m getting ahead of myself.

Here’s the hunk o’ pertinent code that does the work from the device. There’s nothing super fancy in here, but I’ll walk through a few of the pieces:

while True:
    i = GPIO.input(gpio_pir_in)
    motion = 0
    if i == 1:
        motion = 1

    # Need a chunk of code to account for a weirdness of the PIR
    # sensor. No matter what I've tried, I'm getting a blip of motion
    # every minute like clockwork. The internet claims everything from
    # jumper position (H v. L), power fluctations, etc. Nothing offered
    # seems to work, so I'm falling back on a software solution to
    # discount the minute blip

    current_time = int(round(time.time()))
    formatted_time = datetime.fromtimestamp(current_time).ctime()
    if motion:
        print ("I have motion")
        print (" My repeat time is: {}".format(datetime.fromtimestamp(repeat_time).ctime()))
        if repeat_time == 0:
            repeat_time = current_time
            print("  First time for repeat: {}\n".format(formatted_time))
        elif current_time >= repeat_time + 55 and current_time <= repeat_time + 65:
            print ("  Repeat time: {}\n".format(formatted_time))
            needs_updating = 1
            time.sleep(1.0)
            continue
        else:
            print ("  Real motion: {}\n".format(formatted_time))
            repeat_time = current_time
    elif needs_updating:
        needs_updating = 0
        repeat_time += 60
    else:
        if current_time > repeat_time + 90:
            print ("No motion, but updating repeat time\nUpdating to: {}\n".format(datetime.fromtimestamp(repeat_time + 60).ctime()))
            repeat_time += 60

The core of the script is a while loop that fires once a second. I wrote this bit of code to ignore the regular false positives that happen every minute, give or take. It’s intentionally not quite perfect, in that if it detects new motion that isn’t part of the cycle, it resets the cycle. This also means that motion that happens to occur a minute apart might be falsely ignored. The absolute accuracy that I sacrificed for simpler code was a fine compromise for me. If there’s one thing I can recommend, it’s to make life easier for future-you. An algorithm, or some logic, doesn’t have to be perfect if it doesn’t have to be. If it makes your life easier later, then that’s totally fine. Don’t let anyone tell you differently.

In this case, the potential faults could include:
  • Real motion that occurs at one minute of time but is interpreted as false motion; this would likely self-correct within the next minute (the odds of it happening over and over are astronomically small).
  • A false positive motion when real motion occurs and resets our one-minute false motion timer. Then, less than a minute later, an actual false motion happens, which is interpreted as a real motion (because it's been less than a minute since the previously detected motion). In this case, either there is consistent motion happening due to someone being in the room, or someone has just left the room and real motion has stopped, but the false motion was triggered. In the latter case, this just means less than a minute of extra detected motion before the timed pattern kicks back in and is ignored.

In other words, neither of these faults are a big deal.

One aspect of this code that took me some time to debug (even when I THOUGHT I had fixed it) is the 'else' statement at the end. The PIR doesn’t always fire every minute. There were some cases when the PIR would go past one minute without firing, which would cause my test on time at the next minute (and all subsequent minutes) to fail.

        # Turn on/off the LED based on motion
    GPIO.output(40, motion)

        # If the current motion is the same as the previous motion,
        # then don't send anything to firebase. We only track changes.
    if current_motion == motion:
        time.sleep(1.0)
        continue

    previous_motion = current_motion
    current_motion = motion

    try:
        firebase = pyrebase.initialize_app(config)
        db = firebase.database()
        if motion == 1:
            db.child("latest_motion").set('{{"ts": {} }}'.format(current_time))
        db.child(firebase_column).push('{{"ts": {}, "device_id": {}}, "motion": {} }}'.format(current_time, device_id, motion))
    except:
        e = sys.exc_info()[0]
        print ("An error occurred: {}".format(e))
        current_motion = previous_motion

    time.sleep(1.0)
Here is the second half of the while loop. It uses the config blob I saved earlier with a couple changes:

config = {
    apiKey: "<super sekret API key>",
    authDomain: "my-project-2e534.firebaseapp.com",
    databaseURL: "https://my-project-2e534.firebaseio.com",
    storageBucket: "my-project-2e534.appspot.com",
    serviceAccount: “<local path to service account json>”
}
The service account handles the project ID and the sender ID pieces, so they aren’t needed in the config.

The rest, is nice ‘n’ simple. If the current motion detected is the same as the previous, don’t do anything else (I only cared about changes in motion as markers). I wrapped the Firebase connection and publish code in a broad try/catch because both can raise exceptions. But much as I didn’t care about perfect accuracy in the PIR correction code, the same goes for these exceptions. If an exception is thrown, it means one particular data point didn’t make it to the server, but this is fine because the code resets current_motion in the exception handling so that it will just try again in a second. So again, a couple seconds of being “wrong” is just fine in favor of simpler code.

The visualization

Web hosting (for the page that shows if someone is actually in the room) is SUUUPER simple on Firebase. Click the “hosting” tab on the left, and click the “Get Started” button. It leads you by the hand through installing firebase-tools from the command line, allowing you to run all of Firebase’s magical commands. First, there’s firebase login to auth from CLI, then firebase init to put the framework in the current directory. It’s a firebase.json file, and a www directory. If you type firebase serve it starts up a local server that you can use to test out your page as you work. Don’t forget, there’s fairly intense caching that can happen, although it seemed to feel inconsistent to me. If you don’t see changes being made, just kill the process and restart the server with firebase serve.

Even though this post is already pretty long, I wanted to at least talk through how to build a webpage which listens to Firebase data changes:

    <!-- update the version number as needed -->
    <script defer src="/__/firebase/4.5.0/firebase-app.js"></script>
    <!-- include only the Firebase features as you need -->
    <script defer src="/__/firebase/4.5.0/firebase-auth.js"></script>
    <script defer src="/__/firebase/4.5.0/firebase-database.js"></script>
    <script defer src="/__/firebase/4.5.0/firebase-messaging.js"></script>
    <script defer src="/__/firebase/4.5.0/firebase-storage.js"></script>
    <!-- initialize the SDK after all desired features are loaded -->
    <script defer src="/__/firebase/init.js"></script>

    <script src="https://www.gstatic.com/firebasejs/4.5.0/firebase.js"></script>
    <script>
        // Initialize Firebase
        var config = {
            apiKey: "<super sekret API key>",
            authDomain: "my-project-2e534.firebaseapp.com",
            databaseURL: "https://my-project-2e534.firebaseio.com",
            storageBucket: "my-project-2e534.appspot.com",
            messagingSenderId: "<ID_NUM>"
            };
        firebase.initializeApp(config);
    
This is the Node.js configuration script to initialize the Firebase object. If I hadn’t set the authorization for read: true before, I’d need to go through authorization here as well.

Now that we’re all initialized, there are some events that we can listen to to get things rolling:

var occupied = firebase.database().ref('latest_motion');
      occupied.on("value", function(data){
The document I’m updating in Firebase is that latest_motion piece. Whenever the latest_motion value changes (in my case, the timestamp of last motion detected from the device), that function gets called with the JSON output of the document.

Now, I didn’t HAVE to do that. I could have just made it a fully static page and required folks to hit the refresh button instead, but that didn’t seem quite right. Besides, as an IoT person, I don’t get a lot of opportunity to play with web front-ends.

If I were building a production system, there would definitely be some changes I’d need to make to this. But I just want to know if I can go practice my accordion without interrupting someone else who’s already jamming. Someday, I’ll be good enough that I’ll go up when there is someone jamming so we can jam together.

You can find all the device code and the Firebase web page project I used in my GitHub repo here. I also talk IoT and life on my Twitter: @GabeWeiss_.

Announcing Stackdriver Kubernetes Monitoring: Comprehensive Kubernetes observability from the start


If you use Kubernetes, you know how much easier it makes it to build and deploy container-based applications. But that’s only one part of the challenge: you need to be able to inspect your application and underlying infrastructure to understand complex system interactions and debug failures, bottlenecks and other abnormal behavior—to ensure your application is always available, running fast, and doing what it's supposed to do. Up until now, observing a complex Kubernetes environment has required manually stitching together multiple tools and data coming from many sources, resulting in siloed views of system behavior.

Today, we are excited to announce the beta release of Stackdriver Kubernetes Monitoring, which lets you observe Kubernetes in a comprehensive fashion, simplifying operations for both developers and operators.

Monitor multiple clusters at scale, right out of the box

Stackdriver Kubernetes Monitoring integrates metrics, logs, events, and metadata from your Kubernetes environment and from your Prometheus instrumentation, to help you understand, in real time, your application’s behavior in production, no matter your role and where your Kubernetes deployments run.

As a developer, for instance, this increased observability lets you inspect Kubernetes objects (e.g., clusters, services, workloads, pods, containers) within your application, helping you understand the normal behavior of your application, as well as analyze failures and optimize performance. This helps you focus more on building your app and less on instrumenting and managing your Kubernetes infrastructure.

As a Site Reliability Engineer (SRE), you can easily manage multiple Kubernetes clusters in a single place, regardless of whether they’re running on public or private clouds. Right from the start, you get an overall view of the health of each cluster and can drill down and up the various Kubernetes objects to obtain further details on their state, including viewing key metrics and logs. This helps you proactively monitor your Kubernetes environment to prevent problems and outages, and more effectively troubleshoot issues.

If you are a security engineer, audit data from your clusters is sent to Stackdriver Logging where you can see all of the current and historical data associated with the Kubernetes deployment to help you analyze and prevent security exposures.

Works with open source

Stackdriver Kubernetes Monitoring integrates seamlessly with the leading Kubernetes open-source monitoring solution, Prometheus. Whether you want to ingest third-party application metrics, or your own custom metrics, your Prometheus instrumentation and configuration works within Stackdriver Kubernetes Monitoring with no modification.

At Google, we believe that having an enthusiastic community helps a platform stay open and portable. We are committed to continuing our contributions to the Prometheus community to help users run and observe their Kubernetes workloads in the same way, anywhere they want.

To this end, we will expand our current integration with Prometheus to make sure all the hooks we need for our sidecar exporter are available upstream by the time Stackdriver Kubernetes Monitoring becomes generally available.

We also want to extend a warm welcome to Fabian Reinartz, one of the Prometheus maintainers, who has just joined Google as a Software Engineer. We're excited about his future contributions in this space.

Works great alone, plays better together

Stackdriver Kubernetes Monitoring allows you to get rich Kubernetes observability all in one place. When used together with all the other Stackdriver products, you have a powerful toolset that helps you proactively monitor your Kubernetes workloads to prevent failure, speed up root cause analysis and reduce your mean-time-to-repair (MTTR) when issues occur.

For instance, you can configure alerting policies using Stackdriver's multi-condition alerting system to learn when there are issues that require your attention. Or you can explore various other metrics via our interactive metrics explorer, and pursue root cause hypotheses that may lead you to search for specific logs in Stackdriver Logging or inspect latency data in Stackdriver Trace.

Easy to get started on any cloud or on-prem

Stackdriver Kubernetes Monitoring is pre-integrated with Google Kubernetes Engine, so you can immediately use it on your Kubernetes Engine workloads. It can also be integrated with Kubernetes deployments on other clouds or on-prem infrastructure, so you can access a unified collection of logs, events, and metrics for your application, regardless of where your containers are deployed.

Benefits

Stackdriver Kubernetes Monitoring gives you:
  • Reliability: Faster time-to-resolution for issues thanks to comprehensive visibility into your Kubernetes environment, including infrastructure, application and service data. 
  • Choice: Ability to work with any cloud, accessing a unified collection of metrics, logs, and events for your application, regardless of where your containers are deployed.
  • A single source of truth: Customized views appropriate for developers, operators, and security engineers, drawing from a single, unified source of truth for all logs, metrics and monitoring data.
Early access customers have used Stackdriver Kubernetes Monitoring to increase visibility into their Kubernetes environments and simplify operations.
"Given the scale of our business we often have to use multiple tools to help manage the complex environment of our infrastructure. Every second is critical for eBay as we aim to easily connect our millions active buyers with the items they’re looking for. With the early access to Stackdriver Kubernetes Monitoring, we saw the benefits of a unified solution, which helps provide us with faster diagnostics for the eBay applications running on Kubernetes Engine, ultimately providing our customers with better availability and less latency.”

-- Christophe Boudet, Staff Devops, eBay

Getting started with Stackdriver Kubernetes Monitoring 

Stackdriver Kubernetes Monitoring Beta is available for testing in Kubernetes Engine alpha clusters today, and will be available in production clusters as soon as Kubernetes 1.10 rolls out to Kubernetes Engine.

Please help us help you improve your Kubernetes operations! Try Stackdriver Kubernetes Monitoring today and let us know how we can make it better and easier for you to manage your Kubernetes applications. Join our user group and send us your feedback at [email protected]

 To learn more, visit https://cloud.google.com/kubernetes-monitoring/

 And if you’re at KubeCon in Copenhagen join us at our booth for a deep dive demo and discussion

Scale big while staying small with serverless on GCP — the Guesswork.co story


[Editor’s note: Mani Doraisamy built two products—Guesswork.co and CommerceDNA—on top of Google Cloud Platform. In this blog post he shares insights into how his application architecture evolved to support the changing needs of his growing customer base while still staying cost-effective.]

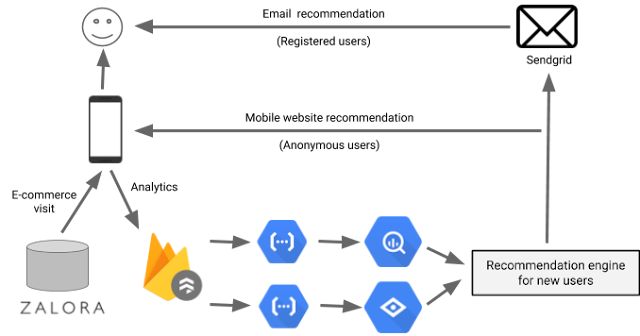
Guesswork is a machine learning startup that helps e-commerce companies in emerging markets recommend products for first-time buyers on their site. Large and established e-commerce companies can analyze their users' past purchase history to predict what product they are most likely to buy next and make personalized recommendations. But in developing countries, where e-commerce companies are mostly focused on attracting new users, there’s no history to work from, so most recommendation engines don’t work for them. Here at Guesswork, we can understand users and recommend them relevant products even if we don’t have any prior history about them. To do that, we analyze lots of data points about where a new user is coming from (e.g., did they come from an email campaign for t-shirts, or a fashion blog about shoes?) to find every possible indicator of intent. Thus far, we’ve worked with large e-commerce companies around the world such as Zalora (Southeast Asia), Galeries Lafayette Group (France) and Daraz (South Asia).

Building a scalable system to support this workload is no small feat. In addition to being able to process high data volumes per each customer, we also need to process hundreds of millions of users every month, plus any traffic spikes that happen during peak shopping seasons.

As a bootstrapped startup, we had three key goals while designing the system:

  1. Stay small. As a small team of three developers, we didn’t want to add any additional personnel even if we needed to scale up for a huge volume of users.
  2. Stay profitable. Our revenue is based on the performance of our recommendation engine. Instead of a recurring fee, customers pay us a commission on sales to their users that come from our recommendations. This business model made our application architecture and infrastructure costs a key factor in our ability to turn a profit.
  3. Embrace constraints. In order to increase our development velocity and stay flexible, we decided to trade off control over our development stack and embrace constraints imposed by managed cloud services.

These three goals turned into our motto: "I would rather optimize my code than fundraise." By turning our business goals into a coding problem, we also had so much more fun. I hope you will too, as I recount how we did it.

Choosing a database: The Three Musketeers

The first stack we focused was the database layer. Since we wanted to build on top of managed services, we decided to go with Google Cloud Platform (GCP)—a best-in-class option when it comes to scaling, in our opinion.

But, unlike traditional databases, cloud databases are not general purpose. They are specialized. So we picked three separate databases for transactional, analytical and machine learning workloads. We chose:

  • Cloud Datastore for our transactional database, because it can support high number of writes. In our case, the user events are in the billions and are updated in real time into Cloud Datastore.
  • BigQuery to analyze user behaviour. For example, we understand from BigQuery that users coming from a fashion blog usually buy a specific type of formal shoes.
  • Vision API to analyze product images and categorize products. Since we work with e-commerce companies across different geographies, the product names and descriptions are in different languages, and categorizing products based on images is more efficient than text analysis. We use this data along with user behaviour data from BigQuery and Cloud Datastore to make product recommendations.

First take: the App Engine approach

Once we chose our databases, we moved on to selecting the front-end service to receive user events from e-commerce sites and update Cloud Datastore. We chose App Engine, since it is a managed service and scales well at our volumes. Once App Engine updates the user events in Cloud Datastore, we synchronized that data into BigQuery and our recommendation engine using Cloud Dataflow, another managed service that orchestrates different databases in real time (i.e., streaming mode).

This architecture powered the first version of our product. As our business grew, our customers started asking for new features. One feature request was to send alerts to users when the price of a product changed. So, in the second version, we began listening to price changes in our e-commerce sites and triggered events to send alerts. The product’s price is already recorded as a user event in Cloud Datastore, but to detect change:

  • We compare the price we receive in the user event with the product master and determine if there is a difference.
  • If there is a difference, we propagate it to the analytical and machine learning databases to trigger an alert and reflect that change in the product recommendation.

There are millions of user events every day. Comparing each user event data with product master increased the number of reads on our datastore dramatically. Since each Cloud Datastore read counts toward our GCP monthly bill, it increased our costs to an unsustainable level.

Take two: the Cloud Functions approach

To bring down our costs, we had two options for redesigning our system:

  • Use memcache to load the product master in memory and compare the price/stock for every user event. With this option, we had no guarantee that memcache would be able to hold so many products in memory. So, we might miss a price change and end up with inaccurate product prices.
  • Use Cloud Firestore to record user events and product data. Firestore has an option to trigger Cloud Functions whenever there’s a change in value of an entity. In our case, the price/stock change automatically triggers a cloud function that updates the analytical and machine learning databases.

During our redesign, Firestore and Cloud Functions were in alpha, but we decided to use them as it gave us a clean and simple architecture:

  • With Firestore, we replaced both App Engine and Datastore. Firestore was able to accept user requests directly from a browser without the need for a front-end service like App Engine. It also scaled well like Datastore.
  • We used Cloud Functions not only as a way to trigger price/stock alerts, but as an orchestration tool to synchronize data between Firestore, BigQuery and our recommendation engine.

It turned out to be a good decision, as Cloud Functions scaled extremely well, even in alpha. For example, we went from one to 20 million users on Black Friday. In this new architecture, Cloud Functions replaced Dataflow’s streaming functionality with triggers, while providing a more intuitive language (JavaScript) than Dataflow’s pipeline transformations. Eventually, Cloud Functions became the glue that tied all the components together.

What we gained

Thanks to the flexibility of our serverless microservice-oriented architecture, we were able to replace and upgrade components as the needs of our business evolved without redesigning the whole system. We achieved the key goal of being profitable by using the right set of managed services and keeping our infrastructure costs well below our revenue. And since we didn't have to manage any servers, we were also able to scale our business with a small engineering team and still sleep peacefully at night.

Additionally, we saw some great outcomes that we didn't initially anticipate:

  • We increased our sales commissions by improving recommendation accuracy

    The best thing that happened in this new version was the ability to A/B test new algorithms. For example, we found that users who browse e-commerce sites with an Android phone are more likely to buy products that are on sale. So, we included user’s device as a feature in the recommendation algorithm and tested it with a small sample set. Since, Cloud Functions are loosely coupled (with Cloud Pub/Sub), we could implement a new algorithm and redirect users based on their device and geography. Once the algorithm produced good results, we rolled it out to all users without taking down the system. With this approach, we were able to continuously improve the accuracy of our recommendations, increasing revenue.
  • We reduced costs by optimizing our algorithm

    As counter intuitive it may sound, we also found that paying more money for compute didn't improve accuracy. For example, we analyzed a month of a user’s events vs. the latest session’s events to predict what the user was likely to buy next. We found that the latest session was more accurate even though it had less data points. The simpler and more intuitive the algorithm, the better it performed. Since Cloud Functions are modular by design, we were able to refactor each module and reduce costs without losing accuracy.
  • We reduced our dependence on external IT teams and signed more customers 

    We work with large companies and depending on their IT team, it can take a long time to integrate our solution. Cloud Functions allowed us to implement configurable modules for each of our customers. For example, while working with French e-commerce companies, we had to translate the product details we receive in the user events into English. Since Cloud Functions supports Node.js, we enabled scriptable modules in JavaScript for each customer that allowed us to implement translation on our end, instead of waiting for the customer’s IT team. This reduced our go-live time from months to days, and we were able to sign up new customers who otherwise might not have been able to invest the necessary time and effort up-front.

Since Cloud Functions was alpha at the time, we did face challenges while implementing non-standard functionality such as running headless Chrome. In such cases, we fell back on App Engine flexible environment and Compute Engine. Over time though, the Cloud Functions product team moved most of our desired functionality back into the managed environment, simplifying maintenance and giving us more time to work on functionality.

Let a thousand flowers bloom

If there is one take away from this story, it is this: Running a bootstrapped startup that serves 100 million users with three developers was unheard of just five years ago. With the relentless pursuit of abstraction among cloud platforms, this has become a reality. Serverless computing is at the bleeding edge of this abstraction. Among the serverless computing products, I believe Cloud Functions has a leg up on its competition because it stands on the shoulders of GCP's data products and their near-infinite scale. By combining simplicity with scale, Cloud Functions is the glue that makes GCP greater than the sum of its parts.The day has come when a bootstrapped startup can build a large-scale application like Gmail or Salesforce. You just read one such story— now it’s your turn :)

Expanding our GPU portfolio with NVIDIA Tesla V100


Cloud-based hardware accelerators like Graphic Processing Units, or GPUs, are a great choice for computationally demanding workloads such as machine learning and high-performance computing (HPC). We strive to provide the widest selection of popular accelerators on Google Cloud to meet your needs for flexibility and cost. To that end, we’re excited to announce that NVIDIA Tesla V100 GPUs are now publicly available in beta on Compute Engine and Kubernetes Engine, and that NVIDIA Tesla P100 GPUs are now generally available.

Today’s most demanding workloads and industries require the fastest hardware accelerators. You can now select as many as eight NVIDIA Tesla V100 GPUs, 96 vCPU and 624GB of system memory in a single VM, receiving up to 1 petaflop of mixed precision hardware acceleration performance. The next generation of NVLink interconnects deliver up to 300GB/s of GPU-to-GPU bandwidth, 9X over PCIe, boosting performance on deep learning and HPC workloads by up to 40%. NVIDIA V100s are available immediately in the following regions: us-west1, us-central1 and europe-west4. Each V100 GPU is priced as low as $2.48 per hour for on-demand VMs and $1.24 per hour for Preemptible VMs. Like our other GPUs, the V100 is also billed by the second and Sustained Use Discounts apply.

Our customers often ask which GPU is the best for their CUDA-enabled computational workload. If you’re seeking a balance between price and performance, the NVIDIA Tesla P100 GPU is a good fit. You can select up to four P100 GPUs, 96 vCPUs and 624GB of memory per virtual machine. Further, the P100 is also now available in europe-west4 (Netherlands) in addition to us-west1, us-central1, us-east1, europe-west1 and asia-east1.

Our GPU portfolio offers a wide selection of performance and price options to help meet your needs. Rather than selecting a one-size-fits-all VM, you can attach our GPUs to custom VM shapes and take advantage of a wide selection of storage options, paying for only the resources you need.


Google Cloud GPU Type
VM Configuration Options
NVIDIA GPU
GPU Mem
GPU Hourly Price**
GPUs
vCPUs*
System Memory*
16GB
$2.48 Standard
$1.24 Preemptible
1,8
(2,4) coming in beta
1-96
1-624 GB
16GB
$1.46 Standard
$0.73 Preemptible
1,2,4
1-96
1-624 GB
12GB
$0.45 Standard
$0.22 Preemptible
1,2,4,8
1-64
1-416 GB

* Maximum vCPU count and system memory limit on the instance might be smaller depending on the zone or the number of GPUs selected.
** GPU prices listed as hourly rate, per GPU attached to a VM that are billed by the second. Pricing for attaching GPUs to preemptible VMs is different from pricing for attaching GPUs to non-preemptible VMs. Prices listed are for US regions. Prices for other regions may be different. Additional Sustained Use Discounts of up to 30% apply to GPU on-demand usage only.


Google Cloud makes managing GPU workloads easy for both VMs and containers. On Google Compute Engine, customers can use instance templates and managed instance groups to easily create and scale GPU infrastructure. You can also use NVIDIA V100s and our other GPU offerings in Kubernetes Engine, where Cluster Autoscaler helps provide flexibility by automatically creating nodes with GPUs, and scaling them down to zero when they are no longer in use. Together with Preemptible GPUs, both Compute Engine managed instance groups and Kubernetes Engine’s Autoscaler let you optimize your costs while simplifying infrastructure operations.

LeadStage, a marketing automation provider, is impressed with the value and scale of GPUs on Google Cloud.

"NVIDIA GPUs work great for complex Optical Character Recognition tasks on poor quality data sets. We use V100 and P100 GPUs on Google Compute Engine to convert millions of handwritten documents, survey drawings, and engineering drawings into machine-readable data. The ability to deploy thousands of Preemptible GPU instances in seconds was vastly superior to the capacity and cost of our previous GPU cloud provider." 
— Adam Seabrook, Chief Executive Officer, LeadStage
Chaos Group provides rendering solutions for visual effects, film, architectural, automotive design and media and entertainment, and is impressed with the speed of NVIDIA V100s on Google Cloud.

"V100 GPUs are great for running V-Ray Cloud rendering services. Among all possible hardware configurations that we've tested, V100 ranked #1 on our benchmarking platform. Thanks to V100 GPUs we can use cloud GPUs on-demand on Compute Engine to render our clients' jobs extremely fast."
— Boris Simandoff, Director of Engineering, Chaos Group
 If you have computationally demanding workloads, GPUs can be a real game-changer. Check our GPU page to learn more about how you can benefit from P100, V100 and other Google Cloud GPUs!

Kubernetes best practices: Organizing with Namespaces


Editor’s note: Today is the second installment in a seven-part video and blog series from Google Developer Advocate Sandeep Dinesh on how to get the most out of your Kubernetes environment. 

As you start to build more and more services on top of Kubernetes, simple tasks start to get more complicated. For example, teams can’t create Kubernetes Services or Deployments with the same name. If you have thousands of pods, just listing them all would take some time, let alone actually administering them! And these are just the tip of the iceberg.

In this episode of Kubernetes Best Practices, let’s take a look at how Kubernetes Namespaces can make managing your Kubernetes resources easier.


What is a Namespace?

You can think of a Namespace as a virtual cluster inside your Kubernetes cluster. You can have multiple namespaces inside a single Kubernetes cluster, and they are all logically isolated from each other. They can help you and your teams with organization, security, and even performance!

The “default” Namespace

In most Kubernetes distributions, the cluster comes out of the box with a Namespace called “default.” In fact, there are actually three namespaces that Kubernetes ships with: default, kube-system (used for Kubernetes components), and kube-public (used for public resources). kube-public isn’t really used for much right now, and it’s usually a good idea to leave kube-system alone, especially in a managed system like Google Kubernetes Engine. This leaves the default Namespace as the place where your services and apps are created.

There is absolutely nothing special about this Namespace, except that the Kubernetes tooling is set up out of the box to use this namespace and you can’t delete it. While it is great for getting started and for smaller production systems, I would recommend against using it in large production systems. This is because it is very easy for a team to accidentally overwrite or disrupt another service without even realizing it. Instead, create multiple namespaces and use them to segment your services into manageable chunks.

Creating Namespaces

Don’t be afraid to create namespaces. They don’t add a performance penalty, and in many cases can actually improve performance as the Kubernetes API will have a smaller set of objects to work with.

Creating a Namespace can be done with a single command. If you wanted to create a Namespace called ‘test’ you would run:

kubectl create namespace test
Or you can create a YAML file and apply it just like any other Kubernetes resource.

test.yaml:

kind: Namespace
apiVersion: v1
metadata:
  name: test
  labels:
    name: test
kubectl apply -f test.yaml

Viewing Namespaces

You can see all the Namespaces with the following command:

kubectl get namespace


You can see the three built-in Namespaces, as well as the new Namespace called ‘test.’

Creating Resources in the Namespace

Let’s take a look at a simple YAML to create a Pod:

apiVersion: v1
kind: Pod
metadata:
  name: mypod
  labels:
    name: mypod
spec:
  containers:
  - name: mypod
    image: nginx

You might notice that there is no mention of namespaces anywhere. If you run a `kubectl apply` on this file, it will create the Pod in the current active namespace. This will be the “default” namespace unless you change it.

There are two ways to explicitly tell Kubernetes in which Namespace you want to create your resources.

One way is to set the “namespace” flag when creating the resource:

kubectl apply -f pod.yaml --namespace=test

You can also specify a Namespace in the YAML declaration.

apiVersion: v1
kind: Pod
metadata:
  name: mypod
  namespace: test
  labels:
    name: mypod
spec:
  containers:
  - name: mypod
    image: nginx

If you specify a namespace in the YAML declaration, the resource will always be created in that namespace. If you try to use the “namespace” flag to set another namespace, the command will fail.

Viewing resources in the Namespace

If you try to find your Pod, you might notice you can’t!

$ kubectl get pods
No resources found.

This is because all commands are run against the currently active Namespace. To find your Pod, you need to use the “namespace” flag.

$ kubectl get pods --namespace=test
NAME      READY     STATUS    RESTARTS   AGE
mypod     1/1       Running   0          10s

This can get annoying quickly, especially if you are a developer working on a team that uses its own Namespace for everything and don’t want to use the “namespace” flag for every command. Let’s see how we can fix that.

Managing your active Namespace

Out of the box, your active namespace is the “default” namespace. Unless you specify a Namespace in the YAML, all Kubernetes commands will use the active Namespace.

Unfortunately, trying to manage your active Namespace with kubectl can be a pain. Fortunately, there is a really good tool called kubens (created by the wonderful Ahmet Alp Balkan) that makes it a breeze!

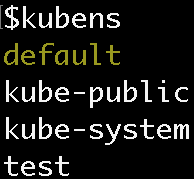
When you run the ‘kubens’ command, you should see all the namespaces, with the active namespace highlighted:


To switch your active namespace to the ‘test’ Namespace, run:

kubens test

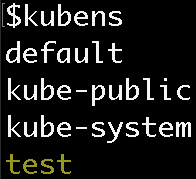
Now you can see that the ‘test’ Namespace is active:


Now, if you run kubectl commands, the Namespace will be ‘test’ instead of ‘default’! This means you don’t need the namespace flag to see the pod in the test namespace.

$ kubectl get pods
NAME      READY     STATUS    RESTARTS   AGE
mypod     1/1       Running   0          10m

Cross Namespace communication

Namespaces are “hidden” from each other, but they are not fully isolated by default. A service in one Namespace can talk to a service in another Namespace. This can often be very useful, for example to have your team’s service in your Namespace communicate with another team’s service in another Namespace.

When your app wants to access a Kubernetes sService, you can use the built-in DNS service discovery and just point your app at the Service’s name. However, you can create a service with the same name in multiple Namespaces! Thankfully, it’s easy to get around this by using the expanded form of the DNS address.

Services in Kubernetes expose their endpoint using a common DNS pattern. It looks like this:

<Service Aame>.<Namespace Name>.svc.cluster.local

Normally, you just need the Service’s name and DNS will automatically resolve to the full address. However, if you need to access a Service in another Namespace just use the Service name plus the Namespace name.

For example, if you want to connect to the “database” service in the “test” namespace, you can use the following address:

database.test


If you want to connect to the “database” service in the “production” namespace, you can use the following address:

database.production


Warning: If you create a Namespace that maps to a TLD like “com” or “org”, and then create a Service that has the same name as a website, like “google” or “reddit”, Kubernetes will intercept requests to “google.com” or “reddit.com” and send them to your Service. This can often be very useful for testing and proxying, but can also easily break things in your cluster!

Note: If you do want to isolate Namespaces, you should use Network Policies to accomplish this. Stay tuned for more on this in a future episode!

Namespace granularity

A common question I get is how many Namespaces to create and for what purpose. What exactly are manageable chunks? Create too many Namespaces and they get in your way, but make too few and you miss out on the benefits.

I think the answer lies in what stage your project or company is in—from small team, to mature enterprise, each has its own organizational structure. Depending on your situation, you can adopt the relevant Namespace strategy.

The small team

In this scenario, you are part of a small team that is working on 5-10 microservices and can easily bring everyone into the same room. In this situation, it makes sense to launch all production services into the “default” Namespace. You might want to have a “production” and “development” namespace if you want to get fancy, but you are probably testing your development environment on your local machine using something like Minikube.

Rapidly growing team(s)

In this scenario, you have a rapidly growing team that is working on 10+ microservices. You are starting to split the team into multiple sub-teams that each own their own microservices. While everyone might know how the complete system works, it is getting harder to coordinate every change with everyone else. Trying to spin up the full stack on your local machine is getting more complicated every day.

It is necessary at this point to use multiple clusters or namespaces for production and development. Each team may choose to have their own namespace for easier manageability.

The large company

In a large company, not everyone knows everyone else. Teams are working on features that other teams might not know about. Teams are using services contracts to communicate with other microservices (e.g., gRPC) and service meshes to coordinate communication (e.g., istio). Trying to run the whole stack locally is impossible. Using a Kubernetes-aware Continuous Delivery system (e.g., Spinnaker) is highly recommended.

At this point, each team definitely needs its own namespace. Each team might even opt for multiple namespaces to run its development and production environments. Setting up RBAC and ResourceQuotas is a good idea as well. Multiple clusters start to make a lot of sense, but might not be necessary.

Note: I’ll deep dive into gRPC, Istio, Spinnaker, RBAC, and resources in future episodes!

Enterprise

At this scale, there are groups that don’t even know about the existence of other groups. Groups might as well be external companies, and services are consumed through well-documented APIs. Each group has multiple teams that have multiple microservices. Using all the tools I mentioned above are necessary; people should not be deploying services by hand and should be locked out of Namespaces they don’t own.

At this point, it probably makes sense to have multiple clusters to reduce the blast radius of poorly configured applications, and to make billing and resource management easier.

Conclusion

Namespaces can help significantly with organizing your Kubernetes resources and can increase the velocity of your teams. Stay tuned for future Kubernetes Best Practices episodes where I’ll show you how you can lock down resources in a Namespace and introduce more security and isolation to your cluster!

Introducing Kubernetes Service Catalog and Google Cloud Platform Service Broker: find and connect services to your cloud-native apps


Kubernetes provides developers with an easy-to-use platform for building cloud-native applications, some of which need to use cloud-based services such as storage or messaging. In fact, there are whole catalogs of services that you may want to access from your cloud-native application, but setting them up and connecting to them from Kubernetes can be difficult and require specialized knowledge.

To make it easier to connect to Google Cloud Platform (GCP) services from either a GCP-hosted Kubernetes cluster or an on-premises Kubernetes cluster, we are releasing a new services framework: Kubernetes Service Catalog, a collection of services available to Kubernetes running on GCP, and the Google Cloud Platform Service Broker, a hosted service that connects to a variety of GCP services. These offerings are based on the Kubernetes Catalog SIG and the Open Service Broker API.

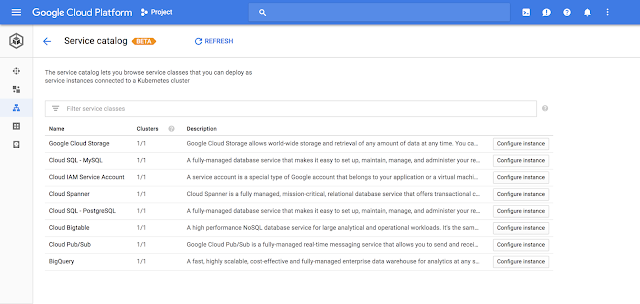
To begin working with Kubernetes Services Catalog, install it in an existing Kubernetes or Google Kubernetes Engine cluster. Kubernetes Service Catalog then uses the Service Broker to give you access to GCP services such as Cloud Pub/Sub, Google Cloud Storage, BigQuery, Cloud SQL and others.

This design makes it easy for you to use the environment that you are familiar with (i.e., the kubectl command line) to create service instances and connect to them. With two commands you can create the service instance and set the security policy to give you application access to the resource. You don’t need to know how to create or manage the services to use them in your application.


Based on open-source APIs, Kubernetes Service Catalog and the Service Broker give you access to a rich ecosystem of services to incorporate into your applications. Brokers for Cloud Foundry and other environments are already available.

This beta release allows you to focus on the services you need to get your job done without the hassle of knowing how the services are built or worrying about the infrastructure you need to run them. Support for the Kubernetes Service Catalog will be rolling out in the Google Cloud Console UI over the next few days. We’ll add more GCP services to the Service Broker as we move forward, opening up a whole new range of services for your applications.

For more information on how you can get started using GCP services from your Kubernetes cluster, visit the documentation.

Exploring container security: Running a tight ship with Kubernetes Engine 1.10


Editor’s note: This is the fifth in a series of blog posts on container security at Google.

It’s only been a few months since we last spoke about securing Google Kubernetes Engine, but a lot has changed since then. Our security team has been working to further harden Kubernetes Engine, so that you can deploy sensitive containerized applications on the platform with confidence. Today we’ll walk through the latest best practices for hardening your Kubernetes Engine cluster, with updates for new features in Kubernetes Engine versions 1.9 and 1.10.

1. Follow the steps in the previous hardening guide

This new hardening guide assumes you’ve already completed the previous one. So go ahead and run though that guide real quick, and head on back over here.

2. Service Accounts and Access Scopes

Next, you’ll need to think about service accounts and access control. We strive to set up Kubernetes Engine with usable but protected defaults. In Kubernetes Engine 1.7, we disabled the Kubernetes Dashboard (the web UI) by default, because it uses a highly privileged service account; and in 1.8, we disabled Attribute-Based Access Control (ABAC) by default, since Role-Based Access Control (RBAC) provides more complex permission management. Now, in Kubernetes Engine 1.10, new clusters will no longer have the compute-rw scope on node service accounts enabled by default, which reduces the blast radius of a potential node compromise. If a node were exploited, an attacker would not be able to use the service account to create new compute resources or read node metadata directly, which could be a path for privilege escalation.

If you’ve created a Kubernetes Engine cluster recently, you may have seen the following warning:


This means that if you have a special requirement to use the node’s service account to access storage or manipulate compute resources, you’ll need to explicitly include the required scopes when creating new clusters:

gcloud container clusters create example-cluster \
    --scopes=compute-rw,gke-default


If you’re like most people and don’t use these scopes, your new clusters are automatically created with the gke-default permissions.

3. Create good RBAC roles

In the Kubernetes Engine 1.8 hardening blog post, we made sure node service accounts were running with the minimum required permissions, but what about the accounts used by DevOps team(s), Cluster administrators, or security teams? They all need different levels of access to clusters, which should be kept as restricted as possible.

While Cloud IAM provides great user access management at the Google Cloud Platform (GCP) Project level, RBAC roles control access within each Kubernetes cluster. They work in concert to help you enforce strong access control.

A good RBAC role should give a user exactly the permissions they need, and no more. Here is how to create and grant a user permission to view pods only, for example:

```
PROJECT_ID=$(gcloud config get-value project)
PRIMARY_ACCOUNT=$(gcloud config get-value account)
# Specify your cluster name.
CLUSTER=cluster-1

# You may have to grant yourself permission to manage roles
kubectl create clusterrolebinding cluster-admin-binding \
   --clusterrole cluster-admin --user $PRIMARY_ACCOUNT

# Create an IAM service account for the user “gke-pod-reader”, which
we will allow to read pods 
gcloud iam service-accounts create gke-pod-reader \
    --display-name "GKE Pod Reader" \
    USER_EMAIL=gke-pod-reader@$PROJECT_ID.iam.gserviceaccount.com

cat > pod-reader-clusterrole.yaml<<EOF
kind: ClusterRole
apiVersion: rbac.authorization.k8s.io/v1
metadata:
  namespace: default
  name: pod-reader
rules:
- apiGroups: [""] # "" indicates the core API group
  resources: ["pods"]
  verbs: ["get", "watch", "list"]
EOF

kubectl create -f pod-reader-clusterrole.yaml

cat > pod-reader-clusterrolebinding.yaml<<EOF
kind: ClusterRoleBinding
apiVersion: rbac.authorization.k8s.io/v1
metadata:
  name: pod-reader-global
subjects:
- kind: User
  name: $USER_EMAIL
  apiGroup: rbac.authorization.k8s.io
roleRef:
  kind: ClusterRole
  name: pod-reader
  apiGroup: rbac.authorization.k8s.io
EOF

kubectl create -f pod-reader-clusterrolebinding.yaml

# Check the permissions of our Pod Reader user.
gcloud iam service-accounts keys create \
   --iam-account $USER_EMAIL pod-reader-key.json
gcloud container clusters get-credentials $CLUSTER
gcloud auth activate-service-account $USER_EMAIL \
   --key-file=pod-reader-key.json

# Our user can get/list all pods in the cluster.
kubectl get pods --all-namespaces

# But they can’t see the deployments, services, or nodes.
kubectl get deployments --all-namespaces
kubectl get services --all-namespaces
kubectl get nodes

# Reset gcloud and kubectl to your main user.
gcloud config set account $PRIMARY_ACCOUNT
gcloud container clusters get-credentials $CLUSTER
```


Check out the GCP documentation more information about how to configure RBAC.

4. Consider custom IAM roles

For most people, the predefined IAM roles available on Kubernetes Engine work great. If they meet your organization's needs then you’re good to go. If you need more fine-grained control, though, we also have the tools you need.

Custom IAM Roles let you define new roles, alongside the predefined ones, with the exact permissions your users require and no more.

5. Explore the cutting edge

We’ve launched a few new features to beta that we recommend turning on, at least in a test environment, to prepare for their general availability.

In order to use these beta features, you’ll need to enable the v1beta1 API on your cluster by running this command:

gcloud config set container/use_v1_api false

Conceal your host VM’s metadata Server [Beta]

Starting with the release of Kubernetes 1.9.3, Kubernetes Engine can conceal the Compute Engine metadata server from your running workloads, to prevent your workload from impersonating the node. Many practical attacks against Kubernetes rely on access to the node’s metadata server to extract the node’s identity document and token.

Constraining access to the underlying service account, by using least privilege service accounts as we did in the previous guide, is a good idea; preventing workloads from impersonating the node is even better. Note that containers running in your pods will still be able to access the non-sensitive data from the metadata server.

Follow these instructions to enable Metadata Concealment.

Enable and define a Pod Security Policy [beta]

Kubernetes offers many controls to restrict your workloads at the pod spec level to execute with only their minimum required capabilities. Pod Security Policy allows you to set smart defaults for your pods, and enforce controls you want to enable across your fleet. The policies you define should be specific to the needs of your application. If you’re not sure where to start, we recommend the restricted-psp.yaml in the kubernetes.io documentation for example policies. It’s pretty restrictive, but it’s a good place to start, and you can loosen the restrictions later as appropriate.

Follow these instructions to get started with Pod Security Policies.

6. Where to look for practical advice

If you’ve been following our blog series so far, hopefully you’ve already learned a lot about container security. For Kubernetes Engine, we’ve put together a new Overview of Kubernetes Engine Security, now published in our documentation, to guide you as you think through your security model. This page can act as a starting point to get a brief overview of the various security features and configurations that you can use to help ensure your clusters are following best practices. From that page, you can find links to more detailed guidance for each of the features and recommendations.

We’re working hard on many more Kubernetes Engine security features. To stay in the know, keep an eye on this blog for more security posts, and have a look at the Kubernetes Engine hardening guide for prescriptive guidance on how to bolster the security of your clusters.