Tag Archives: Android Pie

Improving app performance with ART optimizing profiles in the cloud

Posted by Calin Juravle, Software Engineer

In Android Pie we launched ART optimizing profiles in Play Cloud, a new optimization feature that greatly improves the application startup time after a new install or update. On average, we have observed that apps start 15% faster (cold startup) across a variety of devices. Some hero cases even show 30%+ faster startup times. One of the most important aspects is that users get this for free, without any effort from their side or from developers!

Source: Google internal data

ART optimizing profiles in Play Cloud

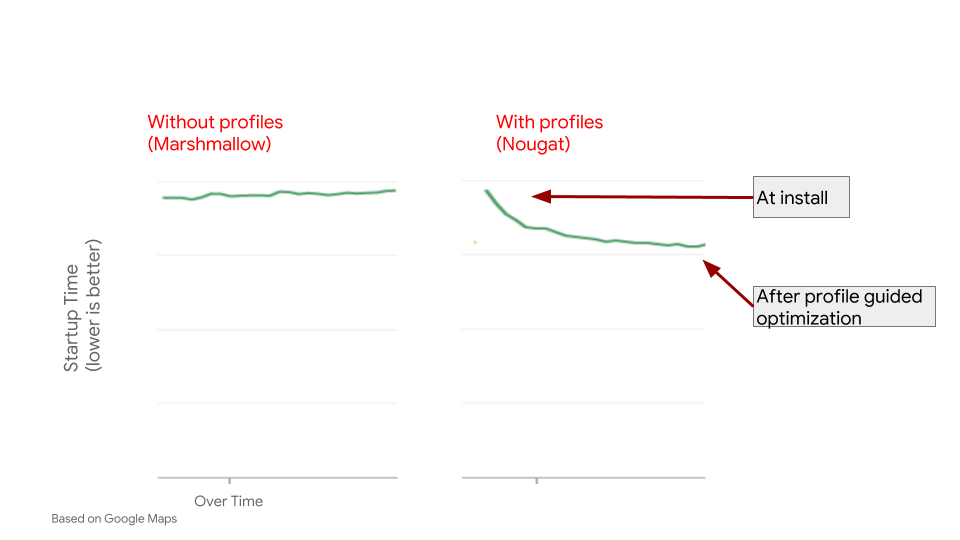
The feature builds on previous Profile Guided Optimization (PGO) work, which was introduced in Android 7.0 Nougat. PGO allows the Android Runtime to help improve an app's performance by building a profile of the app's most important hot code and focusing its optimization effort on it. This leads to big improvements while reducing the traditional memory and storage impact of a fully compiled app. However, it relies on the device to optimize apps based on these code profiles in idle maintenance mode, which means it could be a few days before a user sees the benefits - something we aimed to improve.

Source: Google internal data

ART optimizing profiles in Play Cloud leverages the power of Android Play to bring all PGO benefits at install/update time: most users can get great performance without waiting!

The idea relies on two key observations:

  1. Apps usually have many commonly used code paths (hot code) between a multitude of users and devices, e.g. classes used during startup or critical user paths. This can often be discovered by aggregating a few hundred data points.
  2. App developers often roll-out their apps incrementally, starting with alpha/beta channels before expanding to a wider audience. Even if there isn't an alpha/beta set, there is often a ramp-up of users to a new version of an app.

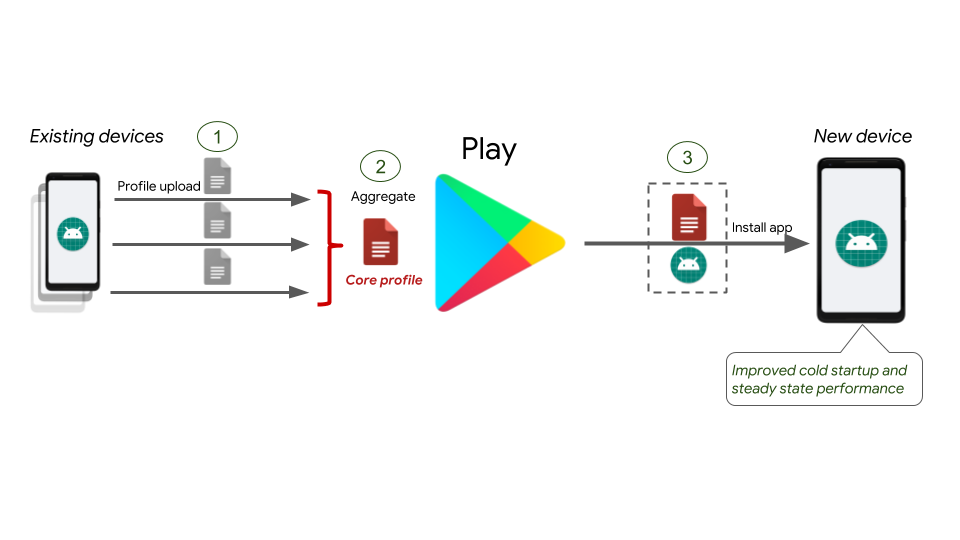
This means we can use the initial rollout of an app to bootstrap the performance for the rest of users. ART analyzes what part of the application code is worth optimizing on the initial devices, and then uploads the data to Play Cloud, which will build a core-aggregated code profile (containing information relevant to all devices). Once there is enough information, the code profile gets published and installed alongside the app's APKs.

On a device, the code profile acts as a seed, enabling efficient profile-guided optimization at install time. These optimizations help improve cold startup time and steady state performance, all without an app developer needing to write a single line of code.

Step 1: Building the code profile

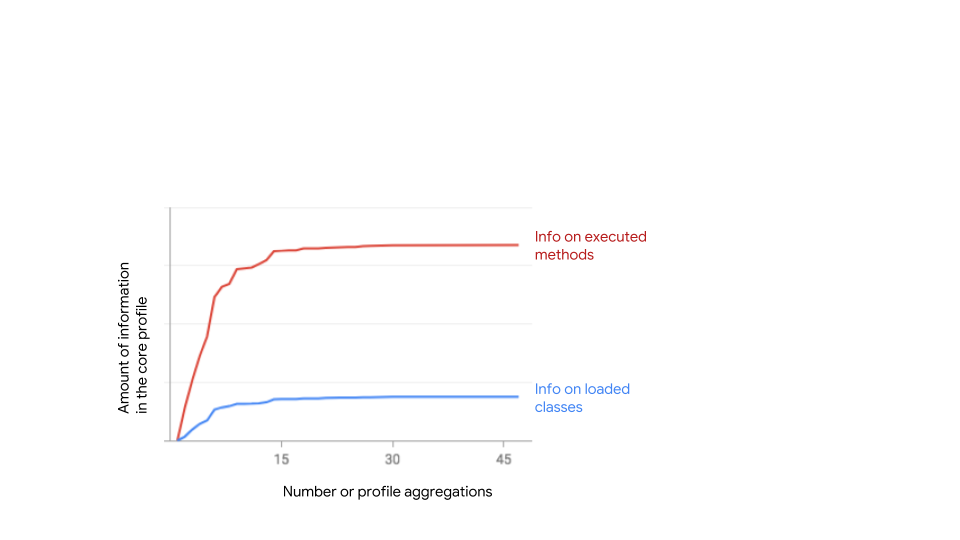
One of the main goals is to build a quality, stable code profile out of aggregated & anonymized data as fast as possible (to maximize the number of users that can benefit), while also making sure we have enough data to accurately optimize an app's performance. Sampling too much data takes up more bandwidth and time at installation. In addition, the longer we take to build the code profile, the fewer users get the benefits. Sampling too little data, and the code profile won't have enough information on what to properly optimize in order to make a difference.

The outcome of the aggregation is what we call a core code profile, which only contains anonymous data about the code that is frequently seen across a random sample of sessions per device. We remove outliers to ensure we focus on the code that matters for most users.

Experiments show that the most commonly used code paths can be calculated very quickly, over a small amount of time. That means we are able to build a code profile fast enough that the majority of users will benefit from.

*Data averaged from Google apps, Source: Google internal data

Step 2: Installing the code profile

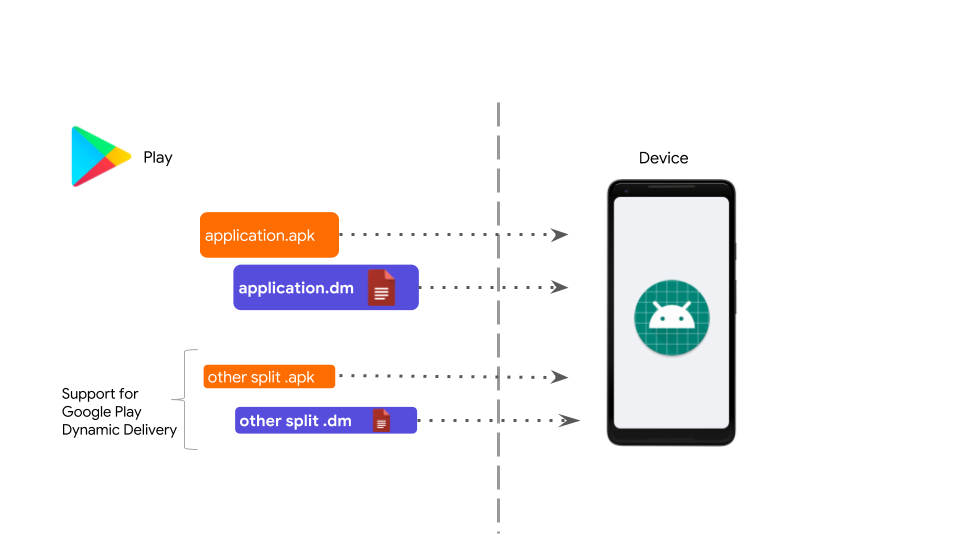
In Android 9.0 Pie, we introduced a new type of installation artifact: dex metadata files. Similar to the APKs, the dex metadata files are regular archives that contain data about how the APK should be optimized - like the core code profiles that have been built in the cloud. A key difference is that the dex metadata are managed solely by the platform and the app stores, and are not directly visible to developers.

There is also built-in support for App Bundles / Google Play Dynamic Delivery: without any developer intervention, all the app's feature splits are optimized.

Step 3: Using the code profiles to optimize performance

To understand how these code profiles achieve better performance, we need to look at their structure. Code profiles contain information about:

  • Classes loaded during startup
  • Hot methods that the runtime deemed worthy of optimizations
  • The layout of the code (e.g. code that executes during startup or post-startup)

Using this information, we use a variety of optimization techniques, out of which the following three provide most of the benefits:

  • App Images: We use the start up classes to build a pre-populated heap where the classes are pre-initialized (called an app image). When the application starts, we map the image directly into memory so that all the startup classes are readily available.
    • The benefit here is that the app's execution saves cycles since it doesn't need to do the work again, leading to a faster startup time.
  • Code pre-compilation: We pre-compile all the hot code. When the apps execute, the most important parts of the code are already optimized and ready to be natively executed. The app no longer needs to wait for the JIT compiler to kick in.
    • The benefit is that the code is mapped as clean memory (compared to the JIT dirty memory) which improves the overall memory efficiency. The clean memory can be released by the kernel when under memory pressure while the dirty memory cannot, lessening the chances that the kernel will kill the app.
  • More efficient dex layout: We reorganize the dex bytecode based on method information the profile exposes. The dex bytecode layout will look like: [startup code, post startup code, the rest of non profiled code].
    • The benefit of doing this is a much higher efficiency of loading the dex byte code in memory: The memory pages have a better occupancy, and since everything is together, we need to load less and we can do less I/O.

Improvements & Observations

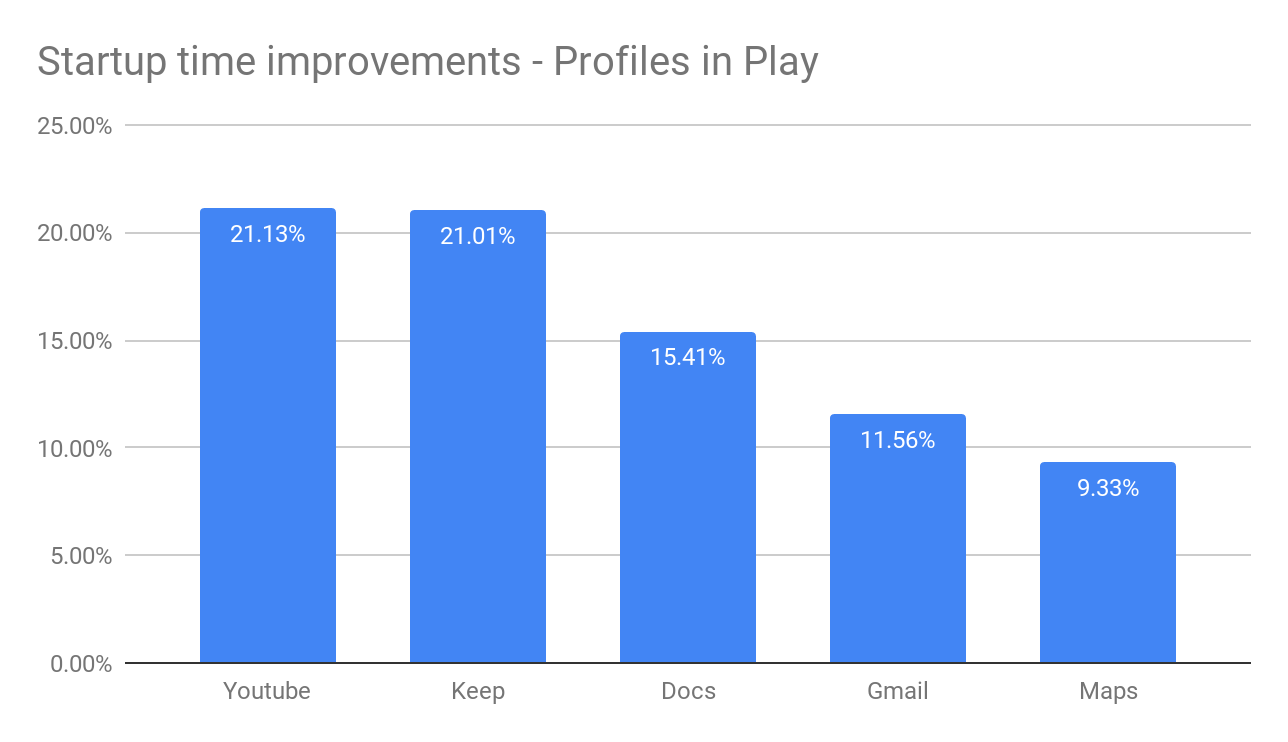
We rolled out profiles in the cloud to all apps on the playstore at the end of last year.

  • More than 30,000 apps have shown improvement
  • On average the cold startup is 15% faster across a variety of devices
    • with many top apps getting 20%+ (e.g. Youtube) or even 30% (e.g. Google Search) on selected devices.
  • 90%+ of the app installs on Android Pie get profiles
  • Little increase in install time for the extra optimization
  • Available to all Pie devices.

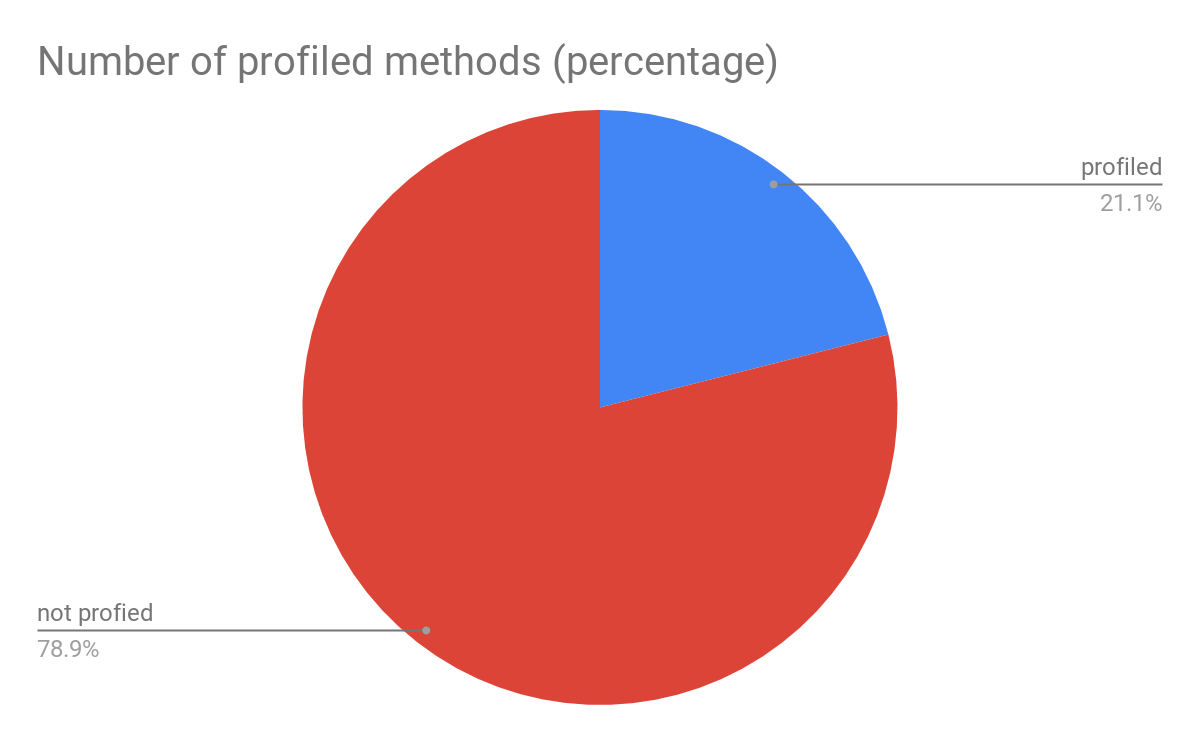
A very interesting observation is that, on average, ART profiles about 20% of the application methods (even less if we count the actual size of the code). For some apps, the profile covers only 2% of the code while for some the number goes up to 60%.

Source: Google internal data

Why is this an important observation? It means that the runtime has not seen a lot of the application code, and is thus not investing in the code's optimization. While there are a lot of valid use-cases where the code will not be executed (e.g. error handling or backwards compatibility code), this may also be due to unused features or unnecessary code. The skew distribution is a strong signal that the latter could play an important role in further optimizations (e.g. lowering APK size by removing unneeded dex bytecode).

Future Development

We're excited about the improvements that ART optimizing profiles has shown, and we'll be growing this concept more in the future. Building a profile of code per app opens opportunities for even more application improvements. Data can be used by developers to improve the app based on what's relevant and important for their end users. Using the information collected in Profiles, code can be re-organized or trimmed for better efficiency. Developers can potentially use App Bundles to split their features based on their use and avoid shipping unnecessary code to their users. We've already seen great improvements in app startup time, and hope to see additional benefits coming from profiles to make developer's lives easier while providing better experiences for our users.

Android Pie à la mode: Security & Privacy

Posted by Vikrant Nanda and René Mayrhofer, Android Security & Privacy Team

There is no better time to talk about Android dessert releases than the holidays because who doesn't love dessert? And what is one of our favorite desserts during the holiday season? Well, pie of course.

In all seriousness, pie is a great analogy because of how the various ingredients turn into multiple layers of goodness: right from the software crust on top to the hardware layer at the bottom. Read on for a summary of security and privacy features introduced in Android Pie this year.

Strengthening Android

Making Android more secure requires a combination of hardening the platform and advancing anti-exploitation techniques.

Platform hardening

With Android Pie, we updated File-Based Encryption to support external storage media (such as, expandable storage cards). We also introduced support for metadata encryption where hardware support is present. With filesystem metadata encryption, a single key present at boot time encrypts whatever content is not encrypted by file-based encryption (such as, directory layouts, file sizes, permissions, and creation/modification times).

Android Pie also introduced a BiometricPrompt API that apps can use to provide biometric authentication dialogs (such as, fingerprint prompt) on a device in a modality-agnostic fashion. This functionality creates a standardized look, feel, and placement for the dialog. This kind of standardization gives users more confidence that they're authenticating against a trusted biometric credential checker.

New protections and test cases for the Application Sandbox help ensure all non-privileged apps targeting Android Pie (and all future releases of Android) run in stronger SELinux sandboxes. By providing per-app cryptographic authentication to the sandbox, this protection improves app separation, prevents overriding safe defaults, and (most significantly) prevents apps from making their data widely accessible.

Anti-exploitation improvements

With Android Pie, we expanded our compiler-based security mitigations, which instrument runtime operations to fail safely when undefined behavior occurs.

Control Flow Integrity (CFI) is a security mechanism that disallows changes to the original control flow graph of compiled code. In Android Pie, it has been enabled by default within the media frameworks and other security-critical components, such as for Near Field Communication (NFC) and Bluetooth protocols. We also implemented support for CFI in the Android common kernel, continuing our efforts to harden the kernel in previous Android releases.

Integer Overflow Sanitization is a security technique used to mitigate memory corruption and information disclosure vulnerabilities caused by integer operations. We've expanded our use of Integer Overflow sanitizers by enabling their use in libraries where complex untrusted input is processed or where security vulnerabilities have been reported.

Continued investment in hardware-backed security

One of the highlights of Android Pie is Android Protected Confirmation, the first major mobile OS API that leverages a hardware-protected user interface (Trusted UI) to perform critical transactions completely outside the main mobile operating system. Developers can use this API to display a trusted UI prompt to the user, requesting approval via a physical protected input (such as, a button on the device). The resulting cryptographically signed statement allows the relying party to reaffirm that the user would like to complete a sensitive transaction through their app.

We also introduced support for a new Keystore type that provides stronger protection for private keys by leveraging tamper-resistant hardware with dedicated CPU, RAM, and flash memory. StrongBox Keymaster is an implementation of the Keymaster hardware abstraction layer (HAL) that resides in a hardware security module. This module is designed and required to have its own processor, secure storage, True Random Number Generator (TRNG), side-channel resistance, and tamper-resistant packaging.

Other Keystore features (as part of Keymaster 4) include Keyguard-bound keys, Secure Key Import, 3DES support, and version binding. Keyguard-bound keys enable use restriction so as to protect sensitive information. Secure Key Import facilitates secure key use while protecting key material from the application or operating system. You can read more about these features in our recent blog post as well as the accompanying release notes.

Enhancing user privacy

User privacy has been boosted with several behavior changes, such as limiting the access background apps have to the camera, microphone, and device sensors. New permission rules and permission groups have been created for phone calls, phone state, and Wi-Fi scans, as well as restrictions around information retrieved from Wi-Fi scans. We have also added associated MAC address randomization, so that a device can use a different network address when connecting to a Wi-Fi network.

On top of that, Android Pie added support for encrypting Android backups with the user's screen lock secret (that is, PIN, pattern, or password). By design, this means that an attacker would not be able to access a user's backed-up application data without specifically knowing their passcode. Auto backup for apps has been enhanced by providing developers a way to specify conditions under which their app's data is excluded from auto backup. For example, Android Pie introduces a new flag to determine whether a user's backup is client-side encrypted.

As part of a larger effort to move all web traffic away from cleartext (unencrypted HTTP) and towards being secured with TLS (HTTPS), we changed the defaults for Network Security Configuration to block all cleartext traffic. We're protecting users with TLS by default, unless you explicitly opt-in to cleartext for specific domains. Android Pie also adds built-in support for DNS over TLS, automatically upgrading DNS queries to TLS if a network's DNS server supports it. This protects information about IP addresses visited from being sniffed or intercepted on the network level.

We believe that the features described in this post advance the security and privacy posture of Android, but you don't have to take our word for it. Year after year our continued efforts are demonstrably resulting in better protection as evidenced by increasing exploit difficulty and independent mobile security ratings. Now go and enjoy some actual pie while we get back to preparing the next Android dessert release!

Acknowledgements: This post leveraged contributions from Chad Brubaker, Janis Danisevskis, Giles Hogben, Troy Kensinger, Ivan Lozano, Vishwath Mohan, Frank Salim, Sami Tolvanen, Lilian Young, and Shawn Willden.

Effective foreground services on Android

Posted by Keith Smyth

This is the fourth in a series of blog posts in which outline strategies and guidance in Android with regard to power.

A process is not forever

Android is a mobile operating system designed to work with constrained memory and battery. For this reason, a typical Android application can have its process killed by the system to recover memory. The process being killed is chosen based on a ranking system of how important that process is to the user at the time. Here, in descending order, is the ranking of each class of process. The higher the rank, the less likely that process is to be killed.

Native Native Linux daemon processes are responsible for running everything (including the process killer itself).
System The system_server process, which is responsible for maintaining this list.
Persistent apps Persistent apps like Phone, Wi-Fi, and Bluetooth are crucial to keeping your device connected and able to provide its most basic features.
Foreground app A foregrounded / top (user visible) app is the app a user is currently using.
Perceptible apps These are apps that the user can perceive are running. For example an app with a foreground service playing audio, or an app set as the preferred voice interaction service will be bound to the system_server, effectively promoting it to Perceptible level.
Service Background services like download manager and sync manager.
Home The Launcher app containing desktop wallpaper
Previous app The previous foreground app the user was using. The previous app lives above the cached apps as it's the most likely app the user will switch to next.
Cached apps These are the remaining apps that have been opened by the user, and then backgrounded. They will be killed first to recover memory, and have the most restrictions applied to them on modern releases. You can read about them on the Behavior Changes pages for Nougat, Oreo and Pie.


The foreground service

There is nothing wrong with becoming a cached app: Sharing the user's device is part of the lifecycle that every app developer must accept to keep a happy ecosystem. On a device with a dead battery, 100% of the apps go unused. And an app blamed for killing the battery could even be uninstalled.

However, there are valid scenarios to promote your app to the foreground: The prerequisites for using a foreground service are that your app is executing a task that is immediate, important (must complete), is perceptible to the user (most often because it was started by the user), and must have a well defined start and finish. If a task in your app meets these criteria, then it can be promoted to the foreground until the task is complete.

There are some guidelines around creating and managing foreground services. For all API levels, a persistent notification with at least PRIORITY_LOW must be shown while the service is created. When targeting API 26+ you will also need to set the notification channel to at least IMPORTANCE_LOW. The notification must have a way for the user to cancel the work, this cancellation can be tied to the action itself: for example, stopping a music track can also stop the music-playback service. Last, the title and description of the foreground service notification must show an accurate description of what the foreground service is doing.

To read more about foreground services, including several important updates in recent releases, see Running a service in the foreground

Foreground service use cases

Some good example usages of foreground services are playing music, completing a purchase transaction, high-accuracy location tracking for exercise, and logging sensor data for sleep. The user will initiate all of these activities, they must happen immediately, have an explicit beginning and end, and all can be cancelled by the user at any time.

Another good use case for a foreground service is to ensure that critical, immediate tasks (e.g. saving a photo, sending a message, processing a purchase) are completed if the user switches away from the application and starts a new one. If the device is under high memory pressure it could kill the previous app while it is still processing causing data loss or unexpected behavior. An elegantly written app will detect being backgrounded and respond by promoting its short, critical task to the foreground to complete.

If you feel you need your foreground service to stay alive permanently, then this is an indicator that a foreground service is not the right answer. Many alternatives exist to both meet the requirements of your use case, and be the most efficient with power.

Alternatives

Passive location tracking is a bad use case for foreground services. If the user has consented to being tracked, use the FusedLocationProvider API to receive bundled location updates at longer intervals, or use the geofencing API to be efficiently notified when a user enters or leaves a specified area. Read more about how to optimize location for battery.

If you wish to pair with a Bluetooth companion device, use CompanionDeviceManager. For reconnecting to the device, BluetoothLeScanner has a startScan method that takes a PendingIntent that will fire when a narrow filter is met.

If your app has work that must be done, but does not have to happen immediately: WorkManager or JobScheduler will schedule the work for the best time for the entire system. If the work must be started immediately, but then can stop if the user stops using the app, we recommend ThreadPools or Kotlin Coroutines.

DownloadManager facilitates handling long running downloads in the background. It will even handle retries over poor connections and system reboots for you.

If you believe you have a use case that isn't handled let us know!

Conclusion

Used correctly, the foreground service is a great way to tell Android that your app is doing something important to the user. Making the right decision on which tool to use remains the best way to provide a premium experience on Android for all users. Use the community and Google to help with these important decisions, and always respect the user first.

Modern background execution in Android

Posted by Luiz Gustavo Martins, Partner Developer Advocate, Partner DevRel

This is the third in a series of blog posts in which outline strategies and guidance in Android with regard to power.

Over the years, executing background tasks on Android has evolved. To write modern apps, it's important to learn how to run your background tasks in modern fashion.

When is an app in the background?

Before understanding what background execution is, we need to have a clear view of when Android understands an app to be in the foreground. An app is considered to be in the foreground if any of the following is true:

If none of those conditions is true, the app is considered to be in the background.

Background execution changes

Running tasks in the background consumes a device's limited resources, like RAM and battery. This might result in a bad user experience. For example, background tasks may degrade the battery life of the device or the user may experience poor device performance at times such as watching a video, playing a game, using the camera.

To improve battery life and give a better user experience, Android has evolved over several releases to establish limits on background execution. These limits include:

Use cases and solutions

Deciding which tools to use to implement background execution requires the developer to have a clear understanding of what they want to accomplish, and under which restrictions. This flowchart can help you make a decision:

  • WorkManager is the recommended solution for background execution, taking into account all OS background execution limits. If you need to guarantee that a task will run even if it is deferred, you should use WorkManager. This API allows you to schedule jobs (one-off or repeating) and chain and combine jobs. You can also apply execution constraints to them such as triggering when the device is idle or charging, or executing when a content provider changes.

    One example is if you need to compress logs to upload them to your server. To do this you can create two work requests:

    • First: compress the file. On this step you may add the constraint that the device should be charging.
    • Second: upload it to the server. For this request you should add a network connectivity constraint so that the work only gets triggered when you have a valid connection.

    After enqueuing both tasks, WorkManager will take care of executing them when your app has access to the resources you need.

    Another nice feature of WorkManager is that it respects power-management features, so that if a job is scheduled to run at a defined time and the device is in Doze at that time, WorkManager will try to run the task during a maintenance window if the constraints are met or after Doze is lifted.

  • If a long-running task is to be scheduled in response to an external event like syncing for new online content, use Firebase Cloud Messaging to notify your app and then create a work request with WorkManager to sync the content. You can learn more about this in "Notifying your users with FCM".
  • If the app needs to complete a user-initiated task without deferring even if the user leaves the app or turns off the screen, such as in the case of music/video playback or navigation, you should use a Foreground service. (The next blog post in this series dives deeper into this use case.)
  • If you need to run a task at an exact time that triggers actions, involves user interactions, and cannot be deferred, use AlarmManager (more specifically the method setExactAndAllowWhileIdle). Examples of time alarms include:
    • a reminder to take medicine
    • a notification that a TV show is about to start.

    When the alarm is triggered, you have very few seconds to finish the work and your app may not have access to the network (for example during Doze or due to App Standby buckets). If you really need network or to do a long task, use WorkManager. Every time a wakeup alarm is triggered, the device comes out of low-power mode and holds a partial wake lock which can significantly impact the battery life over time. This can be monitored via excessive wakeups stats highlighted on Android Vitals, provided via Google Play Console.

In Summary:

Use Case Examples Solution
Guaranteed execution of deferrable work
  • Upload logs to your server
  • Encrypt/Decrypt content to upload/download
WorkManager
A task initiated in response to an external event
  • Syncing new online content like email
FCM + WorkManager
Continue user-initiated work that needs to run immediately even if the user leaves the app
  • Music player
  • Tracking activity
  • Transit navigation
Foreground Service
Trigger actions that involve user interactions, like notifications at an exact time.
  • Alarm clock
  • Medicine reminder
  • Notification about a TV show that is about to start
AlarmManager

Use background execution judiciously so that you can build cool apps that delight users while saving their battery. If you need more information on executing background tasks on Android, there's great content at the Android developer site.

Note: WorkManager is still in public preview. If you need an alternative solution right now, you should use JobScheduler, although it has limitations that don't apply to WorkManager. JobScheduler is part of the Android Framework, and only available for Android API 21 and above; WorkManager works on API 14 and above.

Acknowledgements: This series of blog posts is produced in collaboration between the Android Framework and DevRel teams

Notifying your users with FCM

Posted by Jingyu Shi, Developer Advocate, Partner Devrel

This is the second in a series of blog posts in which outline strategies and guidance in Android with regard to power.

Notifications are a powerful channel you can use to keep your app's users connected and updated. Android provides Notification APIs to create and post notifications on the device, but quite often these notifications are triggered by external events and sent to your app from your app server.

In this blog post, we'll explain when and how to generate these remote notifications to provide timely updates to users and minimize battery drain.

Use FCM for remote notifications

We recommend using Firebase Cloud Messaging (FCM) to send remote notifications to Android devices. FCM is a free, cross-platform messaging solution that reliably delivers hundreds of billions of messages per day. It is primarily used to send remote notifications and to notify client applications that data is available to sync. If you still use Google Cloud Messaging (GCM) or the C2DM library , both of which are deprecated, it's time to upgrade to FCM!

There are two types of FCM messages you can choose from:

  • Notification Messages, which simplify notification handling and are high priority by default.
  • Data Messages, for when you want to handle the FCM messages within the client app.

You can set the priority to either high or normal on the data messages. You can find out more about FCM messages and message handling in this blog post on Firebase Blog.

FCM is optimized to work with Android power management features. Using the appropriate message priority and type helps you reach your users in a timely manner, and also helps save their battery. Learn more about power management features in this blog post: "Moar Power in P and the future".

To notify or not?

All of the notifications that you send should be well-structured and actionable, as well as provide timely and relevant information to your users. We recommend that you follow these notification guidelines, and avoid spamming your users. No one wants to be distracted by irrelevant or poorly-structured notifications. If your app behaves like this, your users may block the notifications or even uninstall your app.

The When not to use a notification section of the Material Design documentation for notifications highlights cases where you should not send your user a notification. For example, a common use case for a normal priority FCM Data Message is to tell the app when there's content ready for sync, which requires no user interaction. The sync should happen quietly in the background, with no need for a notification, and you can use the WorkManager1 or JobScheduler API to schedule the sync.

Post a notification first

If you are sending remote notifications, you should always post the notification as soon as possible upon receiving the FCM message. Adding any additional network requests before posting a notification will lead to delayed notifications for some of your users. When not handled properly, the notifications might not be seen at all, see the "avoid background service" section below.


⚠️ Avoid adding any additional network requests before posting a notification

Also keep in mind that, depending on the state of the device, user actions, and app behavior, one or many power saving features could be restricting your app's background work. As a result, your app's jobs and alarms might be delayed, and its ability to access the network might be restricted.

For all of these reasons, to ensure timely delivery of the notification, you should always show the notification promptly when the FCM message is received, before any other work like network fetch or scheduling jobs.

FCM message payload is your friend

To post a notification upon the receipt of an FCM message, you should include all the data needed for the notification in the FCM message payload.

The same applies to data sync--we recommend that your app send as much data as possible in the FCM payload and, if needed, load the remainder of the data when the app opens. On a well-performing network, there's a good chance that the data will be synced by the time the user opens the app so the spinner won't be shown to the user. If network connectivity is not good, a notification will be sent to the user with the content in the FCM payload to inform the user in a timely manner. The user can then open the app to load all the data.

You can also encrypt FCM messages end-to-end using libraries like Capillary. The image below shows a general flow of how to handle FCM messages.

Need more data?

As convenient as FCM message payload is, it comes with a 4KB maximum limit. If you need to send a rich notification with an image attachment, or you want to improve your user experience by keeping your app in sync with media content, you may need more than the 4KB payload limit. For this, we recommend using FCM messages in combination with the WorkManager 1 or JobScheduler API.

If you need to post a rich notification, we recommend posting the notification first, with some of the content in the FCM message. Then schedule a job to fetch the remainder of the content. Once the job is finished, update the notification if it is still active. For example, you can include a thumbnail or preview of the content in the FCM payload and post it in the notification first. Then schedule a job to fetch the rest of the media files. Be aware that if you've scheduled jobs from the FCM message handler, it is possible that when the user launches the app, the scheduled job won't have finished yet. You should handle this case gracefully.

In short, use the data in the FCM message payload to post a notification and keep your app content updated first. If you still need more data, then schedule jobs with APIs like WorkManager 1 or JobScheduler API.

Avoid background services

One common pitfall is using a background service to fetch data in the FCM message handler, since background service will be stopped by the system per recent changes to Google Play Policy (Starting late 2018, Google Play will require a minimum target API level ).

Android 9 Pie will also impose background execution limits when battery saver is on. Starting a background service will lead to IllegalStateException from a normal priority FCM message. High priority messages do grant you a short whitelist window that allows you to start a background service. However, starting a background service with a network call will put the service at risk of getting terminated by the system, because the short execution window is only intended to be used for posting a notification.

You should avoid using background services but use WorkManager 1 or JobScheduler API instead to perform operations in the background.

Power & message priority

Android 6 Marshmallow introduced Doze. FCM is optimized to work with Doze, and you can use high priority FCM messages to notify your users immediately. In Doze mode, normal priority messages are deferred to a maintenance window. This enables the system to save battery when a device is idle, but still ensure users receive time-critical notifications. Consider an instant messaging app that sends users messages from friends or incoming phone calls or a home monitoring app sends users alarm notifications. These are some of the acceptable examples where you can use high priority FCM messages.

In addition, Android 9 Pie introduced App Standby Buckets and App Restrictions.

The table below shows how various power-management features affect message delivery behaviors.

High priority message delivery Normal priority message delivery
App in Foreground Immediate, unless app is restricted (see below) Immediate, unless app is restricted (see below)
App in Background
Device in Doze (M+) and Doze "on the go" (N+) Immediate Deferred until maintenance window
App Standby Buckets (P+) May be restricted No restriction
App Restrictions (P+) All messages dropped (see below) All messages dropped (see below)
Battery Saver No restriction No restriction


★ Note: Starting January 2019, App Restrictions (in Battery Setting) will include restrictions on FCM messages. You can find out if your app is in the restricted state with the isBackgroundRestricted API. Once your app is in the restricted state, no FCM messages will be delivered to the app at all. This will apply to both high and normal priority FCM messages and when app is in either foreground or background.

App Standby Buckets impose different levels of restrictions based on the app's standby bucket. Based on which bucket your app belongs to, there might be a cap for the number of high priority messages you are allowed to send per day. Once you reach the cap, any subsequent high priority messages will be downgraded to normal priority. See more details in the power management restrictions.

High priority FCM messages are designed to send remote notifications or trigger actions that involve user interactions. As long as you always use high priority messages for these purposes, your high priority messages will be delivered immediately and remote notifications will be displayed without delay. In addition, when a notification from a high priority message causes a user to open your app, the app gets promoted to the active bucket, which exempts it from FCM caps. The example below shows an instant messaging app moving to the active bucket after the user taps on a notification triggered by a high priority FCM message.

However, if you use high priority messages to send notifications to the blocked notification channels or tasks which do not involve user interactions, you will run the risk of wasting the high priority messages allocated in your app's bucket. Once reaching the cap, you won't be able to send urgent notifications anymore.

In summary, you should only use high priority FCM messages to deliver immediate, time-critical notifications to users. Doing so will ensure these messages and subsequent high priority messages reach your users without getting downgraded. You should use normal priority messages to trigger events that do not require immediate execution, such as a notification that is not time-sensitive or a data sync in the background.

Test with Android 9!

We highly recommend that you test your apps under all of the power management features mentioned above. To learn more about handling FCM messages on Android in your code, visit the Firebase blog.

Thank you for helping move the ecosystem forward, making better Android apps, and saving users' batteries!

Acknowledgements: This blog posts is in joint collaboration with FCM and Android teams.

1 WorkManager is the recommended solution for background processing once it's stable.

Moar Power in Android 9 Pie and the future

Posted by Madan Ankapura, Product Manager, Android

This is the first in a series of blog posts that outline strategies and guidance in Android with regard to power.

Your users care a lot about battery -- if it runs out too quickly, it means they can't use your apps. Being a good steward of battery power is an important part of your relationship with the user, and we're continuing to add features to the platform that can help you accomplish this.

As part of our announced Play policy about improving app security and performance, an app's target API level must be no more than one year older than the current Android release. Keeping the target API level current will ensure that apps can take advantage of security and performance enhancements offered in the latest platform releases. When you update your app's target API level, it's important that you evaluate your background and foreground needs, which could have a significant impact on power & performance.

Past releases of Android included a number of features that helped manage battery life better, like:

  • Job Scheduler in Android 5.0 Lollipop, which allows deferring work
  • Doze and App Standby in Android 6.0 Marshmallow, which disables network access and suspends syncs and background work - when device or apps are unused for a prolonged period.
  • Doze improvements in Android 7.0 Nougat, which applies a subset of Doze restrictions when the screen is off and not stationary.
  • Background limits in Android 8.0 Oreo, which prevent background services and throttle location updates.

In Android 9 Pie, we made further improvements based on these three principles:

  1. Developers want to build cool apps
  2. Apps need to be power-efficient
  3. Users don't want to be bothered to configure app settings

This means that the OS needs to be smarter and adapt to user preferences while improving the battery life of the device. To address these needs, we have introduced App Standby Buckets, Background Restrictions, and improved Battery Saver. Please test your app with these features enabled on a device running Android 9 Pie.

Battery Saver and Doze operate on a device-wide level, while Adaptive Battery (app standby buckets powered by a Deepmind ML model) and background restrictions operate on a per-app basis. The diagram below helps understand when a scheduled work will run.

As you update your apps to target Oreo or above, please review this checklist and follow the below table for background work

Currently Using Porting to Oreo
JobScheduler JobScheduler
Firebase JobDispatcher Firebase JobDispatcher
Background Service Jobscheduler
Foreground Service Foreground Service with action to STOP service

Note: when the WorkManager API becomes stable, we will be recommending WorkManager for most of these use cases

We recommend the following strategy given the importance for app developers to invest in the right design patterns and architecture:

  1. Do the needed work when the user is actively using the app
  2. Make any work/task that is done in the background deferrable
  3. Use foreground services but provide an action in the notification so user can stop the foreground service

Similarly, other OS primitives like alarms, network, and FCM messages also have constraints that are described in the developer documentation on power-management restrictions. You can learn more about each of these features via Google I/O presentation, DevByte and additional power optimization developer documentation.

We will be publishing a series of design pattern guidances in the upcoming weeks. Stay tuned.

Acknowledgements: This series of blog posts is in joint collaboration with Android Framework and DevRel teams.

Android Pie SDK is now more Kotlin-friendly

Posted by James Lau, Product Manager (@jmslau)

When using the Java programming language, one of the most common pitfalls is trying to access a member of a null reference, causing a NullPointerException to be thrown. Kotlin offers protection against this by baking nullable and non-nullable types into the type system. This helps eliminate NullPointerExceptions from your code and improve your app's overall quality. When Kotlin code is calling into APIs written in the Java programming language, it relies on nullability annotations in those APIs to determine the nullability of each parameter and the return type. Unannotated parameters and return types are treated as platform types, which weakens the null-safety guarantee of Kotlin.

As part of yesterday's Android 9 announcement, we have also released a new Android SDK that contains nullability annotations for some of the most frequently used APIs. This will preserve the null-safety guarantee when your Kotlin code is calling into any annotated APIs in the SDK. Even if you are using the Java programming language, you can still benefit from these annotations by using Android Studio to catch nullability contract violations.

Not a breaking change

Normally, nullability contract violations in Kotlin result in compilation errors. But to ensure the newly annotated APIs are compatible with your existing code, we are using an internal mechanism provided by the Kotlin compiler team to mark the APIs as recently annotated. Recently annotated APIs will result only in warnings instead of errors from the Kotlin compiler. You will need to use Kotlin 1.2.60 or later.

Our plan is to have newly added nullability annotations produce warnings only, and increase the severity level to errors starting in the following year's Android SDK. The goal is to provide you with sufficient time to update your code.

How to use the "Kotlin-friendly" SDK

To get started, go to Tools > SDK Manager in Android Studio. Select Android SDK on the left menu, and make sure the SDK Platforms tab is open.

Use SDK Manager in Android Studio to install SDK for API Level 28 Revision 6

Check Android 8.+ (P) and click OK. This will install the Android SDK Platform 28 revision 6 if it is not already installed. After that, set your project's compile SDK version to API 28 to start using the new Android Pie SDK with nullability annotations.

Use the Project Structure Dialog to change your project's Compile Sdk Version to API 28

You may also need to update your Kotlin plugin in Android Studio if it's not already up-to-date. Make sure your Kotlin plugin version is 1.2.60 or later by going to Tools > Kotlin > Configure Kotlin Plugin Updates.

Once it's set up, your builds will start showing warnings if you have any code that violates nullability contracts in the Android SDK. An example of such a warning is shown below.

Sample warning from the Kotlin compiler when code violates a recently added nullability contract in the Android SDK.

You will also start seeing warnings in Android Studio's code editor if you call an Android API with the incorrect nullability. An example is shown below.

Android Studio warning about passing a null reference to a parameter annotated as a recently non-null type in the android.graphics.Path API.

Leveraging nullability annotations from the Java programming language

You can benefit from the new nullability annotations even if your code is in the Java programming language. By default, Android Studio will highlight any nullability contract violations with a warning, like the one below:

Android Studio showing a warning about nullability contract violation in code written in the Java programming language

To ensure that you have this inspection enabled, you can go to the IDE's settings page and search for "Constant conditions & exceptions" inspection and make sure that item is checked.

Use the Inspections page under Settings to ensure the Constant conditions & exceptions code inspection is enabled.

If you are using the Java programming language, nullability contract violations will not produce any compiler warning or error. Only the in-IDE code inspections are available to flag these issues.

You can also run code inspections across your entire project and see the aggregated results. Click on Analyze > Inspect Code… to start.

What's Next

The Android SDK API surface is very large, and we have only annotated a small percentage of the APIs so far - there is still lots of work remaining. Over the next several Android SDK releases, we will continue to add nullability annotations to the existing Android APIs, as well as making sure new APIs are annotated.

With the "Kotlin-friendly" Android SDK, the nullability annotations in AndroidX (part of the Jetpack family), and Android KTX, we are continuing to improve the Android APIs for developers using Kotlin. If you have not yet tried Kotlin, we encourage you to try it. Not only can Kotlin make your code more concise, it can also improve the stability of your apps.

Happy Kotlin-ing!

Android 9 Pie: Powered by AI for a smarter, simpler experience that adapts to you

https://lh6.googleusercontent.com/bKLmlK_9gXQcA9G0PhSyp2lCZ282r8irBHlyVflIjPCSl6D0wX0aaQGfTHYUoAqxzkFDvbZcveXcCjBIs7it2wEcjbPglWoDAMJH88btu7O_isbZM5VUdZPLfpDQFSz_Fy0EOl7N
The latest and greatest release of Android is officially here! Android 9 Pie comes with features that make your phone smarter and simpler to use, plus help you with your digital wellbeing.


The latest release of Android is here! And it comes with a heaping helping of artificial intelligence baked in to make your phone smarter, simpler and more tailored to you. Today we’re officially introducing Android 9 Pie.


We’ve built Android 9 to learn from you—and work better for you—the more you use it. From predicting your next task so you can jump right into the action you want to take, to prioritizing battery power for the apps you use most, to helping you disconnect from your phone at the end of the day, Android 9 adapts to your life and the ways you like to use your phone.


Tailored to you


Android 9 aims to make your phone even smarter by learning from you and adapting to your usage patterns. That’s why Android 9 comes with features like Adaptive Battery, which learns the apps you use most and prioritizes battery for them, and Adaptive Brightness, which learns how you like to set the brightness in different settings, and does it for you.
 
Android 9 also helps you get things done faster with App Actions, which predicts what you’ll want to do next based on your context and displays that action right on your phone. Say it’s Tuesday morning and you’re preparing for your commute: you’ll be suggested actions like navigating to work on Google Maps or resuming an audiobook with Google Play Books. And when you put in headphones after work, you may see options to call your mom or start your favorite Spotify playlist.
Later this fall, we’ll also roll out Slices (pie...slices...get it?!) which shows relevant information from your favorite apps when you need it. If you start typing “Lyft” into Google Search, you’ll see a “slice” of the Lyft app, showing prices for your ride home and the ETA for a driver so you can take action more quickly and easily.


Android 9 — now easy as pie
Making your phone smarter and more adaptive is important, but we also want Android to be easier to use and more approachable. In Android 9, we’ve introduced a new system navigation featuring a single home button.


This is especially helpful as phones grow taller and it’s more difficult to get things done on your phone with one hand. With a single, clean home button, you can swipe up to see a newly designed Overview, the spot where at a glance you have full-screen previews of your recently used apps.


You can swipe up from anywhere to see full-screen previews of recently used apps and simply tap to jump back into one of them. If you find yourself constantly switching between apps on your Pixel, we’ve got good news for you: Smart Text Selection (which recognizes the meaning of the text you’re selecting and suggests relevant actions) now works on the Overview of your recent apps, making it easier to perform the action you want.

Changing how you navigate your phone is a big deal, but small changes can make a big difference too. Android P also brings a redesigned Quick Settings, a better way to take and edit screenshots (say goodbye to the vulcan grip that was required before), simplified volume controls, an easier way to manage notifications and more. You’ll notice small changes like these across the platform, to help make the things you do all the time easier than ever.  


Find the balance that’s right for your life
While much of the time we spend on our phones is useful, many of us wish we could disconnect more easily and free up time for other things. In fact, over 70 percent of people we talked to in our research said they want more help with this. So we’ve been working to add key capabilities right into Android to help people achieve the balance with technology they’re looking for.  


At Google I/O in May, we previewed some of these digital wellbeing features for Android, including a new Dashboard that helps you understand how you’re spending time on your device; an App Timer that lets you set time limits on apps and grays out the icon on your home screen when the time is up; the new Do Not Disturb, which silences all the visual interruptions that pop up on your screen; and Wind Down, which switches on Night Light and Do Not Disturb and fades the screen to grayscale before bedtime.

Digital Wellbeing will officially launch on Pixel phones this fall, with Android One and other devices coming later this year. But these features are available in beta now for Pixel phones running Android 9. To try them out:

  1. Make sure you’re running Android 9 Pie on your device. (Learn how to check which version of Android you have.)
  2. Sign up for the beta with the email address you use with Google Play.
  3. Accept your invitation to become a beta tester by clicking the link in your welcome email.

Once you’ve accepted your invitation, Digital Wellbeing will appear in your phone’s Settings app. It may take up to 24 hours for Digital Wellbeing to appear on your device.


Security and privacy baked in


Improving security is always important in each of our platform releases.  In addition to continuously hardening the platform, and an improved security model for biometrics, Android 9 enables industry-leading hardware security capabilities to allow protecting sensitive data like credit card information using a secure, dedicated chip.  Android 9 also brings important privacy improvements, such as TLS by default and DNS over TLS to help protect all web communications and keep them private.


Coming to a device near you
Starting today, an over-the-air update to Android 9 will begin rolling out to Pixel phones. And devices that participated in the Beta program from Sony Mobile, Xiaomi, HMD Global, Oppo, Vivo, OnePlus, and Essential, as well as all qualifying Android One devices, will receive this update by the end of this fall! We are also working with a number of other partners to launch or upgrade devices to Android 9 this year.


Learn more about Android 9 Pie at android.com/9.

Posted by: Sameer Samat, VP of Product Management, Android & Google Play