Category Archives: Google Cloud Platform Blog

Product updates, customer stories, and tips and tricks on Google Cloud Platform

ASP.NET Core developers, meet Stackdriver diagnostics


Being able to diagnose application logs, errors and latency is key to understanding failures, but it can be tricky and time-consuming to implement correctly. That’s why we're happy to announce general availability of Stackdriver Diagnostics integration for ASP.NET Core applications, providing libraries to easily integrate Stackdriver Logging, Error Reporting and Trace into your ASP.NET Core applications, with a minimum of effort and code. While on the road to GA, we’ve fixed bugs, listened to and applied customer feedback, and have done extensive testing to make sure it's ready for your production workloads.

The Google.Cloud.Diagnostics.AspNetCore package is available on NuGet. ASP.NET Classic is also supported with the Google.Cloud.Diagnostics.AspNet package.

Now, let’s look at the various Google Cloud Platform (GCP) components that we integrated into this release, and how to begin using them to troubleshoot your ASP.NET Core application.

Stackdriver Logging 

Stackdriver Logging allows you to store, search, analyze, monitor and alert on log data and events from GCP and AWS. Logging to Stackdriver is simple with Google.Cloud.Diagnostics.AspNetCore. The package uses ASP.NET Core’s built in logging API; simply add the Stackdriver provider and then create and use a logger as you normally would. Your logs will then show up in the Stackdriver Logging section of the Google Cloud Console. Initializing and sending logs to Stackdriver Logging only requires a few lines of code:

public void Configure(IApplicationBuilder app, ILoggerFactory loggerFactory)
{
    // Initialize Stackdriver Logging
    loggerFactory.AddGoogle("YOUR-GOOGLE-PROJECT-ID");
    ...
}

public void LogMessage(ILoggerFactory loggerFactory)
{
    // Send a log to Stackdriver Logging
    var logger = loggerFactory.CreateLogger("NetworkLog");
    logger.LogInformation("This is a log message.");
}
Here’s view of Stackdriver logs shown in Cloud Console:

This shows two different logs that were reported to Stackdriver. An expanded log shows its severity, timestamp, payload and many other useful pieces of information.

Stackdriver Error Reporting 

Adding the Stackdriver Error Reporting middleware to the beginning of your middleware flow reports all uncaught exceptions to Stackdriver Error Reporting. Exceptions are grouped and shown in the Stackdriver Error Reporting section of Cloud Console. Here’s how to initialize Stackdriver Error Reporting in your ASP.NET Core application:

public void ConfigureServices(IServiceCollection services)
{
    services.AddGoogleExceptionLogging(options =>
    {
        options.ProjectId = "YOUR-GOOGLE-PROJECT-ID";
        options.ServiceName = "ImageGenerator";
        options.Version = "1.0.2";
    });
    ...
}

public void Configure(IApplicationBuilder app)
{
    // Use before handling any requests to ensure all unhandled exceptions are reported.
    app.UseGoogleExceptionLogging();
    ...
}

You can also report caught and handled exceptions with the IExceptionLogger interface:
public void ReadFile(IExceptionLogger exceptionLogger)
{
    try
    {
        string scores = File.ReadAllText(@"C:\Scores.txt");
        Console.WriteLine(scores);
    }
    catch (IOException e)
    {
        exceptionLogger.Log(e);
    }
}
Here’s a view of Stackdriver Error Reports in Cloud Console:

This shows the occurrence of an error over time for a specific application and version. The exact error is shown on the bottom.

Stackdriver Trace 

Stackdriver Trace captures latency information on all of your applications. For example, you can diagnose if HTTP requests are taking too long by using a Stackdriver Trace integration point. Similar to Error Reporting, Trace hooks into your middleware flow and should be added at the beginning of your middleware flow. Initializing Stackdriver Trace is similar to setting up Stackdriver Error Reporting:

public void ConfigureServices(IServiceCollection services)
{
    string projectId = "YOUR-GOOGLE-PROJECT-ID";
    services.AddGoogleTrace(options =>
    {
        options.ProjectId = projectId;
    });
    ...
}

public void Configure(IApplicationBuilder app)
{
    // Use at the start of the request pipeline to ensure the entire request is traced.
    app.UseGoogleTrace();
    ...
}
You can also manually trace a section of code that will be associated with the current request:
public void TraceHelloWorld(IManagedTracer tracer)
{
    using (tracer.StartSpan(nameof(TraceHelloWorld)))
    {
        Console.Out.WriteLine("Hello, World!");
    }
}
Here’s a view of a trace across multiple servers in Cloud Console:
This shows the time spent for portions of an HTTP request. The timeline shows both time spent on the front-end and on the back-end.

Not using ASP.NET Core? 


If you are haven’t made the switch to ASP.NET Core but still want to use Stackdriver diagnostics tools, we also provide a package for ASP.NET accordingly named Google.Cloud.Diagnostics.AspNet. It provides simple Stackdriver diagnostics integration into ASP.NET applications. You can add Error Reporting and Tracing for MVC and Web API with a line of code to your ASP.NET application. And while ASP.NET does not have a logging API, we have also integrated Stackdriver Logging with log4net in our Google.Cloud.Logging.Log4Net package. 

Our goal is to make GCP a great place to build and run ASP.NET and ASP.NET Core applications, and troubleshooting performance and errors is a big part of that. Let us know what you think of this new functionality, and leave us your feedback on GitHub.

How to build a conversational app using Cloud Machine Learning APIs, Part 3


In part 1 and part 2 of this series, we showed you how to build a conversational tour guide app with API.AI and Google Cloud Machine Learning APIs. In this final part, you’ll learn how to extend this app to the Google Assistant-supported devices (Google Home, eligible Android phones and iPhones, and Android Wear). And we’ll build this on top of the existing API.AI agent created in parts 1 and 2.

New Intents for Actions on Google

In part 1, we discussed the app’s input and output context relationships.

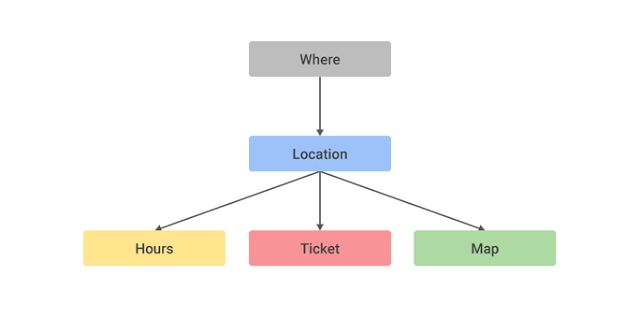
The where context requires the user to upload an image, which is not supported by the Google Assistant. We can modify the context relationship as below.

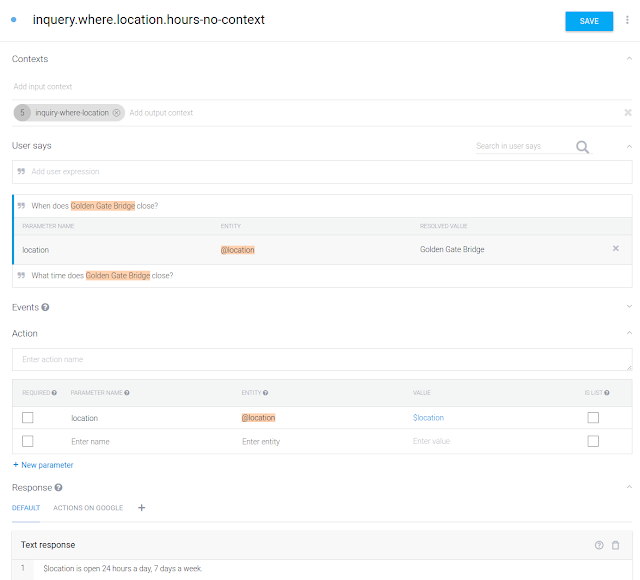
We will add three new intents, hours-no-context, ticket-no-context and map-no-context. Each intent will set location as the output context so that other intents can use the location as an input parameter. 


Enable Actions on Google Integration 


Now we’ll enable Actions on Google to support the Google Assistant.

  1.  Open your API.AI console. Under the Integrations Tab, turn on the Actions on Google integration.
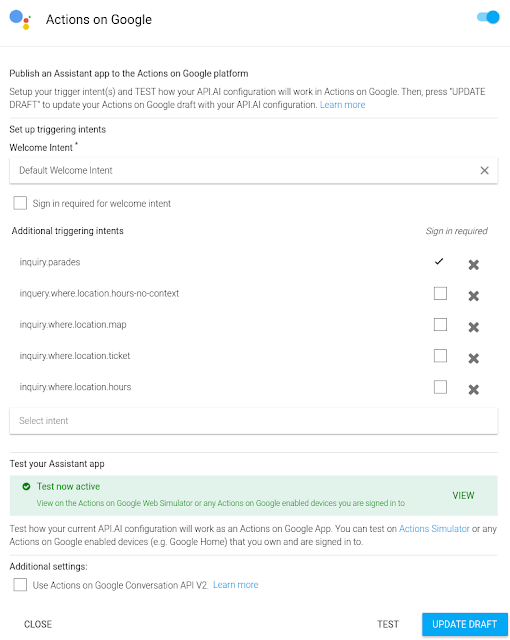
  2. In the popup dialog under Additional triggering intents, add all intents you want to support on the Google Assistant. The system will automatically set the Welcome Intent to Default Welcome Intent. You can also click SETTINGS under Actions on Google to bring up this settings dialog in the future. Note that the inquiry.where intent requires uploading an image and won’t work on the Google Assistant, so you should not add that intent to the triggering intents list. We discussed how to add a new intent to support that in New Intent for Actions on Google section. 
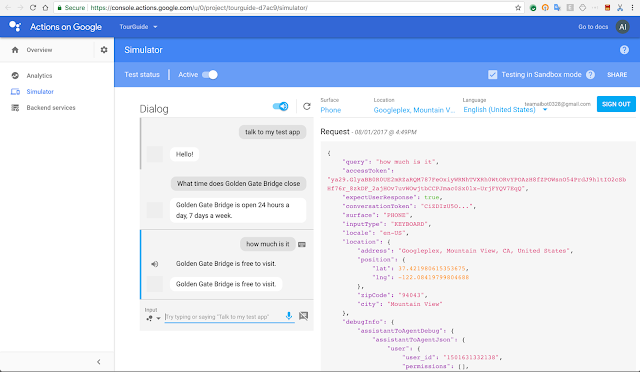
  3. After you’re done adding all the intents that we want to support on Google on Actions (e.g., hours-no-context intent) to the additional triggering intents list, hit UPDATE and TEST button on the bottom. It will generate a green box. Tap the VIEW button to go to the Actions on Google Web Simulator. 
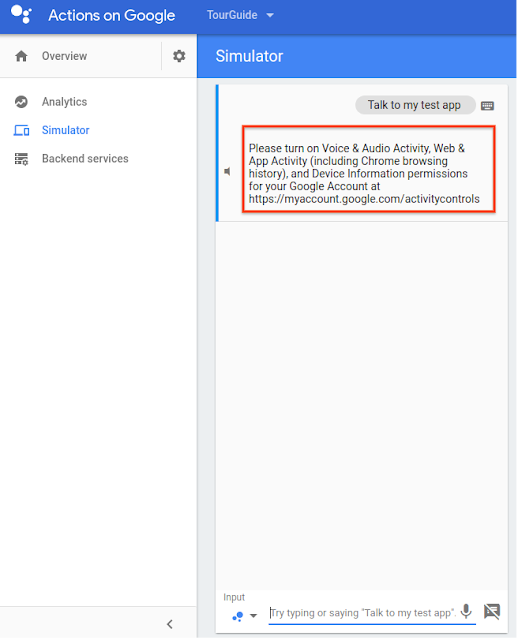
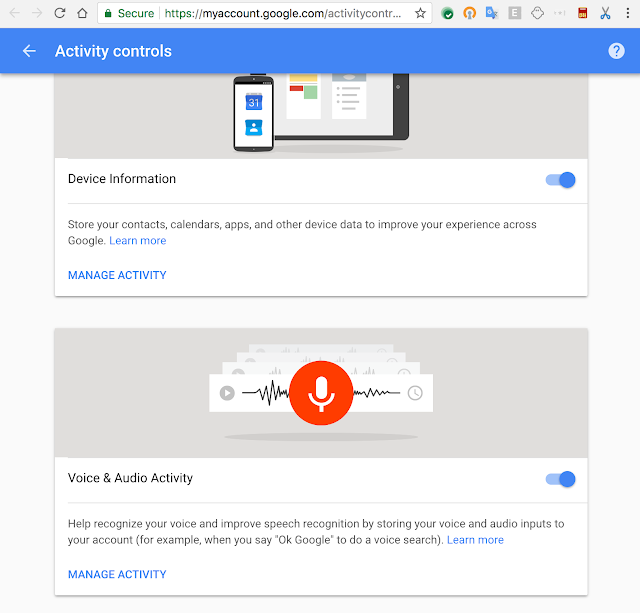
    If this is your first time on Actions on Google console, it will prompt you to turn on Device Information and Voice & Audio Activity on your Activity controls center.
    By default these settings are off. If you already turn them on, you won’t see the prompt. 
  4. Go back to the simulator after turning on these two settings. Now we're ready to test the integration on the simulator! Start by typing or saying “Talk to my test app”. The simulator will respond with the texts from the Default Welcome Intent. Afterward, you can test the app as if you were in the API.AI test console. 

Difference between tell() and ask() APIs 

As we mentioned in part 2, there is a subtle difference between tell() and ask() APIs when we implement the Cloud Function with the Actions on Google SDK. This doesn’t make much of a difference in part 1 and part 2, but it does in part 3 when we integrate Actions on Google. tell() will end the conversation and close the mic, while ask() will keep the conversation open and wait for the next user input.

You can test out the difference in the simulator. If you use tell() in the Cloud Functions, you’ll need to say “talk to my test app” again once you’ve triggered the intents with the Cloud Functions webhook such as the inquiry.parades intent “Are there any parades today?”. If you use ask(), you will still be in the test app conversation and won’t need to say “talk to my test app” again.

Next steps 

We hope this example demonstrates how to build a simple app powered by machine learning. For more getting started info, you might also want to try:

You can download the source code from github.

Introducing Puppet support for Google Cloud Platform


The ability to control resources programmatically with tools they know and love can make a big difference for developers creating cloud-native applications. That’s why today, we released and open sourced a set of comprehensive modules to improve the ability for Puppet users to manage Google Cloud Platform (GCP) resources using the Puppet domain specific language, or DSL. The new modules follow Puppet’s object convergence model, allowing you to define the desired state of your GCP resources that our providers will enforce directly within the Puppet language.

The new modules support the following products:
These new modules are Puppet Approved, having passed the rigorous quality and review bar from Puppet Engineering team, and are open-source under the Apache-2.0 license, available from GCP’s Github repository.

We also released a unified authentication module that provides a single authentication mechanism for all the modules.

The modules have been tested on CentOS, Debian, Ubuntu, Windows and other OS’s. Refer to the operating system support matrix for compatibility details. They work with both Puppet Open Source and Puppet Enterprise.

The power of Puppet 

It’s important to note that Puppet is not a scripting language. Rather, it follows an object-convergence model, allowing you to define a desired state for your resource, which our providers make so by applying necessary changes.

In other words, with Puppet, you don’t say “run this list of commands to install Apache on my machine,” you say “Apache should be installed and configured.” There is some nuance here, but with the latter, Puppet handles verifying if Apache is installed, checks for the correct dependencies, upgrades it if it’s not at the correct version and — most importantly — does nothing if everything is good. Puppet already understands the implementation differences across operating system and will handle doing the right thing for your chosen distribution.

Following an object-convergence model has various benefits: It makes your resource manifest declarative, abstracting away various details (e.g., OS-specific actions); and it makes definitions simpler to read, modify and audit. The following manifest creates a full Google Container Engine cluster, in just 15 lines of code.
gauth_credential { 'mycred':
  provider => serviceaccount,
  path     => '/home/nelsona/my_account.json',
  scopes   => ['https://www.googleapis.com/auth/cloud-platform'],
}

gcontainer_cluster { 'myapp-netes':
  ensure             => present,
  initial_node_count => 2,
  node_config        => {
    machine_type => 'n1-standard-4', # we want a 4-core machine for our cluster
    disk_size_gb => 500,             # ... and a lot of disk space
  },
  zone               => 'us-central1-f',
  project            => 'google.com:graphite-playground',
  credential         => 'mycred',
}
For specific examples of how to use Puppet with the individual GCP modules, visit their respective Forge pages.

Getting started with Puppet on GCP 

To hit the ground running with Puppet and GCP, follow these basic steps:
Install the appropriate modules.
  1. Get a service account with privileges on the GCP resources you want to manage and enable the the APIs for each of the GCP services you intend to use. 
  2. Describe your GCP infrastructure in Puppet. 
  3. Apply your manifest. 
Let’s discuss these steps in more detail.

1. Install your modules 

All Google modules for Puppet are available on Puppet Forge. We also provide a “bundle” module that installs every GCP module at once, so you can choose the granularity of the code you pull into your infrastructure.

Note: Google modules requires neither administrator privileges nor special privileges/scopes on the machines being executed. It is safe to install the modules either as a regular user or in your Puppet master. Install on the master if you want it distributed to all clients.

The authentication module depends on a few gems released by Google. As with everything related to system configuration, you can install the gems using Puppet itself.
$ puppet apply <<EOF
package { [
    'googleauth',
    'google-api-client',
  ]:
    ensure   =< present,
    provider =< gem,
}
EOF
Here’s the command for Installing all the Puppet modules with a single command:
puppet module install google/cloud
Or, you can install only the modules for select products:
puppet module install google/gcompute    # Google Compute Engine
puppet module install google/gcontainer  # Google Container Engine
puppet module install google/gdns        # Google Cloud DNS
puppet module install google/gsql        # Google Cloud SQL
puppet module install google/gstorage    # Google Cloud Storage
Once installed, verify the modules’ health by running:
puppet module list
You should see an output similar to:
$ puppet module list
/home/nelsona/.puppetlabs/etc/code/modules
├── google-cloud (v0.1.0)
├── google-gauth (v0.1.0)
├── google-gcompute (v0.1.0)
├── google-gcontainer (v0.1.0)
├── google-gdns (v0.1.0)
├── google-gsql (v0.1.0)
└── google-gstorage (v0.1.0)
/opt/puppetlabs/puppet/modules (no modules installed)

2. Get your service account credentials and enable APIs 

To ensure maximum flexibility and portability, all authentication and authorization to your GCP resources must be done via service account credentials. Using service accounts allows you to restrict the privileges to the minimum necessary to perform the job.

Note: Because service accounts are portable, you don’t need to run Puppet inside GCP. Our modules run on any computer with internet access, including on other cloud providers. You might, for example, execute deployments from within a CI/CD system pipeline such as Travis or Jenkins, or from your own development machine.
Click here to learn more about service accounts, and how to create and enable them.

Also make sure you have enabled the the APIs for each of the GCP services you intend to use.

3a. Define authentication mechanism 

Once you have your service account, add this block to your manifest to begin authenticating with it. The resource title, here 'mycred' is referenced in the objects in the credential parameter.
gauth_credential { 'mycred':
  provider => serviceaccount,
  path     => '/home/nelsona/my_account.json',
  scopes   => ['https://www.googleapis.com/auth/cloud-platform'],
}
For further details on how to setup or customize authentication visit the Google Authentication documentation.

3b. Define your resources 

You can manage any resource for which we provide a type. The example below creates a Kubernetes cluster in Google Container Engine. For the full list of resources that you can manage, please refer to the respective module documentation link or to this aggregate summary view.
gcontainer_cluster { 'myapp-netes':
  ensure             => present,
  initial_node_count => 2,
  node_config        => {
    machine_type => 'n1-standard-4', # we want a 4-core machine for our cluster
    disk_size_gb => 500,             # ... and a lot of disk space
  },
  project            => 'google.com:graphite-playground',
  credential         => 'mycred',
}

4. Apply your manifest 

Next, tell Puppet to enforce and bring your resources into the state described in the manifest. For example:

puppet apply <your-file.pp>

Please note that you can apply the manifest standalone, one time, or periodically in the background using an agent.

Next steps 

You’re now ready to start managing your GCP resources with Puppet, and start reaping the benefits of cross-cloud configuration management. We will continue to improve the modules and add coverage to more Google products. We are also in the process of preparing the technology used to create these modules for release as open source. If you want have questions about this effort please visit Puppet on GCP Discussions forum, or reach out to us on [email protected].

Further Reading 

Titan in depth: Security in plaintext


While there are no absolutes in computer security, we design, build and operate Google Cloud Platform (GCP) with the goal to protect customers' code and data. We harden our architecture at multiple layers, with components that include Google-designed hardware, a Google-controlled firmware stack, Google-curated OS images, a Google-hardened hypervisor, as well as data center physical security and services.
Photograph of Titan inside Google's purpose-built server
In this post, we provide details of the mechanisms of how we will establish a hardware root of trust using our custom chip, Titan.

First introduced at Google Cloud Next '17, Titan is a secure, low-power microcontroller designed with Google hardware security requirements and scenarios in mind. Let’s take a look at how Titan works to ensure that a machine boots from a known good state using verifiable code, and establishes the hardware root of trust for cryptographic operations in our data centers.
Photograph of Urs Hölzle unveiling Titan at Google Cloud Next '17 (YouTube)


Machine boot basics 

Machines in Google’s datacenters, as with most modern computers, have multiple components, including one or more CPUs, RAM, Baseboard Management Controller (BMC), NIC, boot firmware, boot firmware flash and persistent storage. Let’s review how these components interact to boot the machine:
  1. The machine's boot process starts when the BMC configuring the machine hardware lets the CPU come out of reset. 
  2. The CPU then loads the basic firmware (Boot or UEFI) from the boot firmware flash, which performs further hardware/software configuration. 
  3. Once the machine is sufficiently configured, the boot firmware accesses the "boot sector" on the machine's persistent storage, and loads a special program called the "boot loader" into the system memory. 
  4. The boot firmware then passes execution control to the boot loader, which loads the initial OS image from storage into system memory and passes execution control to the operating system. 
In our datacenters, we protect the boot process with secure boot. Our machines boot a known firmware/software stack, cryptographically verify this stack and then gain (or fail to gain) access to resources on our network based on the status of that verification. Titan integrates with this process and offers additional layers of protection.

As privileged software attacks increase and more research becomes available on rootkits, we have committed to delivering secure boot and hardware-based root of trust for machines that form our infrastructure and host our Google Cloud workloads.

Secure boot with Titan 

Typically, secure boot relies on a combination of an authenticated boot firmware and boot loader along with digitally signed boot files to provide its security guarantees. In addition, a secure element can provide private key storage and management. Titan not only meets these expectations, but goes above and beyond to provide two important additional security properties: remediation and first-instruction integrity. Trust can be re-established through remediation in the event that bugs in Titan firmware are found and patched, and first-instruction integrity allows us to identify the earliest code that runs on each machine’s startup cycle.

To achieve these security properties, Titan comprises several components: a secure application processor, a cryptographic co-processor, a hardware random number generator, a sophisticated key hierarchy, embedded static RAM (SRAM), embedded flash and a read-only memory block. Titan communicates with the main CPU via the Serial Peripheral Interface (SPI) bus, and interposes between the boot firmware flash of the first privileged component, e.g., the BMC or Platform Controller Hub (PCH), allowing Titan to observe every byte of boot firmware.

Titan's application processor immediately executes code from its embedded read-only memory when its host machine is powered up. The fabrication process lays down immutable code, known as the boot ROM, that is trusted implicitly and validated at every chip reset. Titan runs a Memory Built-In Self-Test every time the chip boots to ensure that all memory (including ROM) has not been tampered with. The next step is to load Titan’s firmware. Even though this firmware is embedded in the on-chip flash, the Titan boot ROM does not trust it blindly. Instead, the boot ROM verifies Titan's firmware using public key cryptography, and mixes the identity of this verified code into Titan's key hierarchy. Then, the boot ROM loads the verified firmware.

Once Titan has booted its own firmware in a secure fashion, it will turn its attention to the host’s boot firmware flash, and verify its contents using public key cryptography. Titan can gate PCH/BMC access to the boot firmware flash until after it has verified the flash content, at which point it signals readiness to release the rest of the machine from reset. Holding the machine in reset while Titan cryptographically verifies the boot firmware provides us the first-instruction integrity property: we know what boot firmware and OS booted on our machine from the very first instruction. In fact, we even know which microcode patches may have been fetched before the boot firmware's first instruction. Finally, the Google-verified boot firmware configures the machine and loads the boot loader, which subsequently verifies and loads the operating system.
Photograph of Titan up-close on a printed circuit board. Chip markings obscured.

Cryptographic identity using Titan 

In addition to enabling secure boot, we’ve developed an end-to-end cryptographic identity system based on Titan that can act as the root of trust for varied cryptographic operations in our data centers. The Titan chip manufacturing process generates unique keying material for each chip, and securely stores this material—along with provenance information—into a registry database. The contents of this database are cryptographically protected using keys maintained in an offline quorum-based Titan Certification Authority (CA). Individual Titan chips can generate Certificate Signing Requests (CSRs) directed at the Titan CA, which—under the direction of a quorum of Titan identity administrators—can verify the authenticity of the CSRs using the information in the registry database before issuing identity certificates.

The Titan-based identity system not only verifies the provenance of the chips creating the CSRs, but also verifies the firmware running on the chips, as the code identity of the firmware is hashed into the on-chip key hierarchy. This property enables remediation and allows us to fix bugs in Titan firmware, and issue certificates that can only be wielded by patched Titan chips. The Titan-based identity system enables back-end systems to securely provision secrets and keys to individual Titan-enabled machines, or jobs running on those machines. Titan is also able to chain and sign critical audit logs, making those logs tamper-evident. To offer tamper-evident logging capabilities, Titan cryptographically associates the log messages with successive values of a secure monotonic counter maintained by Titan, and signs these associations with its private key. This binding of log messages with secure monotonic counter values ensures that audit logs cannot be altered or deleted without detection, even by insiders with root access to the relevant machine.

Conclusion 

Our goal is to protect the boot process by securing it with a dedicated entity that is explicitly engineered to behave in an expected manner. Titan provides this root of trust by enabling verification of the system firmware and software components, and establishes a strong, hardware-rooted system identity. Google designed Titan's hardware logic in-house to reduce the chances of hardware backdoors. The Titan ecosystem ensures that production infrastructure boots securely using authorized and verifiable code.

In short:
  1. Titan provides a hardware-based root of trust that establishes strong identity of a machine, with which we can make important security decisions and validate the “health” of the system. 
  2. Titan offers integrity verification of firmware and software components. 
  3. The system’s strong identity ensures that we'll have a non-repudiable audit trail of any changes done to the system. Tamper-evident logging capabilities help identify actions performed by an insider with root access. 
For more information about how we harden our environment, visit the Google Cloud Platform Security page.

Introducing App Engine firewall, an easy way to control access to your app


A key security feature for application developers and administrators is to be able to allow or deny incoming requests based on source IP addresses. This capability can help you do production testing without exposing your app to the world, block access to your app from specific geographies or block requests from a malicious user.

Today, we’re thrilled to announce the beta release of Google App Engine firewall. With App Engine firewall, you simply provide a set of rules, order them by priority and specify an IP address, or a set of IP addresses, to block or allow, and we’ll take care of the rest.

When App Engine firewall receives a request that you’ve configured to be denied, it returns an HTTP 403 Forbidden response without ever hitting your app. If your app is idle, this prevents new instances from spinning up, and if you’re getting heavy traffic, the denied request won’t add to your load  or cost you money.

App Engine firewall replaces the need for a code-based solution within your app that still allows requests in, but which can cost you resources and still expose your app.


Getting started with App Engine firewall 


You can setup App Engine firewall rules in the Google Cloud Console as well as with the App Engine Admin API or gcloud command-line tool.

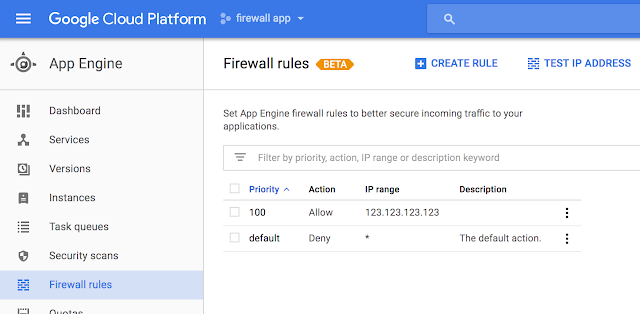
Let’s say you’d like to test your application and give access only to browsers from your company’s private network. Open your firewall rules in the Cloud Console and you'll see a default rule that allows all traffic to your app.

First, add a new rule allowing traffic only from the range of IP addresses coming from your private network. Then, update the default rule to deny all traffic.


As with typical firewall semantics, App Engine firewall evaluates rules with a lower priority value first, followed by rules with a higher value. In the example above, the Allow rule with a priority of 100 is evaluated first, followed by the default rule.

To make sure that your set of firewall rules is working as intended, you can test an IP address to see if a request coming from this address would be allowed or denied.

From the Cloud Console, click the Test IP tab in the Firewall Rules section.

The response indicates if the request can proceed and indicates the specific firewall rule that matched the provided IP address.
With App Engine firewall, it’s easy to set up network access to your app and focus on what matters most: your app, without worrying about access control within your code. Check out the full documentation here.

App Engine firewall is in beta, so avoid using this functionality in production environments. If you have any questions, concerns or if something is not working as you’d expect, you can post in the Google App Engine forum, log a public issue or get in touch on the App Engine slack channel (#app-engine).

Introducing Network Service Tiers: Your cloud network, your way


We're excited to announce Network Service Tiers AlphaGoogle Cloud Platform (GCP) now offers a tiered cloud network. We let you optimize for performance by choosing Premium Tier, which uses Google’s global network with unparalleled quality of service, or optimize for cost, using the new Standard Tier, an attractively-priced network with performance comparable to that of other leading public clouds.

"Over the last 18 years, we built the world’s largest network, which by some accounts delivers 25-30% of all internet traffic” said Urs Hölzle, SVP Technical Infrastructure, Google. “You enjoy the same infrastructure with Premium Tier. But for some use cases, you may prefer a cheaper, lower-performance alternative. With Network Service Tiers, you can choose the network that’s right for you, for each application.”

Power of Premium Tier 

If you use Google Cloud today, then you already use the powerful Premium Tier.

Premium Tier delivers traffic over Google’s well-provisioned, low latency, highly reliable global network. This network consists of an extensive global private fiber network with over 100 points of presence (POPs) across the globe. By this measure, Google’s network is the largest of any public cloud provider.

In Premium Tier, inbound traffic from your end user to your application in Google Cloud enters Google’s private, high performance network at the POP closest to your end user, and GCP delivers this traffic to your application over its private network.
Outbound and Inbound traffic delivery
Similarly, GCP delivers outbound traffic from your application to end users on Google’s network and exits at the POP closest to them, wherever the end users are across the globe. Thus, most of this traffic reaches its destination with a single hop to the end user’s ISP, so it enjoys minimum congestion and maximum performance.

We architected the Google network to be highly redundant, to ensure high availability for your applications. There are at least three independent paths (N+2 redundancy) between any two locations on the Google network, helping ensure that traffic continues to flow between these two locations even in the event of a disruption. As a result, with Premium Tier, your traffic is unaffected by a single fiber cut. In many situations, traffic can flow to and from your application without interruption even with two simultaneous fiber cuts.

GCP customers use Global Load Balancing, another Premium Tier feature, extensively. You not only get the management simplicity of a single anycast IPv4 or IPv6 Virtual IP (VIP), but can also expand seamlessly across regions, and overflow or fail over to other regions.
With Premium Tier, you use the same network that delivers Google’s Search, Gmail, YouTube, and other services as well as the services of customers such as The Home Depot, Spotify and Evernote.
"75% of homedepot.com is now served out of Google Cloud. From the get-go, we wanted to run across multiple regions for high availability. Google's global network is one of the strongest features for choosing Google Cloud."   
Ravi Yeddula, Senior Director Platform Architecture & Application Development, The Home Depot.


Introducing Standard Tier 


Our new Standard Tier delivers network quality comparable to that of other major public clouds, at a lower price than our Premium Tier.

Why is Standard Tier less expensive? Because we deliver your outbound traffic from GCP to the internet over transit (ISP) networks instead of Google’s network.

Outbound and Inbound traffic delivery
Similarly, we deliver your inbound traffic, from end user to GCP, on Google’s network only within the region where your GCP destination resides. If your user traffic originates from a different region, their traffic will first travel over transit (ISP) network(s) until it reaches the region of the GCP destination.

Standard Tier provides lower network performance and availability compared to Premium Tier. Since we deliver your outbound and inbound traffic on Google’s network only on the short hop between GCP and the POP closest to it, the performance, availability and redundancy characteristics of Standard Tier depend on the transit provider(s) carrying your traffic. Your traffic may experience congestion or outages more frequently relative to Premium Tier, but at a level comparable to other major public clouds.

We also provide only regional network services in Standard Tier, such as the new regional Cloud Load Balancing service. In this tier, your Load Balancing Virtual IP (VIP) is regional, similar to other public cloud offerings, and adds management complexity compared to Premium Tier Global Load Balancing, if you require multi-region deployment.

Compare performance of tiers 

We commissioned Cedexis, an internet performance monitoring and optimization tools company, to take preliminary performance measurements for both Network Service Tiers. As expected, Premium Tier delivers higher throughput and lower latency than Standard Tier. You can view the live dashboards at www.cedexis.com/google-reports/ under the "Network Tiers" section. Cedexis also details their testing methodology on their website.

Cedexis graph below shows throughput for Premium and Standard Tier for HTTP Load Balancing traffic at 50th percentile. Standard (blue line) throughput is 3,223 kbps while Premium (green line) is 5,401 kbps, making Premium throughput ~1.7x times that of Standard. See Cedexis graph below:


In general, Premium Tier displays considerably higher throughput, at every percentile, than Standard Tier.

Compare pricing for tiers 


We're introducing new pricing for Premium and Standard Tiers. You can review detailed pricing for both tiers here. This pricing will take effect when Network Service Tiers become Generally Available (GA). While in alpha and beta, existing internet egress pricing applies.

With the new Network Tiers pricing (effective at GA), outbound traffic (GCP to internet) is priced 24-33% lower in Standard Tier than in Premium Tier for North America and Europe. Standard Tier is less expensive than internet egress options offered by other major public cloud providers (based on typical published prices for July, 2017). Inbound traffic remains free for both Premium and Standard Tiers. We'll also change our current destination-based pricing for Premium Tier to be based on both source and destination of traffic since the cost of network traffic varies with the distance your traffic travels over Google’s network. In contrast, Standard Tier traffic will be source-based since it does not travel much over Google’s network.

Choose the right tier 


Here’s a decision tree to help you choose the tier that best fits your requirements.


Configure the tier for your application(s) 


One size does not fit all, and your applications in Google Cloud often have differing availability, performance, footprint and cost requirements. Configure the tier at the resource-level (per Instance, Instance template, Load balancer) if you want granular control or at the overarching project-level if you want to use the same tier across all resources.

Try Network Service Tiers today 

“Cloud customers want choices in service levels and cost. Matching the right service to the right business requirements provides the alignment needed by customers. Google is the first public cloud provider to recognize that in the alpha release of Network Service Tiers. Premium Tier caters to those who need assured quality, and Standard Tier to those who need lower costs or have limited need for global networking.”  
Dan Conde, Analyst at ESG

Learn more by visiting Network Service Tiers website, and give Network Service Tiers a spin by signing up for alpha. We look forward to your feedback!

Rolling your own private Ruby gem server on Google Cloud Platform


Great news, Rubyists! We recently released google-cloud-gemserver gem, making it possible to deploy a private gem server to Google Cloud Platform (GCP) with a single command:

$ google-cloud-gemserver create --use-proj [MY_PROJECT_ID]

This is a big deal for organizations that build libraries with proprietary business logic or that mirror public libraries for internal use. In Ruby, these libraries are called gems, and until recently, there wasn't a good hosted solution for serving them. For Ruby in particular, many developers found themselves building their own custom solutions or relying on third parties such as Gemfury.

Running a gem server run on GCP has a lot of advantages. Specifically, the above command deploys the gem server to a Google App Engine Flex instance which has 99.95% uptime (Google Container Engine support coming soon). App Engine can also autoscale the number of instances based on CPU utilization to minimize the amount of maintenance for the gem server. Having the gem server on GCP also allows you to use existing cloud infrastructure such as Stackdriver Logging, Cloud Storage, and direct access to the underlying VM running the gem server for fine-grained control. The gem server can store an unlimited amount of public and private gems allowing an unlimited amount of users with the correct permissions to access it. This level of flexibility and customization makes GCP a highly productive environment to deploy apps to and the gem server is no exception.


Using the gem server 


Let’s take a look at how to install and configure a private gem server.
To deploy your own private gem server to GCP:
  1. First install the gem:
    $ gem install google-cloud-gemserver
  2. Ensure you have Cloud SDK installed and a GCP project created with billing enabled. Also ensure that you are authenticated with it. For a full list of prerequisites, read this checklist. 
  3. Run the following command in your terminal:
    $ google-cloud-gemserver create --use-proj [MY_PROJECT_ID]
    where MY_PROJECT_ID is the GCP project ID the gem server will be deployed to. This deploys the gem server to App Engine and creates a default key used to push and fetch gems from the gem server. For brevity, the value of this key will later be referred to as “my-key” and its name will later be referred to as “my-key-name”.
Now, you can access the gem server at http://[MY_PROJECT_ID].appspot.com. Gems can easily be pushed to the gem server with a key that has write access to the gem server. The above command generated a default key, my-key, that can be used. You can push a gem by running:

$ gem push --key my-key-name [PATH_TO_MY_GEM] --host \         
> http://[MY_PROJECT_ID].appspot.com/private/

Before you can download gems from the gem server, you need to create a key that has read access to the gem server. Conveniently, the “create” command above also generated a default key. Installing gems uses bundler, which needs to be configured such that it associates the gem server with my-key when downloading gems, otherwise the download would fail with a 401 Unauthorized Error. This is also done automatically for my-key when you use the “create” command. Now, make a small modification to your Gemfile:
source “[GEMSERVER_URL]”

source “[GEMSERVER_URL]/private” do
  gem “MY_GEM”
end

Then, run “bundle install” and it fetches and installs the gem “MY_GEM” from the gem server!

Conclusion 

That is all it takes to spin up a personal, private gem server on GCP and access gems from it. Under the hood, it uses Google Cloud SQL to manage gem metadata, cached gems, authentication keys, etc., and Cloud Storage to maintain backups of the gems. The google-cloud-gemserver gem is built on top of an existing gem that runs a private gem server locally; it served as a base and was extended to work with GCP infrastructure. It is worth noting that the google-cloud-gemserver gem is open source and actively maintained. We are always looking to improve the gem and encourage contributions!

Distributed TensorFlow and the hidden layers of engineering work


With all the buzz around Machine Learning as of late, it’s no surprise that companies are starting to experiment with their own ML models, and a lot of them are choosing TensorFlow. Because TensorFlow is open source, you can run it locally to quickly create prototypes and deploy fail-fast experiments that help you get your proof-of-concept working at a small scale. Then, when you’re ready, you can take TensorFlow, your data, and the same code and push it up into Google Cloud to take advantage of multiple CPUs, GPUs or soon even some TPUs.

When you get to the point where you’re ready to take your ML work to the next level, you will have to make some choices about how to set up your infrastructure. In general, many of these choices will impact how much time you spend on operational engineering work versus ML engineering work. To help, we’ve published a pair of solution tutorials to show you how you can create and run a distributed TensorFlow cluster on Google Compute Engine and run the same code to train the same model on Google Cloud Machine Learning Engine. The solutions use MNIST as the model, which isn’t necessarily the most exciting example to work with, but does allow us to emphasize the engineering aspects of the solutions.

We’ve already talked about the open-source nature of TensorFlow, allowing you to run it on your laptop, on a server in your private data center, or even a Raspberry PI. TensorFlow can also run in a distributed cluster, allowing you divide your training workloads across multiple machines, which can save you a significant amount of time waiting for results. The first solution shows you how to set up a group of Compute Engine instances running TensorFlow, as in Figure 1, by creating a reusable custom image, and executing an initiation script with Cloud Shell. There are quite a few steps involved in creating the environment and getting it to function properly. Even though they aren’t complex steps, they are operational engineering steps, and will take time away from your actual ML development.
Figure 1. A distributed TensorFlow cluster on Google Compute Engine.

The second solution uses the same code with Cloud ML Engine, and with one command you’ll automatically provision the compute resources needed to train your model. This solution also delves into some of the general details of neural networks and distributed training. It also gives you a chance to try out TensorBoard to visualize your training and resulting model as seen in Figure 2. The time you save provisioning compute resources can be spent analyzing your ML work more deeply.
Figure 2. Visualizing the training result with TensorBoard.

Regardless of how you train your model, the whole point is you want to use it to make predictions. Traditionally, this is where the most engineering work has to be done. In the case where you want to build a web-service to run your predictions, at a minimum, you’ll have to provision, configure and secure some web servers, load balancers, monitoring agents, and create some kind of versioning process. In both of these solutions, you’ll use the Cloud ML Engine prediction service to effectively offload all of those operational tasks to host your model in a reliable, scalable, and secure environment. Once you set up your model for predictions, you’ll quickly spin up a Cloud Datalab instance and download a simple notebook to execute and test the predictions. In this notebook you’ll draw a number with your mouse or trackpad, as in Figure 3, which will get converted to the appropriate image matrix format that matches the MNIST data format. The notebook will send your image to your new prediction API and tell you which number it detected as in Figure 4.
Figure 3.
Figure 4.


This brings up one last and critical point about the engineering efforts required to host your model for predictions, which is not deeply expanded upon in these solutions, but is something that Cloud ML Engine and Cloud Dataflow can easily address for you. When working with pre-built machine learning models that work on standard datasets, it can be easy to lose track of the fact that machine learning model training, deployment, and prediction are often at the end of a series of data pipelines. In the real world, it’s unlikely that your datasets will be pristine and collected specifically for the purpose of learning from the data.
Rather, you’ll usually have to preprocess the data before you can feed it into your TensorFlow model. Common preprocessing steps include de-duplication, scaling/transforming data values, creating vocabularies, and handling unusual situations. The TensorFlow model is then trained on the clean, processed data.

At prediction time, it is the same raw data that will be received from the client. Yet, your TensorFlow model has been trained with de-duplicated, transformed, and cleaned-up data with specific vocabulary mappings. Because your prediction infrastructure might not be written in Python, there is a significant amount of engineering work necessary to build libraries to carry out these tasks with exacting consistency in whatever language or system you use. Many times there is too much inconsistency in how the preprocessing is done before training versus how it’s done before prediction. Even the smallest amount of inconsistency can cause your predictions to behave poorly or unexpectedly. By using Cloud Dataflow to do the preprocessing and Cloud ML Engine to carry out the predictions, it’s possible to minimize or completely avoid this additional engineering work. This is because Cloud Dataflow can apply the same preprocessing transformation code to both historical data during training and real-time data during prediction.

Summary 

Developing new machine learning models is getting easier as TensorFlow adds new APIs and abstraction layers and allows you to run it wherever you want. Cloud Machine Learning Engine is powered by TensorFlow so you aren’t locked into a proprietary managed service, and we’ll even show you how to build your own TensorFlow cluster on Compute Engine if you want. But we think that you might want to spend less time on the engineering work needed to set up your training and prediction environments, and more time tuning, analyzing and perfecting your model. With Cloud Machine Learning Engine, Cloud Datalab, and Cloud Dataflow you can optimize your time. Offload the operational engineering work to us, quickly and easily analyze and visualize your data, and build preprocessing pipelines that are reusable for training and prediction.

How to analyze Fastly real-time streaming logs with BigQuery


[Editor’s note: Today we hear from Fastly, whose edge cloud platform allows web applications to better serve global users with services for content delivery, streaming, security and load-balancing. In addition to improving response times for applications built on Google Cloud Platform (GCP), Fastly now supports streaming its logs to Google Cloud Storage and BigQuery, for deeper analysis. Read on to learn more about the integration and how to set it up in your environment.] 

Fastly’s collaboration with Google Cloud combines the power of GCP with the speed and flexibility of the Fastly edge cloud platform. Private interconnects with Google at 14 strategic locations across the globe give GCP and Fastly customers dramatically improved response times to Google services and storage for traffic going over these interconnects.

Today, we’ve announced our BigQuery integration; we can now stream real-time logs to Google Cloud Storage and BigQuery, allowing companies to analyze unlimited amounts of edge data. If you’re a Fastly customer, you can get actionable insights into website page views per month and usage by demographic, geographic location and other dimensions. You can use this data to troubleshoot connectivity problems, pinpoint configuration areas that need performance tuning, identify the causes of service disruptions and improve your end users’ experience. You can even combine Fastly log data with other data sources such as Google Analytics, Google Ads data and/or security and firewall logs using a BigQuery table. You can save Fastly’s real-time logs to Cloud Storage for additional redundancy; in fact, many customers back up logs directly into Cloud Storage from Fastly.
A Fastly POP fronts a GCP-based application, and streams its logs to BigQuery

Let’s look at how to set up and start using Cloud Storage and BigQuery to analyze Fastly logs.

Fastly / BigQuery quick setup 


Before adding BigQuery as a logging endpoint for Fastly services, you need to register for a Cloud Storage account and create a Cloud Storage bucket. Once you've done that, follow these steps to integrate with Fastly.
  1. Create a Google Cloud service account
    BigQuery uses service accounts for third-party application authentication. To create a new service account, see Google's guide on generating service account credentials. When you create the service account, set the key type to JSON.  

  2. Obtain the private key and client email
    Once you’ve created the service account, download the service account JSON file. This file contains the credentials for your BigQuery service account. Open the file and make a note of the private_key and client_email.

  3. Enable the BigQuery API (if not already enabled)
    To send your Fastly logs to your Cloud Storage bucket, you'll need to enable the BigQuery API in the GCP API Manager. 

  4. Create the BigQuery dataset
    After you've enabled the BigQuery API, follow these instructions to create a BigQuery dataset:
    • Log in to BigQuery.
    • Click the arrow next to your account name on the sidebar and select Create new dataset.
    • The Create Dataset window appears.

    • In the Dataset ID field, type a name for the dataset (e.g., fastly_bigquery), and click the OK button. 
  5. Add a BigQuery table

    After you've created the BigQuery dataset, you'll need to add a BigQuery table. There are three ways of creating the schema for the table:
    1. Edit the schema using the BigQuery web interface
    2. Edit the schema using the text field in the BigQuery web interface
    3. Use an existing table
    We recommend creating a new table and creating the schema using the user interface. However, you can also edit a text-based representation of the table schema. In fact, you can switch between the text version and the UI at any time. For your convenience, at the bottom of this blogpost we've included an example of the logging format to use in the Fastly user interface and the corresponding BigQuery schema in text format. Note: It's important that the data you send to BigQuery from Fastly matches the schema for the table, or it could result in the data being corrupted or just silently being dropped.

    As per the BigQuery documentation, click the arrow next to the dataset name on the sidebar and select Create new table.
    The Create Table page appears:
    • In the Source Data section, select Create empty table.
    • In the Table name field, type a name for the table (e.g., logs).
    • In the Schema section of the BigQuery website, use the interface to add fields and complete the schema. Click the Create Table button.

  6. Add BigQuery as a logging endpoint
    Follow these instructions to add BigQuery as a logging endpoint:
    • Review the information in our Setting Up Remote Log Streaming guide.
    • Click the BigQuery logo. The Create a BigQuery endpoint page appears:
    • Fill out the Create a BigQuery endpoint fields as follows:
      • In the Name field, supply a human-readable endpoint name.
      • In the Log format field, enter the data to send to BigQuery. See the example format section for details.
      • In the Email field, type the client_email address associated with the BigQuery account.
      • In the Secret key field, type the secret key associated with the BigQuery account.
      • In the Project ID field, type the ID of your GCP project.
      • In the Dataset field, type the name of your BigQuery dataset.
      • In the Table field, type the name of your BigQuery table.
      • In the Template field, optionally type an strftime compatible string to use as the template suffix for your table.
    • Click Create to create the new logging endpoint.
    • Click the Activate button to deploy your configuration changes. 

Formatting JSON objects to send to BigQuery 

The data you send to BigQuery must be serialized as a JSON object, and every field in the JSON object must map to a string in your table's schema. The JSON can have nested data in it (e.g., the value of a key in your object can be another object). Here's an example format string for sending data to BigQuery:
{
  "timestamp":"%{begin:%Y-%m-%dT%H:%M:%S%z}t",
  "time_elapsed":%{time.elapsed.usec}V,
  "is_tls":%{if(req.is_ssl, "true", "false")}V,
  "client_ip":"%{req.http.Fastly-Client-IP}V",
  "geo_city":"%{client.geo.city}V",
  "geo_country_code":"%{client.geo.country_code}V",
  "request":"%{req.request}V",
  "host":"%{req.http.Fastly-Orig-Host}V",
  "url":"%{cstr_escape(req.url)}V",
  "request_referer":"%{cstr_escape(req.http.Referer)}V",
  "request_user_agent":"%{cstr_escape(req.http.User-Agent)}V",
  "request_accept_language":"%{cstr_escape(req.http.Accept-Language)}V",
  "request_accept_charset":"%{cstr_escape(req.http.Accept-Charset)}V",
  "cache_status":"%{regsub(fastly_info.state, "^(HIT-(SYNTH)|(HITPASS|HIT|MISS|PASS|ERROR|PIPE)).*", "\\2\\3") }V"
}

Example BigQuery schema 

The textual BigQuery schema for the example format shown above would look something like this:
timestamp:STRING,time_elapsed:FLOAT,is_tls:BOOLEAN,client_ip:STRING,geo_city:STRING,geo_co
untry_code:STRING,request:STRING,host:STRING,url:STRING,request_referer:STRING,request_use
r_agent:STRING,request_accept_language:STRING,request_accept_charset:STRING,cache_status:S
TRING
When creating your BigQuery table, click on the "Edit as Text" link and paste this example in.

Get started now

Congratulations! You’ve just configured Fastly to send its logs in real time to Cloud Storage and BigQuery, where you can easily analyze them to better understand how users are interacting with your applications. Please contact us with any questions. If you’re a current customer, we’d love to hear about how you're using Fastly and GCP. And if you’re new to Fastly, you can try it out for free; simply sign up here to get going.

How to build a conversational app using Cloud Machine Learning APIs, Part 2


In part 1 of this blogpost, we gave you an overview of what a conversational tour guide iOS app might look like built on Cloud Machine Learning APIs and API.AI. We also demonstrated how to create API.AI intents and contexts. In part 2, we’ll discuss an advanced API.AI topic — webhook with Cloud Functions. We’ll also show you how to use Cloud Machine Learning APIs (Vision, Speech and Translation) and how to support a second language.

Webhooks via Cloud Functions 

In API.AI, Webhook integrations allow you to pass information from a matched intent into a web service and get a result from it. Read on to learn how to request parade info from Cloud Functions.
  1. Go to console.cloud.google.com. Log in with your own account and create a new project. 

  2. Once you’ve created a new project, navigate to that project. 
  3. Enable the Cloud Functions API. 

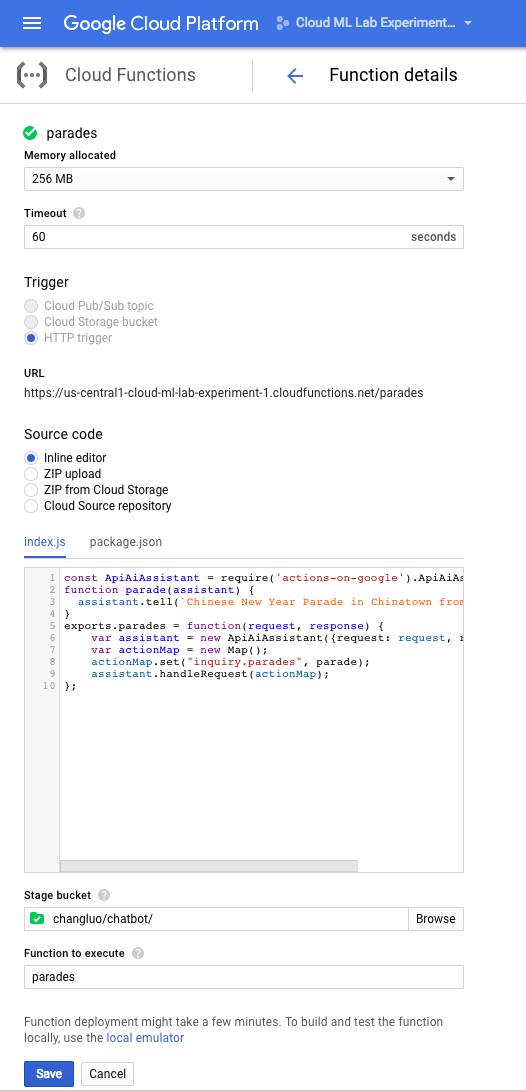
  4. Create a function. For the purposes of this guide, we’ll call the function “parades”. Select the “HTTP” trigger option, then select “inline” editor. 

  5. Don’t forget to specify the function to execute to “parades”.

    You’ll also need to create a “stage bucket”. Click on “browse” — you’ll see the browser, but no buckets will exist yet. 

  6. Click on the “+” button to create the bucket.
    • Specify a unique name for the bucket (you can use your project name, for instance), select “regional” storage and keep the default region (us-central1).
    • Click back on the “select” button in the previous window.
    • Click the “create” button to create the function.

    The function will be created and deployed: 

  7. Click the “parades” function line. In the “source” tab, you’ll see the sources. 
Now it’s time to code our function! We’ll need two files: the “index.js” file will contain the JavaScript / Node.JS logic, and the “package.json” file contains the Node package definition, including the dependencies we’ll need in our function.

Here’s our package.json file. This is dependent on the actions-on-google NPM module to ease the integration with API.AI and the Actions on Google platform that allows you to extend the Google Assistant with your own extensions (usable from Google Home):
{
  "name": "parades",
  "version": "0.0.1",
  "main": "index.js",
  "dependencies": {
    "actions-on-google": "^1.1.1"
  }
}

In the index.js file, here’s our code:

const ApiAiApp = require('actions-on-google').ApiAiApp;
function parade(app) {
  app.ask(`Chinese New Year Parade in Chinatown from 6pm to 9pm.`);
}
exports.parades = function(request, response) {
    var app = new ApiAiApp({request: request, response: response});
    var actionMap = new Map();
    actionMap.set("inquiry.parades", parade);
    app.handleRequest(actionMap);
};

In the code snippets above: 
  1. We require the actions-on-google NPM module. 
  2. We use the ask() method to let the assistant send a result back to the user. 
  3. We export a function where we’re using the actions-on-google module’s ApiAiApp class to handle the incoming request. 
  4. We create a map that maps “intents” from API.AI to a JavaScript function. 
  5. Then, we call the handleRequest() to handle the request. 
  6. Once done, don’t forget to click the “create” function button. It will deploy the function in the cloud. 
There's subtle difference between tell() and ask() APIs. tell() will end the conversation and close the mic, while ask() will not. This difference doesn’t matter for API.AI projects like the one we demonstrate here in part 1 and part 2 of this blogpost. When we integrate Actions on Google in part 3, we’ll explain this difference in more detail. 

As shown below, the “testing” tab invokes your function, the “general” tab shows statistics and the “trigger” tab reveals the HTTP URL created for your function: 


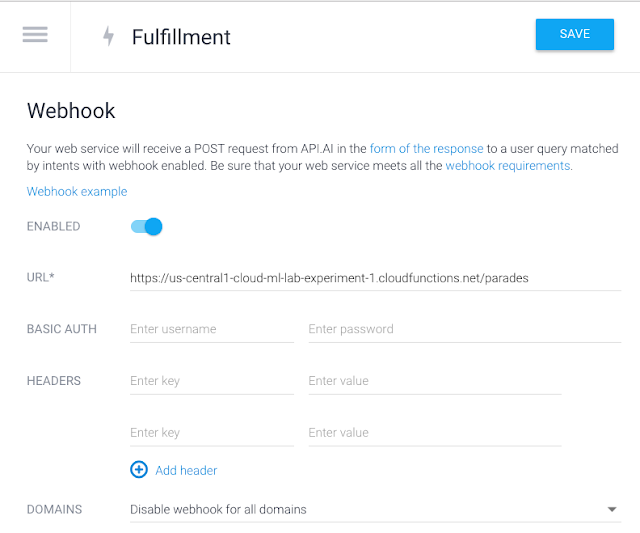
Your final step is to go to the API.AI console, then click the Fulfillment tab. Enable webhook and paste the URL above into the URL field. 


With API.AI, we’ve built a chatbot that can converse with a human by text. Next, let’s give the bot “ears” to listen with Cloud Speech API, “eyes” to see with Cloud Vision API, a “mouth” to talk with the iOS text-to-speech SDK and “brains” for translating languages with Cloud Translation API.

Using Cloud Speech API 

Cloud Speech API includes an iOS sample app. It’s quite straightforward to integrate the gRPC non-streaming sample app into our chatbot app. You’ll need to acquire an API key from Google Cloud Console and replace this line in SpeechRecognitionService.m with your API key.

#define API_KEY @"YOUR_API_KEY"

Landmark detection 

 NSDictionary *paramsDictionary =
  @{@"requests":@[
        @{@"image":
            @{@"content":binaryImageData},
          @"features":@[
              @{@"type":@"LANDMARK_DETECTION", @"maxResults":@1}]}]};

Follow this example to use Cloud Vision API on iOS. You’ll need to replace the label and face detection with landmark detection as shown below. 

You can use the same API key you used for Cloud Speech API. 

Text to speech

iOS 7+ has a built-in text-to-speech SDK, AVSpeechSynthesizer. The code below is all you need to convert text to speech.

#import 
AVSpeechUtterance *utterance = [[AVSpeechUtterance alloc] initWithString:message];
AVSpeechSynthesizer *synthesizer = [[AVSpeechSynthesizer alloc] init];
[synthesizer speakUtterance:utterance];

Supporting multiple languages

Supporting additional languages in Cloud Speech API is a one-line change on the iOS client side. (Currently, there's no support for mixed languages.) For Chinese, replace this line in SpeechRecognitionService.m

recognitionConfig.languageCode = @"en-US";
with
recognitionConfig.languageCode = @"zh-Hans";

To support additional text-to-speech languages, add this line to the code:

#import 
AVSpeechUtterance *utterance = [[AVSpeechUtterance alloc] initWithString:message];
utterance.voice = [AVSpeechSynthesisVoice voiceWithLanguage:@"zh-Hans"];
AVSpeechSynthesizer *synthesizer = [[AVSpeechSynthesizer alloc] init];
[synthesizer speakUtterance:utterance];
Both Cloud Speech API and Apple’s AVSpeechSynthesisVoice support BCP-47 language code.

Cloud Vision API landmark detection currently only supports English, so you’ll need to use the Cloud Translation API to translate to your desired language after receiving the English-language landmark description. (You would use Cloud Translation API similarly to Cloud Vision and Speech APIs.) 

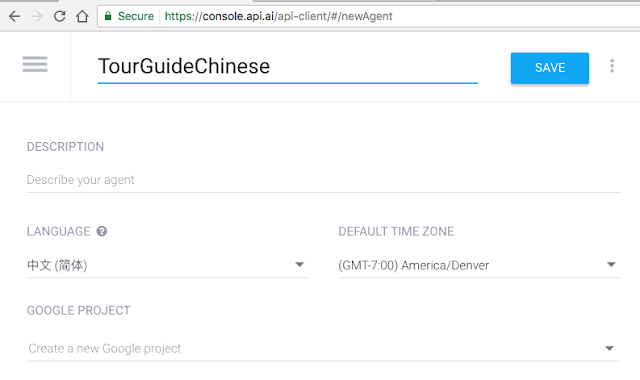
On the API.AI side, you’ll need to create a new agent and set its language to Chinese. One agent can support only one language. If you try to use the same agent for a second language, machine learning won’t work for that language. 
You’ll also need to create all intents and entities in Chinese. 
And you’re done! You’ve just built a simple “tour guide” chatbot that supports English and Chinese.


Next time 

We hope this example has demonstrated how simple it is to build an app powered by machine learning. For more getting-started info, you might also want to try:
You can download the source code from Github.

In part 3, we’ll cover how to build this app on Google Assistant with Actions on Google integration.