Category Archives: Google Cloud Platform Blog

Product updates, customer stories, and tips and tricks on Google Cloud Platform

New ways to manage sensitive data with the Data Loss Prevention API


If your organization has sensitive and regulated data, you know how much of a challenge it can be to keep it secure and private. The Data Loss Prevention (DLP) API, which went beta in March, can help you quickly find and protect over 50 types of sensitive data such as credit card numbers, names and national ID numbers. And today, we’re announcing several new ways to help protect sensitive data with the DLP API, including redaction, masking and tokenization.

These new data de-identification capabilities help you to work with sensitive information, while reducing the risk of sensitive data being inadvertently revealed. If like many enterprises you follow the principle of least privilege or need-to-know access to data (only use or expose the minimum data required for an approved business process) the DLP API can help you enforce these principles in production applications and data workflows. And because it’s an API, the service can be pointed at any virtually any data source or storage system. DLP API offers native support and scale for scanning large datasets in Google Cloud Storage, Datastore and BigQuery.
Google Cloud DLP API enables our security solutions to scan and classify documents and images from multiple cloud data stores and email sources. This allows us to offer our customers critical security features, such as classification and redaction, which are important for managing data and mitigating risk. Google’s intelligent DLP service enables us to differentiate our offerings and grow our business by delivering high quality results to our customers.  
 Sateesh Narahari, VP of Products, Managed Methods

New de-identification tools in DLP API

De-identifying data removes identifying information from a dataset, making it more difficult to associate the remaining data with an individual and reducing the risk of exposure.
With the DLP API, you can classify and mask sensitive elements in both structured data and unstructured data.


The DLP API now supports a variety of new data transformation options:

Redaction and suppression 
Redaction and suppression remove entire values or entire records from a dataset. For example, if a support agent working in a customer support UI doesn’t need to see identifying details to troubleshoot the problem, you might decide to redact those values. Or, if you’re analyzing large population trends, you may decide to suppress records that contain unique demographics or rare attributes, since these distinguishing characteristics may pose a greater risk.
The DLP API identifies and redacts a name, social security number, telephone number and email address
Partial masking 
Partial masking obscures part of a sensitive attribute  for example, the last 7 digits of a US telephone number. In this example, a 10-digit phone number retains only the area code.
Tokenization or secure hashing
Tokenization, also called secure hashing, is an algorithmic transformation that replaces a direct identifier with a pseudonym or token. This can be very useful in cases where you need to retain a record identifier or join data but don’t want to reveal the sensitive underlying elements. Tokens are key-based and can be configured to be reversible (using the same key) or non-reversible (by not retaining the key).

The DLP API supports the following token types:
  • Format-Preserving Encryption - a token of the same length and character set.


  • Secure, key-based hashes - a token that's a 32-byte hexadecimal string generated using a data encryption key.


  • Dynamic data masking 
    The DLP API can apply various de-identification and masking techniques in real time, which is sometimes referred to as “Dynamic Data Masking” (DDM). This can be useful if you don’t want to alter your underlying data, but want to mask it when viewed by certain employees or users. For example, you could mask data when it’s presented in a UI, but require special privileges or generate additional audit logs if someone needs to view the underlying personally identifiable information (PII). This way, users aren’t exposed to the identifying data by default, but only when business needs dictate.
    With the DLP API, you can prevent users from seeing sensitive data in real-time

    Bucketing, K-anonymity and L-Diversity 
    The DLP API offers even more methods that can help you transform and better understand your data. To learn more about bucketing, K-anonymity, and L-Diversity techniques, check out the docs and how-to guides.


    Get started with the DLP API

    With these new transformation capabilities, the DLP API can help you classify and protect sensitive data no matter where it’s stored. With all tools that are designed to assist with data discovery and classification, there's no certainty that it will be 100% effective in meeting your business needs or obligations. To get started with DLP API today, take a look at the quickstart guides.

    Looking back on our migration from bare metal to GCP: Sentry


    [Editor’s note: Is the thought of migrating to Google Cloud Platform (GCP) simultaneously exciting and daunting? You’re not alone. This summer, after months of planning, Sentry took the plunge and moved its hosted open-source error tracking service from a bare-metal provider to GCP. Read on to learn about why it decided to switch and how it settled on its migration game-plan.]

    It was the first weekend in July. And because we’re in San Francisco, it was so foggy and windy that we may as well have been huddled inside an Antarctic research station trying to avoid The Thing.

    The Sentry operations team had gathered at HQ in SOMA to finish migrating our infrastructure to GCP. The previous two and a half months had been tireless (and tiring), but we finished the day by switching over sentry.io’s DNS records and watched as traffic slowly moved from our colo provider in Texas to us-central1 in Iowa.

    We’ve now gone several months without dedicated hardware, with no downtime along the way, and we feel good about having made the switch from bare metal to a cloud provider. Here’s what we learned along the way.

    It’s all about meeting unpredictable demand

    As an error tracking service, Sentry’s traffic is naturally unpredictable, as there’s simply no way to foresee when a user’s next influx of events will be. On bare metal, we handled this by preparing for the worst(ish) and over-provisioning machines in case of a spike. We’re hardly the only company to do this; it’s a popular practice for anyone running on dedicated hardware. And since providers often compete on price, users like us reap the benefits of cheap computing power.

    Unfortunately, as demand grew, our window for procuring new machines shrunk. We demanded more from our provider, requesting machines before we really needed them and kept them idle for days on end. This was exacerbated when we needed bespoke machines, since databases and firewalls took even more time to piece together than commodity boxes.

    But even in the best case, you still had an onsite engineer sprinting down the floor clutching a machine like Marshawn Lynch clutches a football. It was too nerve-wracking. We made the decision to switch to GCP because the machines are already there, they turn on in seconds after we request them, and we only pay for them when they’re on.

    Building the bridge is harder than crossing it

    We decided that migrating to GCP was possible in April, and the operations team spent the next two months working diligently to make it happen. Our first order of business: weed out all the single data center assumptions that we’d made. Sentry was originally constructed for internal services communicating across the room from each other. Increasing that distance to hundreds of miles during the migration would change behaviour in ways that we never planned for. At the same time, we wanted to make certain that we could sustain the same throughput between two providers during the migration that we previously sustained inside of only one.

    The first fork in the road that we came to was the literal network bridge. We had two options: Maintain our own IPsec VPN or encrypt arbitrary connections between providers. Weighing the options, we agreed that public end-to-end latency was low enough that we could rely on stunnel to protect our private data across the public wire. Funneling this private traffic through machines acting as pseudo-NATs yielded surprisingly solid results. For two providers that were roughly 650 miles apart, we saw latencies of around 15 milliseconds for established connections.

    The rest of our time was spent simulating worst-case scenarios, like “What happens if this specific machine disappears?” and “How do we point traffic back the other way if something goes wrong?” After a few days of back-and-forth on disaster scenarios, we ultimately determined that we could successfully migrate with the caveat that the more time we spent straddled between two providers, the less resilient we would be.

    Every change to infrastructure extends your timeline

    A lot of conversations about migrating to the cloud weigh the pros and cons of doing a “lift and shift” vs. re-architecting for the cloud. We chose the former. If we were going to be able to migrate quickly, it was because we were treating GCP as a hardware provider. We gave them money, they gave us machines to connect to and configure. Our entire migration plan was focused around moving off of our current provider, not adopting a cloud-based architecture.

    Sure, there were solid arguments for adopting GCP services as we started moving, but we cast those arguments aside and reminded ourselves that the primary reason for our change was not about architecture  it was about infrastructure. Minimizing infrastructure changes not only reduced the work required, but also reduced the possibility for change in application behavior. Our focus was on building the bridge, not rebuilding Sentry.

    Migrate like you’re stealing a base

    Once we agreed that we’d built the bridge correctly, we sought out to divert our traffic the safest way we could think of: slow and thorough testing, followed by quick and confident migrating. We spent a week diverting our L4 traffic to GCP in short bursts, which helped us build confidence that we could process data in one provider and store it in the other.

    Then the migration really got underway. It started with failing over our single busiest database, just to be extra certain that Google Compute Engine could actually keep up with our IO. Those requirements met, it was a race to get everything else into GCP the other databases, the workers writing to them and the web machines reading from them. We did everything we could to rid ourselves of hesitation. Like stealing a base, successful migrations are the result of careful planning and confident execution.


    Dust doesn’t settle, you settle dust

    The fateful and foggy July day when we switched over finally came. After a few days, we deleted our old provider’s dashboard from our Bookmarks and set out to get comfortable in GCP: we hung a few pictures, removed the shims we put in place for the migration and checked what time the bar across the street had happy hour. More to the point, now that we had a clearer picture of resource requirements, we could start resizing our instances.

    No matter how long we spent projecting resource usage within Compute Engine, we never would have predicted our increased throughput. Due to GCP’s default microarchitecture, Haswell, we noticed an immediate performance increase across our CPU-intensive workloads, namely source map processing. The operations team spent the next few weeks making conservative reductions in our infrastructure, and still managed to cut our infrastructure costs by roughly 20%. No fancy cloud technology, no giant infrastructure undertaking  just new rocks that were better at math.

    Now that we’ve finished our apples-to-apples migration, we can finally explore all of the features that GCP provides in hopes of adding even more resilience to Sentry. We’ll talk about these features, as well as the techniques we use to cut costs, in future blog posts.

    I’d like to send out a special thanks to Matt Robenolt and Evan Ralston for their contributions to this project; you are both irreplaceable parts of the Sentry team. We would love to have another person on our team to help us break ground on our next infrastructure build-out. Maybe that person is you?

    21 new open-source solutions available from Google Cloud Launcher


    Deploying open-source solutions in the cloud usually means a lot of work keeping up-to-date with security hotfixes and version updates. Our Cloud Launcher marketplace provides production-grade solutions that you can launch and manage in just a few clicks, and Click To Deploy solutions further lower operational costs with open source products that are maintained by Google.

    Click To Deploy solutions are vanilla installs identical to what you install yourself. When a critical vulnerability is detected, we jump on it and provide an updated solution as soon as we can. Existing customers also get a notification to update their image. Google Cloud customers tell us they love the ease and simplicity of Click To Deploy solutions, and have come to rely on our timeliness to help keep them secure.

    Today, we launched an additional 21 new VM solutions for some of the most popular open-source products:


    There’s no additional cost to use Click to Deploy solutions beyond the cost of infrastructure. Check out the full catalog of Click To Deploy solutions for Cloud Launcher, and if you’re new to Google Cloud Platform (GCP), get started with $300 dollar of credits for 12 months.

    API design: Choosing between names and identifiers in URLs


    If you're involved in the design of web APIs, you know there's disagreement over the style of URL to use in your APIs, and that the style you choose has profound implications for an API’s usability and longevity. The Apigee team here at Google Cloud has given a lot of thought to API design, working both internally and with customers, and I want to share with you the URL design patterns we're using in our most recent designs, and why.

    When you look at prominent web APIs, you'll see a number of different URL patterns.

    Here are two API URLs that exemplify two divergent schools of thought on URL style: https://ebank.com/accounts/a49a9762-3790-4b4f-adbf-4577a35b1df7
    https://library.com/shelves/american-literature/books/moby-dick

    The first is an anonymized and simplified version of a real URL from a U.S. bank where I have a checking account. The second is adapted from a pedagogic example in the Google Cloud Platform API Design Guide.

    The first URL is rather opaque. You can probably guess that it’s the URL of a bank account, but not much more. Unless you're unusually skilled at memorizing hexadecimal strings, you can’t easily type this URL—most people will rely on copy and paste or clicking on links to use this URL. If your hexadecimal skills are as limited as mine, you can’t tell at a glance whether two URLs like these are the same or different, or easily locate multiple occurrences of the same URL in a log file.

    The second URL is much more transparent. It’s easy to memorize, type and compare with other URLs. It tells a little story: there's a book that has a name that's located on a shelf that also has a name. This URL can be easily translated into a natural-language sentence.

    Which should you use? At first glance, it may seem obvious that URL #2 is preferable, but the truth is more nuanced.

    The case for identifiers 


    There is a long tradition—one that predates computers—of allocating numeric or alphanumeric identifiers to entities. Banks and insurance companies allocate identifiers for accounts and policies. Manufacturers, wholesalers and retailers identify products with product codes. Editions of books are identified by their ISBN numbers. Governments issue social security numbers, driver's license numbers, criminal case numbers, land parcel numbers and so on, and our first example is simply an expression of this idea in the URL format of the world wide web.

    If identifiers like these have the disadvantages described above—hard to read, compare, remember and type, and devoid of useful information about the entity they identify—why do we use them?

    The primary reason is that they remain valid and unambiguous even when things change, and stability and certainty are critically important qualities (Tim Berners-Lee wrote an often-quoted article on this topic). If we don't allocate an identifier for a bank account, how can we reliably reference it in the future? Identifying the account using information that we know about it is unreliable because that information is subject to change and may not uniquely identify the account. Details about its owner are all subject to change (e.g., name, address, marital status), or subject to ambiguity (date and place of birth), or both. Even if we have a reliable identifier for the owner, ownership of the account can change, and identifying the account by where and when it was created doesn’t guarantee uniqueness.


    Hierarchical names 


    Hierarchical naming is a very powerful technique that humans have used for centuries to organize information and make sense of the world. The taxonomy of nature, developed in the 1700s by Carolus Linnaeus, is one very famous example.

    URLs in the style of the second example—formed from hierarchies of simple names—are based on this idea. These URLs have the inverse qualities of simple numeric or alphanumeric identifiers: they're easier for humans to use, construct and get information from, but they're not stable in the face of change.

    If you know anything about Linnaeus’ taxonomy, you know that its elements have been renamed and the hierarchy restructured extensively over time; in fact the rate of change has increased with the adoption of modern technologies like DNA analysis. The ability to change is very important for most naming schemes and you should be suspicious of designs that assume that names will not change. In our experience, renaming and reorganizing the name hierarchy turn out to be important or desirable in most user scenarios, even if it wasn’t anticipated by the original API designers.

    The downside of the second example URL is that if a book or shelf changes its name, references to it based on hierarchical names like this one in the example URL will break. Changing name is probably not plausible for a book that is a copy of a mass-printed work of literature, but might apply to other documents you might find an a library, and renaming a shelf seems entirely plausible. Similarly, if a book moves between shelves, which also seems plausible, then references based on this URL will also break.

    There is a general rule here. URLs based on opaque identifiers (sometimes called permalinks) are inherently stable and reliable, but they aren’t very human-friendly. The way to make URLs human-friendly is to build them from information that's meaningful to humans—like names and hierarchies—in which case one of two unfortunate things will happen: either you have to prohibit renaming entities and reorganizing hierarchies, or be prepared to deal with the consequences when links based on these URLs break.

    Up until this point I have talked about the effects this identity dilemma in terms of its impact on URLs exposed by APIs, but the problem also affects identities stored in databases and exchanged between implementation components. URLs exposed by an API are generally based on the identities that the API implementation stores in databases, so design decisions that affect URLs usually also affect database and API implementation design, and vice versa. If you use hierarchical names to identify entities in the implementation as well as the API, the consequences of broken references is compounded, as is the difficulty of supporting renaming and reparenting. This means that the topic is a very important one for total system design, not just API design.

    The best of both worlds 


    Faced with these tradeoffs, which style of URL should you choose? The best response is not to choose: you need both to support a full range of function. Providing both styles of URL gives your API a stable identifier as well as the ease of use of hierarchical names.

    The Google Cloud Platform (GCP) API itself supports both types of URL for entities where renaming or reparenting makes sense. For example, GCP projects have both an immutable identity embedded in stable permalink URLs, and a separate mutable name that you can use in searches. The identity of one of my GCP projects is ‘bionic-bison-166600' (which shows that identifiers don't have to be as inscrutable as RFC-compliant UUIDs—they just need to be stable and unique) and its name is currently "My First Project Renamed".

    Identifiers are for look-up. Names are for search.


    We know from the principles of the world-wide web that every URL identifies a specific entity. It's fairly apparent that "https://ebank.com/accounts/a49a9762-3790-4b4f-adbf-4577a35b1df7" is the URL of a specific bank account. Whenever I use this URL, now or in the future, it will always refer to the same bank account. You might be tempted to think that 'https://library.com/shelves/american-literature/books/moby-dick' is the URL of a specific book. If you think renaming and relocating books could never make sense in a library API, even hypothetically, then you can perhaps defend that point of view, but otherwise you have to think of this URL differently. When I use this URL today, it refers to a specific, dog-eared copy of Moby Dick that is currently on the American Literature shelf. Tomorrow, if the book or shelf is moved or renamed, it may refer to a shiny new copy that replaced the old one, or to no book at all. This shows that the second URL isn’t the URL of a specific book—it must be the URL of something else. You should think of it as the URL of a search result. Specifically, the result of this search:
    find the book that is [currently] named "moby-dick", and is [currently] on the shelf that is [currently] named "american-literature"
    Here’s another URL for the same search result, where the difference is entirely one of URL style, not meaning:

    https://library.com/search?kind=book&name=moby-dick&shelf=(name=american-literature) 

    Understanding that URLs based on hierarchical names are actually the URLs of search results rather than the URLs of the entities in those search results is a key idea that helps explain the difference between naming and identity.

    Using names and identifiers together 


    To use permalink and search URLs together, you start by allocating a permalink for each entity. For example, to create a new bank account, I might expect to POST a representation of the new account details to https://ebank.com/accounts. The successful response contains a status code of 201 along with an HTTP "Location" header whose value is the URL of the new account: "https://ebank.com/accounts/a49a9762-3790-4b4f-adbf-4577a35b1df7".

     If I were designing an API for the library, I would follow the same pattern. I might start with the creation of a shelf by POSTing the following body to https://library.com/locations:

    {"kind": "Shelf",
     "name": "American-Literature",
    }

    This results in the allocation of the following URL for the shelf:

    https://library.com/shelf/20211fcf-0116-4217-9816-be11a4954344

    Then, to create the entry for the book, I might post the following body to https://library.com/inventory:

    {"kind": "Book",
     "name": "Moby-Dick",
     "location": "/shelf/20211fcf-0116-4217-9816-be11a4954344"
    }

    resulting in the allocation of this URL for the book: 

    https://library.com/book/745ba01d-51a1-4615-9571-ee14d15bb4af

    This stable URL will always refer to this particular copy of Moby Dick, regardless of what I call it or where in the library I put it. Even if the book is lost or destroyed, this URL will continue to identify it.

    Based on these entities, I also expect the following search URLs to be valid:

    https://library.com/shelf/american-literatature/book/moby-dick
    https://library.com/search?kind=book&name=moby-dick&shelf=(name=american-literature)

    You can implement both of these search URL styles in the same API if you have the time and energy; otherwise, pick the style you prefer and stick with it.

    Whenever a client performs a GET on one of these search URLs, the identity URL (i.e., its permalink, in this case https://library.com/book/745ba01d-51a1-4615-9571-ee14d15bb4af) of the found entity should be included in the response, either in a header (the HTTP Content-Location header exists for this purpose), in the body, or, ideally, in both. This enables clients to move freely between the permalink URLs and the search URLs for the same entities.


    The downside of two sets of URLs 


    Every design has its drawbacks. Obviously, it takes a little more effort to implement both permalink entity URLs and search URLs in the same API.

    A more serious challenge is that you have to educate your users on which URL to use in which circumstance. When they store URLs in a database, or even just create bookmarks, they’ll probably want to use the identity URLs (permalinks), even though they may use search URLs for other purposes.

    You also need to be careful about how you store your identifiers—the identifiers that should be stored persistently by the API implementation are almost always the identifiers that were used to form the permalinks. Using names to represent references or identity in a database is rarely the right thing to do—if you see names in a database used this way, you should examine that usage carefully.

    Users who write scripts to access the API can choose between search and permalink URLs. Writing scripts with search URLs is often easier and faster, because you can construct search URLs easily from names or numbers you already know, whereas it usually takes a little more effort in a script to parse permalink URLs out of API response headers and bodies.

    The downside of using search URLs in scripts is that they break if an API entity gets renamed or moved in the hierarchy, in the same way that scripts tend to break when files are renamed or moved. Since you are accustomed to fixing scripts when file names change, you may decide to go ahead and use the search URLs and simply fix the scripts when they break. However, if reliability and stability of scripts is very important to you, write your scripts with permalinks.

    Permalinks and search URLs: better together 


    Unless you're very restrictive about the changes you allow to your data, you really can’t achieve stability, reliability and ease-of-use in an API with a single set of URLs. The best APIs implement both permalink URLs based on identifiers for stable identification and search URLs based on names (and perhaps other values) for ease-of-use. For more on API design, read the eBook, “Web API Design: The Missing Link” or check out more API design posts on the Apigee blog.

    Now, you can monitor, debug and log your Ruby apps with Stackdriver


    The Google Cloud Ruby team continues to expand our support for Ruby apps running on Google Cloud Platform (GCP). Case in point, we’ve released beta gems for Stackdriver, our monitoring, logging and diagnostics suite. Now you can use Stackdriver in your Ruby projects not only on GCP but also on AWS and in your own data center. You can read more about the libraries on GitHub.

    Like with all our Ruby libraries, we’re focused on ensuring the Stackdriver libraries make sense to Rubyists and helps them do their jobs more easily. Installation is easy. With Rails, simply add the "stackdriver" gem to your Gemfile and the entire suite is automatically loaded for you. With other Rack-based web frameworks like Sinatra, you require the gem and use the provided middleware.

    Stackdriver Debugger is my favorite Stackdriver product. It provides live, production debugging without needing to redeploy. Once you’ve included the gem in your application, go to Cloud Console, upload your code (or point the debugger at a repository) and you’ll get snapshots of your running application including variable values and stacktraces. You can even add arbitrary log lines to your running application without having to redeploy it. Better yet, Debugger captures all this information in just one request to minimize the impact on your running application.
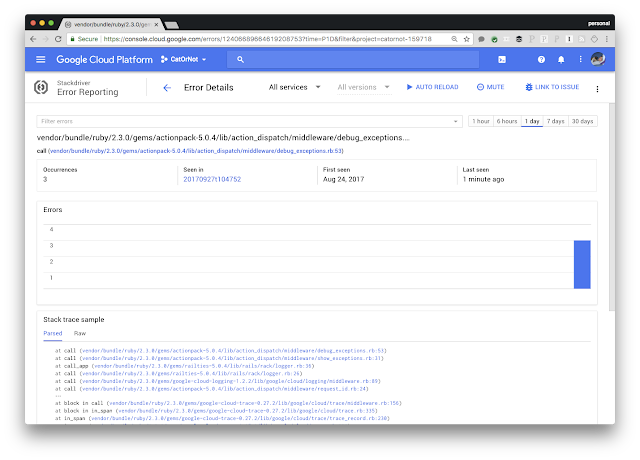
    Stackdriver Error Reporting is Google Cloud's exception detection and reporting tool. It catches crashes in your application, groups them logically, alerts you to them (with appropriate alerting back-off), and displays them for you neatly in the UI. The UI shows you stacktraces of the errors and links to logs and distributed traces for each crash, and lets you acknowledge errors and link a group of errors to a bug in your bug database so you can keep better track of what is going on. In addition to automatically detecting errors, Stackdriver Error Reporting lets you send errors from your code in just a single line. 
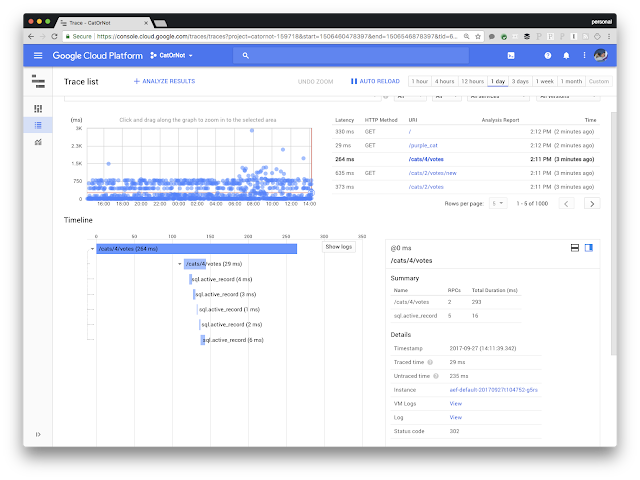
    Stackdriver Trace is Google's application performance monitoring and distributed tracing tool. In Rails it automatically shows you the amount of time a request spends hitting the database, rendering the views, and in application logic. It can also show you how a request moves through a microservices architecture and give you detailed reports on latency trends over time. This way, you can answer once and for all "Did the application get slower after the most recent release?"
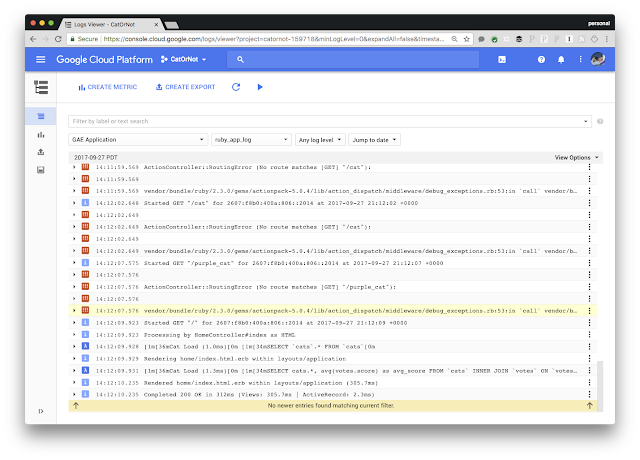
    Stackdriver Logging’s Ruby library was already generally available, and is currently being used by many of Container Engine customers in conjunction with the fluentd logging agent. You can use the logging library even if you don't use Container Engine, since it’s a drop-in replacement for the Ruby and Rails Logger. And when the Stackdriver gem is included in a Rails application, information like request latency is automatically pushed to Stackdriver Logging as well. 
    You can find instructions for getting started with the Stackdriver gems on GitHub. The Stackdriver gems are currently in beta, and we’re eager for folks to try them out and give us feedback either in the Ruby channel on the GCP Slack or on GitHub, so we can make the libraries as useful and helpful as possible to the Ruby community.

    App Engine firewall now generally available


    Securing applications in the cloud is critical for a variety of reasons: restricting access to trusted sources, protecting user data and limiting your application's bandwidth usage in the face of a DoS attack. The App Engine firewall lets you control access to your App Engine app through a set of rules, and is now generally available, ready to secure access to your production applications. Simply set up an application, provide a list of IP ranges to deny or allow, and App Engine does the rest.

    With this release, you can now use the IPv4 and IPv6 address filtering capability in the App Engine firewall to enforce more comprehensive security policies rather than requiring developers to modify their application.

    We have received lots of great feedback from our customers and partners about the security provided by the App Engine firewall, including Reblaze and Cloudflare:
    "Thanks to the newly released App Engine firewall, Reblaze can now prevent even the most resourceful hacker from bypassing our gateways and accessing our customers’ App Engine applications directly. This new feature enables our customers to take advantage of Reblaze's comprehensive web security (including DDoS protection, WAF/IPS, bot mitigation, full remote management, etc.) on App Engine." 
     Tzury Bar Yochay, CTO of Reblaze Technologies
    "With the App Engine firewall, our customers can lock down their application to only accept traffic from Cloudflare IPs. Because Cloudflare uses a reverse-proxy server, this integration further prevents direct access to an application’s origin servers and allows Cloudflare to filter and block malicious activity." 
     Travis Perkins, Head of Alliances at Cloudflare

    Simple and effective 


    Getting started with the App Engine firewall is easy. You can set up rules in the Google Cloud Platform Console, via REST requests in the App Engine Admin API, or with our gcloud CLI.

    For example, let's say you have an application that's being attacked by several addresses on a rogue network. First, get the IP addresses from your application’s request logs. Then, add a deny rule for the rogue network to the firewall. Make sure the default rule is set to allow so that other users can still access the application.

    And that's it! No need to modify and redeploy the application; access is now restricted to your whitelisted IP addresses. The IP addresses that match a deny rule will receive an HTTP 403 request before the request reaches your app, which means that your app won't spin up additional instances or be charged for handling the request.

    Verify rules for any IP


    Some applications may have complex rulesets, making it hard to determine whether an IP will be allowed or denied. In the Cloud Console, the Test IP tab allows you to enter an IP and see if your firewall will allow or deny the request.

    Here, we want to make sure an internal developer IP is allowed. However, when we test the IP, we can see that the "rogue net" blocking rule takes precedence.
    Rules are evaluated in priority order, with the first match being applied, so we can fix this by allowing the developer IP with a smaller priority value than the blocked network it lies within.
    Another check, and we can see it's working as intended.
    For more examples and details, check out the full App Engine firewall documentation.

    We'd like to thank all you beta users who gave us feedback, and encourage anyone with questions, concerns or suggestions to reach out to us by reporting a public issue, posting in the App Engine forum, or messaging us on the App Engine slack channel.

    Introducing Grafeas: An open-source API to audit and govern your software supply chain


    Building software at scale requires strong governance of the software supply chain, and strong governance requires good data. Today, Google, along with JFrog, Red Hat, IBM, Black Duck, Twistlock, Aqua Security and CoreOS, is pleased to announce Grafeas, an open source initiative to define a uniform way for auditing and governing the modern software supply chain. Grafeas (“scribe” in Greek) provides organizations with a central source of truth for tracking and enforcing policies across an ever growing set of software development teams and pipelines. Build, auditing and compliance tools can use the Grafeas API to store, query and retrieve comprehensive metadata on software components of all kinds.

    As part of Grafeas, Google is also introducing Kritis, a Kubernetes policy engine that helps customers enforce more secure software supply chain policies. Kritis (“judge” in Greek) enables organizations to do real-time enforcement of container properties at deploy time for Kubernetes clusters based on attestations of container image properties (e.g., build provenance and test status) stored in Grafeas.
    “Shopify was looking for a comprehensive way to track and govern all the containers we ship to production. We ship over 6,000 builds every weekday and maintain a registry with over 330,000 container images. By integrating Grafeas and Kritis into our Kubernetes pipeline, we are now able to automatically store vulnerability and build information about every container image that we create and strictly enforce a built-by-Shopify policy: our Kubernetes clusters only run images signed by our builder. Grafeas and Kritis actually help us achieve better security while letting developers focus on their code. We look forward to more companies integrating with the Grafeas and Kritis projects.”  
    Jonathan Pulsifer, Senior Security Engineer at Shopify. (Read more in Shopify’s blog post.)

    The challenge of governance at scale 


    Securing the modern software supply chain is a daunting task for organizations both large and small, exacerbated by several trends:

    • Growing, fragmented toolsets: As an organization grows in size and scope, it tends to use more development languages and tools, making it difficult to maintain visibility and control of its development lifecycle. 
    • Open-source software adoption: While open-source software makes developers more productive, it also complicates auditing and governance. 
    • Decentralization and continuous delivery: The move to decentralize engineering and ship software continuously (e.g., “push on green”) accelerates development velocity, but makes it difficult to follow best practices and standards. 
    • Hybrid cloud deployments: Enterprises increasingly use a mix of on-premises, private and public cloud clusters to get the best of each world, but find it hard to maintain 360-degree visibility into operations across such diverse environments. 
    • Microservice architectures: As organizations break down large systems into container-based microservices, it becomes harder to track all the pieces.

    As a result, organizations generate vast quantities of metadata, all in different formats from different vendors and are stored in many different places. Without uniform metadata schemas or a central source of truth, CIOs struggle to govern their software supply chains, let alone answer foundational questions like: “Is software component X deployed right now?” “Did all components deployed to production pass required compliance tests?” and “Does vulnerability Y affect any production code?” 

    The Grafeas approach 

    Grafeas offers a central, structured knowledge-base of the critical metadata organizations need to successfully manage their software supply chains. It reflects best practices Google has learned building internal security and governance solutions across millions of releases and billions of containers. These include:

    • Using immutable infrastructure (e.g., containers) to establish preventative security postures against persistent advanced threats 
    • Building security controls into the software supply chain, based on comprehensive component metadata and security attestations, to protect production deployments 
    • Keeping the system flexible and ensuring interoperability of developer tools around common specifications and open-source software

    Grafeas is designed from the ground up to help organizations apply these best practices in modern software development environments, using the following features and design points:

    • Universal coverage: Grafeas stores structured metadata against the software component’s unique identifier (e.g., container image digest), so you don’t have to co-locate it with the component’s registry, and so it can store metadata about components from many different repositories. 
    • Hybrid cloud-friendly: Just as you can use JFrog Artifactory as the central, universal component repository across hybrid cloud deployments, you can use the Grafeas API as a central, universal metadata store. 
    • Pluggable: Grafeas makes it easy to add new metadata producers and consumers (for example, if you decide to add or change security scanners, add new build systems, etc.) 
    • Structured: Structured metadata schemas for common metadata types (e.g., vulnerability, build, attestation and package index metadata) let you add new metadata types and providers, and the tools that depend on Grafeas can immediately understand those new sources. 
    • Strong access controls: Grafeas allows you to carefully control access for multiple metadata producers and consumers. 
    • Rich query-ability: With Grafeas, you can easily query all metadata across all of your components so you don’t have to parse monolithic reports on each component.

    Defragmenting and centralizing metadata 

    At each stage of the software supply chain (code, build, test, deploy and operate), different tools generate metadata about various software components. Examples include the identity of the developer, when the code was checked in and built, what vulnerabilities were detected, what tests were passed or failed, and so on. This metadata is then captured by Grafeas. See the image below for a use case of how Grafeas can provide visibility for software development, test and operations teams as well as CIOs.
    (click to enlarge)

    To give a comprehensive, unified view of this metadata, we built Grafeas to promote cross-vendor collaboration and compatibility; we’ve released it as open source, and are working with contributors from across the ecosystem to further develop the platform:

    • JFrog is implementing Grafeas in the JFrog Xray API and will support hybrid cloud workflows that require metadata in one environment (e.g., on-premises in Xray) to be used elsewhere (e.g., on Google Cloud Platform). Read more on JFrog’s blog
    • Red Hat is planning on enhancing the security features and automation of Red Hat Enterprise Linux container technologies in OpenShift with Grafeas. Read more on Red Hat’s blog
    • IBM plans to deliver Grafeas and Kristis as part of the IBM Container Service on IBM Cloud, and to integrate our Vulnerability Advisor and DevOps tools with the Grafeas API. Read more on IBM’s blog
    • Black Duck is collaborating with Google to implement the Google artifact metadata API implementation of Grafeas, to bring improved enterprise-grade open-source security to Google Container Registry and Google Container Engine. Read more on Black Duck’s blog
    • Twistlock will integrate with Grafeas to publish detailed vulnerability and compliance data directly into orchestration tooling, giving customers more insight and confidence about their container operations. Read more on Twistlock’s blog.
    • Aqua Security will integrate with Grafeas to publish vulnerabilities and violations, and to enforce runtime security policies based on component metadata information. Read more on Aqua’s blog
    • CoreOS is exploring integrations between Grafeas and Tectonic, its enterprise Kubernetes platform, allowing it to extend its image security scanning and application lifecycle governance capabilities. 

    Already, several contributors are planning upcoming Grafeas releases and integrations:

    • JFrog’s Xray implementation of Grafeas API 
    • A Google artifact metadata API implementation of Grafeas, together with Google Container Registry vulnerability scanning 
    • Bi-directional metadata sync between JFrog Xray and the Google artifact metadata API 
    • Black Duck integration with Grafeas and the Google artifact metadata API 
    Building on this momentum, we expect numerous other contributions to the Grafeas project early in 2018.

    Join us!

    The way we build and deploy software is undergoing fundamental changes. If scaled organizations are to reap the benefits of containers, microservices, open source and hybrid cloud, they need a strong governance layer to underpin their software development processes. Here are some ways you can learn more about and contribute to the project:


     We hope you will join us!

    4 ways you can deploy an ASP.NET Core app to GCP


    For the past several months, all you .NET developers out there have been kicking the tires on running .NET Core apps on App Engine flexible environment. Now, thanks to all your great feedback, we’re really happy to announce that .NET Core support is generally available on App Engine flexible environment as well as Container Engine. We support .NET Core 1.0, 1.1 and 2.0 with Google-supported Docker images that are optimized for running on Google Cloud Platform (GCP).

    Now that you can run your .NET Core apps on GCP in a supported fashion, the question becomes what’s the best way to get your apps there? In a nutshell, there are four basic methods for deploying an ASP.NET Core app to GCP, depending on your target environment:
    1. Deploy from Visual Studio directly using the Cloud Tools for Visual Studio extension 
    2. Deploy a Framework Dependent Deployment bundle with "dotnet publish"
    3. Deploy to App Engine flexible environment with a custom Dockerfile 
    4. Deploy to Container Engine with a custom Dockerfile 

    Method 1 is arguably the simplest, most direct way to get your app up and running on GCP, and takes care of creating all necessary components, including the Dockerfile, behind the scenes. Methods 2, 3 and 4 are appropriate when you cannot use Visual Studio, and can be performed directly from the command line. These methods require you to gather and create the several components necessary to deploy your app, including:
    • Build artifacts, such as .dlls, that are the result of publishing your app and which include all the necessary dependencies to be able to run
    • In the case of App Engine, an app.yaml file that defines the deployment, and that sits at the root of the app’s deployment files
    Deploying your app will also require you to build a Docker image, for which you’ll need to create a Dockerfile that describes to the Docker service how to build the image. App Engine creates the Dockerfile for you while it deploys your app (see “Method 3: Deploy to App Engine with a custom Dockerfile” below). If you’re deploying to Container Engine, however, you’ll need to create the Dockerfile yourself.

    Let’s take a deeper look at these four methods.

    Method 1: Deploy from Visual Studio 


    To deploy your ASP.NET Core apps to GCP, you can use our Cloud Tools for Visual Studio extension, which takes care of all the necessary details to deploy your app from right inside the Visual Studio IDE.

    Method 2: Deploy a Framework Dependent Deployment bundle 


    The simplest way to deploy an app from the command line, meanwhile, is to deploy the result of running "dotnet publish" to create a Framework Dependent Deployment bundle. This directory contains your app’s dlls and all of the dependencies referenced in your project files.

    To deploy this directory to App Engine flexible environment, you also need to place your app.yaml in the build artifacts directory. To make this placement automatic, place the app.yaml file in the root of the startup project of the solution, next to the the .csproj file, and add app.yaml to .csproj as a file to be copied to the output. You can do this by adding the following snippet to .csproj:

    <ItemGroup>
      <None Include="app.yaml" CopyToOutputDirectory="PreserveNewest" />
    </ItemGroup>
    

    And here’s the minimum app.yaml file necessary to deploy to App Engine flexible:

    runtime: aspnetcore
    env: flex

    This app.yaml indicates that you're using the “aspnetcore” runtime to run ASP.NET Core apps, and that you're running in App Engine flexible environment. You can further customize your app with these additional app.yaml settings.

    Once you’ve made the above change to your .csproj, publishing the app with the "dotnet publish" command copies app.yaml to the output directory. This creates a directory that's ready to be deployed.

    To deploy this directory to App Engine flexible environment, follow these steps:

    1. From the startup project’s directory, run “dotnet publish” with the configuration of your choice, for example:
      dotnet publish -c Release

      This publishes the release build to the directory “bin\<configuration>\netcore<version>\publish” with the app’s deployment files, including app.yaml if you included it in .csproj. 

    2. Deploy the app to App Engine flexible by running:
      gcloud app deploy 
      bin\<configuration>\netcore<version>\publish\app.yaml

      This deploys the app to App Engine for you, and gcloud takes care of all of the complexities of wrapping your app into a Docker image.

    Method 3: Deploy to App Engine with a custom Dockerfile 


    If you need more control over how your app’s container is built, you can specify your own Dockerfile. This happens when you need to install custom packages in the container, extra tools or need more control over the contents of the container.

    In this case, you’ll need the following app.yaml:
    runtime: custom
    env: flex

    The “runtime: custom” setting tells App Engine that you'll supply the Dockerfile to build your app’s image.

    Next, you need to create a Dockerfile for your app. Here are two possible ways to write the Dockerfile, depending on your needs.

    1. Creating a Dockerfile for a published app 

    2. If you want to keep going down the published app route, you can specify a Dockerfile to build the app’s image based on a published directory. The Dockerfile looks like this:

      FROM gcr.io/google-appengine/aspnetcore:2.0
      ADD ./ /app
      ENV ASPNETCORE_URLS=http://*:${PORT}
      WORKDIR /app
      ENTRYPOINT [ "dotnet", "MainProject.dll" ]


      Notice how this Dockerfile example uses the “gcr.io/google-appengine/aspnetcore:2.0” as its base image. We've created a set of Docker images that are optimized for running ASP.NET Core apps in App Engine and Container Engine, and we highly recommend that you use them for your custom Dockerfiles. These are the same images we use when we generate Dockerfiles for you during deployment. Be sure to change it to refer to the correct .NET Core runtime version for your app.

      To ensure that the Dockerfile is in the published directory, add it to your .csproj so it's published when the app is published. Assuming that the Dockerfile is in the root of the startup project, on the same level as .csproj and app.yaml, add the following snippet to .csproj:

      <ItemGroup>
        <None Include="app.yaml" CopyToOutputDirectory="PreserveNewest" />
        <None Include="Dockerfile" CopyToOutputDirectory="PreserveNewest" />
      </ItemGroup>

      With this change, whenever you run “dotnet publish” both files are copied to the published directory. To deploy, just follow the same steps as before:

      dotnet publish -c Release


      gcloud app deploy 
      bin\<configuration>\netcore<version>\publish\app.yaml


    3. Creating a Dockerfile that compiles and publishes the app
      If you can easily build your ASP.NET Core app on Linux, you should consider using a multi-stage Dockerfile that performs the restore and publish steps during the build process, before building the final app’s image. This makes it a bit more convenient to deploy the app, as the build is done during deployment.

      Here’s what that Dockerfile looks like:  

    4. # First let’s build the app and publish it.
      FROM gcr.io/cloud-builders/csharp/dotnet AS builder
      COPY . /src
      WORKDIR /src
      RUN dotnet restore --packages /packages
      RUN dotnet publish -c Release -o /published
      
      # Now let's build the app's image.
      FROM gcr.io/google-appengine/aspnetcore:2.0
      COPY --from=builder /published /app
      ENV ASPNETCORE_URLS=http://*:${PORT}
      WORKDIR /app
      ENTRYPOINT [ "dotnet", "multistage-2.0.dll" ]
      This Dockerfile uses the “gcr.io/cloud-builders/csharp/dotnet” builder image that wraps the .NET SDKs for all supported versions of .NET Core.

      The main advantage of this method is that you can put app.yaml and the Dockerfile in the root of your project, next to .csproj. Then, to deploy the app, simply run the following command:

      gcloud app deploy app.yaml

      This uploads your app sources to Cloud Builder where the build will take place. The resulting build artifacts will then be used to produce the final app image, which will be deployed to App Engine. You can also run tests during the build process, making this a complete CI/CD solution.


    Method 4: Deploy to Container Engine 


    When you need more control over your workloads, or need to use protocols not supported by App Engine, you can use Container Engine. Deploying to Container Engine is somewhat similar to deploying to App Engine you build a Docker image for your app and then deploy it to an existing cluster.

    To build your app’s Docker image you can use either of the methods described above in Method 3 a Dockerfile for a published app, or a Dockerfile that builds and publishes your app during the Docker build process.

    Building the app’s Docker image

    While you can use any of the strategies defined earlier when writing the Dockerfile for your app, if you want to deploy to Container Engine, you’ll need to build the Docker image yourself. You’ll also need to push the image to a repository from which Container Engine can read the image. The easiest way to do this is to push the image to Cloud Container Registry, a private Docker image repository that stores images for your project in Cloud Storage.

    The simplest way to build a Docker image and push it to Container Registry is to use Cloud Container Builder, a hosted Docker service that builds Docker images and pushes them to Container Registry in a single operation. First, go to your app’s root deployment directory, which was created as part of “dotnet publish” or is the root of the project, depending on the option you chose. Then run the following command:

    kubectl run myservice --image=gcr.io/<your project id>/<app name> --port=8080

    This command builds a Docker image called gcr.io/$PROJECT_ID/<app name> where $PROJECT_ID is automatically substituted for your GCP project ID and <app name> is the name of your app. 

    Deploying the image to a Container Engine cluster 

    Next, you’ll need to deploy the image you just created to Container Engine. But first, to interact with Container Engine, you need to install kubectl, which allows you to interact with your cluster from the command line.

    The easiest way to install kubectl is to let gcloud do it for you by running:

    gcloud components install kubectl

    You must also store your cluster’s credentials on your machine so kubectl can access them. Once you’ve create your Container Engine cluster, run the following command to get those credentials:

    gcloud container clusters get-credentials

    Now let’s see how to deploy your app to Container Engine. First, create a deployment to run the image. You can do this easily from the command line with the following command:

    kubectl run myservice --image=gcr.io/<your project id>/<app name> --port=8080

    This creates a new Kubernetes deployment on which to run your app, as well as all the necessary pods. You can even specify the number of replicas of your code to run using the --replicas=n parameter, where n is any number of your choosing.

    Note: Here, we assume that your Docker containers export port 8080, the default for App Engine flexible environment, and that you expose services from port 80. To change these defaults, read about how to configure HTTPS support for public Kubernetes services.

    Then, expose this deployment so it can be seen from outside of your cluster. The easiest way to do this is with the following command:

    kubectl expose deployment myservice --port=80 --target-port=8080 
    --type=LoadBalancer

    This exposes the deployment that you created above with a service of type LoadBalancer, indicating that this is a public service with a public IP address.

    In conclusion

    We're really excited to bring .NET developers to GCP. Whether you like App Engine flexible environment, or prefer the power that Container Engine gives you, we have you covered. We're also investing in making you really productive as a .NET developer on GCP. For more information on how to build apps with .NET for GCP, visit our .NET page, where you can learn about our .NET libraries and more.

    We're fully committed to open source. You can find all our images in the https://github.com/GoogleCloudPlatform/aspnet-docker repo. We look forward to your feedback, feel free to open issues on the aspnet-docker repo with your ideas and suggestions.

    GCP adds support for multiple network interfaces


    By default, VM instances in a Virtual Private Cloud (VPC) have a single network interface. Sometimes you need more than that, say, to enforce networking or security functions in the instance, or across isolated VPCs. That’s why today, we’re excited to announce that multiple network interface support is generally available, allowing you to provision up to eight network interfaces on a single VM instance.

    With multiple network interfaces available to an instance, you can:
    • Connect virtual network and security appliances 
    • Isolate public-facing services from an internal network and its services 
    • Separate management, control, storage and data plane networks 
    • Create an inexpensive fault-tolerant solution 
    With multiple network interfaces, you can host virtualized networking or security functions that apply to communication across separate VPC networks, for example, from public to VPC network domains and vice versa. Examples of these VPC network and security functions include load balancers, Intrusion Detection and Prevention Systems (IDS/IPS), Web Application Firewalls (WAF) and WAN optimization. Having multiple network interfaces is also useful when applications running in an instance need to separate traffic, for example data plane traffic from management plane traffic.

    Here’s an example of creating a VM instance with multiple network interfaces, in this case, an inside network and an outside network.
    Below is a sample architectural diagram of a security appliance with four network interfaces. As you can see, you can create North-South networks (e.g., the outbound network on the left) or East-West (e.g., the inbound networks on the bottom). [Editor’s note: If you’d like to build your own architectural diagrams such as this, check out these sample diagrams and our icon library.]
    Support for multiple network interfaces makes it possible for enterprises to migrate sensitive applications to Google Cloud, and our partners are weaving this functionality into their products.
    "We have been working closely with Google Cloud on design and use cases for this capability. The multiple network interface VM will enable Palo Alto Networks to provide the same enterprise-grade security that customers are used to in their private data centers. Customers will be able to inspect not just the traffic coming into GCP, but also the East-West traffic between their GCP projects and across VPCs." 
    Adam Geller, VP, Product Management for Virtualization and Cloud at Palo Alto Networks
    "We are delighted to have worked with Google to demonstrate how NETSCOUT’s packet-based application assurance can be extended to multiple interface GCP compute instances. This will allow GCP customers to leverage the benefits of multiple network interfaces, while minimizing the disruption of cloud migration and hybrid cloud deployments through the proactive identification of issues impacting user experience, operational efficiency and productivity." 
    Paul Barrett, CTO for Enterprise Business Operations

    To learn more about configuring and using multiple NICs, visit the documentation. To participate as a GCP partner, join the partner community. Then get ready to build cloud applications that deliver the flexibility, security features and agility that enterprises have come to expect from cloud networks.