When you look at an image, what parts of an image do you pay attention to first? Would a machine be able to learn this? We provide a machine learning model that can be used to do just that. Why is it useful? The latest generation image format (JPEG XL) supports serving the parts that you pay attention to first, which results in an improved user experience: images will appear to load faster. But the model not only works for encoding JPEG XL images, but can be used whenever we need to know where a human would look first.
An open sourcing attention center model
What regions in an image will attract the majority of human visual attention first? We trained a model to predict such a region when given an image, called the attention center model, which is now open sourced. In addition to the model, we provide a script to use it in combination with the JPEG XL encoder: google/attention-center.
Some example predictions of our attention center model are shown in the following figure, where the green dot is the predicted attention center point for the image. Note that in the “two parrots” image both parrots’ heads are visually important, so the attention center point will be in the middle.
 |
| Images are from Kodak image data set: http://r0k.us/graphics/kodak/ |
The model is 2MB and in the TensorFlow Lite format. It takes an RGB image as input and outputs a 2D point, which is the predicted center of human attention on the image. That predicted center is the place where we should start with operations (decoding and displaying in JPEG XL case). This allows the most visually salient/import regions to be processed as early as possible. Check out the code and continue to build upon it!
Attention center ground-truth data
To train a model to predict the attention center, we first need to have some ground-truth data from the attention center. Given an image, some attention points can either be collected by eye trackers [1], or be approximated by mouse clicks on a blurry version of the image [2]. We first apply temporal filtering to those attention points and keep only the initial ones, and then apply spatial filtering to remove noise (e.g., random gazes). We then compute the center of the remaining attention points as the attention center ground-truth. An example illustration figure is shown below for the process of obtaining the ground-truth.
 |
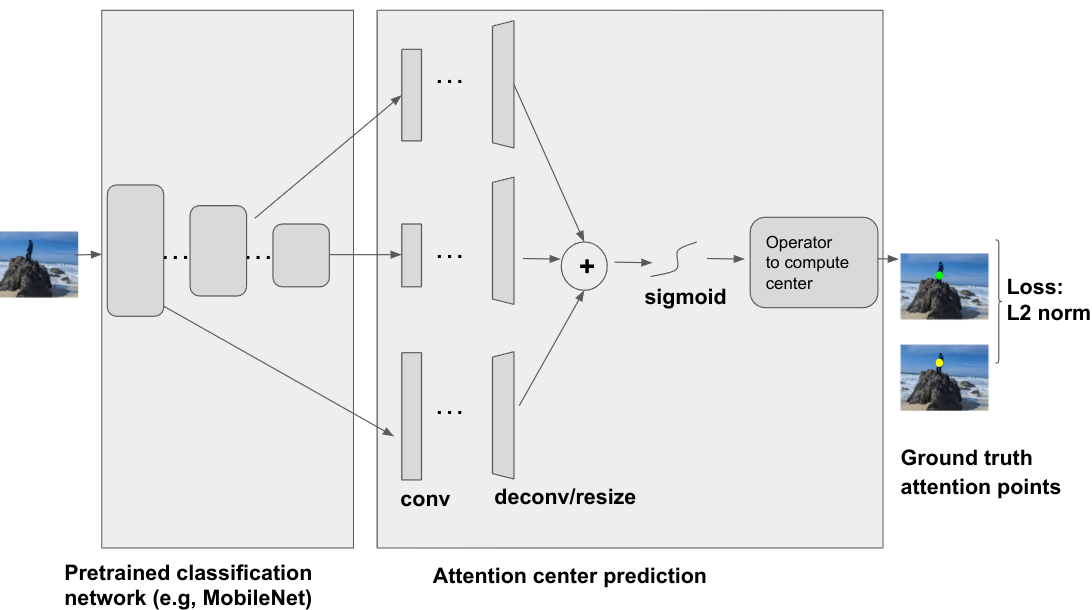
Attention center model architecture
The attention center model is a deep neural net, which takes an image as input, and uses a pre-trained classification network, e.g, ResNet, MobileNet, etc., as the backbone. Several intermediate layers that output from the backbone network are used as input for the attention center prediction module. These different intermediate layers contain different information e.g., shallow layers often contain low level information like intensity/color/texture, while deeper layers usually contain higher and more semantic information like shape/object. All are useful for the attention prediction. The attention center prediction applies convolution, deconvolution and/or resizing operator together with aggregation and sigmoid function to generate a weighting map for the attention center. And then an operator (the Einstein summation operator in our case) can be applied to compute the (gravity) center from the weighting map. An L2 norm between the predicted attention center and the ground-truth attention center can be computed as the training loss.
 |
Progressive JPEG XL images with attention center model
JPEG XL is a new image format that allows the user to encode images in a way to ensure the more interesting parts come first. This has the advantage that when viewing images that are transferred over the web, we can already display the attention grabbing part of the image, i.e. the parts where the user looks first and as soon as the user looks elsewhere ideally the rest of the image already has arrived and has been decoded. Using Saliency in progressive JPEG XL images | Google Open Source Blog illustrates how this works in principle. In short, in JPEG XL, the image is divided into square groups (typically of size 256 x 256), and the JPEG XL encoder will choose a starting group in the image and then grow concentric squares around that group. It was this need for figuring out where the attention center of an image is that led us to open source the attention center model, together with a script to use it in combination with the JPEG XL encoder. Progressive decoding of JPEG XL images has recently been added to Chrome starting from version 107. At the moment, JPEG XL is behind an experimental flag, which can be enabled by going to chrome://flags, searching for “jxl”.
To try out how partially loaded progressive JPEG XL images look, you can go to https://google.github.io/attention-center/.
By Moritz Firsching, Junfeng He, and Zoltan Szabadka – Google Research
References
[1] Valliappan, Nachiappan, Na Dai, Ethan Steinberg, Junfeng He, Kantwon Rogers, Venky Ramachandran, Pingmei Xu et al. "Accelerating eye movement research via accurate and affordable smartphone eye tracking." Nature communications 11, no. 1 (2020): 1-12.
[2] Jiang, Ming, Shengsheng Huang, Juanyong Duan, and Qi Zhao. "Salicon: Saliency in context." In Proceedings of the IEEE conference on computer vision and pattern recognition, pp. 1072-1080. 2015.