Tag Archives: Security

Making authentication faster than ever: passkeys vs. passwords


In recognition of World Password Day 2023, Google announced its next step toward a passwordless future: passkeys. 


Passkeys are a new, passwordless authentication method that offer a convenient authentication experience for sites and apps, using just a fingerprint, face scan or other screen lock. They are designed to enhance online security for users. Because they are based on the public key cryptographic protocols that underpin security keys, they are resistant to phishing and other online attacks, making them more secure than SMS, app based one-time passwords and other forms of multi-factor authentication (MFA). And since passkeys are standardized, a single implementation enables a passwordless experience across browsers and operating systems. 


Passkeys can be used in two different ways: on the same device or from a different device. For example, if you need to sign in to a website on an Android device and you have a passkey stored on that same device, then using it only involves unlocking the phone. On the other hand, if you need to sign in to that website on the Chrome browser on your computer, you simply scan a QR code to connect the phone and computer to use the passkey.


The technology behind the former (“same device passkey”) is not new: it was originally developed within the FIDO Alliance and first implemented by Google in August 2019 in select flows. Google and other FIDO members have been working together on enhancing the underlying technology of passkeys over the last few years to improve their usability and convenience. This technology behind passkeys allows users to log in to their account using any form of device-based user verification, such as biometrics or a PIN code. A credential is only registered once on a user’s personal device, and then the device proves possession of the registered credential to the remote server by asking the user to use their device’s screen lock. 


The user’s biometric, or other screen lock data, is never sent to Google’s servers - it stays securely stored on the device, and only cryptographic proof that the user has correctly provided it is sent to Google. Passkeys are also created and stored on your devices and are not sent to websites or apps. If you create a passkey on one device the Google Password Manager can make it available on your other devices that are signed into the same system account.


Learn more on how passkey works under the hood in our Google Security Blog.


Emerging Google data shows promise for a passwordless future with passkeys


Passkeys were originally designed to provide simpler and more secure authentication experiences for users, and so far, the technology has proven to be simpler and faster than passwords. Google data (March-April 2023) shows how the percentage of users successfully authenticating through same device passkeys is 4x higher than the success rate typically achieved with passwords: average authentication success rate with passwords is 13.8%, while local passkey success rate is 63.8% (see figure 1 below). 


Passkeys are not just easier to use, but also significantly faster than passwords. On average, a user can successfully sign in within 14.9 seconds, while it typically takes twice as long to sign in with passwords (30.4 seconds, as seen in Figure 2 below). Preliminary, qualitative data collected from user research also indicates that  users already perceive this convenience as the key value of passkeys.


Figure 1: authentication success rate with passkey vs password. Data from March-April 2023 (n≈100M)


Figure 2: time spent authenticating with passkey vs password (data from March-April 2023). Dashed, vertical lines indicate average duration for each authentication method (n≈100M) 


We are excited to share this data following our launch of passkeys for Google Accounts. Passkeys are faster, more secure, and more convenient than passwords and MFA, making them a desirable alternative to passwords and a promising development in the journey to a more secure future. To learn more about passkeys and how to turn a basic form-based username and password sign-in system into one that supports passkeys, check out the documentation on developers.google.com/identity/passkeys.  

Introducing rules_oci


Today, we are announcing the General Availability 1.0 version of rules_oci, an open-sourced Bazel plugin (“ruleset”) that makes it simpler and more secure to build container images with Bazel. This effort was a collaboration we had with Aspect and the Rules Authors Special Interest Group. In this post, we’ll explain how rules_oci differs from its predecessor, rules_docker, and describe the benefits it offers for both container image security and the container community.


Bazel and Distroless for supply chain security


Google’s popular build and test tool, known as Bazel, is gaining fast adoption within enterprises thanks to its ability to scale to the largest codebases and handle builds in almost any language. Because Bazel manages and caches dependencies by their integrity hash, it is uniquely suited to make assurances about the supply chain based on the Trust-on-First-Use principle. One way Google uses Bazel is to build widely used Distroless base images for Docker. 


Distroless is a series of minimal base images which improve supply-chain security. They restrict what's in your runtime container to precisely what's necessary for your app, which is a best practice employed by Google and other tech companies that have used containers in production for many years. Using minimal base images reduces the burden of managing risks associated with security vulnerabilities, licensing, and governance issues in the supply chain for building applications.


rules_oci vs rules_docker


Historically, building container images was supported by rules_docker, which is now in maintenance mode. The new ruleset, called rules_oci, is better suited for Distroless as well as most Bazel container builds for several reasons:


  • The Open Container Initiative standard has changed the playing field, and there are now multiple container runtimes and image formats. rules_oci is not tied to running a docker daemon already installed on the machine.

  • rules_docker was created before many excellent container manipulation tools existed, such as Crane, Skopeo, and Zot. rules_oci is able to simply rely on trusted third-party toolchains and avoid building or maintaining any Bazel-specific tools.

  • rules_oci doesn’t include any language-specific rules, which makes it much more maintainable than rules_docker. Also, it avoids the pitfalls of stale dependencies on other language rulesets.


Other benefits of rules_oci


There are other great features of rules_oci to highlight as well. For example, it uses Bazel’s downloader to fetch layers from a remote registry, improving caching and allowing transparent use of a private registry. Multi-architecture images make it more convenient to target platforms like ARM-based servers, and support Windows Containers as well. Code signing allows users to verify that a container image they use was created by the developer who signed it, and was not modified by any third-party along the way (e.g. person-in-the-middle attack). In combination with the work on Bazel team’s roadmap, you’ll also get a Software Bill of Materials (SBOM) showing what went into the container you use.


Since adopting rules_oci and Bazel 6, the Distroless team has seen a number of improvements to our build processes, image outputs, and security metadata:


  • Native support for signing allows us to eliminate a race condition that could have left some images unsigned. We now sign on immutable digests references to images during the build instead of tags after the build.

  • Native support for oci indexes (multi platform images) allowed us to remove our dependency on docker during build. This also means more natural and debuggable failures when something goes wrong with multi platform builds.

  • Improvements to fetching and caching means our CI builds are faster and more reliable when using remote repositories.

  • Distroless images are now accompanied by SBOMs embedded in a signed attestation, which you can view with cosign and some jq magic:


cosign download attestation gcr.io/distroless/base:latest-amd64 | jq -rcs '.[0].payload' | base64 -d | jq -r '.predicate' | jq


In the end, rules_oci allowed us to modernize the Distroless build while also adding necessary supply chain security metadata to allow organizations to make better decisions about the images they consume.

Get started with rules_oci


Today, we’re happy to announce that rules_oci is now a 1.0 version. This stability guarantee follows the semver standard, and promises that future releases won’t include breaking public API changes. Aspect provides resources for using rules_oci, such as a Migration guide from rules_docker. It also provides support, training, and consulting services for effectively adopting rules_oci to build containers in all languages.


If you use rules_docker today, or are considering using Bazel to build your containers, this is a great time to give rules_oci a try. You can help by filing actionable issues, contributing code, or donating to the Rules Authors SIG OpenCollective. Since the project is developed and maintained entirely as community-driven open source, your support is essential to keeping the project healthy and responsive to your needs.


Special thanks to Sahin Yort and Alex Eagle from Aspect. 


So long passwords, thanks for all the phish


Starting today, you can create and use passkeys on your personal Google Account. When you do, Google will not ask for your password or 2-Step Verification (2SV) when you sign in.


Passkeys are a more convenient and safer alternative to passwords. They work on all major platforms and browsers, and allow users to sign in by unlocking their computer or mobile device with their fingerprint, face recognition or a local PIN.


Using passwords puts a lot of responsibility on users. Choosing strong passwords and remembering them across various accounts can be hard. In addition, even the most savvy users are often misled into giving them up during phishing attempts. 2SV (2FA/MFA) helps, but again puts strain on the user with additional, unwanted friction and still doesn’t fully protect against phishing attacks and targeted attacks like "SIM swaps" for SMS verification. Passkeys help address all these issues.


Creating passkeys on your Google Account


When you add a passkey to your Google Account, we will start asking for it when you sign in or perform sensitive actions on your account. The passkey itself is stored on your local computer or mobile device, which will ask for your screen lock biometrics or PIN to confirm it's really you. Biometric data is never shared with Google or any other third party – the screen lock only unlocks the passkey locally.


Unlike passwords, passkeys can only exist on your devices. They cannot be written down or accidentally given to a bad actor. When you use a passkey to sign in to your Google Account, it proves to Google that you have access to your device and are able to unlock it. Together, this means that passkeys protect you against phishing and any accidental mishandling that passwords are prone to, such as being reused or exposed in a data breach. This is stronger protection than most 2SV (2FA/MFA) methods offer today, which is why we allow you to skip not only the password but also 2SV when you use a passkey. In fact, passkeys are strong enough that they can stand in for security keys for users enrolled in our Advanced Protection Program.


Creating a passkey on your Google Account makes it an option for sign-in. Existing methods, including your password, will still work in case you need them, for example when using devices that don't support passkeys yet. Passkeys are still new and it will take some time before they work everywhere. However, creating a passkey today still comes with security benefits as it allows us to pay closer attention to the sign-ins that fall back to passwords. Over time, we'll increasingly scrutinize these as passkeys gain broader support and familiarity.


Using passkeys to sign in to your Google Account


Using passkeys does not mean that you have to use your phone every time you sign in. If you use multiple devices, e.g. a laptop, a PC or a tablet, you can create a passkey for each one. In addition, some platforms securely back your passkeys up and sync them to other devices you own. For example, if you create a passkey on your iPhone, that passkey will also be available on your other Apple devices if they are signed in to the same iCloud account. This protects you from being locked out of your account in case you lose your devices, and makes it easier for you to upgrade from one device to another.


If you want to sign in on a new device for the first time, or temporarily use someone else's device, you can use a passkey stored on your phone to do so. On the new device, you’d just select the option to "use a passkey from another device" and follow the prompts. This does not automatically transfer the passkey to the new device, it only uses your phone's screen lock and proximity to approve a one-time sign-in. If the new device supports storing its own passkeys, we will ask separately if you want to create one there.


In fact, if you sign in on a device shared with others, you should not create a passkey there. When you create a passkey on a device, anyone with access to that device and the ability to unlock it, can sign in to your Google Account. While that might sound a bit alarming, most people will find it easier to control access to their devices rather than maintaining good security posture with passwords and having to be on constant lookout for phishing attempts.


If you lose a device with a passkey for your Google Account and believe someone else can unlock it, you can immediately revoke the passkey in your account settings. If your device supports the option to remotely wipe it, consider doing that as well, especially if it also has passkeys for other services. We always recommend having a recovery phone and email on your account, as it increases your chance of recovering it in case someone gains access.


To start using passkeys on your personal Google Account today, visit g.co/passkeys.


How does this work under the hood?


The main ingredient of a passkey is a cryptographic private key – this is what is stored on your devices. When you create one, the corresponding public key is uploaded to Google. When you sign in, we ask your device to sign a unique challenge with the private key. Your device only does so if you approve this, which requires unlocking the device. We then verify the signature with your public key.


Your device also ensures the signature can only be shared with Google websites and apps, and not with malicious phishing intermediaries. This means you don't have to be as watchful with where you use passkeys as you would with passwords, SMS verification codes, etc. The signature proves to us that the device is yours since it has the private key, that you were there to unlock it, and that you are actually trying to sign in to Google and not some intermediary phishing site. The only data shared with Google for this to work is the public key and the signature. Neither contains any information about your biometrics.


The private key behind the passkey lives on your devices and in some cases, it stays only on the device it was created on. In other cases, your operating system or an app similar to a password manager may sync it to other devices you own. Passkey sync providers like the Google Password Manager and iCloud Keychain use end-to-end encryption to keep your passkeys private.


Since each passkey can only be used for a single account, there is no risk of reusing them across services. This means that your Google Account is safe from data breaches across your other accounts, and vice versa.


When you do need to use a passkey from your phone to sign in on another device, the first step is usually to scan a QR code displayed by that device. The device then verifies that your phone is in proximity using a small anonymous Bluetooth message and sets up an end-to-end encrypted connection to the phone through the internet. The phone uses this connection to deliver your one-time passkey signature, which requires your approval and the biometric or screen lock step on the phone. Neither the passkey itself nor the screen lock information is sent to the new device. The Bluetooth proximity check ensures remote attackers can’t trick you into releasing a passkey signature, for example by sending you a screenshot of a QR code from their own device.


Passkeys are built on the protocols and standards Google helped create in the FIDO Alliance and W3C WebAuthn working group. This means passkey support works across all platforms and browsers that adopt these standards. You can store the passkeys for your Google Account on any compatible device or service.


The same standards and protocols power security keys, our strongest offering for high risk accounts. Passkeys inherit many of their strong account protections from security keys, but with convenience that is suitable for everyone.


Today's launch is a big step in a cross-industry effort that we helped start more than 10 years ago, and we are committed to passkeys as the future of secure sign-in, for everyone. We hope that other web and app developers adopt passkeys and are able to use our deployment as a model. Developers can learn more about passkey support on our Chrome and Android platforms here.

Google and Apple lead initiative for an industry specification to address unwanted tracking

Companies welcome input from industry participants and advocacy groups on a draft specification to alert users in the event of suspected unwanted tracking

Location-tracking devices help users find personal items like their keys, purse, luggage, and more through crowdsourced finding networks. However, they can also be misused for unwanted tracking of individuals.

Today Google and Apple jointly submitted a proposed industry specification to help combat the misuse of Bluetooth location-tracking devices for unwanted tracking. The first-of-its-kind specification will allow Bluetooth location-tracking devices to be compatible with unauthorized tracking detection and alerts across Android and iOS platforms. Samsung, Tile, Chipolo, eufy Security, and Pebblebee have expressed support for the draft specification, which offers best practices and instructions for manufacturers, should they choose to build these capabilities into their products.

“Bluetooth trackers have created tremendous user benefits but also bring the potential of unwanted tracking, which requires industry-wide action to solve,” said Dave Burke, Google’s vice president of Engineering for Android. “Android has an unwavering commitment to protecting users and will continue to develop strong safeguards and collaborate with the industry to help combat the misuse of Bluetooth tracking devices.”

“Apple launched AirTag to give users the peace of mind knowing where to find their most important items,” said Ron Huang, Apple’s vice president of Sensing and Connectivity. “We built AirTag and the Find My network with a set of proactive features to discourage unwanted tracking, a first in the industry, and we continue to make improvements to help ensure the technology is being used as intended. “This new industry specification builds upon the AirTag protections, and through collaboration with Google, results in a critical step forward to help combat unwanted tracking across iOS and Android.”

In addition to incorporating feedback from device manufacturers, input from various safety and advocacy groups has been integrated into the development of the specification.

“The National Network to End Domestic Violence has been advocating for universal standards to protect survivors – and all people – from the misuse of bluetooth tracking devices. This collaboration and the resulting standards are a significant step forward. NNEDV is encouraged by this progress,” said Erica Olsen, the National Network to End Domestic Violence’s senior director of its Safety Net Project. “These new standards will minimize opportunities for abuse of this technology and decrease burdens on survivors in detecting unwanted trackers. We are grateful for these efforts and look forward to continuing to work together to address unwanted tracking and misuse.”

“Today’s release of a draft specification is a welcome step to confront harmful misuses of Bluetooth location trackers,” said Alexandra Reeve Givens, the Center for Democracy & Technology’s president and CEO. “CDT continues to focus on ways to make these devices more detectable and reduce the likelihood that they will be used to track people. A key element to reducing misuse is a universal, OS-level solution that is able to detect trackers made by different companies on the variety of smartphones that people use every day. We commend Apple and Google for their partnership and dedication to developing a uniform solution to improve detectability. We look forward to the specification moving through the standardization process and to further engagement on ways to reduce the risk of Bluetooth location trackers being misused.”

The specification has been submitted as an Internet-Draft via the Internet Engineering Task Force (IETF), a leading standards development organization. Interested parties are invited and encouraged to review and comment over the next three months. Following the comment period, Google and Apple will partner to address feedback and will release a production implementation of the specification for unwanted tracking alerts by the end of 2023 that will then be supported in future versions of Android and iOS.

Google will share more on how we’re combatting unwanted tracking at I/O 2023.

Secure mobile payment transactions enabled by Android Protected Confirmation

Unlike other mobile OSes, Android is built with a transparent, open-source architecture. We firmly believe that our users and the mobile ecosystem at-large should be able to verify Android’s security and safety and not just take our word for it.

We’ve demonstrated our deep belief in security transparency by investing in features that enable users to confirm that what they expect is happening on their device is actually happening.

The Assurance of Android Protected Confirmation

One of those features is Android Protected Confirmation, an API that enables developers to utilize Android hardware to provide users even more assurance that a critical action has been executed securely. Using a hardware-protected user interface, Android Protected Confirmation can help developers verify a user’s action intent with a very high degree of confidence. This can be especially useful in a number of user moments – like during mobile payment transactions - that greatly benefit from additional verification and security.

We’re excited to see that Android Protected Confirmation is now gaining ecosystem attention as an industry-leading method for confirming critical user actions via hardware. Recently, UBS Group AG and the Bern University of Applied Sciences, co-financed by Innosuisse and UBS Next, announced they’re working with Google on a pilot project to establish Protected Confirmation as a common application programmable interface standard. In a pilot planned for 2023, UBS online banking customers with Pixel 6 or 7 devices can use Android Protected Confirmation backed by StrongBox, a certified hardware vault with physical attack protections, to confirm payments and verify online purchases through a hardware-based confirmation in their UBS Access App.


Demonstrating Real-World Use for Android Protection Confirmation

We’ve been working closely with UBS to bring this pilot to life and ensure they’re able to test it on Google Pixel devices. Demonstrating real-world use cases that are enabled by Android Protected Confirmation unlocks the promise of this technology by delivering improved and innovative experiences for our users. We’re seeing interest in Android Protected Confirmation across the industry and OEMs are increasingly looking at how to build even more hardware-based confirmation into critical security user moments. We look forward to forming an industry alliance that will work together to strengthen mobile security and home in on protecting confirmation support.

How we fought bad apps and bad actors in 2022

Keeping Google Play safe for users and developers remains a top priority for Google. Google Play Protect continues to scan billions of installed apps each day across billions of Android devices to keep users safe from threats like malware and unwanted software.

In 2022, we prevented 1.43 million policy-violating apps from being published on Google Play in part due to new and improved security features and policy enhancements — in combination with our continuous investments in machine learning systems and app review processes. We also continued to combat malicious developers and fraud rings, banning 173K bad accounts, and preventing over $2 billion in fraudulent and abusive transactions. We’ve raised the bar for new developers to join the Play ecosystem with phone, email, and other identity verification methods, which contributed to a reduction in accounts used to publish violative apps. We continued to partner with SDK providers to limit sensitive data access and sharing, enhancing the privacy posture for over one million apps on Google Play.

With strengthened Android platform protections and policies, and developer outreach and education, we prevented about 500K submitted apps from unnecessarily accessing sensitive permissions over the past 3 years.

Developer Support and Collaboration to Help Keep Apps Safe

As the Android ecosystem expands, it’s critical for us to work closely with the developer community to ensure they have the tools, knowledge, and support to build secure and trustworthy apps that respect user data security and privacy.

In 2022, the App Security Improvements program helped developers fix ~500K security weaknesses affecting ~300K apps with a combined install base of approximately 250B installs. We also launched the Google Play SDK Index to help developers evaluate an SDK’s reliability and safety and make informed decisions about whether an SDK is right for their business and their users. We will keep working closely with SDK providers to improve app and SDK safety, limit how user data is shared, and improve lines of communication with app developers.


We also recently launched new features and resources to give developers a better policy experience. We’ve expanded our Helpline pilot to give more developers direct policy phone support. And we piloted the Google Play Developer Community so more developers can discuss policy questions and exchange best practices on how to build safe apps.

More Stringent App Requirements and Guidelines

In addition to the Google Play features and policies that are central to providing a safe experience for users, each Android OS update brings privacy, security, and user experience improvements. To ensure users realize the full benefits of these advances — and to maintain the trusted experience people expect on Google Play — we collaborate with developers to ensure their apps work seamlessly on newer Android versions. With the new Target API Level policy, we’re strengthening user security and privacy by protecting users from installing apps that may not have the full set of privacy and security features offered by the latest versions of Android.

This past year, we rolled out new license requirements for personal loan apps in key geographies – Kenya, Nigeria, and Philippines – with more stringent requirements for loan facilitator apps in India to combat fraud. We also clarified that our impersonation policy prohibits the impersonation of an entity or organization – helping to give users more peace of mind that they are downloading the app they’re looking for.

We are also working to help fight fraudulent and malicious ads on Google Play. With an updated ads policy for developers, we are providing key guidelines that will improve the in-app user experience and prohibit unexpected full screen interstitial ads. This update is inspired by the Mobile Apps Experiences - Better Ads Standards.

Improving Data Transparency, Security Controls and Tools

We launched the Data safety section in Google Play last year to give users more clarity on how their app data is being collected, shared, and protected. We’re excited to work with developers on enhancing the Data safety section to share their data collection, sharing, and safety practices with their users.

In 2022, the Google Play Store was the first commercial app store to recognize and display a badge for any app that has completed an independent security review through App Defense Alliance’s Mobile App Security Assessment (MASA). The badge is displayed within an app’s respective Data Safety section. MASA leverages OWASP’s Mobile Application Security Verification Standard, which is the most widely adopted set of security requirements for mobile applications. We’re seeing strong developer interest in MASA with widely used apps across major app categories, e.g., Roblox, Uber, PayPal, Threema, YouTube, and many more.

This past year, we also expanded the App Defense Alliance, an alliance of partners with a mission to protect Android users from bad apps through shared intelligence and coordinated detection. McAfee and Trend Micro joined Google, ESET, Lookout, and Zimperium, to reduce the risk of app-based malware and better protect Android users.

We’ve also continued to enhance protections for developers and their apps, such as hardening Play Integrity API with KeyMint and Remote Key Provisioning.

Bringing Continuous Security and Privacy Enhancements to Pixel Users

For Pixel users, we added more powerful features to help keep our users safe. The new security and privacy settings have been launched to all Pixel devices running Android 13, improving the security and privacy posture for millions of users’ around the world every month. Private Compute Core also allows Pixel phones to detect harmful apps in a privacy preserving way.

Looking Ahead

We remain committed to keeping Google Play and our ecosystem of users and developers safe, and we look forward to many exciting security and safety announcements in 2023.

Celebrating SLSA v1.0: securing the software supply chain for everyone

Last week the Open Source Security Foundation (OpenSSF) announced the release of SLSA v1.0, a framework that helps secure the software supply chain. Ten years of using an internal version of SLSA at Google has shown that it’s crucial to warding off tampering and keeping software secure. It’s especially gratifying to see SLSA reaching v1.0 as an open source project—contributors have come together to produce solutions that will benefit everyone.

SLSA for safer supply chains

Developers and organizations that adopt SLSA will be protecting themselves against a variety of supply chain attacks, which have continued rising since Google first donated SLSA to OpenSSF in 2021. In that time, the industry has also seen a U.S. Executive Order on Cybersecurity and the associated NIST Secure Software Development Framework (SSDF) to guide national standards for software used by the U.S. government, as well as the Network and Information Security (NIS2) Directive in the European Union. SLSA offers not only an onramp to meeting these standards, but also a way to prepare for a climate of increased scrutiny on software development practices.

As organizations benefit from using SLSA, it’s also up to them to shoulder part of the burden of spreading these benefits to open source projects. Many maintainers of the critical open source projects that underpin the internet are volunteers; they cannot be expected to do all the work when so many of the rewards of adopting SLSA roll out across the supply chain to benefit everyone.

Supply chain security for all

That’s why beyond contributing to SLSA, we’ve also been laying the foundation to integrate supply chain solutions directly into the ecosystems and platforms used to create open source projects. We’re also directly supporting open source maintainers, who often cite lack of time or resources as limiting factors when making security improvements to their projects.

Our Open Source Security Upstream Team consists of developers who spend 100% of their time contributing to critical open source projects to make security improvements. For open source developers who choose to adopt SLSA on their own, we’ve funded the Secure Open Source Rewards Program, which pays developers directly for these types of security improvements.

Currently, open source developers who want to secure their builds can use the free SLSA L3 GitHub Builder, which requires only a one-time adjustment to the traditional build process implemented through GitHub actions. There’s also the SLSA Verifier tool for software consumers. Users of npm—or Node Package Manager, the world’s largest software repository—can take advantage of their recently released beta SLSA integration, which streamlines the process of creating and verifying SLSA provenance through the npm command line interface. We’re also supporting the integration of Sigstore into many major package ecosystems, meaning that users can sign and verify artifacts directly from package management tooling, without having to manage keys. Our intention is to continue to expand these types of integrations across open source ecosystems so supply chain security solutions are universal and easily accessible.

We’re also making it easier for everyone to understand their dependencies. Vulnerabilities like Log4Shell have shown the importance (and difficulty) of knowing what projects you depend on and where their security weaknesses might be. Developers can use the deps.dev API to generate real dependency graphs, with OpenSSF Scorecard security scores and other security metadata for each dependency they use. They can also use OSV-Scanner to generate a high quality list of actionable vulnerabilities in those dependencies. In the future, we hope to support automatic remediation and patching through the OSV database service, minimizing the effort that open source developers spend on securing their projects.

Continued community contributions

Ultimately, our goal is to make supply chain security invisible and available to everyone, built directly into each ecosystem for frictionless adoption. To get there, we’ll continue contributing to these efforts and encouraging other organizations who rely on open source to similarly dedicate developers to upstream support. The internet as we know it today wouldn’t be available without open source software, and it’s in everyone’s best interests to give back to the communities that make modern software development possible.

gVisor improves performance with root filesystem overlay

Overview

Container technology is an integral part of modern application ecosystems, making container security an increasingly important topic. Since containers are often used to run untrusted, potentially malicious code it is imperative to secure the host machine from the container.

A container's security depends on its security boundaries, such as user namespaces (which isolate security-related identifiers and attributes), seccomp rules (which restrict the syscalls available), and Linux Security Module configuration. Popular container management products like Docker and Kubernetes relax these and other security boundaries to increase usability, which means that users need additional container security tools to provide a much stronger isolation boundary between the container and the host.

The gVisor open source project, developed by Google, provides an OCI compatible container runtime called runsc. It is used in production at Google to run untrusted workloads securely. Runsc (run sandbox container) is compatible with Docker and Kubernetes and runs containers in a gVisor sandbox. gVisor sandbox has an application kernel, written in Golang, that implements a substantial portion of the Linux system call interface. All application syscalls are intercepted by the sandbox and handled in the user space kernel.

Although gVisor does not introduce large fixed overheads, sandboxing does add some performance overhead to certain workloads. gVisor has made several improvements recently that help containerized applications run faster inside the sandbox, including an improvement to the container root filesystem, which we will dive deeper into.

Costly Filesystem Access in gVisor

gVisor uses a trusted filesystem proxy process (“gofer”) to access the filesystem on behalf of the sandbox. The sandbox process is considered untrusted in gVisor’s security model. As a result, it is not given direct access to the container filesystem and its seccomp filters do not allow filesystem syscalls.

In gVisor, the container rootfs and bind mounts are configured to be served by a gofer.

Gofer mounts configuration in gVisor

When the container needs to perform a filesystem operation, it makes an RPC to the gofer which makes host system calls and services the RPC. This is quite expensive due to:

  1. RPC cost: This is the cost of communicating with the gofer process, including process scheduling, message serialization and IPC system calls.
    • To ameliorate this, gVisor recently developed a purpose-built protocol called LISAFS which is much more efficient than its predecessor.
    • gVisor is also experimenting with giving the sandbox direct access to the container filesystem in a secure manner. This would essentially nullify RPC costs as it avoids the gofer being in the critical path of filesystem operations.
  2. Syscall cost: This is the cost of making the host syscall which actually accesses/modifies the container filesystem. Syscalls are expensive, because they perform context switches into the kernel and back into userspace.
    • To help with this, gVisor heavily caches the filesystem tree in memory. So operations like stat(2) on cached files are serviced quickly. But other operations like mkdir(2) or rename(2) still need to make host syscalls.

Container Root Filesystem

In Docker and Kubernetes, the container’s root filesystem (rootfs) is based on the filesystem packaged with the image. The image’s filesystem is immutable. Any change a container makes to the rootfs is stored separately and is destroyed with the container. This way, the image’s filesystem can be shared efficiently with all containers running the same image. This is different from bind mounts, which allow containers to access the bound host filesystem tree. Changes to bind mounts are always propagated to the host and persist after the container exits.

Docker and Kubernetes both use the overlay filesystem by default to configure container rootfs. Overlayfs mounts are composed of one upper layer and multiple lower layers. The overlay filesystem presents a merged view of all these filesystem layers at its mount location and ensures that lower layers are read-only while all changes are held in the upper layer. The lower layer(s) constitute the “image layer” and the upper layer is the “container layer”. When the container is destroyed, the upper layer mount is destroyed as well, discarding the root filesystem changes the container may have made. Docker’s overlayfs driver documentation has a good explanation.

Rootfs Configuration Before

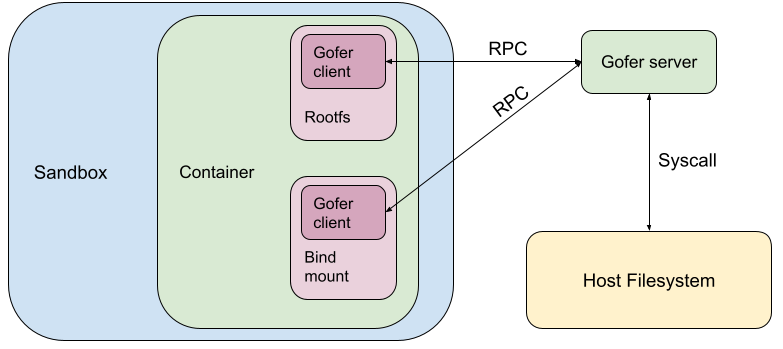
Let’s consider an example where the image has files foo and baz. The container overwrites foo and creates a new file bar. The diagram below shows how the root filesystem used to be configured in gVisor earlier. We used to go through the gofer and access/mutate the overlaid directory on the host. It also shows the state of the host overlay filesystem.

Rootfs configuration in gVisor earlier

Opportunity! Sandbox Internal Overlay

Given that the upper layer is destroyed with the container and that it is expensive to access/mutate a host filesystem from the sandbox, why keep the upper layer on the host at all? Instead we can move the upper layer into the sandbox.

The idea is to overlay the rootfs using a sandbox-internal overlay mount. We can use a tmpfs upper (container) layer and a read-only lower layer served by the gofer client. Any changes to rootfs would be held in tmpfs (in-memory). Accessing/mutating the upper layer would not require any gofer RPCs or syscalls to the host. This really speeds up filesystem operations on the upper layer, which contains newly created or copied-up files and directories.

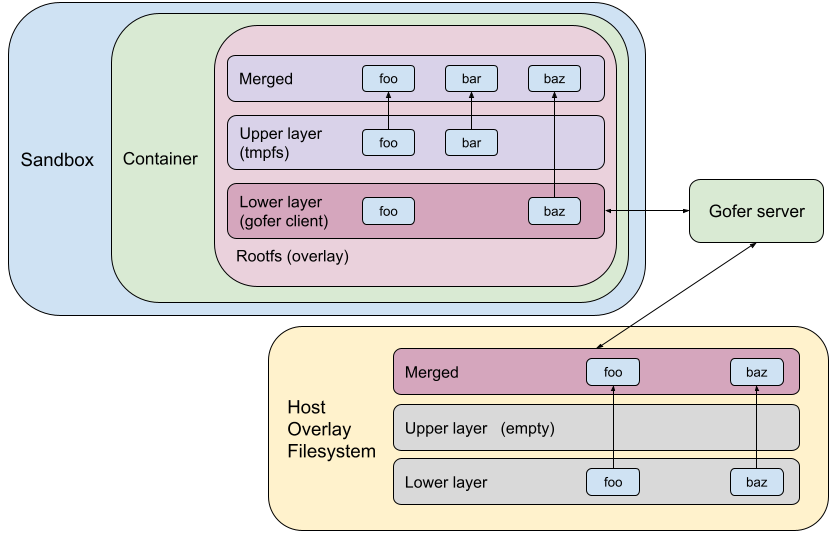
Using the same example as above, the following diagram shows what the rootfs configuration would look like using a sandbox-internal overlay.

Rootfs configuration in gVisor with internal overlay

Host-Backed Overlay

The tmpfs mount by default will use the sandbox process’s memory to back all the file data in the mount. This can cause sandbox memory usage to blow up and exhaust the container’s memory limits, so it’s important to store all file data from tmpfs upper layer on disk. We need to have a tmpfs-backing “filestore” on the host filesystem. Using the example from above, this filestore on the host will store file data for foo and bar.

This would essentially flatten all regular files in tmpfs into one host file. The sandbox can mmap(2) the filestore into its address space. This allows it to access and mutate the filestore very efficiently, without incurring gofer RPCs or syscalls overheads.

Self-Backed Overlay

In Kubernetes, you can set local ephemeral storage limits. The upper layer of the rootfs overlay (writeable container layer) on the host contributes towards this limit. The kubelet enforces this limit by traversing the entire upper layerstat(2)-ing all files and summing up their stat.st_blocks*block_size. If we move the upper layer into the sandbox, then the host upper layer is empty and the kubelet will not be able to enforce these limits.

To address this issue, we introduced “self-backed” overlays, which create the filestore in the host upper layer. This way, when the kubelet scans the host upper layer, the filestore will be detected and its stat.st_blocks should be representative of the total file usage in the sandbox-internal upper layer. It is also important to hide this filestore from the containerized application to avoid confusing it. We do so by creating a whiteout in the sandbox-internal upper layer, which blocks this file from appearing in the merged directory.

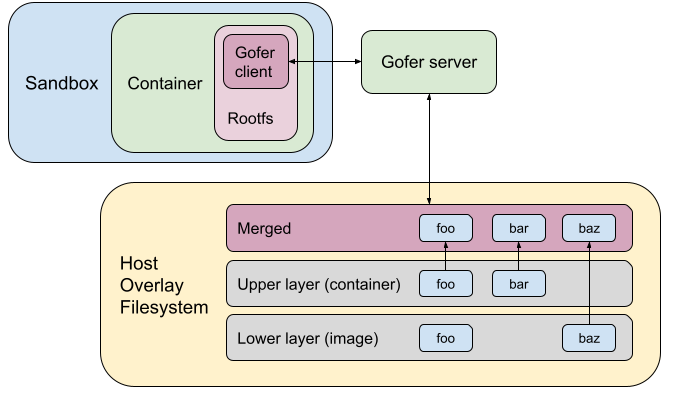
The following diagram shows what rootfs configuration would finally look like today in gVisor.

Rootfs configuration in gVisor with self-backed internal overlay

Performance Gains

Let’s look at some filesystem-intensive workloads to see how rootfs overlay impacts performance. These benchmarks were run on a gLinux desktop with KVM platform.

Micro Benchmark

Linux Test Project provides a fsstress binary. This program performs a large number of filesystem operations concurrently, creating and modifying a large filesystem tree of all sorts of files. We ran this program on the container's root filesystem. The exact usage was:

sh -c "mkdir /test && time fsstress -d /test -n 500 -p 20 -s 1680153482 -X -l 10"

You can use the -v flag (verbose mode) to see what filesystem operations are being performed.

The results were astounding! Rootfs overlay reduced the time to run this fsstress program from 262.79 seconds to 3.18 seconds! However, note that such microbenchmarks are not representative of real-world applications and we should not extrapolate these results to real-world performance.

Real-world Benchmark

Build jobs are very filesystem intensive workloads. They read a lot of source files, compile and write out binaries and object files. Let’s consider building the abseil-cpp project with bazel. Bazel performs a lot of filesystem operations in rootfs; in bazel’s cache located at ~/.cache/bazel/.

This is representative of the real-world because many other applications also use the container root filesystem as scratch space due to the handy property that it disappears on container exit. To make this more realistic, the abseil-cpp repo was attached to the container using a bind mount, which does not have an overlay.

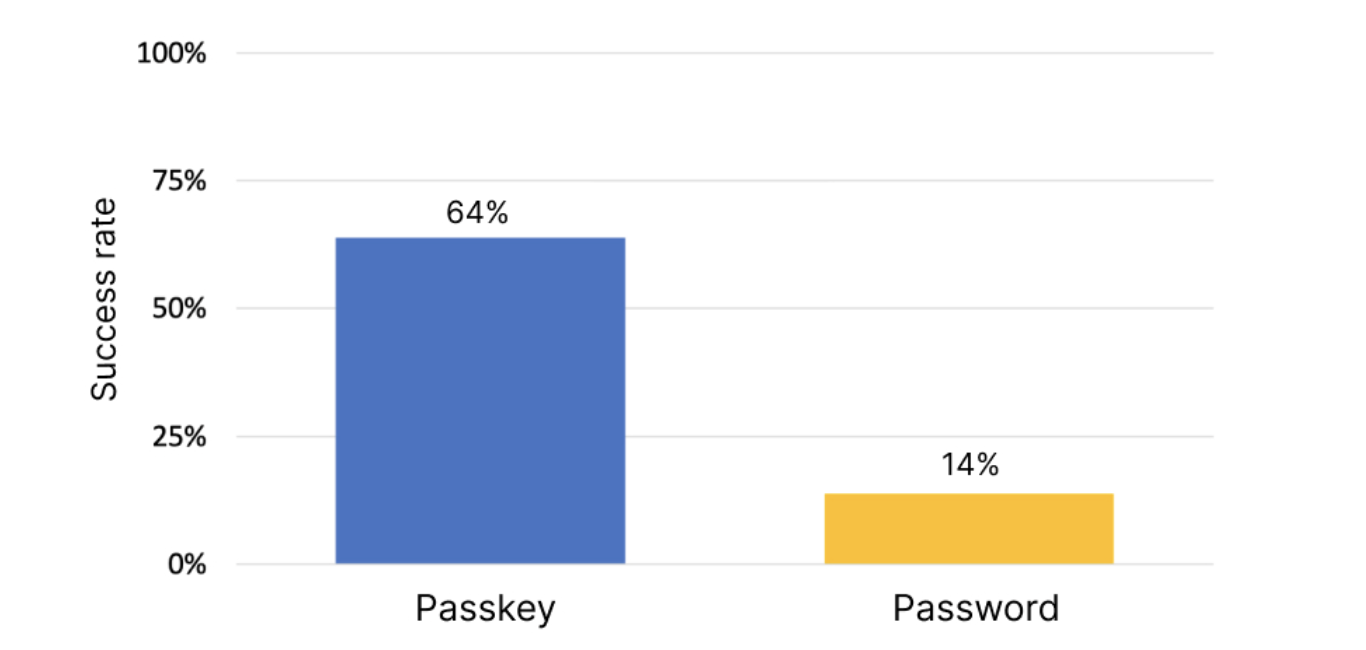
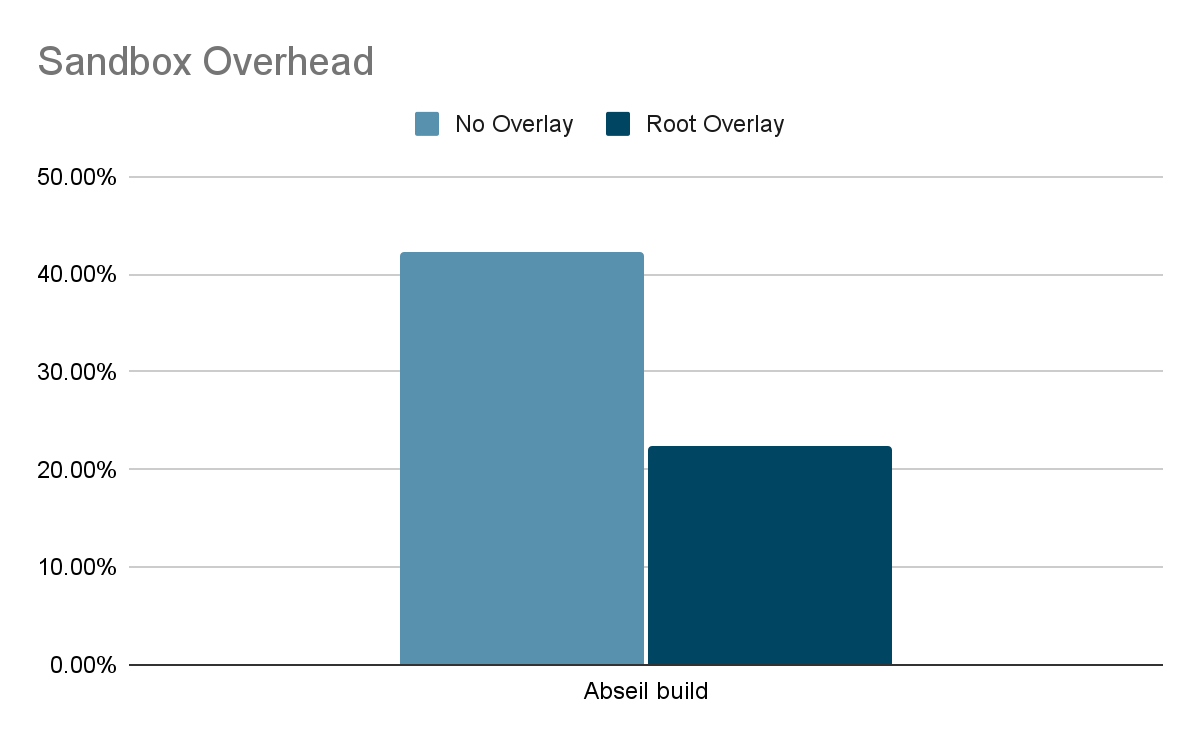
When measuring performance, we care about reducing the sandboxing overhead and bringing gVisor performance as close as possible to unsandboxed performance. Sandboxing overhead can be calculated using the formula overhead = (s-n)/n where ‘s’ is the amount of time taken to run a workload inside gVisor sandbox and ‘n’ is the time taken to run the same workload natively (unsandboxed). The following graph shows that rootfs overlay halved the sandboxing overhead for abseil build!

The impact of rootfs overlay on sandboxing overhead for abseil build

Conclusion

Rootfs overlay in gVisor substantially improves performance for many filesystem-intensive workloads, so that developers no longer have to make large tradeoffs between performance and security. We recently made this optimization the default in runsc. This is part of our ongoing efforts to improve gVisor performance. You can learn more about gVisor at gvisor.dev. You can also use gVisor in GKE with GKE Sandbox. Happy sandboxing!

Securely Hosting User Data in Modern Web Applications

Many web applications need to display user-controlled content. This can be as simple as serving user-uploaded images (e.g. profile photos), or as complex as rendering user-controlled HTML (e.g. a web development tutorial). This has always been difficult to do securely, so we’ve worked to find easy, but secure solutions that can be applied to most types of web applications.

Classical Solutions for Isolating Untrusted Content

The classic solution for securely serving user-controlled content is to use what are known as “sandbox domains”. The basic idea is that if your application's main domain is example.com, you could serve all untrusted content on exampleusercontent.com. Since these two domains are cross-site, any malicious content on exampleusercontent.com can’t impact example.com.

This approach can be used to safely serve all kinds of untrusted content including images, downloads, and HTML. While it may not seem like it is necessary to use this for images or downloads, doing so helps avoid risks from content sniffing, especially in legacy browsers.

Sandbox domains are widely used across the industry and have worked well for a long time. But, they have two major downsides:

  1. Applications often need to restrict content access to a single user, which requires implementing authentication and authorization. Since sandbox domains purposefully do not share cookies with the main application domain, this is very difficult to do securely. To support authentication, sites either have to rely on capability URLs, or they have to set separate authentication cookies for the sandbox domain. This second method is especially problematic in the modern web where many browsers restrict cross-site cookies by default.
  2. While user content is isolated from the main site, it isn’t isolated from other user content. This creates the risk of malicious user content attacking other data on the sandbox domain (e.g. via reading same-origin data).

It is also worth noting that sandbox domains help mitigate phishing risks since resources are clearly segmented onto an isolated domain.

Modern Solutions for Serving User Content

Over time the web has evolved, and there are now easier, more secure ways to serve untrusted content. There are many different approaches here, so we will outline two solutions that are currently in wide use at Google.

Approach 1: Serving Inactive User Content

If a site only needs to serve inactive user content (i.e. content that is not HTML/JS, for example images and downloads), this can now be safely done without an isolated sandbox domain. There are two key steps:

  1. Always set the Content-Type header to a well-known MIME type that is supported by all browsers and guaranteed not to contain active content (when in doubt, application/octet-stream is a safe choice).
  2. In addition, always set the below response headers to ensure that the browser fully isolates the response.

Response Header

Purpose

X-Content-Type-Options: nosniff

Prevents content sniffing

Content-Disposition: attachment; filename="download"

Triggers a download rather than rendering

Content-Security-Policy: sandbox

Sandboxes the content as if it was served on a separate domain

Content-Security-Policy: default-src ‘none’

Disables JS execution (and inclusion of any subresources)

Cross-Origin-Resource-Policy: same-site

Prevents the page from being included cross-site

This combination of headers ensures that the response can only be loaded as a subresource by your application, or downloaded as a file by the user. Furthermore, the headers provide multiple layers of protection against browser bugs through the CSP sandbox header and the default-src restriction. Overall, the setup outlined above provides a high degree of confidence that responses served in this way cannot lead to injection or isolation vulnerabilities.

Defense In Depth

While the above solution represents a generally sufficient defense against XSS, there are a number of additional hardening measures that you can apply to provide additional layers of security:

  • Set a X-Content-Security-Policy: sandbox header for compatibility with IE11
  • Set a Content-Security-Policy: frame-ancestors 'none' header to block the endpoint from being embedded
  • Sandbox user content on an isolated subdomain by:
    • Serving user content on an isolated subdomain (e.g. Google uses domains such as product.usercontent.google.com)
    • Set Cross-Origin-Opener-Policy: same-origin and Cross-Origin-Embedder-Policy: require-corp to enable cross-origin isolation

Approach 2: Serving Active User Content

Safely serving active content (e.g. HTML or SVG images) can also be done without the weaknesses of the classic sandbox domain approach.

The simplest option is to take advantage of the Content-Security-Policy: sandbox header to tell the browser to isolate the response. While not all web browsers currently implement process isolation for sandbox documents, ongoing refinements to browser process models are likely to improve the separation of sandboxed content from embedding applications. If SpectreJS and renderer compromise attacks are outside of your threat model, then using CSP sandbox is likely a sufficient solution.

At Google, we’ve developed a solution that can fully isolate untrusted active content by modernizing the concept of sandbox domains. The core idea is to:

  1. Create a new sandbox domain that is added to the public suffix list. For example, by adding exampleusercontent.com to the PSL, you can ensure that foo.exampleusercontent.com and bar.exampleusercontent.com are cross-site and thus fully isolated from each other.
  2. URLs matching *.exampleusercontent.com/shim are all routed to a static shim file. This shim file contains a short HTML/JS snippet that listens to the message event handler and renders any content it receives.
  3. To use this, the product creates either an iframe or a popup to $RANDOM_VALUE.exampleusercontent.com/shim and uses postMessage to send the untrusted content to the shim for rendering.
  4. The rendered content is transformed to a Blob and rendered inside a sandboxed iframe.

Compared to the classic sandbox domain approach, this ensures that all content is fully isolated on a unique site. And, by having the main application deal with retrieving the data to be rendered, it is no longer necessary to use capability URLs.

Conclusion

Together, these two solutions make it possible to migrate off of classic sandbox domains like googleusercontent.com to more secure solutions that are compatible with third-party cookie blocking. At Google, we’ve already migrated many products to use these solutions and have more migrations planned for the next year. We hope that by sharing these solutions, we can help other websites easily serve untrusted content in a secure manner.