Tag Archives: autofill

What’s new in the Jetpack Compose April ’25 release

Posted by Jolanda Verhoef – Developer Relations Engineer

Today, as part of the Compose April ‘25 Bill of Materials, we’re releasing version 1.8 of Jetpack Compose, Android's modern, native UI toolkit, used by many developers. This release contains new features like autofill, various text improvements, visibility tracking, and new ways to animate a composable's size and location. It also stabilizes many experimental APIs and fixes a number of bugs.

To use today’s release, upgrade your Compose BOM version to 2025.04.01 :

implementation(platform("androidx.compose:compose-bom:2025.04.01"))
Note: If you are not using the Bill of Materials, make sure to upgrade Compose Foundation and Compose UI at the same time. Otherwise, autofill will not work correctly.
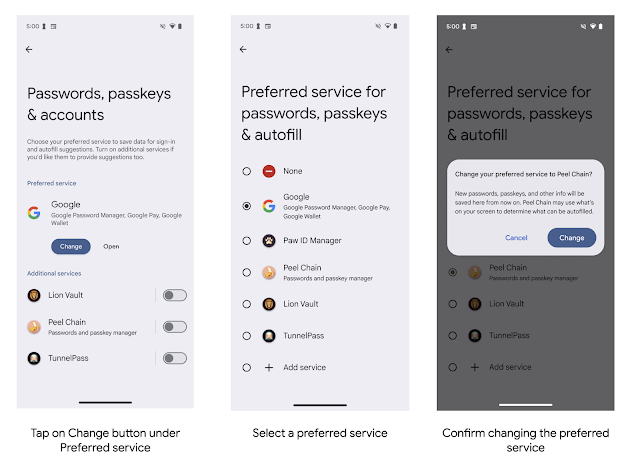
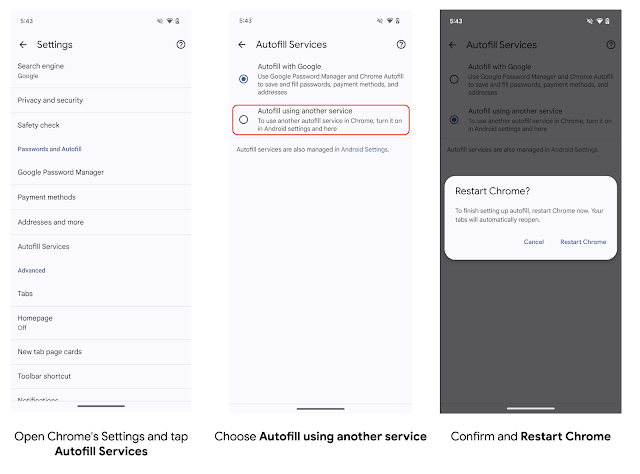
Autofill

Autofill is a service that simplifies data entry. It enables users to fill out forms, login screens, and checkout processes without manually typing in every detail. Now, you can integrate this functionality into your Compose applications.

Setting up Autofill in your Compose text fields is straightforward:

      1. Set the contentType Semantics: Use Modifier.semantics and set the appropriate contentType for your text fields. For example:

TextField(
  state = rememberTextFieldState(),
  modifier = Modifier.semantics {
    contentType = ContentType.Username 
  }
)

      2. Handle saving credentials (for new or updated information):

          a. Implicitly through navigation: If a user navigates away from the page, commit will be called automatically - no code needed!

          b. Explicitly through a button: To trigger saving credentials when the user submits a form (by tapping a button, for instance), retrieve the local AutofillManager and call commit().

For full details on how to implement autofill in your application, see the Autofill in Compose documentation.

Text

When placing text inside a container, you can now use the autoSize parameter in BasicText to let the text size automatically adapt to the container size:

Box {
    BasicText(
        text = "Hello World",
        maxLines = 1,
        autoSize = TextAutoSize.StepBased()
    )
}
moving image of Hello World text inside a container

You can customize sizing by setting a minimum and/or maximum font size and define a step size. Compose Foundation 1.8 contains this new BasicText overload, with Material 1.4 to follow soon with an updated Text overload.

Furthermore, Compose 1.8 enhances text overflow handling with new TextOverflow.StartEllipsis or TextOverflow.MiddleEllipsis options, which allow you to display ellipses at the beginning or middle of a text line.

val text = "This is a long text that will overflow"
Column(Modifier.width(200.dp)) {
  Text(text, maxLines = 1, overflow = TextOverflow.Ellipsis)
  Text(text, maxLines = 1, overflow = TextOverflow.StartEllipsis)
  Text(text, maxLines = 1, overflow = TextOverflow.MiddleEllipsis)
}
text overflow handling displaying ellipses at the beginning and middle of a text line

And finally, we're expanding support for HTML formatting in AnnotatedString, with the addition of bulleted lists:

Text(
  AnnotatedString.fromHtml(
    """
    <h1>HTML content</h1>
    <ul>
      <li>Hello,</li>
      <li>World</li>
    </ul>
    """.trimIndent()
  )
)
a bulleted list of two items

Visibility tracking

Compose UI 1.8 introduces a new modifier: onLayoutRectChanged. This API solves many use cases that the existing onGloballyPositioned modifier does; however, it does so with much less overhead. The onLayoutRectChanged modifier can debounce and throttle the callback per what the use case demands, which helps with performance when it’s added onto an item in LazyColumn or LazyRow.

This new API unlocks features that depend on a composable's visibility on screen. Compose 1.9 will add higher-level abstractions to this low-level API to simplify common use cases.

Animate composable bounds

Last year we introduced shared element transitions, which smoothly animate content in your apps. The 1.8 Animation module graduates LookaheadScope to stable, includes numerous performance and stability improvements, and includes a new modifier, animateBounds. When used inside a LookaheadScope, this modifier automatically animates its composable's size and position on screen, when those change:

Box(
  Modifier
    .width(if(expanded) 180.dp else 110.dp)
    .offset(x = if (expanded) 0.dp else 100.dp)
    .animateBounds(lookaheadScope = this@LookaheadScope)
    .background(Color.LightGray, shape = RoundedCornerShape(12.dp))
    .height(50.dp)
) {
  Text("Layout Content", Modifier.align(Alignment.Center))
}
a moving image depicting animate composable bounds

Increased API stability

Jetpack Compose has utilized @Experimental annotations to mark APIs that are liable to change across releases, for features that require more than a library's alpha period to stabilize. We have heard your feedback that a number of features have been marked as experimental for some time with no changes, contributing to a sense of instability. We are actively looking at stabilizing existing experimental APIs—in the UI and Foundation modules, we have reduced the experimental APIs from 172 in the 1.7 release to 70 in the 1.8 release. We plan to continue this stabilization trend across modules in future releases.

Deprecation of contextual flow rows and columns

As part of the work to reduce experimental annotations, we identified APIs added in recent releases that are less than optimal solutions for their use cases. This has led to the decision to deprecate the experimental ContextualFlowRow and ContextualFlowColumn APIs, added in Foundation 1.7. If you need the deprecated functionality, our recommendation for now is to copy over the implementation and adapt it as needed, while we work on a plan for future components that can cover these functionalities better.

The related APIs FlowRow and FlowColumn are now stable; however, the new overflow parameter that was added in the last release is now deprecated.

Improvements and fixes for core features

In response to developer feedback, we have shipped some particularly in-demand features and bug fixes in our core libraries:

Get started!

We’re grateful for all of the bug reports and feature requests submitted to our issue tracker - they help us to improve Compose and build the APIs you need. Continue providing your feedback, and help us make Compose better.

Happy composing!

Chrome on Android to support third-party autofill services natively

Posted by Eiji Kitamura – Developer Advocate

Chrome on Android will soon allow third-party autofill services (like password managers) to natively autofill forms on websites. Developers of these services need to tell their users to toggle a setting in Chrome to continue using their service with Chrome.


Background

Google is the default autofill service on Chrome, providing passwords, passkeys and autofill for other information like addresses and payment data.

A third-party password manager can be set as the preferred autofill service on Android through System Settings. The preferred autofill service can fill across all Android apps. However, to autofill forms on Chrome, the autofill service needs to use "compatibility mode". This causes glitches on Chrome such as janky page scrolling and potentially showing duplicate suggestions from Google and a third-party.

With this coming change, Chrome on Android will allow third-party autofill services to natively autofill forms giving users a smoother and simpler user experience. Third-party autofill services can autofill passwords, passkeys and other information like addresses and payment data, as they would in other Android apps.


Try the feature yourself

You can already test the functionality on Chrome 131 and later. First, set a third-party autofill service as preferred in Android 14:

Note: Instructions may vary by device manufacturer. The below steps are for a Google Pixel device running Android 15.
    1. Open Android's System Settings
    2. Select Passwords, passkeys & accounts
    3. Tap on Change button under Preferred service
    4. Select a preferred service
    5. Confirm changing the preferred autofill service

Side by side screenshots show the steps involved in enabling third-party autofill service from your device: first tap 'Change', then select the new service, and finally confirm the change.

Secondly, enable third-party autofill service on Chrome

    1. Open Chrome on Android
    2. Open chrome://flags#enable-autofill-virtual-view-structure
    3. Set the flag to "Enabled" and restart
    4. Open Chrome's Settings and tap Autofill Services
    5. Choose Autofill using another service
    6. Confirm and restart Chrome
Note: Steps 2 and 3 are not necessary after Chrome 131. Chrome 131 is scheduled to be stable on November 12th, 2024.
Side by side screenshots show the steps involved in changing your preferred password service on a smartphone: first tap 'Autofill Services', then select 'Autofill using another service', and finally restart Chrome to complete setup.

You can emulate how Chrome behaves after compatibility mode is disabled by updating chrome://flags#suppress-autofill-via-accessibility to Enabled.

Actions required from third-party autofill services

Implementation wise, autofill service developers don't need an additional implementation as long as they have a proper integration with autofill services. Chrome will gracefully respect it and autofill forms.

Chrome plans to stop supporting compatibility mode in early 2025. Users must select Autofill using another service in Chrome settings to ensure their autofill experience is unaffected. The new setting is available in Chrome 131. You should encourage your users to toggle the setting, to ensure they have the best autofill experience possible with your service and Chrome on Android.


Timeline

    • October 16th, 2024: Chrome 131 beta is available
    • November 12th, 2024: Chrome 131 is in stable
    • Early 2025: Compatibility mode is no longer available on Chrome

Getting your Android app ready for Autofill

Posted by Wojtek Kalicinski, Android Developer Advocate, Akshay Kannan, Product Manager for Android Authentication, and Felipe Leme, Software Engineer on Android Frameworks

Starting in Oreo, Autofill makes it easy for users to provide credit cards, logins, addresses, and other information to apps. Forms in your apps can now be filled automatically, and your users no longer have to remember complicated passwords or type the same bits of information more than once.

Users can choose from multiple Autofill services (similar to keyboards today). By default, we include Autofill with Google, but users can also select any third party Autofill app of their choice. Users can manage this from Settings->System->Languages>Advanced->Autofill service.

What's available today

Today, Autofill with Google supports filing credit cards, addresses, logins, names, and phone numbers. When logging in or creating an account for the first time, Autofill also allows users to save the new credentials to their account. If you use WebViews in your app, which many apps do for logins and other screens, your users can now also benefit from Autofill support, as long as they have Chrome 61 or later installed.

The Autofill API is open for anyone to implement a service. We are actively working with 1Password, Dashlane, Keeper, and LastPass to help them with their implementations towards becoming certified on Android. We will be certifying password managers and adding them to a curated section in the Play Store, which the "Add service" button in settings will link to. If you are a password manager and would like to be certified, please get in touch.

What you need to do as a developer

As an app developer, there are a few simple things you can do to take advantage of this new functionality and make sure that it works in your apps:

Test your app and annotate your views if needed

In many cases, Autofill may work in your app without any effort. But to ensure consistent behavior, we recommend providing explicit hints to tell the framework about the contents of your field. You can do this using either the android:autofillHints attribute or the setAutofillHints() method.

Similarly, with WebViews in your apps, you can use HTML Autocomplete Attributes to provide hints about fields. Autofill will work in WebViews as long as you have Chrome 61 or later installed on your device. Even if your app is using custom views, you can also define the metadata that allows autofill to work.

For views where Autofill does not make sense, such as a Captcha or a message compose box, you can explicitly mark the view as IMPORTANT_FOR_AUTOFILL_NO (or IMPORTANT_FOR_AUTOFILL_NO_EXCLUDE_DESCENDANTS in the root of a view hierarchy). Use this field responsibly, and remember that users can always bypass this by long pressing an EditText and selecting "Autofill" in the overflow menu.

Affiliate your website and mobile app

Autofill with Google can seamlessly share logins across websites and mobile apps ‒ passwords saved through Chrome can also be provided to native apps. But in order for this to work, as an app developer, you must explicitly declare the association between your website with your mobile app. This involves 2 steps:

Step 1: Host a JSON file at yourdomain.com/.well-known/assetlinks.json

If you've used technologies like App Links or Google Smart Lock before, you might have heard about the Digital Asset Links (DAL) file. It's a JSON file placed under a well known location in your website that lets you make public, verifiable statements about other apps or websites.

You should follow the Smart Lock for Passwords guide for information about how to create and host the DAL file correctly on your server. Even though Smart Lock is a more advanced way of signing users into your app, our Autofill service uses the same infrastructure to verify app-website associations. What's more, because DAL files are public, third-party Autofill service developers can also use the association information to secure their implementations.

Step 2: Update your App's Manifest with the same information

Once again, follow the Smart Lock for Passwords guide to do this, under "Declare the association in the Android app."

You'll need to update your app's manifest file with an asset_statements resource, which links to the URL where your assetlinks.json file is hosted. Once that's done, you'll need to submit your updated app to the Play Store, and fill out the Affiliation Submission Form for the association to go live.

When using Android Studio 3.0, the App Links Assistant can generate all of this for you. When you open the DAL generator tool (Tools -> App Links Assistant -> Open Digital Asset Links File Generator), simply make sure you enable the new checkbox labeled "Support sharing credentials between the app and website".

Then, click on "Generate Digital Asset Links file", and copy the preview content to the DAL file hosted on your server and in your app. Please remember to verify that the selected domain names and certificates are correct.

Future work

It's still very early days for Autofill in Android. We are continuing to make some major investments going forward to improve the experience, whether you use Autofill with Google or a third party password manager.

Some of our key areas of investment include:

  1. Autofill with Google: We want to provide a great experience out of the box, so we include Autofill with Google with all Oreo devices. We're constantly improving our field detection and data quality, as well as expanding our support for saving more types of data.
  2. WebView support: We introduced initial support for filling WebViews in Chrome 61, and we'll be continuing to test, harden, and make improvements to this integration over time, so if your app uses WebViews you'll still be able to benefit from this functionality.
  3. Third party app support: We are working with the ecosystem to make sure that apps work as intended with the Autofill framework. We urge you as developers to give your app a spin on Android Oreo and make sure that things work as expected with Autofill enabled. For more info, see our full documentation on the Autofill Framework.

If you encounter any issues or have any suggestions for how we can make this better for you, please send us feedback.