By Goran Petrovic
History
It’s been a long-standing tradition of my team to organize hackathons twice a year. In weeks prior to the hackathon, the team gathers and brainstorms ideas for projects, ranging from improving the testing infrastructure or an existing process, to trying out a wild idea they’ve had for some time. Just before the hackathon, the team rates the accumulated ideas on a coolness-impact scale: how much fun does a project sound vs. how impactful could it potentially be; while impact is important, for hackathons, fun is non-negotiable. Then, engineers who are excited to work on some of the proposed projects subscribe and form teams. It was no different in the cold winter of 2013, where among the plethora of cool and wild ideas, one was to prototype Mutation testing.
For those who are not familiar with it, mutation testing is a method of evaluating test quality by injecting bugs into the code and seeing whether the tests detect the fault or not. The more injected bugs the tests catch, the better they are. Here’s an example:
Negating the if condition.
def checkout(cart):
  if not cart.items:
    throw Error("cart empty")
return checkout_internal(cart) | def checkout(cart):
if cart.items:
throw Error("cart empty")
return checkout_internal(cart) |
If a test fails, we say it kills the mutant, and if no tests fail, we say that the mutant is alive.
By the end of the hackathon, mutagenesis was implemented for C++ and Python, and a prototype was born: a shell script that evaluates generated mutants in a diff (pull request) and textually reports live mutants in the files in the diff. A year passed with no work done on the project, before I started to work on it in my
20% time. I had no idea what Mutation testing was at the time, so I researched and read papers on the topic, and collected lots of ideas on what I should focus on.
From Prototype To Launch
I quickly realized that the hackathon crew did not calculate the Mutation score, the ratio of mutants detected by tests, which is a prominent metric in the research literature and the holy grail of evaluating test quality, but just enumerated live mutants. My first exposure to mutants was just running the tool on the mutagenesis code itself and trying to understand the report. I was immediately overwhelmed: after a long execution time, I was facing thousands of mutants in just a handful of files. I tried going through a couple, but after a few minutes I grew tired and moved on with my main project, which happened to be on Google Shopping. In the following months, I stayed away from my 20% project, but I kept thinking about it, bugging my colleagues and friends about the ideas I had to make mutation testing work for us. After many months of brainstorming and discussions, almost a year after the original hackathon project, I was ready to design the Mutation Testing Service.
I faced two big problems. First, I could force myself to go through lots of mutants, and maybe find a useful one that would prompt me to write a test case, but I could not force others, not even my teammates. Second, the vast majority of mutants were simply bad. Here are some examples:
Replacing division with subtraction, but in a logging statement.
log.Infof("Found %d (%.2f %%)!", e,
float64(e)*100.0 / total) | log.Infof("Found %d (%.2f %%)!", e,
float64(e)*100.0 - total) |
Appending number 1 to an error message.
Error.create(((key + " disabled"))); | Error.create(((key + " disabled") + 1)); |
Replacing greater than with less than when comparing length of a collection to zero.
showCart := len(cart.GetItems()) > 0 | showCart := len(cart.GetItems()) < 0 |
Replacing the idiomatic python check for whether the module is imported or executed as main.
if (__name__ == '__main__'): | if (__name__ != '__main__'): |
Changing python’s string concatenation (+) to string multiplication (*).
message = ('id ' + run_idx) | message = ('id ' * run_idx) |
Changing a tuning parameter.
slo = (20 * time.Second) | slo = (20 * time.Second) + 1 |
Changing a network timeout, but the network layer is mocked in the tests.
_TIMEOUT = (60 * 10) | _TIMEOUT = (60 / 10) |
Subtracting form -∞.
df = df.replace(
  [numpy.inf, -numpy.inf],
  numpy.nan
) | df = df.replace(
[numpy.inf, -numpy.inf - 1],
numpy.nan
) |
Yes, the tests did not detect these mutants, but we would not want such tests anyway. Many of them would produce fragile,
change-detector tests. We later settled on calling them
unproductive mutants: writing tests for those mutants would make the test suite worse, not better.
I realized that I needed to suppress these types of mutants: if I reported them, nobody would use mutation testing, myself included. Most of the mutants were not useful, and that is a waste of developer attention. The onus was on me to create a better tool. I set out to try various heuristics by looking at the report and suppressing mutants that I found unproductive. I encoded the heuristics in AST (
Abstract Syntax Tree) matching rules, and I dubbed the AST nodes which contained unproductive mutants as
arid nodes. In the beginning, there were only a few rules in the system, but that was enough to make me feel confident that my colleagues would give it a try.
The other big issue was the sheer number of mutants. With five or more in a line, hundreds in a file, it was a challenge to display them, and even if I managed that, nobody would go through them anyway. I quickly realized that they shouldn’t: it took a lot of time for me to go through the mutants, and, while some pointed me to a hole in my test suite, most were useless, and many of them, especially ones in the same line, redundant. I did not need every possible combination of operators changed to tell me that my test for that condition was insufficient; one was just fine. That was my first decision on mutation testing: to report at most one mutant in a line. This was a quick and easy decision to make, because, if you’ve ever used a Code review system, you know that having more makes the review noisy and harder to do. Another reason why it was such an easy decision was that it would have been computationally prohibitively expensive to calculate all mutants, and I could have thrown my 20% project down the drain. I call it limitation-driven development :)
Of course, the idea was to report live mutants during
Code review. Code review is the perfect time in the engineering process to surface useful findings about the code being changed, and integrating into the existing developer process has the
highest chance that the developers will take action. This seemed like the most normal thing in the world: we had hundreds of
analyzers and all engineers were used to receiving findings from various analyses of their code. It took an outsider to point out that this was a strange approach: mutation testing was classically run on the whole program and the mutation score calculated and used as guidance.
This is what a Mutant finding looks like in the Code review tool:
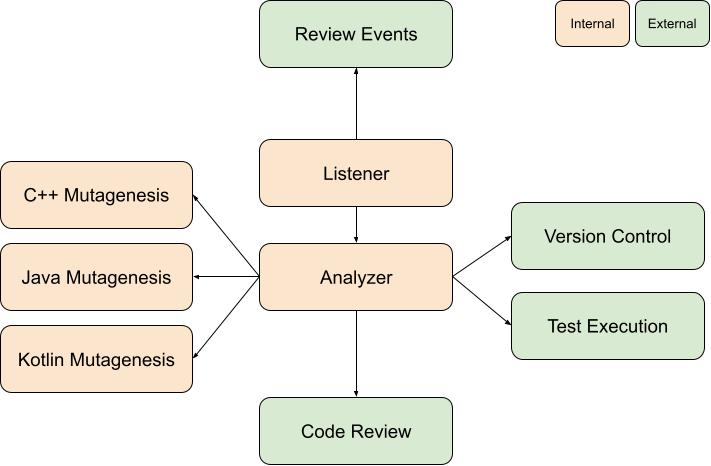
Mutation Testing at Google is a dynamic analyzer of code changes that surfaces mutants during Code review by posting code findings. In terms of infrastructure, it consists of three main parts: the
change listener, the
analyzer, and many
mutagenesis servers, one for each language.
Each event during the Code review is announced using a publisher-subscriber pattern, and any interested party can listen, and react, to these events. When a change is sent for Code review, many things happen: linters are run, automated tests are evaluated, coverage is calculated, and for the users of mutation testing, mutants are generated and evaluated. Listening on all events coming from the Code review system, the listener schedules a mutation run on the analyzer.
The first thing the analyzer does is get the code coverage results for the patch in question; from it, the analyzer can extrapolate which tests cover which lines of source code. This is a very useful piece of information, because running the minimum set of tests that can kill a mutant is crucial; if we just ran all tests that were linked in, or covered the project, that would be prohibitively computationally expensive
Next, for each covered line in each file in the patch, a mutagenesis server for the language in question is asked to produce a mutant. The mutagenesis server parses the file, traverses its AST, and applies the mutators in the requested order (as per mutation context), ignoring arid nodes, nodes in uncovered lines and in lines that are not affected by the proposed patch.
When the analyzer assembles all mutants, it patches them one by one to a version control context and then evaluates all the tests for each mutant in parallel. For mutants for which all tests pass, the analyzer surfaces a finding for the code author and reviewers, and is done for the time being.
Because the Code review is a laborious and dynamic process, with many rounds of comments from reviewers and many automated findings from hundreds of different analyzers, there can be many snapshots as the patch evolves: adoption of recommendations from reviewers or accepting proposed changes from linters yields many code states. Mutation testing first runs after coverage is available, and then it runs for each subsequent snapshot: developers like to see the fruits of their labor: when they write a test to kill a mutant, they want to see the mutant killed.
I launched Mutation testing for the Shopping Engineering Productivity team in late 2015. Around 15 of my colleagues were subjected to Mutant findings during their Code reviews, and it was a bumpy start. Each finding has two buttons: Please fix and Not useful, as you can see on the Code review screenshot above. A reviewer can instruct the code author to fix some finding (e.g. a ClangTidy finding might point out that an object is being unnecessarily copied and suggest using a reference instead, or a Mutant finding might point out that code is not well tested). The author and all reviewers can give feedback to the author of the finding/analyzer that their finding is not useful. This is a source of valuable information, and I made use of it. For each mutant that was deemed not useful, I’d check it out and see whether I could generalize from it and add a new rule to my arid node heuristics. Slowly, I collected several hundred heuristics, many of them generally applicable, but many also tied to internal stuff, like monitoring frameworks. More and more, I noticed that just marking nodes as arid and suppressing mutants in them was not enough on its own; a more powerful mechanism was required to reduce this noise even further. Take a look at these motivating examples:
Changing the condition of an in statement, but the body is arid (a logging statement).
if _, err := Del(req); err != nil {
  log.Errorf("cleanup failed: %v”, cerr)
} | if _, err := c.Del(req); err == nil {
log.Errorf("cleanup failed: %v”, cerr)
} |
Similar pattern, but in C++:
if (!(!status.ok())) {
    LOG(WARNING) << "Updating dependency graph failed" << status;
} |
I settled for a transitive rule: an AST node is arid if I say it’s arid, or if it’s a compound statement and all its body is also arid. This made sense in retrospect, but it took some looking at reported examples of unproductive mutants to crystalize. Because the logging statements are arid, the whole if statement’s body is arid, and hence, the if statement itself is arid, including its condition.
In the summer of 2015, my intern, Małgorzata Salawa, and I got mutagenesis implemented for C++, Go, Python, and Java, and having transitive arid node detection and surfacing at most a single mutant per line and 7 per file, we called it a v1.0 and launched. Mutation testing was always an opt-in service, and in the beginning had a few users (93 code reviews in Q1 of 2016), but over time it ramped up to 2,500 users in February 2017, to tens of thousands today. The early days were crucial to get the users’ feedback and extend the arid node heuristics ever further. In the beginning, the Not Useful rate was around 80%, and this was already with some heuristics and at most a single mutant per line. With time, I got it down to around 15%. I was always aware that getting the rate to 0% was impossible, because of the nature of the mutants: sometimes, the mutant would produce an equivalent behavior as the original, and there was no way to avoid that fully.
Changing cached lookup by removing the cache and always recalculating yields functionally equivalent code, undetectable by conventional testing.
func (s *Serv) calculate(in int32) int {
  if val, ok := if s.cache[in] {
    return val
  }
  val := s.calc(in)
  s.cache[in] = val
  return val
} | func (s *Serv) calculate(in int32) int {
val := s.calc(in)
s.cache[in] = val
return val
} |
I was both surprised and happy that I could lower the Not useful rate to under 50%.
Mutation Context
As time went by, I added support for more languages. In early 2017, I implemented support for JavaScript and TypeScript, and later in the year I added support for Dart. In 2018 I added support for
ZetaSQL. And finally, in early 2020, I added support for Kotlin as it became more and more popular in the Android world.
I kept track of various stats for all mutants: their survival rates and Please fix/Not useful ratios.
The worst performing mutator was ABS(Absolute Value Mutator) that would replace an expression with ±abs(expression), for example:
absl::Minutes(10) - elapsed; | absl::Minutes(-abs(10)) - elapsed; |
Looking at the examples, I had to agree. Because the feedback was predominantly negative for this mutator, I quickly completely disabled it for all languages.
I soon noticed that the SBR (Statement Block Removal) mutator, which deletes statements or whole blocks, is the most common one, and that made sense: while mutating a logical or arithmetic operator required the existence of such an operator in the code to be mutated, any line of code was eligible for deletion. Mutants generated by code deletion, though, did not have the best reported usefulness, or productivity. In fact, almost all other mutators generated more productive mutants than the SBR, and that got me thinking: not all code is the same; a condition within an if statement that contains a return statement is not the same as a condition in another location.
Out of this, an idea was born: context-based mutator selection. For each line, I would randomly shuffle mutator operators and pick one by one until one generated a mutant in that line. That was not ideal, because I knew that some operators worked better than others in some contexts. Rather than just randomly picking a mutant operator, I decided to pick the one most likely to generate a surviving mutant that is then most likely to be productive when reported, based on historical data. I had millions of mutants to learn from, I just needed to define the distance between pieces of code. Finally deciding to look for AST nodes that were in similar contexts as the node being mutated, I looked at the nodes around the node under mutation, and encoded the child-parent relationships of the near-by nodes to capture the AST context. Armed with the distance measure and with the help of my returning intern Małgorzata, it was easy to find the closest AST contexts from historic mutants and to look at their fate and pick the best one. I ordered the mutators by their productivity and tried to generate a mutant in the node, in that order, since it’s quite possible that some of the mutant operators are not applicable on some piece of code.
This was quite an improvement. Both mutant survivability and usefulness improved significantly for all mutant operators and programming languages. You can read more about the findings in
the upcoming paper.
Mutation testing is only valuable if the test cases we write for mutants are valuable.
Mutants do not resemble real bugs, they are simpler than bugs found in the wild. Mutation testing relies on the coupling hypothesis:
mutants are coupled with real bugs if a test suite that is sensitive enough to detect mutants is also sensitive enough to detect the more complex real bugs. Reporting mutants and writing tests to kill them only makes sense if they are coupled with real bugs.
I instinctively thought that fault coupling was real, otherwise I would not have worked on mutation testing at all, and I’ve seen many many cases where mutants pointed to a bug; but still, I wanted to verify this hypothesis, if only for our code base. I designed an experiment: I would generate all mutants in a line for explicit bug-fixing changes, before and after the fix, and I would check whether, had mutation testing been run, it would have surfaced a mutant in the change that introduced the bug, and potentially prevented it (i.e., killed in the change that fixed the bug and added new tests cases). I ran this experiment on weekends for over a month, because we did not have the resources to run it during workdays. While I normally generate a single mutant in a line, to test the fault coupling effect, I used the classical mutation testing approach and generated all possible mutants, while still adhering to the arid node suppression. A total of 33 million test suites were executed to test hundreds of thousands of mutants, finally to conclude that, in around 70% of cases, a bug was coupled with a mutant.
While I was at it, I also checked my intuition on whether a single mutant per line was enough, and found that it was overwhelmingly so: in more than 90% of cases, either all mutants were killed in a line or none was. It’s worth keeping in mind that I still applied my arid node suppression heuristics for this experiment. It was great to finally have confirmation of my intuitions.
I also looked into the developer behavior changes after using mutation testing on a project for longer periods of time, and discovered that projects that use mutation testing get more tests over time, as developers get exposed to more and more mutants. Not only do developers write more test cases, but those test cases are more effective in killing mutants: less and less mutants get reported over time. I noticed this from personal experience too: when writing unit tests, I would see where I cut some corners in the tests, and anticipated the mutant. Now I just add the missing test cases, rather than facing a mutant in my Code review, and I rarely see mutants these days, as I’ve learned to anticipate and preempt them.
You can read more about the findings in our
ICSE paper.
Conclusion
It’s been a long road since that hackathon in the winter of 2013. Mutation testing was a lot of fun to work on. It had its challenges, and I had days where I thought that I would throw everything down the drain (I’m looking at you, clang), but I am glad I stuck with it.
The most interesting part of the project was getting Mutation testing to scale to such a large code base, and that required redefining the problem and adapting it to the existing ecosystem that engineers were already used to. Another interesting angle was working, and learning from, the academic community, in particular Gordon Fraser (University of Passau) and René Just (University of Washington).
I would like to encourage everyone to give one of the many open source mutation testing tools a try on their projects. With some tweaks here and there, it can be a great way to keep your software well tested.