Author Archives: GCP Team

New Cloud Filestore service brings GCP users high-performance file storage


As we celebrate the upcoming Los Angeles region for Google Cloud Platform (GCP) in one of the creative centers of the world, we’re really excited about helping you bring your creative visions to life. At Google, we want to empower artist collaboration and creation with high-performance cloud technology. We know folks need to create, read and write large files with low latency. We also know that film studios and production shops are always looking to render movies and create CGI images faster and more efficiently. So alongside our LA region launch, we’re pleased to enable these creative projects by bringing file storage capabilities to GCP for the first time with Cloud Filestore.

Cloud Filestorebeta is managed file storage for applications that require a file system interface and a shared file system. It gives users a simple, integrated, native experience for standing up fully managed network-attached storage (NAS) with their Google Compute Engine and Kubernetes Engine instances.

We’re pleased to add Cloud Filestore to the GCP storage portfolio because it enables native platform support for a broad range of enterprise applications that depend on a shared file system.


Cloud Filestore will be available as a storage option in the GCP console
We're especially excited about the high performance that Cloud Filestore offers to applications that require high throughput, low latency and high IOPS. Applications such as content management systems, website hosting, render farms and virtual workstations for artists typically require low-latency file operations, high-performance random I/O, and high throughput and performance for metadata-intensive operations. We’ve heard from some of our early users that they’ve saved time serving up websites with Cloud Filestore, cut down on hardware needs and sped up the compute-intensive process of rendering a movie.

Putting Cloud Filestore into practice

For organizations with lots of rich unstructured content, Cloud Filestore is a good place to keep it. For example, graphic design, video and image editing, and other media workflows use files as an input and files as the output. Filestore also helps creators access shared storage to manipulate and produce these types of large files. If you’re a web developer creating websites and blogs that serve file content to your audience, you’ll find it easy to integrate Cloud Filestore with web software like Wordpress. That’s what Jellyfish did.

Jellyfish is a boutique marketing agency focused on delivering high-performance marketing services to their global clients. A major part of that service is delivering a modern and flexible digital web presence.

“Wordpress hosts 30% of the world’s websites, so delivering a highly available and high performance Wordpress solution for our clients is critical to our business. Cloud Filestore enabled us to simply and natively integrate Wordpress on Kubernetes Engine , and take advantage of the flexibility that will provide our team.”
- Ashley Maloney, Lead DevOps Engineer at Jellyfish Online Marketing
Cloud Filestore also provides the reliability and consistency that latency-sensitive workloads need. One example is fuzzing, the process of running millions of permutations to identify security vulnerabilities in code. At Google, ClusterFuzz is the distributed fuzzing infrastructure behind Chrome and OSS-Fuzz that’s built for fuzzing at scale. The ClusterFuzz team needed a shared storage platform to store the millions of files that are used as input for fuzzing mutations.
“We focus on simplicity that helps us scale. Having grown from a hundred VMs to tens of thousands of VMs, we appreciate technology that is efficient, reliable, requires little to no configuration and scales seamlessly without management. It took one premium Filestore instance to support a workload that previously required 16 powerful servers. That frees us to focus on making Chrome and OSS safer and more reliable.”
- Abhishek Arya, Information Security Engineer, Google Chrome
Write once and read many is another type of workload where consistency and reliability are critical. At ever.ai, they’re training an advanced facial recognition platform on 12 billion photos and videos for tens of millions of users in 95 countries. The team constantly needs to share large amounts of data between many servers that will be written once but read a bunch. They faced a challenge in writing this data to a non-POSIX object storage, reading from which required custom code or to download the data. So they turned to Cloud Filestore.
“Cloud Filestore was easy to provision and mount, and reliable for the kind of workload we have. Having a POSIX file system that we can mount and use directly helps us speed-read our files, especially on new machines. We can also use the normal I/O features of any language and don’t have to use a specific SDK to use an object store."
- Charlie Rice, Chief Technology Officer, ever.ai
Cloud Filestore is also particularly helpful with rendering requirements. Rendering is the process by which media production companies create computer-generated images by running specialized imaging software to create one or more frames of a movie. We’ve just announced our newest GCP region in Los Angeles, where we expect there are more than a few of you visual effects artists and designers who can use Cloud Filestore. Let’s take a closer look at an example rendering workflow so you can see how Cloud Filestore can read and write data for this specialized purpose without tying up on-site hardware.

Using Cloud Filestore for rendering

When you render a movie, the rendering job typically runs across fleets ("render farms") of compute machines, all of which mount a shared file system. Chances are you’re doing this with on-premises machines and on-premises files, but with Cloud Filestore you now have a cloud option.

To get started, create a Cloud Filestore instance, and seed it with the 3D models and raw footage for the render. Set up your Compute Engine instance templates to mount the Cloud Filestore instance. Once that's set, spin up your render farm with however many nodes you need, and kick off your rendering job. The render nodes all concurrently read the same source data set from the Network File System (NFS) share, perform the rendering computations and write the output artifacts back to the share. Finally, your reassembly process reads the artifacts from Cloud Filestore and assembles it and writes into the final form.

Cloud Filestore Price and Performance

We offer two price-for-performance tiers. The high-performance Premium tier is $0.30 per GB per month, and the midrange performance Standard tier is $0.20 per GB per month in us-east1, us-central1, and us-west1 (Other regions vary). To keep your bill simple and predictable, we charge for provisioned capacity. You can resize on demand without downtime to a max of 64TB*. We do not charge per-operation fees. Networking is free in the same zone, and cross zone standard egress networking charges apply.

Cloud Filestore Premium instance throughput is designed to provide up to 700 MB/s and 30,000 IOPS for reads, regardless of the Cloud Filestore instance capacity. Standard instances are lower priced and performance scales with capacity, hitting peak performance at 10TB and above. A simple performance model makes it easier to predict costs and optimize configurations. High performance means your applications run faster. As you can see in the image below, the Cloud Filestore Premium tier outperforms the design goal with the specified benchmarks, based on performance testing we completed in-house.

Trying Cloud Filestore for yourself

Cloud Filestore will release into beta next month. To sign up to be notified about the beta release, complete this request form. Visit our Filestore page to learn more.

In addition to our new Cloud Filestore offering, we partner with many file storage providers to meet all of your file needs. We recently announced NetApp Cloud Volumes for GCP and you can find other partner solutions in our launcher.

If you’re interested in learning more about file storage from Google, check out this session at Next 2018 next month. For more information, and to register, visit the Next ‘18 website.

Bust a move with Transfer Appliance, now generally available in U.S.


As we celebrate the upcoming Los Angeles Google Cloud Platform (GCP) region in one of the creative centers of the world, we are excited to share news about a product that can help you get your data there as fast as possible. Google Transfer Appliance is now generally available in the U.S., with a few new features that will simplify moving data to Google Cloud Storage. Customers have been using Transfer Appliance for almost a year, and we’ve heard great feedback.

The Transfer Appliance is a high-capacity server that lets you transfer large amounts of data to GCP, quickly and securely. It’s recommended if you’re moving more than 20TB of data, or data that would take more than a week to upload.

You can now request a Transfer Appliance directly from your Google Cloud Platform console. Indicate the amount of data you’re looking to transfer, and our team will help you choose the version that is the best fit for your needs.

The service comes in two configurations: 100TB or 480TB of raw storage capacity. We see typical data compression rates of 2x the raw capacity. The 100TB model is priced at $300, plus express shipping (approximately $500); the 480TB model is priced at $1,800, plus shipping (approximately $900).

You can mount Transfer Appliance as an NFS volume, making it easy to drag and drop files, or rsync, from your current NAS to the appliance. This feature simplifies the transfer of file-based content to Cloud Storage, and helps our migration partners expedite the move for customers.
"SADA Systems provides expert cloud consultation and technical services, helping customers get the most out of their Google Cloud investment. We found Transfer Appliance helps us transition the customer to the cloud faster and more efficiently by providing a secure data transfer strategy."
-Simon Margolis, Director of Cloud Platform, SADA Systems
Transfer Appliance can also help you transition your backup workflow to the cloud quickly. To do that, move the bulk of your current backup data offline using Transfer Appliance, and then incrementally back up to GCP over the network from there. Partners like Commvault can help you do this.

With this release, you’ll also find a more visible end-to-end integrity check, so you can be confident that every bit was transferred as is, and have peace of mind in deleting source data.

Transfer Appliance in action

In developing Transfer Appliance, we built a device designed for the data center, so it slides into a standard 19” rack. That has been a positive experience for our early customers, even those with floating data centers (yes, actually floating--see below for more).

We’ve seen our customers successfully use Transfer Appliance for the following use cases:
  • Migrate your data center (or parts of it) to the cloud.
  • Kick-start your ML or analytics project by transferring test data and staging it quickly.
  • Move large archives of content like creative libraries, videos, images, regulatory or backup data to Cloud Storage.
  • Collect data from research bodies or data providers and move it to Google Cloud for analysis.
We’ve heard about lots of innovative, interesting data projects powered by Transfer Appliance. Here are a few of them.

One early adopter, Schmidt Ocean Institute, is a private non-profit foundation that combines advanced science with state-of-the-art technology to achieve lasting results in ocean research. Their goals are to catalyze sharing of information and to communicate this knowledge to audiences around the world. For example, the Schmidt Ocean Institute owns and operates research vessel Falkor, the first oceanographic research vessel with a high-performance cloud computing system installed onboard. Scientists run models and software and can plan missions in near-real time while at sea. With the state-of-the-art technologies onboard, scientists contribute scientific data to the oceanographic community at large, very quickly. Schmidt Ocean Institute uses Transfer Appliance to safely get the data back to shore and publicly available to the research community as fast as possible.

“We needed a way to simplify the manual and complex process of copying, transporting and mailing hard drives of research data, as well as making it available to the scientific community as quickly as possible. We are able to mount the Transfer Appliance onboard to store the large amounts of data that result from our research expeditions and easily transfer it to Google Cloud Storage post-cruise. Once the data is in Google Cloud Storage, it’s easy to disseminate research data quickly to the community.”
-Allison Miller, Research Program Manager, Schmidt Ocean Institute

Beatport, a division of LiveStyle, serves an audience of electronic music DJs, producers and their fans. Google Transfer Appliance afforded Beatport the opportunity to rethink their storage architecture in the cloud without affecting their customer-facing network in the process.

“DJs, music producers and fans all rely on Beatport as the home for the world’s electronic music. By moving our library to Google Cloud Storage, we can access our audio data with the advanced tools that Google Cloud Platform has to offer. Managing tens of millions of lossless quality files poses unique challenges. Migrating to the highly performant Cloud Storage puts our wealth of audio data instantly at the fingertips of our technology team. Transfer Appliance made that move easier for our team.”
-Jonathan Steffen, CIO, beatport
Eleven Inc. creates content, brand experiences and customer activation strategies for clients across the globe. Through years of work for their clients, Eleven built a large library of creative digital assets and wanted a way to cost-effectively store that data in the cloud. Facing ISP network constraints and a desire to free up space on their local asset server quickly, Eleven Inc. used Transfer Appliance to facilitate their migration.

“Working with Transfer Appliance was a smooth experience. Rack, capture and ship. And now that our creative library is in Google Cloud Storage, it's much easier to think about ways to more efficiently manage the data throughout its life-cycle.”
-Joe Mitchell, Director of Information Systems
amplified ai combines extensive IP industry experience with deep learning to offer instant patent intelligence to inventors and attorneys. This requires a lot of patent data for building models. Transfer Appliance helped amplified ai move TBs of this specialized essential data to the cloud quickly.

“My hands are already full building deep learning models on massive, disparate data without also needing to worry about physically moving data around. Transfer Appliance was easy to understand, easy to install, and made it easy to capture and transfer data. It just did what it was supposed to do and saved me time which, for a busy startup, is the most valuable asset.”
-Chris Grainger, Founder & CTO, amplified ai
Airbus Defence and Space Geo Inc. uses their exclusive access to radar and optical satellites to offer a stunning Earth observation images library. As part of a major cloud migration effort, Airbus moved hundreds of TBs of this data to the cloud with Transfer Appliance so they can better serve images to clients from Cloud Storage. They improved data quality along with the migration by using Transfer Appliance.

“We needed to liberate. To flex on demand and scale in the cloud, and unleash our creativity. Transfer Appliance was a catalyst for that. In addition to migrating an amount of data that would not have been possible over the network, this transfer gave us the opportunity to improve our storage in the process—to clean out the clutter.”
-Dave Wright, CTO, Airbus Defense and Space Geo Inc.


National Collegiate Sports Archives (NCSA) is the creator and owner of the VAULT, which contains years worth of college sports footage. NCSA digitizes archival sports footage from leading schools and delivers it via mobile, advertising and social media platforms. With a lot of precious footage to deliver to college sports fans around the globe, NCSA needed a way to move data into Google Cloud Platform quickly and with zero disruption for their users.

“With a huge archive of collegiate sports moments, we wanted to get that content into the cloud and do it in a way that provides value to the business. I was looking for a solution that would cost-effectively, simply and safely execute the transfer and let our teams focus on improving the experience for our users. Transfer Appliance made it simple to capture data in our data center and ship it to Google Cloud. ”
-Jody Smith, Technology Lead, NCSA

Tackle your data migration needs with Transfer Appliance

To get detailed information on Transfer Appliance, check out our documentation. And visit our Data Transfer page to learn more about our other cloud data transfer options.

We’re looking forward to bringing Transfer Appliance to regions outside of the U.S. in the coming months. But we need your help: Where should we deploy first? If you are interested in offline data transfer but not located in the U.S., please indicate so in the request form.

If you’re interested in learning more about cloud data migration strategies, check out this session at Next 2018 next month. For more information, and to register, visit the Next ‘18 website.

Google Cloud for Electronic Design Automation: new partners


A popular enterprise use case for Google Cloud is electronic design automation (EDA)—designing electronic systems such as integrated circuits and printed circuit boards. EDA workloads, like simulations and field solvers, can be incredibly computationally intensive. They may require a few thousand CPUs, sometimes even a few hundred thousand CPUs, but only for the duration of the run. Instead of building up massive server farms that are oversubscribed during peak times and sit idle for the rest of the time, you can use Google Cloud Platform (GCP) compute and storage resources to implement large-scale modeling and simulation grids.

Our partnerships with software and service providers make Google Cloud an even stronger platform for EDA. These solutions deliver elastic infrastructure and improved time-to-market for customers like eSilicon, as described here.

Scalable simulation capacity on GCP provided by Metrics Technologies (more details below)

This week at Design Automation Conference, we’re showcasing a first-of-its-kind implementation of EDA in the cloud: our implementation of the Synopsys VCS simulation solution for internal EDA workloads on Google Cloud, by the Google Hardware Engineering team. We also have several new partnerships to help you achieve operational and engineering excellence through cloud computing, including:

  • Metrics Technologies is the first EDA platform provider of cloud-based SystemVerilog simulation and verification management, accelerating the move of semiconductor verification workloads into the cloud. The Metrics Cloud Simulator and Verification Manager, a pay-by-the-minute software-as-a-service (SaaS) solution built entirely on GCP, improves resource utilization and engineering productivity, and can scale capacity with variable demand. Simulation resources are dynamically adjusted up or down by the minute without the need to purchase additional hardware or licenses, or manage disk space. You can find Metrics news and reviews at www.metrics/news.ca, or schedule a demo at DAC 2018 at www.metrics.ca.
  • Elastifile delivers enterprise-grade, scalable file storage on Google Cloud. Powered by a high-performance, POSIX-compliant distributed file system with integrated object tiering, Elastifile simplifies storage and data management for EDA workflows. Deployable in minutes via Google Cloud Launcher, Elastifile enables cloud-accelerated circuit design and verification, with no changes required to existing tools and scripts.
  • NetApp is a leading provider of high-performance storage solutions. NetApp is launching Cloud Volumes for Google Cloud Platform, which is currently available in Private Preview. With NetApp Cloud Volumes, GCP customers have access to a fully-managed, familiar file storage (NFS) service with a cloud native experience.
  • Quobyte provides a parallel, distributed, POSIX-compatible file system that runs on GCP and on-premises to provide petabytes of storage and millions of IOPS. As a distributed file system, Quobyte scales IOPS and throughput linearly with the number of nodes–avoiding the performance bottlenecks of clustered or single filer solutions. You can try Quobyte today on the Cloud Launcher Marketplace.
If you’d like to learn more about EDA offerings on Google Cloud, we encourage you to visit us at booth 1251 at DAC 2018. And if you’re interested in learning more about how our Hardware Engineering team’s used Synopsys VCS on Google Cloud for internal Google workloads, please stop by Design Infrastructure Alley on Tuesday for a talk by team members Richard Ho and Ravi Rajamani. Hope to see you there!

Protect your Compute Engine resources with keys managed in Cloud Key Management Service


In Google Cloud Platform, customer data stored at rest is always encrypted by default using multiple layers of encryption technology. We also offer a continuum of encryption key management options to help meet the security requirements of your organization.

Did you know there is now beta functionality you can use to further increase protection of your Compute Engine disks, images and snapshots using your own encryption keys stored and managed with Cloud Key Management Service (KMS)? These customer-managed encryption keys (CMEKs) provide you with granular control over which disks, images and snapshots will be encrypted.

You can see below that on one end of the spectrum, Compute Engine automatically encrypts disks and manages keys on your behalf. On the other end, you can continue using your customer-supplied encryption keys (CSEK) for your most sensitive or regulated workloads, if you desire.

This feature helps you strike a balance between ease of use and control: Your keys are in the cloud, but still under your management. This option is ideal for organizations in regulated industries that need to meet strict requirements for data protection, but which don’t want to deal with the overhead of creating custom solutions to generate and store keys, manage and record key access, etc.

Setting up CMEK in Compute Engine helps quickly deliver peace of mind to these organizations, because they control access to the disk by virtue of controlling the key.

How to create a CMEK-supported disk

Getting started with the CMEK feature is easy. Follow the steps below to create and attach a Compute Engine disk that is encrypted with a key that you control.

You’ll need to create a key ring and key in KMS. This—and all the rest of the steps below—can be accomplished in several ways: through the Developer Console, APIs and gcloud. In this tutorial, we’ll be using the developer console. We’ll start on the Cryptographic Keys page, where we’ll select “Create Key Ring.”

Give your keyring a name. Do the same with the key the next page. For this tutorial, feel free to leave all the other fields as-is.

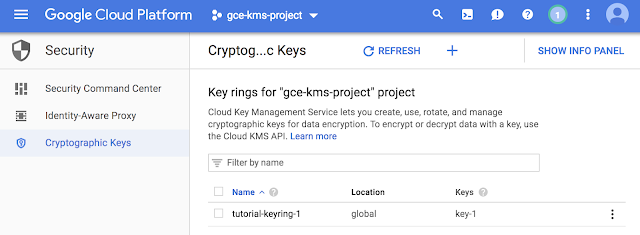
Having finished those steps, you now have a keyring with a single AES-256 encryption key. In the screenshot below, you can see it as “tutorial-keyring-1.” And since the keyring is managed by KMS, it is already fully integrated with Cloud Identity and Access Management (IAM) and Cloud Audit Logging, so you can easily manage permissions and monitor how it’s used.

With the key in place, you can start encrypting disks with CMEK keys. The instructions below are for creating a new instance and protecting its boot disk with a CMEK key. Note that it is also possible to create new encrypted disks from snapshots and images and attach them to existing VMs, or even to encrypt the underlying snapshots and images themselves.

First we’ll go to the VM instances page, and create a new VM instance.

On the instance creation page, expand the “Management, Disks, Networking and SSH keys” section and go to the “Disks” tab. There, you’ll see options for the three different encryption options described above. Select “Custom-managed key” and select the appropriate key from the dropdown menu.

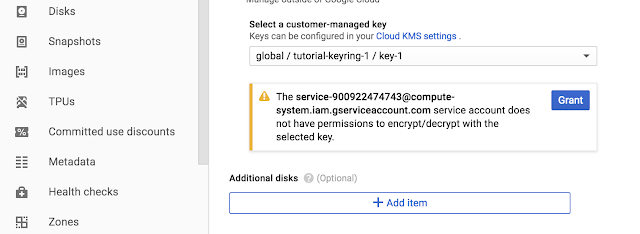
Note that if this is your first time doing this, you may see the following dialogue. This is expected - you’ll need to grant this service account permissions. In turn, this service account is used by Compute Engine to do the actual encryption and decryption of disks, images and snapshots.

Once you’ve done this, confirm the VM creation by selecting “Create”.

And there you have it! With a few easy steps, you can create a key in Cloud KMS, encrypt a disk with the key and mount it to a VM. Since you manage the key, you can choose at any time to suspend or delete the key. If that happens, resources protected by that key won’t start until key access is restored.

Try CMEKs for yourself

Visit the Developer Console and start using your CMEKs to help secure your Compute Engine disks, images and snapshots. As always, your feedback is invaluable to us, and we’d love to hear what you think. Safe computing!

Six essential security sessions at Google Cloud Next 18


We aim to be the most secure cloud, but what does that mean? If you’re coming to Google Cloud Next '18 next month in San Francisco, now is your chance to identify and understand the technologies and best practices that set Google Cloud Platform (GCP) apart from other cloud providers. There are dozens of breakout sessions dedicated to security, but if time is short, here are six sessions that will give you a solid understanding of foundational GCP security practices and offerings, as well as insight into the cutting-edge security research and development being done by our team.

1. How Google Protects Your Data at Rest and in Transit

First things, first. Come learn how Google protects your data within Google infrastructure, when it’s stored on disk as well as when it moves across our network, for use by various services. Google Cloud Security and Privacy Product Managers Maya Kaczorowski and Il-Sung Lee will also cover additional protections you can put in place such as Customer-Managed Encryption Keys, IPsec tunnels, and Istio. More details are available here.

2. How Google's Security Infrastructure Design Enabled Rapid, Seamless Response to “Spectre” and “Meltdown”

Not content to sit back and wait, Google has a huge team of security researchers that actively push the limits of our systems. This year, researchers found two significant vulnerabilities in modern compute architectures: Spectre and Meltdown. This session will detail those vulnerabilities, and more to the point, how we remediated them transparently, without customer downtime. Learn more here.

3. BeyondCorp Beyond Google

New Google employees always marvel at how they can access Google resources from anywhere, without a VPN. That’s made possible by our BeyondCorp model, and core BeyondCorp technologies such as global scale security proxies, phishing-resistant 2nd factor authentication, and laptop security enforcement are increasingly available to Google Cloud customers. In this session, French resource management provider VEOLIA describes how it built out a BeyondCorp model on Google Cloud to reach 169,000 employees across five continents. Register for the session here.

4. Trust Through (Access) Transparency

'When do you access my data, and how will I know?' is a question that troubles every cloud customer who cares about their data—and one that few cloud providers have an answer for. This talk reviews Google's robust data protection infrastructure, and introduces Google's new Access Transparency product, which gives customers near-real-time oversight over data accesses by Google's administrators. The talk also guides customers through how to audit accesses and mitigate against this risk, together with examples from our customers of where this has successfully been done. Register for the session here.

5. Google Cloud: Data Protection and Regulatory Compliance

Security in the cloud is much more than encryption and firewalls. If you’re subject to regulations, you often need to demonstrate data protection and compliance with a variety of regulatory standards. In this session, we cover recent trends in the data protection space, such as GDPR, and share tools you can leverage to help address your compliance needs. You'll learn how you can partner with Google to enhance data security and meet global regulatory obligations. You can find a full session description here.

6. Shield Your Cloud with Verifiable Advanced Platform Security

Last but not least, you’ll definitely want to attend this session by Googlers Andrew Honig and
Nelly Porter, as they discuss issues facing VM security in the cloud, and an interesting new approach to mitigate against local code gaining escalation privileges. After attending this session, you’ll understand how we prevent workloads running on Google Cloud Platform from being penetrated by boot malware or firmware rootkits. Register for the session here.

Of course, this is just the tip of the iceberg. Security runs through everything we do at Google Cloud. In addition to these six sessions, there are 31 other breakout sessions dedicated to security, not to mention keynotes and supersessions, hands-on labs, meetups and bootcamps. Don’t delay, register for Next today.

How to connect Stackdriver to external monitoring


Google Stackdriver lets you track your cloud-powered applications with monitoring, logging and diagnostics. Using Stackdriver to monitor Google Cloud Platform (GCP) or Amazon Web Services (AWS) projects has many advantages—you get detailed performance data and can set up tailored alerts. However, we know from our customers that many businesses are bridging cloud and on-premises environments. In these hybrid situations, it’s often necessary to also connect Stackdriver to an on-prem monitoring system. This is especially important if there is already a monitoring process in place that involves classic IT Business Management (ITBM) tasks, like opening and closing tickets and incidents automatically.

Luckily, you can use Stackdriver for these circumstances by enabling the alerting policies via webhooks. We’ll explain how in this blog post, using the example of monitoring the uptime of a web server. Setting up the monitoring condition and alerting policy is really where Stackdriver shines, since it auto-detects GCP instances and can analyze log files. This differs depending on the customer environment. (You can also find more here about alerting and incident management in Stackdriver.)

Get started with server and firewall policies to external monitoring

To keep it simple, we’ll start with explaining how to do an HTTP check on a freshly installed web server (nginx). This is called an uptime check in Stackdriver.

First, let’s set up the server and firewall policy. In order for the check to be successful, make sure you’ve created a firewall rule in the GCP console that allows HTTP traffic to the public IP of the web server. The best way to do that is to create a tag-based firewall rule that allows all IP addresses (0.0.0.0/0) on the tag “http.” You can now add that tag to your newly created web server instance. (We created ours by creating a micro instance using Ubuntu image, then installing nginx using apt-get).

If you prefer containers, you can use Kubernetes to spin up an nginx container.

Make sure to check the firewall rule by manually adding your public IP in a browser. If all is configured correctly, you should see the nginx greeting page:

Setting up the uptime check

Now let’s set up the website uptime check. Open the Stackdriver monitoring menu in your GCP cloud console.

In this case, we created a little web server instance with a public IP address. We want to monitor this public IP address to check the web server’s uptime. To set this up, select “Uptime Checks” from the right-side menu of the Stackdriver monitoring page.

Remember: This is a test case, so we set the check interval to one minute. For real-world use cases, this value might change according to the service monitoring requirements.

Once you have set up the Uptime Check, you can now go ahead and set up an alerting policy. Click on “Create New Policy” in the following popup window (only appears the first time you create an Uptime Check). Or you can click on “Alerting” on the left-side Stackdriver menu to set it up. Click on “Create a Policy” in the popup menu.

Setting up the alert policy

Once you click on “Create a Policy,” you should see a new popup with four steps to complete.

The first step will ask for a condition “when” to trigger the alert. This is where you have to make sure the Uptime Check is added. To do this, simply click on the “Add Condition” button.

A new window will appear from the right side:

Specify the Uptime Check by clicking on Select under “Basic Health.”

This will bring up this window (also from the right side) to select the specific Uptime Check to alert on. Simply choose “URL” in the “Resource Type” field and the “IF UPTIME CHECK” section will appear automatically. Here, we select the previously created Uptime Check.


You can also set the duration of the service downtime to trigger an alert. In this case, we used the default of five minutes. Click “Save Condition” to continue with the Alert Policy setup.

This leads us to step two:

This is where things get interesting. In order to include an external monitoring system, you can use so-called webhooks. Those are typically callouts using an HTTP POST method to send JSON formatted messages to the external system. The on-prem or third-party monitoring system needs to understand this format in order to be used properly. Typically, there’s wide support in the monitoring system industry for receiving and using webhooks.

Setting up the alerts

Now you’ll set up the alerts. In this example, we’re configuring a webhook only. You can set up multiple ways to get alerted simultaneously. If you want to get an email and a webhook at the same time, just configure it that way by adding the second (or third) method. In this example, we’ll use a free webhook receiver to monitor if our setup works properly.

Once the site has generated a webhook receiver for you, you’ll have a link you can use that will list all received tokens for you. Remember, this is for testing purposes only. Do not send in any user-specific data such as private IP addresses or service names.

Next you have to configure the notification to use a webhook so it’ll send a message over to our shiny new webhook receiver. Click on “Add Notification.”

By default a field will appear saying “Email”—click on the drop-down arrow to see the other options:

Select “Webhook” in the drop-down menu.

The system will most properly tell you that there is no webhook setup present. That’s because you haven’t specified any webhook receiver yet. Click on “Setup Webhook.”

(If you’ve already set up a webhook receiver, the system won’t offer you this option here.)

Therefore you need to go to the “select project” dropdown list (top left side, right next to the Stackdriver logo in the gray bar area). Click on the down arrow symbol (next to your project ID) and see at the bottom of the drop-down box the option “Account Settings.”

In the popup window, select “Notifications” (bottom of the left-side list under “Settings”) and then click on “Webhooks” at the top menu. Here you can add additional webhooks if needed.

Click on “Create webhook.”

Remember to put in your webhook endpoint URL. In our test case, we do not need any authentication.

Click on “Test Connection” to verify and see your first webhook appearing on the test site!

It should say “This is a test alert notification from Stackdriver.”

Now let’s continue with the Alerting Policy. Choose the newly created webhook by selecting “Webhook” as notification type and the webhook name (created earlier) as the target. If you want to have additional notification settings (like SMS, email, etc.), feel free to add those as well by clicking on “Add another notification.”

Once you add a notification, you can optionally add documentation by creating a so-called “Markdown document.” Learn more here about the Markdown language.

Last but not least, give the Alert Policy a descriptive name:

We decided to go super creative and call it “HTTP - uptime alert.” Once you have done this, click “Save Policy” at the bottom of the page.

Done! You just created your first policy. including a webhook to trigger alerts on incidents.

The policy should be green and the uptime check should report your service being healthy. If not, check your firewall rules.

Test your alerting

If everything is normal and works as expected, it is time to try your alerting policy. In order to do that, simply delete the “allow-http” firewall rule created earlier. This should result in a “service unavailable” condition for our Uptime Check. Remember to give it a little while. The Uptime Check will wait 10 seconds per region and overall one minute until it declares the service down (remember, we configured that here).

Now you’ll see that you can’t reach the nginx web server instance anymore:

Now let’s go to the Stackdriver overview page to see if we can find the incident. Click on “Monitoring Overview” in the left-side menu at the very top:

Indeed, the Uptime Check comes back red, telling us the service is down. Also, our Alerting Policy has created an incident saying that the “HTTP - uptime alert” has been triggered and the service has been unavailable for a couple of minutes now.

Let’s check the test receiver site to see if we got the webhook to trigger there:

You can see we got the webhook alert with the same information regarding the incident. This information is passed on using the JSON format for easy parsing at the receiving end. You will see the policy name that was triggered (first red rectangle), the state “open,” as well as the “started at” timestamp in Unix time format (seconds passed since 1970). Also, it will tell you that the service is failing in the “summary” field. If you had configured any optional documentation, you’d see it using the JSON format (HTTP post).

Bring the service back

Now, recreate the firewall rule to see if we get an “incident resolved” message.

Let’s check the overview screen again (remember to give it five or six minutes after the rule to react)

You can see that service is back up. Stackdriver automatically resolves open incidents once the condition restores. So in our case, the formerly open incident is now restored, since the Uptime Check comes back as “healthy” again. This information is also passed on using the alerting policy. Let’s see if we got a “condition restored” webhook message as well.

By the power of webhooks, it also told our test monitoring system that this incident is closed now, including useful details such as the ending time (Unix timestamp format) and a summary telling us that the service has returned to a normal state.

If you need to connect Stackdriver to a third-party monitoring system, webhooks is one extremely flexible way of doing this. It will let your operations team continue using their familiar go-to resources on-premises, while using all advantages of Stackdriver in a GCP (or AWS) environment. Furthermore, existing monitoring processes can be reused to bridge into the Google Cloud world.

Remember that Stackdriver can do far more than Uptime Checks, including log monitoring over source code monitoring, debugging and tracing user interactions with your application. Whether it’s alerting policy functionality, using the webhook messaging or other checks you could define in Stackdriver, all can be forwarded to a third-party monitoring tool. Even better, you can close incidents automatically once they have been resolved.

Have fun monitoring your cloud services!

Related content:

New ways to manage and automate your Stackdriver alerting policies
How to export logs from Stackdriver Logging: new solution documentation
Monitor your GCP environment with Cloud Security Command Center

Announcing a new certification from Google Cloud Certified: the Associate Cloud Engineer


Cloud is no longer an emerging technology. Now that businesses large and small are realizing the potential of cloud services, the need to hire individuals who can manage cloud workloads has sky-rocketed. Today, we’re launching a new Associate Cloud Engineer certification, designed to address the growing demand for individuals with the foundational cloud skills necessary to deploy applications and maintain cloud projects on Google Cloud Platform (GCP).

The Associate Cloud Engineer certification joins Professional Cloud Architect, which launched in 2016, and Data Engineer, which followed quickly thereafter. These certifications identify individuals with the skills and experience to leverage GCP to overcome complex business challenges. Since the program’s inception, Google Cloud Certified has experienced continual growth, especially this last year when the number of people sitting for our professional certifications grew by 10x.

Because cloud technology affects so many aspects of an organization, IT professionals need to know when and how to use cloud tools in a variety of scenarios, ranging from data analytics to scalability. For example, it's not enough to launch an application in the cloud. Associate Cloud Engineers also ensure that the application grows seamlessly, is properly monitored, and readily managed by authorized personnel.

Feedback from the beta launch of the Associate Cloud Engineer certification has been great. Morgan Jones, an IT professional, was eager to participate because he sees “the future of succeeding and delivering business value from the cloud is to adopt a multi-cloud strategy. This certification can really help me succeed in the GCP environment."

As an entry point to our professional-level certifications, the Associate Cloud Engineer demonstrates solid working knowledge of GCP products and technologies. “You have to have experience on the GCP Console to do well on this exam. If you haven’t used the platform and you just cram for the exam, you will not do well. The hands-on labs helped me prepare for that,” says Jones.

Partners were a major impetus in the development of the Associate Cloud Engineer exam, which will help them expand GCP knowledge throughout their organizations and address increasing demand for Google Cloud technologies head-on. Their enthusiastic response to news of this exam sends signals that the Associate Cloud Engineer will be a catalyst for an array of opportunities for those early in their cloud career.

"We are really excited for the Associate Cloud Engineer to come to market. It allows us to target multiple role profiles within our company to drive greater knowledge and expertise of Google Cloud technologies across our various managed services offerings."
- Luvlynn McAllister, Rackspace, Director, Sales Strategy & Business Operations

The Associate Cloud Engineer exam is:
  • Two hours long
  • Recommended for IT professionals with six months of GCP experience
  • Available for a registration fee of $125 USD
  • Currently available in English
  • Available at Next ‘18 for registered attendees

The Google Cloud training team offers numerous ways to increase your Google Cloud know-how. Join our webinar on July 10 at 10:30am to hear from members of the team who developed the exam about how this certification differs from others in our program and how to best prepare. If you still want to check your readiness, take the online practice exam at no charge. For more information on suggested training and an exam guide, visit our website. Register for the exam today.

How to run SAP Fiori Front-End Server (OpenUI5) on GCP in 20 mins


Who enjoys doing risky development on their SAP system? No one. But if you need to build enterprise apps that use your SAP backend, not doing development is a non-starter. One solution is to apply Gartner’s Bimodal IT, the practice of managing two separate but coherent styles of work: one focused on predictability; the other on exploration. This is an awesome strategy for creating frontend innovation with modern HTML5 / JS applications that are loosely coupled to backend core ERP system, reducing risk. And it turns out that Google Cloud Platform (GCP) can be a great way to do Bimodal IT in a highly cost-effective way.

This blog walks through setting up SAP OpenUI5 on a GCP instance running a local node.js webserver to run sample apps. These apps can be the building blocks to develop new enterprise apps in the cloud without impacting your SAP backend. Let’s take a deeper look.

Set up your GCP account:

Make sure that you have set up your GCP free trial ($300 credit):
https://cloud.google.com/free/

After signing up, you can access GCP at
https://console.cloud.google.com

Everything in GCP happens in a project so we need to create one and enable billing (this uses your $300 free credit).

From the GCP Console, select or create a project by clicking the GO TO THE MANAGE RESOURCES PAGE

Make sure that billing is enabled (using your $300 free credit):

Setting up SAP OpenUI5 in GCP


1. Create a compute instance (virtual machine):


In the top left corner click on ‘Products and Services’:


Select ‘Compute Engine → VM instances’
  • Click ‘Create instance’
  • Give it the coolest name you can think of
  • Select the zone closest to where you are located
  • Under ‘Machine Type’, choose “micro (1 shared CPU)”. Watch the cost per month drop like a stone!
  • Under ‘Firewall’, check ‘Allow HTTP traffic’

Keep everything else as default and click Create.Your Debian VM should start in about 5-10 seconds.


2. Set up OpenUI5 on the new image:

SAP has an open-source version of its SAPUI5 that is the basis for its Fiori Front-End Server called OpenUI5.OpenUI5 comes with a number of sample apps. Let’s deploy this to a local node.js webserver on the instance.
Install nodejs and npm (node package manager):
sudo apt-get update
curl -sL https://deb.nodesource.com/setup_10.x | sudo -E bash -
sudo apt-get install -y nodejs

SAP files are zipped so install unzip with:
sudo apt-get install unzip

Make a project directory and change to it (feel free to change the name):
mkdir saptest 
cd saptest
Download the latest Stable OpenUI5 SDK from:
https://openui5.org/download.html
eg.,
wget https://www.google.com/url?q=https://openui5.hana.ondemand.com/downloads/openui5-sdk-1.54.6.zip&sa=D&source=hangouts&ust=1529597279793000&usg=AFQjCNHiQIJnKJVJyacNwVjl_6dogj-ejQ
Time to grab a coffee as the download may take about 5 to 10 minutes depending on your connection speed.
Extract the zip file to your project directory with:
unzip openui5-sdk-1.54.5.zip
Next we will set up a local static node.js http server to serve up requests running on port 8888. Download static_server.js and package.json from Github into your project folder:
curl -O
https://raw.githubusercontent.com/htammen/static_server/master/static_server.js
curl -O
https://raw.githubusercontent.com/htammen/static_server/master/package.json
(https://github.com/htammen/static_server)
Identify your primary working directory and create a symbolic link to your resources folder. This allows the demo apps to work out of the box without modification (adjust the path to match your own):
pwd
ln -s /home/<me>/saptest/resources resources 
Call the node package manager to install the http server:
npm install
Run the node.js static server to accept http requests:
node static_server.js
Your node server should now be running and be able to serve up SAPOpenUI5 sample applications from localhost. However, we should make this testable from outside the VM (e.g., mobile) so let’s set up a firewall rule to allow traffic to our new static server on port 8888.
In the GCP Console click on ‘Products and Services’ (top left)
Networking → VPC Networking → Firewall Rules.
Click New to create a new firewall rule and enter the following settings:


Name:
allow-nodeserver
Network:
default
Priority
1000
Direction
Ingress
Action on Match
Allow
Targets
All instances on network
Source filter
IP ranges
Source IP ranges
0.0.0.0/0
Specified Protocols and ports
tcp:8888

Now, click ‘Create’.
Go to Products and Services → Compute Engine → VM instances and copy the External IP. Open up a browser and navigate to:
http://<External IP>:8888/index.html 
Congratulations! You are now running the OpenUI5 front-end on your GCP instance.

3. Explore the OpenUI5 demo apps

You can take a look at the sample applications offered un OpenUI5 by clicking on ‘Demo Apps’ or you can navigate directly to the shopping cart application with:
http://<External IP>:8888/test-resources/sap/m/demokit/cart/webapp/index.html
(Pro-Tip: email this link to yourself and open on your mobile device to see the adaptable UI in action. Really cool.)
These demo apps are just connecting to local sample data in XML files. In the real world oData is often used. oData is a great way of connecting your front-end systems to backend SAP systems. This can be activated on your SAP Gateway. Please consult your SAP documentation setting this up.
SAPUI5 has even more capabilities than OpenUI5 (e.g. charts and micro graphs). This is available either in your SAP Deployment or on the SAP Cloud Platform. In addition, you can also leverage this on top of GCP via Cloud Foundry. Learn more here.
Good luck in your coding adventures!

References and other links

This awesome blog was the baseline of this tutorial:
https://blogs.sap.com/2015/09/25/running-ui5-apps-on-local-nodejs-server/

Some other good links to check out:
https://openui5.org/getstarted.html
https://blogs.sap.com/2017/03/13/how-to-consume-an-odata-service-with-openui5-sapui5/
https://blogs.sap.com/2015/07/15/sapui5-vs-fiori/
https://blogs.sap.com/2015/05/11/s4-hana-delivers-the-netweaver-vision-of-a-bimodal-it/

GPUs as a service with Kubernetes Engine are now generally available


[Editor's note: This is one of many posts on enterprise features enabled by Kubernetes Engine 1.10. For the full coverage, follow along here.]

Today, we’re excited to announce the general availability of GPUs in Google Kubernetes Engine, which have become one of the platform’s fastest growing features since they entered beta earlier this year, with core-hours soaring by 10X since the end of 2017.

Together with the GA of Kubernetes Engine 1.10, GPUs make Kubernetes Engine a great fit for enterprise machine learning (ML) workloads. By using GPUs in Kubernetes Engine for your CUDA workloads, you benefit from the massive processing power of GPUs whenever you need, without having to manage hardware or even VMs. We recently introduced the latest and the fastest NVIDIA Tesla V100 to the portfolio, and the P100 is generally available. Last but not least, we also offer the entry-level K80, which is largely responsible for the popularity of GPUs. All our GPU models are available as Preemptible GPUs, as a way to reduce costs while benefiting from GPUs in Google Cloud. Check out the latest prices for GPUs here.

As the growth in GPU core-hours indicates, our users are excited about GPUs in Kubernetes Engine. Ocado, the world’s largest online-only grocery retailer, is always looking to apply state-of-the-art machine learning models for Ocado.com customers and Ocado Smart Platform retail partners, and runs the models on preemptible, GPU-accelerated instances on Kubernetes Engine.
“GPU-attached nodes combined with Kubernetes provide a powerful, cost-effective and flexible environment for enterprise-grade machine learning. Ocado chose Kubernetes for its scalability, portability, strong ecosystem and huge community support. It’s lighter, more flexible and easier to maintain compared to a cluster of traditional VMs. It also has great ease-of-use and the ability to attach hardware accelerators such as GPUs and TPUs, providing a huge boost over traditional CPUs.”
— Martin Nikolov, Research Software Engineer, Ocado
GPUs in Kubernetes Engine also have a number of unique features:
  • Node Pools allow your existing cluster to use GPUs whenever you need.
  • Cluster Autoscaler automatically creates nodes with GPUs whenever pods requesting GPUs are scheduled, and scale down to zero when GPUs are no longer consumed by any active pods.
  • Taint and toleration technology ensures that only pods that request GPUs will be scheduled on the nodes with GPUs, and prevents pods that do not require GPUs from running on them.
  • Resource quota that allows administrators to limit resource consumption per namespace in a large cluster shared by multiple users or teams.
We also heard from you that you need an easy way to understand how your GPU jobs are performing: how busy the GPUs are, how much memory is available, and how much memory is allocated. We are thrilled to announce that you can now monitor those information natively from the GCP Console.You can also visualize these metrics in Stackdriver.
Fig 1. GPU memory usage and duty cycle 

The general availability of GPUs in Kubernetes Engine represents a lot of hard work behind the scenes, polishing the internals for enterprise workloads. Jiaying Zhang, the technical lead for this general availability, led the Device Plugins effort in Kubernetes 1.10, working closely with the OSS community to understand its needs, identify common requirements, and come up with an execution plan to build a production-ready system.

Try them today

To get started using GPUs in Kubernetes Engine using our free-trial of $300 credits, you’ll need to upgrade your account and apply for a GPU quota for the credits to take effect. For a more detailed explanation of Kubernetes Engine with GPUs, for example how to install NVIDIA drivers and how to configure a pod to consume GPUs, check out the documentation.

In addition to GPUs in Kubernetes Engine, Cloud TPUs are also now publicly available in Google Cloud. For example, RiseML uses Cloud TPUs in Kubernetes Engine for a hassle-free machine learning infrastructure that is easy-to-use, highly scalable, and cost-efficient. If you want to be among the first to access Cloud TPUs in Kubernetes Engine, join our early access program today.

Thanks for your feedback on how to shape our roadmap to better serve your needs. Keep the conversation going by connecting with us on the Kubernetes Engine Slack channel.

Cloud TPU now offers preemptible pricing and global availability


Deep neural networks have enabled breakthroughs across a variety of business and research challenges, including translating text between languages, transcribing speech, classifying image content, and mastering the game of Go. Because training and running deep learning models can be extremely computationally demanding, we rely on our custom-built Tensor Processing Units (TPUs) to power several of our major products, including Translate, Photos, Search, Assistant, and Gmail.

Cloud TPUs allow businesses everywhere to transform their own products and services with machine learning, and we’re working hard to make Cloud TPUs as widely available and as affordable as possible. As of today, Cloud TPUs are available in two new regions in Europe and Asia, and we are also introducing preemptible pricing for Cloud TPUs that is 70% lower than the normal price.

Cloud TPUs are available in the United States, Europe, and Asia at the following rates, and you can get started in minutes via our Quickstart guide:
One Cloud TPU (v2-8) can deliver up to 180 teraflops and includes 64 GB of high-bandwidth memory. The colorful cables link multiple TPU devices together over a custom 2-D mesh network to form Cloud TPU Pods. These accelerators are programmed via TensorFlow and are widely available today on Google Cloud Platform.

Benchmarking Cloud TPU performance-per-dollar


Training a machine learning model is analogous to compiling code: ML training needs to happen fast for engineers, researchers, and data scientists to be productive, and ML training needs to be affordable for models to be trained over and over as a production application is built, deployed, and refined. Key metrics include time-to-accuracy and training cost.

Researchers at Stanford recently hosted an open benchmarking competition called DAWNBench that focused on time-to-accuracy and training cost, and Cloud TPUs won first place in the large-scale ImageNet Training Cost category. On a single Cloud TPU, our open-source AmoebaNet reference model cost only $49.30 to reach the target accuracy, and our open-source ResNet-50 model cost just $58.53. Our TPU Pods also won the ImageNet Training Time category: the same ResNet-50 code running on just half of a TPU pod was nearly six times faster than any non-TPU submission, reaching the target accuracy in approximately 30 minutes!

Although we restricted ourselves to standard algorithms and standard learning regimes for the competition, another DAWNBench submission from fast.ai (3rd place in ImageNet Training Cost, 4th place in ImageNet Training Time) altered the standard ResNet-50 training procedure in two clever ways to achieve faster convergence (GPU implementation here). After DAWNBench was over, we easily applied the same optimizations to our Cloud TPU ResNet-50 implementation. This reduced ResNet-50 training time on a single Cloud TPU from 8.9 hours to 3.5 hours, a 2.5X improvement, which made it possible to train ResNet-50 for just $25 with normal pricing.

Preemptible Cloud TPUs make the Cloud TPU platform even more affordable. You can now train ResNet-50 on ImageNet from scratch for just $7.50. Preemptible Cloud TPUs allow fault-tolerant workloads to run more cost-effectively than ever before; these TPUs behave similarly to Preemptible VMs. And because TensorFlow has built-in support for saving and restoring from checkpoints, deadline-insensitive workloads can easily take advantage of preemptible pricing. This means you can train cutting-edge deep learning models to achieve DAWNBench-level accuracy for less than you might pay for lunch!


Select Open-Source Reference Models
Normal training cost
(TF 1.8)
Preemptible training cost
(TF 1.8)
ResNet-50 (with optimizations from fast.ai): Image classification
~$25
~$7.50
ResNet-50 (original implementation): Image classification
~$59
~$18
AmoebaNet: Image classification (model architecture evolved from scratch on TPUs to maximize accuracy)
~$49
~$15
RetinaNet: Object detection
~$40
~$12
Transformer: Neural machine translation
~$41
~$13
ASR Transformer: Speech recognition (transcribe speech to text)
~$86
~$27

Start using Cloud TPUs today

We aim for Google Cloud to be the best place to run all of your machine learning workloads. Cloud TPUs offer great performance-per-dollar for training and batch inference across a variety of machine learning applications, and we also offer top-of-the-line GPUs with recently-improved preemptible pricing.

We’re excited to see what you build! To get started, please check out the Cloud TPU Quickstart, try our open source reference models, and be sure to sign up for a free trial to start with $300 in cloud credits. Finally, we encourage you to watch our Cloud-TPU-related sessions from Google I/O and the TensorFlow Dev Summit: “Effective machine learning with Cloud TPUs” and “Training Performance: A user’s guide to converge faster.


A datacenter technician scoots past two rows of Cloud TPUs and supporting equipment.