Tag Archives: Security & Identity

Cloud Identity-Aware Proxy: a simple and more secure way to manage application access


Many businesses are eager to move their internal applications to the cloud, but need to ensure their sensitive data is protected when doing so. While enterprise IT teams are skilled at building innovative apps, they may not be experts on identity and security models for cloud-hosted applications.

That’s why we developed Cloud Identity-Aware Proxy, which is now generally available. Cloud IAP provides granular access controls and is easy to use so that companies can quickly and more securely host their internal apps in the cloud.

Here’s an example of how it works. Say you’re a large consumer goods company with a global data science team that needs access to specific internal data. Your IT team might need to manage an ever-changing list of employees who need access. After moving these applications to Google Cloud Platform (GCP), admins can enable Cloud IAP, add groups to the access control lists, thereby making sure applications are only safely accessible to the users that need them from anywhere on the Internet. This means your enterprise IT team can spend its time doing what they do best — like building a world-class supply chain system — instead of focusing on complex security issues.

Here’s a little more on what Cloud IAP offers:

A zero trust security model for the cloud 

Following the BeyondCorp security model that focuses on building zero trust networks, Cloud IAP shifts access controls from the network perimeter to individual users This means you can evaluate all of an application's access requests by taking into account who the user is and what they want to access, eliminating the need for setting up virtual private clouds and copying access control policies for each new application.


Better, more granular access controls 


Using Cloud IAP for access control and auditing allows enterprises to ensure access is restricted to the right people. This makes it safer than ever to move your data to the cloud.

No more need for VPNs

With Cloud IAP, you can grant access to employees or vendors without worrying about unreliable VPNs that require client-side installs. Admins can now determine who should be able to access each application based on the app’s unique security considerations. Additionally, applications deployed behind Cloud IAP require no code changes — you can simply deploy your existing application, turn on Cloud IAP, and your application is protected.

Interested in giving it a try? Check out the step-by-step instructions on how to get started here. We hope Cloud IAP makes it possible for more organizations to spend less time worrying about security and more time on the things that matter — like developing applications that grow their business.

Titan in depth: Security in plaintext


While there are no absolutes in computer security, we design, build and operate Google Cloud Platform (GCP) with the goal to protect customers' code and data. We harden our architecture at multiple layers, with components that include Google-designed hardware, a Google-controlled firmware stack, Google-curated OS images, a Google-hardened hypervisor, as well as data center physical security and services.
Photograph of Titan inside Google's purpose-built server
In this post, we provide details of the mechanisms of how we will establish a hardware root of trust using our custom chip, Titan.

First introduced at Google Cloud Next '17, Titan is a secure, low-power microcontroller designed with Google hardware security requirements and scenarios in mind. Let’s take a look at how Titan works to ensure that a machine boots from a known good state using verifiable code, and establishes the hardware root of trust for cryptographic operations in our data centers.
Photograph of Urs Hölzle unveiling Titan at Google Cloud Next '17 (YouTube)


Machine boot basics 

Machines in Google’s datacenters, as with most modern computers, have multiple components, including one or more CPUs, RAM, Baseboard Management Controller (BMC), NIC, boot firmware, boot firmware flash and persistent storage. Let’s review how these components interact to boot the machine:
  1. The machine's boot process starts when the BMC configuring the machine hardware lets the CPU come out of reset. 
  2. The CPU then loads the basic firmware (Boot or UEFI) from the boot firmware flash, which performs further hardware/software configuration. 
  3. Once the machine is sufficiently configured, the boot firmware accesses the "boot sector" on the machine's persistent storage, and loads a special program called the "boot loader" into the system memory. 
  4. The boot firmware then passes execution control to the boot loader, which loads the initial OS image from storage into system memory and passes execution control to the operating system. 
In our datacenters, we protect the boot process with secure boot. Our machines boot a known firmware/software stack, cryptographically verify this stack and then gain (or fail to gain) access to resources on our network based on the status of that verification. Titan integrates with this process and offers additional layers of protection.

As privileged software attacks increase and more research becomes available on rootkits, we have committed to delivering secure boot and hardware-based root of trust for machines that form our infrastructure and host our Google Cloud workloads.

Secure boot with Titan 

Typically, secure boot relies on a combination of an authenticated boot firmware and boot loader along with digitally signed boot files to provide its security guarantees. In addition, a secure element can provide private key storage and management. Titan not only meets these expectations, but goes above and beyond to provide two important additional security properties: remediation and first-instruction integrity. Trust can be re-established through remediation in the event that bugs in Titan firmware are found and patched, and first-instruction integrity allows us to identify the earliest code that runs on each machine’s startup cycle.

To achieve these security properties, Titan comprises several components: a secure application processor, a cryptographic co-processor, a hardware random number generator, a sophisticated key hierarchy, embedded static RAM (SRAM), embedded flash and a read-only memory block. Titan communicates with the main CPU via the Serial Peripheral Interface (SPI) bus, and interposes between the boot firmware flash of the first privileged component, e.g., the BMC or Platform Controller Hub (PCH), allowing Titan to observe every byte of boot firmware.

Titan's application processor immediately executes code from its embedded read-only memory when its host machine is powered up. The fabrication process lays down immutable code, known as the boot ROM, that is trusted implicitly and validated at every chip reset. Titan runs a Memory Built-In Self-Test every time the chip boots to ensure that all memory (including ROM) has not been tampered with. The next step is to load Titan’s firmware. Even though this firmware is embedded in the on-chip flash, the Titan boot ROM does not trust it blindly. Instead, the boot ROM verifies Titan's firmware using public key cryptography, and mixes the identity of this verified code into Titan's key hierarchy. Then, the boot ROM loads the verified firmware.

Once Titan has booted its own firmware in a secure fashion, it will turn its attention to the host’s boot firmware flash, and verify its contents using public key cryptography. Titan can gate PCH/BMC access to the boot firmware flash until after it has verified the flash content, at which point it signals readiness to release the rest of the machine from reset. Holding the machine in reset while Titan cryptographically verifies the boot firmware provides us the first-instruction integrity property: we know what boot firmware and OS booted on our machine from the very first instruction. In fact, we even know which microcode patches may have been fetched before the boot firmware's first instruction. Finally, the Google-verified boot firmware configures the machine and loads the boot loader, which subsequently verifies and loads the operating system.
Photograph of Titan up-close on a printed circuit board. Chip markings obscured.

Cryptographic identity using Titan 

In addition to enabling secure boot, we’ve developed an end-to-end cryptographic identity system based on Titan that can act as the root of trust for varied cryptographic operations in our data centers. The Titan chip manufacturing process generates unique keying material for each chip, and securely stores this material—along with provenance information—into a registry database. The contents of this database are cryptographically protected using keys maintained in an offline quorum-based Titan Certification Authority (CA). Individual Titan chips can generate Certificate Signing Requests (CSRs) directed at the Titan CA, which—under the direction of a quorum of Titan identity administrators—can verify the authenticity of the CSRs using the information in the registry database before issuing identity certificates.

The Titan-based identity system not only verifies the provenance of the chips creating the CSRs, but also verifies the firmware running on the chips, as the code identity of the firmware is hashed into the on-chip key hierarchy. This property enables remediation and allows us to fix bugs in Titan firmware, and issue certificates that can only be wielded by patched Titan chips. The Titan-based identity system enables back-end systems to securely provision secrets and keys to individual Titan-enabled machines, or jobs running on those machines. Titan is also able to chain and sign critical audit logs, making those logs tamper-evident. To offer tamper-evident logging capabilities, Titan cryptographically associates the log messages with successive values of a secure monotonic counter maintained by Titan, and signs these associations with its private key. This binding of log messages with secure monotonic counter values ensures that audit logs cannot be altered or deleted without detection, even by insiders with root access to the relevant machine.

Conclusion 

Our goal is to protect the boot process by securing it with a dedicated entity that is explicitly engineered to behave in an expected manner. Titan provides this root of trust by enabling verification of the system firmware and software components, and establishes a strong, hardware-rooted system identity. Google designed Titan's hardware logic in-house to reduce the chances of hardware backdoors. The Titan ecosystem ensures that production infrastructure boots securely using authorized and verifiable code.

In short:
  1. Titan provides a hardware-based root of trust that establishes strong identity of a machine, with which we can make important security decisions and validate the “health” of the system. 
  2. Titan offers integrity verification of firmware and software components. 
  3. The system’s strong identity ensures that we'll have a non-repudiable audit trail of any changes done to the system. Tamper-evident logging capabilities help identify actions performed by an insider with root access. 
For more information about how we harden our environment, visit the Google Cloud Platform Security page.

Introducing App Engine firewall, an easy way to control access to your app


A key security feature for application developers and administrators is to be able to allow or deny incoming requests based on source IP addresses. This capability can help you do production testing without exposing your app to the world, block access to your app from specific geographies or block requests from a malicious user.

Today, we’re thrilled to announce the beta release of Google App Engine firewall. With App Engine firewall, you simply provide a set of rules, order them by priority and specify an IP address, or a set of IP addresses, to block or allow, and we’ll take care of the rest.

When App Engine firewall receives a request that you’ve configured to be denied, it returns an HTTP 403 Forbidden response without ever hitting your app. If your app is idle, this prevents new instances from spinning up, and if you’re getting heavy traffic, the denied request won’t add to your load  or cost you money.

App Engine firewall replaces the need for a code-based solution within your app that still allows requests in, but which can cost you resources and still expose your app.


Getting started with App Engine firewall 


You can setup App Engine firewall rules in the Google Cloud Console as well as with the App Engine Admin API or gcloud command-line tool.

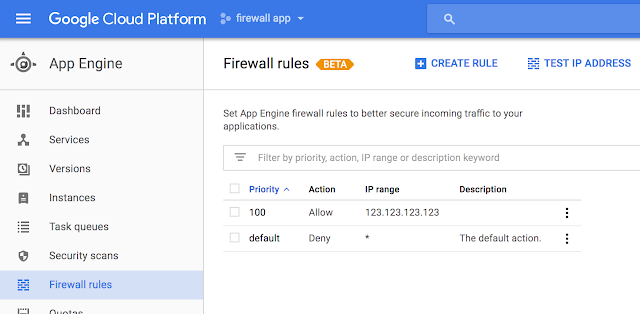
Let’s say you’d like to test your application and give access only to browsers from your company’s private network. Open your firewall rules in the Cloud Console and you'll see a default rule that allows all traffic to your app.

First, add a new rule allowing traffic only from the range of IP addresses coming from your private network. Then, update the default rule to deny all traffic.


As with typical firewall semantics, App Engine firewall evaluates rules with a lower priority value first, followed by rules with a higher value. In the example above, the Allow rule with a priority of 100 is evaluated first, followed by the default rule.

To make sure that your set of firewall rules is working as intended, you can test an IP address to see if a request coming from this address would be allowed or denied.

From the Cloud Console, click the Test IP tab in the Firewall Rules section.

The response indicates if the request can proceed and indicates the specific firewall rule that matched the provided IP address.
With App Engine firewall, it’s easy to set up network access to your app and focus on what matters most: your app, without worrying about access control within your code. Check out the full documentation here.

App Engine firewall is in beta, so avoid using this functionality in production environments. If you have any questions, concerns or if something is not working as you’d expect, you can post in the Google App Engine forum, log a public issue or get in touch on the App Engine slack channel (#app-engine).

Demystifying container vs VM-based security: Security in plaintext


Containerized workloads have gained in popularity over the past few years for enterprises and startups alike. Containers can significantly improve development speed, lower costs by improving resource utilization, and improve production consistency; however, their unique security implications in comparison to traditional VM-based applications are often not well understood. At Google, we’ve been running container-based production infrastructure for more than a decade and want to share our perspective on how container security compares to traditional applications.

Containerized workloads differ from traditional applications in several major ways. They also provide a number of advantages:

  • Modularized applications (monolithic applications vs. microservices)
  • Lower release overhead (convenient packaging format and well defined CI/CD practices)
  • Shorter lifetimes, less risk to have outdated packages (months to years vs. days to hours)
  • Less drift from original state during runtime (less direct access for maintenance, since workload is short-lived and can easily be rebuilt and re-pushed)
Now let’s examine how these differences can affect various aspects of security.

Understanding the container security boundary

The most common misconception about container security is that containers should act as security boundaries just like VMs, and as they are not able to provide such guarantee, they are a less secure deployment option. However, containers should be viewed as a convenient packaging and delivering mechanism for applications, rather than as mini VMs.

In the same way that traditional applications are not perfectly isolated from one another within a VM, an attacker or rogue program could break out of a running container and gain control of other containers running on the same VM. However, with a properly secured cluster, a container breakout would require an unpatched vulnerability in the kernel, in the common container infrastructure (e.g., docker), or in other services exposed to the workload from the VM. To help reduce the risk of these attacks Google Container Engine provides fully managed nodes and actively monitors for vulnerabilities and outdated packages in the VM  including third party add-ons and performs auto update and auto repair when necessary. This helps minimize the attack window for a container breakout when a new vulnerability is discovered.

A properly secured and updated VM provides process level isolation that applies to both regular applications as well as container workloads, and customers can use Linux security modules to further restrict a container’s attack surface. For example, Kubernetes, an open source production-grade container orchestration system, supports native integration with AppArmor, Seccomp and SELinux to impose restrictions on syscalls that are exposed to containers. Kubernetes also provides additional tooling to further support container isolation. PodSecurityPolicy allows customers to impose restriction on what a workload can do or access at the Node level. For particularly sensitive workloads that require VM level isolation, customers can use taint and toleration to help ensure only workloads that trust each other are scheduled on the same VM.

Ultimately, in the case of applications running in both VMs and containers, the VM provides the final security barrier. Just like you wouldn’t run programs with mixed security levels on the same VM, you shouldn’t run pods with mixed security levels on the same node due to the lack of guaranteed security boundaries between pods.


Minimizing outdated packages

One of the most common attack vectors for applications running in a VM is vulnerabilities in outdated packages. In fact, 99.9% of exploited vulnerabilities are compromised more than a year after the CVE was published (Verizon Data Breach Investigation Report, 2015). With monolithic applications, application maintainers often patch OSes and applications manually and VM-based workloads often run for an extended period of time before they're refreshed.

In the container world, microservices and well defined CI/CD pipelines make it easier to release more frequently. Workloads are typically short-lived (days or even hours), drastically reducing the attack surface for outdated application packages. Container Engine’s host OS is hardened and updated automatically. Further, for customers who adopt fully managed nodes, the guest OS and system containers are also patched and updated automatically, which helps to further reduce the risk from known vulnerabilities.

In short, containers go hand in hand with CI/CD pipelines that allow for very regular releases and update the containers with the latest patches as frequently as possible.


Towards centralized governance

One of the downsides of running traditional applications on VMs is that it’s nearly impossible to understand exactly what software is running in your production environment, let alone control exactly what software is being deployed. This is a result of three primary root causes:
  1. The VM is an opaque application packaging format, and it's hard to establish a streamlined workflow to examine and catalog its content prior to deployment
  2. VM image management is not standardized or widely adopted, and it’s often hard to track down every image that has ever been deployed to a project
  3. Due to VM workloads’ long lifespans, administrators must frequently manipulate running workloads to update and maintain both the applications and the OS, which can cause significant drift from the application’s original state when it was deployed
And because it’s hard to determine the accurate states of traditional applications at scale, the typical security controls will approximate by focusing on anomaly detection in application and OS behaviors and settings.

In contrast, containers provide a more transparent, easy-to-inspect and immutable format for packaging applications, making it easy to establish a workflow to inspect and catalog container content prior to deployment. Containers also come with a standardized image management mechanism (a centralized image repository that keeps track of all versions of a given container). And because containers are typically short-lived and can easily be rebuilt and re-pushed, there's typically less drift of a running container from its deploy-time state.

These properties help turn container dev and deploy workflows into key security controls. By making sure that only the right containers built by the right process with the right content are deployed, organizations can gain control and knowledge of exactly what’s running in their production environment.


Shared security ownership

In some ways, traditional VM-based applications offer a simpler security model than containerized apps. Their runtime environment is typically created and maintained by a single owner, and IT maintains total control over the code they deploy to production. Infrequent and drawn-out releases also mean that centralized security teams can examine every production push in detail.

Containers, meanwhile, enable agile release practices that allow faster and more frequent pushes to production, leaving less time for centralized security reviews, and shifting the responsibility for security back to developers.

To mitigate the risks introduced by faster development and decentralized security ownership, organizations adopting containers should also adopt best practices highlighted in the previous section such as having a private registry to centrally control external dependencies in a production deployment (e.g., open-source base images); image scanning as part of CI/CD process to identify vulnerabilities and problematic dependencies; and deploy-time controls to help ensure only known good software gets deployed to production.

Overall, an automated and streamlined secure software supply chain that ensures software quality and provenance can provide significant security advantages and can still incorporate periodic manual review.

Summary


While many of the security limitations of VM-based applications hold true for containers (for now), using containers for application packaging and deployment creates opportunities for more accurate and streamlined security controls.

Watch this space for future posts that dig deep on containers, security and effective software development teams.

Visit our webpage to learn more about the Google Cloud Platform (GCP) security model.

Help keep your Google Cloud service account keys safe


Google Cloud Platform (GCP) offers robust service account key management capabilities to help ensure that only authorized and properly authenticated entities can access resources running on GCP.

If an application runs entirely on GCP, managing service account keys is easy  they never leave GCP, and GCP performs tasks like key rotation automatically. But many applications run on multiple environments  local developer laptops, on-premises databases and even environments running in other public clouds. In that case, keeping keys safe can be tricky.

Ensuring that account keys aren’t exposed as they move across multiple environments is paramount to maintaining application security. Read on to learn about best practices you can follow when managing keys in a given application environment.

Introducing the service account

When using an application to access Cloud Platform APIs, we recommend you use a service account, an identity whose credentials your application code can use to access other GCP services. You can access a service account from code running on GCP, in your on-premises environment or even another cloud.

If you’re running your code on GCP, setting up a service account is simple. In this example, we’ll use Google Compute Engine as the target compute environment.
Now that you have a service account, you can launch instances to run from it. (Note: You can also temporarily stop an existing instance and restart it with an alternative service account).
  • Next, install the client library for the language in which your application is written. (You can also use the SDK but the client libraries are the most straightforward and recommended approach.) With this, your application can use the service account credentials to authenticate applications running on the instance. You don’t need to download any keys because you are using a Compute Engine instance, and we automatically create and rotate the keys.

Protecting service account keys outside GCP

If your application is running outside GCP, follow the steps outlined above, but install the client library on the destination virtual or physical machine. When creating the service account, make sure that you're following the principles of least-privilege. This is good practice in all cases, but it becomes even more important when you download credentials, as GCP no longer manages the key, increasing the risk of it being inadvertently exposed.

In addition, you’ll need to create a new key pair for the service account, and download the private key (which is not retained by Google). Note that with external keys, you're responsible for security of the private key and other management operations such as key rotation.

Applications need to be able to use external keys to be authorized to call Google Cloud APIs. Using the Google API client libraries facilitates this. Google API client libraries use Application Default Credentials for a simple way to get authorization credentials when they're called. When using an application outside of GCP, you can authenticate using the service account for which the key was generated by pointing the GOOGLE_APPLICATION_CREDENTIALS environment variable to the location where you downloaded the key.


Best practices when downloading service account keys

Now you have a key that can gain access to GCP resources, you need to ensure that you manage the key appropriately. The remainder of this post focuses on best practices to avoid exposing keys outside of their intended scope of use. Here are best practices to follow:
  1. If you’ve downloaded the key for local development, make sure it's not granted access to production resources.
  2. Rotate keys using the following IAM Service Account API methods:
    • ServiceAccounts.keys.create()
    • Replace old key with new key
    • ServiceAccounts.keys.delete()
  3. Consider implementing a daily key rotation process and provide developers with a cloud storage bucket from which they can download the new key every day.
  4. Audit service accounts and keys using either the serviceAccount.keys.list() method or the Logs Viewer page in the console.
  5. Restrict who is granted the Service Account Actor and Service Account User role for a service account, as they will have full access to all the resources.
  6. Always use the client libraries and the GOOGLE_APPLICATION_CREDENTIALS for local development.
  7. Prevent developers from committing keys to external source code repositories.
  8. And finally, regularly scan external repositories for keys and take remedial action if any are located.

Now let’s look at ways to implement some of these best practices.

Key rotation

Keyrotator is a simple CLI tool written in Python that you can use as is, or as the basis for a service account rotation process. Run it as a cron job on an admin instance, say, at midnight, and write the new key to Cloud Storage for developers to download in the morning.

It's essential to control access to the Cloud Storage bucket that contains the keys. Here’s how:
  1. Create a dedicated project setup for shared resources.
  2. Create a bucket in the dedicated project; do NOT make it publicly accessible.
  3. Create a group for the developers who need to download the new daily key.
  4. Grant read access to the bucket using Cloud IAM by granting the storage.objectViewer role to your developer group for the project with the storage bucket.
If you wish to implement stronger controls, use the Google Cloud Key Management Service to manage secrets using Cloud Storage.


Prevent committing keys to external source code repositories

You should not need to keep any keys with your code, but accidents happen and keys may inadvertently get pushed out with your code.

One way to avoid this is not to use external repositories and put processes in place to prevent their use. GCP provides private git repositories for this use case.

You can also put in place preventive measures to stop keys from being committed to your git repo. One open-source tool you can use is git-secrets. This is configured as a git hook when installed
It runs automatically when you run the ‘git commit’ command.

You need to configure git-secrets to check for patterns that match service account keys. This is fairly straightforward to configure:

Here's a service account private key when downloaded as a JSON file:

{
 "type": "service_account",
 "project_id": "your-project-id",
 "private_key_id": "randomsetofalphanumericcharacters",
 "private_key": "-----BEGIN PRIVATE KEY-----\thisiswhereyourprivatekeyis\n-----END PRIVATE KEY-----\n",
 "client_email": "[email protected]",
 "client_id": "numberhere",
 "auth_uri": "https://accounts.google.com/o/oauth2/auth",
 "token_uri": "https://accounts.google.com/o/oauth2/token",
 "auth_provider_x509_cert_url": "https://www.googleapis.com/oauth2/v1/certs",
 "client_x509_cert_url": "https://www.googleapis.com/robot/v1/metadata/x509/keyname%40your-project-id.iam.gserviceaccount.com"
}

To locate any service account keys, look for patterns that match the key name such as ‘private_key_id’ and ‘private_key’. Then, to locate any service account files in the local git folder, add the following registered patterns:

git secrets --add 'private_key'
git secrets --add 'private_key_id'

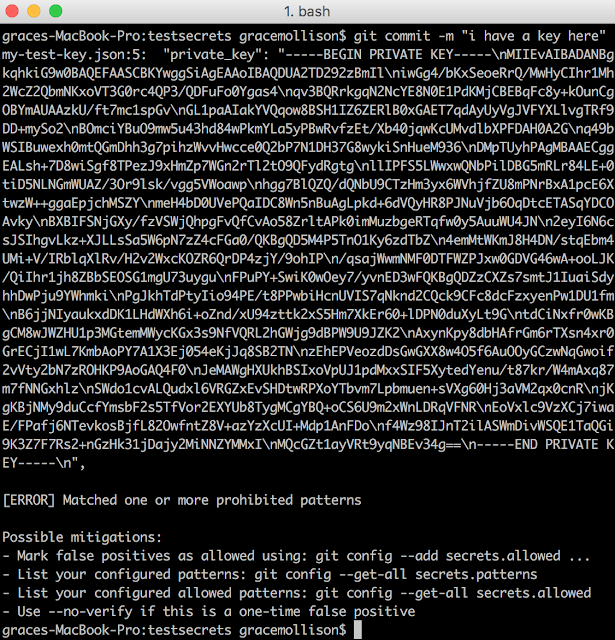
Now, when you try to run ‘git commit’ and it detects the pattern, you'll receive an error message and be unable to do the commit unless mitigating action is taken.
This screenshot shows a (now deleted) key to illustrate what developers see when they try to commit files that may contain private details.

Scan external repositories for keys

To supplement the use of git-secrets you can also run the open-source tool trufflehog. Trufflehog searches a repo’s history for secrets by using entropy analysis (it uses Shannon entropy) to find any keys that may have been uploaded.


Conclusion

In this post, we’ve shown you how to help secure service account keys, whether you're using them to authenticate applications running exclusively on GCP, in your local environment or in other clouds. Follow these best practices to avoid accidentally revealing keys and to control who can access your application resources. To learn more about authentication and authorization on GCP, check out our Authentication Overview.

Google Cloud services are switching Certificate Authority


Earlier this year, Google announced that we had established Google Trust Services to operate our own Root Certificate Authority on behalf of Google and Alphabet. Preparations are proceeding apace and customers that rely on Google services—including Google Cloud services such as Compute Engine, Gmail and others—should be aware that Google will soon begin using a different Certificate Authority (CA). We expect this to have no impact for the vast majority of customers.

Google commonly uses TLS (previously known as SSL) to secure communications between Google services and our users. As part of TLS, a server is required to provide proof of its identity in the form of a certificate that's signed by a CA. Google has long used certificates ultimately issued by the CA “GeoTrust.”

In the coming months, Google will begin using the GlobalSign R2 CA (“GS Root R2”). As it's a well-established and commonly trusted root CA, we expect minimal disruption to clients. However, for TLS clients that operate with custom root stores, we recommend that customers and application vendors ensure that their applications trust at least our minimum root set (PEM file).

The Google Trust Services home page contains links for customers and application vendors to test support for Google-operated roots, including GS Root R2. However, because we may use other roots in the future, customers should use the aforementioned root set and not simply the specific roots currently listed there.

More generally, a reasonable root set is not the only factor in ensuring that TLS clients continue to function over time. TLS clients should also meet these requirements to ensure minimal disruption:
  1. Support for TLS 1.2.
  2. A Server Name Indication (SNI) extension that contains the domain that's being connected to.
  3. Support for the cipher suite TLS_ECDHE_RSA_WITH_AES_128_GCM_SHA256 using the NIST P-256 curve (a.k.a “secp256r1”) and uncompressed points.
  4. At a minimum, trust the certificates listed at https://pki.google.com/roots.pem.
  5. Support for DNS Subject Alternative Names (SANs) by the certificate verifier, where SANs may include a single wildcard as the left-most label in the domain name.
We've been working hard to ensure that the transition to a new CA is as smooth as possible for users of our services. Feel free to reach out to us with questions or concerns: Google Cloud Platform | G Suite.

Mapping your organization with the Google Cloud Platform resource hierarchy


As your cloud footprint grows, it becomes harder to answer questions like
"How do I best organize my resources?" "How do I separate departments, teams, environments and applications?" "How do I delegate administrative responsibilities in a way that maintains central visibility?" and "How do I manage billing and cost allocation?"

Google Cloud Platform (GCP) tools like Cloud Identity & Access Management, Cloud Resource Manager, and Organization policies let you tackle these problems in a way that best meets your organization’s requirements.

Specifically, the Organization resource, which represents a company in GCP and is the root of the resource hierarchy, provides centralized visibility and control over all its GCP resources.

Now, we're excited to announce the beta launch of Folders, an additional layer under Organization that provides greater flexibility in arranging GCP resources to match your organizational structure.

"As our work with GCP scaled, we started looking for ways to streamline our projects, Thanks to Cloud Resource Manager, we now centrally control and monitor how resources are created and billed in our domain. We use IAM and Folders to provide our departments with the autonomy and velocity they need, without losing visibility into resource access and usage. This has significantly reduced our management overhead, and had a direct positive effect on our ability to support our customers at scale.”  Marcin Kołda, Senior Software Engineer at Ocado Technology.

The Google Cloud resource hierarchy


Organization, Projects and now Folders comprise the GCP resource hierarchy. You can think of the hierarchy as the equivalent of the filesystem in traditional operating systems. It provides ownership, in that each GCP resource has exactly one parent that controls its lifecycle. It provides grouping, as resources can be assembled into Projects and Folders that logically represent services, applications or organizational entities, such as departments and teams in your organization. Furthermore, it provides the “scaffolding” for access control and configuration policies, which you can attach at any node and propagate down the hierarchy, simplifying management and improving security.

The diagram below shows an example of the GCP resource hierarchy.
Projects are the first level of ownership, grouping and policy attach point. At the other end of the spectrum, the Organization contains all the resources that belong to a company and provides the high-level scope for centralized visibility and control. A policy defined at the Organization level is inherited by all the resources in the hierarchy. In the middle, Folders can contain Projects or other Folders and provide the flexibility to organize and create the boundaries for your isolation requirements.

As the Organization Admin for your company, you can, for example, create first-level Folders under the Organization to map your departments: Engineering, IT, Operations, Marketing, etc. You can then delegate full control of each Folder to the lead of the corresponding department by assigning them the Folder Admin IAM role. Each department can organize their own resources by creating sub-folders for teams, or applications. You can define Organization-wide policies centrally at the Organization level, and they're inherited by all resources in the Organization, ensuring central visibility and control. Similarly, policies defined at the Folder level are propagated down the corresponding subtree, providing teams and departments with the appropriate level of autonomy.

What to consider when mapping your organization onto GCP


Each organization has a unique structure, culture, velocity and autonomy requirements. While there isn’t a predefined recipe that fits all scenarios, here are some criteria to consider as you organize your resources in GCP.

Isolation: Where do you want to establish trust boundaries: at the department and team level, at the application or service level, or between production, test and dev environments? Use Folders with their nested hierarchy and Projects to create isolation between your cloud resources. Set IAM policies at the different levels of the hierarchy to determine who has access to which resources.

Delegation: How do you balance autonomy with centralized control? Folders and IAM help you establish compartments where you can allow more freedom for developers to create and experiment, and reserve areas with stricter control. You can for example create a Development Folder where users are allowed to create Projects, spin up virtual machines (VMs) and enable services. You can also safeguard your production workflows by collecting them in dedicated Projects and Folders where least privilege is enforced through IAM.

Inheritance: How can inheritance optimize policy management? As we mentioned, you can define policies at every node of the hierarchy and propagate them down. IAM policies are additive. If, for example, [email protected] is granted Compute Engine instanceAdmin role for a Folder, he will be able to start VMs in each Project under that Folder.

Shared resources: Are there resources that need to be shared across your organization, like networks, VM images, service accounts? Use Projects and Folders to build central repositories for your shared resources and limit administrative privileges over these resources to only selected users. Use least privilege principle to allow access to other users.

Managing the GCP resource hierarchy


As part of the Folders beta launch, we've redesigned the Cloud Console user interface to improve visibility and management of the resource hierarchy. You can now effortlessly browse the hierarchy, manage resources and define IAM policies via the new scope picker and the Manage Resources page shown below.
In this example, the Organization “myorganization.com” is structured in two top-level folders for the Engineering and IT departments. The Engineering department then creates two sub-folders for Product_A and Product_B, which in turn contain folders for the production, development and test environments. You can define IAM permissions for each Folder from within the same UI, by selecting the resources of interest and accessing the control pane on the right hand side, as shown below.
By leveraging IAM permissions, the Organization Admin can restrict visibility to users within portions of the tree, creating isolation and enforcing trust boundaries between departments, products or environments. In order to maximize security of the production environment for Product_A for example, only selected users may be granted access or visibility to the corresponding Folder. Developer [email protected], for instance, is working on new features for Product_A, but in order to minimize risk of mistakes in the production environment, he's not given visibility to the Production Folder. You can see his visibility of the Organization hierarchy in the diagram below:


As with any other GCP component, alongside the UI, we've provided API and command line (gcloud) interfaces to programmatically manage the entire resource hierarchy, enabling automation and standardization of policies and environments.

The following script creates the resource hierarchy above programmatically using the gcloud command line tool.


# Find your Organization ID
 
me@cloudshell:~$ gcloud organizations list
DISPLAY_NAME        ID     DIRECTORY_CUSTOMER_ID
myorganization.com  358981462196  C03ryezon
 
# Create first level folder “Engineering” under the Organization node
 
me@cloudshell:~$ gcloud alpha resource-manager folders create
--display-name=Engineering --organization=358981462196
Waiting for [operations/fc.2201898884439886347] to finish...done.                                                                                                                     Created [<Folder 
createTime: u'2017-04-16T22:49:10.144Z' 
displayName: u'Engineering' 
lifecycleState: LifecycleStateValueValuesEnum(ACTIVE, 1) 
name: u'folders/1000107035726' 
parent: u'organizations/358981462196'>].

 
# Add a Folder Admin role to the “Engineering” folder
 
me@cloudshell:~$ gcloud alpha resource-manager folders add-iam-policy-binding 
1000107035726 --member=user:[email protected] 
--role=roles/resourcemanager.folderAdmin
bindings: 
- members:  
- user:[email protected]  
role: roles/resourcemanager.folderAdmin
- members:  
- user:[email protected]  
role: roles/resourcemanager.folderEditor
etag: BwVNX61mPnc=
 
 
# Check the IAM policy set on the “Engineering” folder
 
me@cloudshell:~$ gcloud alpha resource-manager folders get-iam-policy 
1000107035726
bindings: 
- members:  
- user:[email protected]  
role: roles/resourcemanager.folderAdmin
- members:  
- user:[email protected]  
role: roles/resourcemanager.folderEditor
etag: BwVNX61mPnc=


# Create second level folder “Product_A” under folder “Engineering”
 
me@cloudshell:~$ gcloud alpha resource-manager folders create 
--display-name=Product_A --folder=1000107035726
Waiting for [operations/fc.2194220672620579778] to finish...done.                                                                                                                     Created [].
 
# Crate third level folder “Development” under folder “Product_A”
 
me@cloudshell:~$ gcloud alpha resource-manager folders create 
--display-name=Development --folder=1000107035726
Waiting for [operations/fc.3497651884412259206] to finish...done.                                                                                                                     Created [].
 
# List all the folders under the Organization
 
me@cloudshell:~$ gcloud alpha resource-manager folders list 
--organization=358981462196
DISPLAY_NAME  PARENT_NAME                 ID
IT            organizations/358981462196  575615098945
Engineering   organizations/358981462196  661646869517
Operations    organizations/358981462196  895951706304
 
# List all the folders under the “Engineering” folder
 
me@cloudshell:~$ gcloud alpha resource-manager folders list 
--folder=1000107035726
DISPLAY_NAME  PARENT_NAME           ID
Product_A     folders/1000107035726  732853632103
Product_B     folders/1000107035726  941564020040
 
 
# Create a new project in folder “Product_A”
 
me@cloudshell:~$ gcloud alpha projects create my-awesome-service-2 --folder 
732853632103
Create in progress for [https://cloudresourcemanager.googleapis.com/v1/projects/my-awesome-service-3].Waiting for [operations/pc.2821699584791562398] to finish...done. 


# List projects under folder “Production”
 
me@cloudshell:~$ gcloud alpha projects list --filter 'parent.id=725271112613'
PROJECT_ID            NAME                  PROJECT_NUMBER
my-awesome-service-1  my-awesome-service-1  869942226409
my-awesome-service-2  my-awesome-service-2  177629658252


As you can see, Cloud Resource Manager is a powerful way to manage and organize GCP resources that belong to an organization. To learn more, check out the Quickstarts, and stay tuned as we add additional capabilities in the months to come.

Solutions guide: How to secure rendering workloads on GCP


In the world of visual effects, security and content protection is on everyone's mind. Ensuring the security of intellectual property as it moves through your production pipeline is essential to being awarded jobs from major Hollywood studios. Data must be encrypted at all times, access to resources must be carefully controlled, and any changes must be logged, both on-premises and in the cloud.

Today, we're happy to present a best practices guide to Securing Rendering Workloads on Google Cloud Platform (GCP). This guide, coupled with Google Cloud’s security, core compliance and MPAA best practices, is aimed at visual effects facilities that need to pass security compliance audits. That said, any organization concerned with cloud security will benefit from its recommendations.

This document will evolve along with GCP's security features. We'll add and update content as we update and introduce products to help secure your data.

We hope you find this guide useful and concise. Please tell us what you think, and be sure to sign up for a trial at no cost to learn more about securing your workloads on the cloud.

Getting started with Cloud Identity-Aware Proxy


At Google Cloud Next '17, we announced the beta of Cloud Identity-Aware Proxy (Cloud IAP). Cloud IAP lets you control access to your web applications running on Google Cloud Platform (GCP). You can learn more about it and why it’s a simpler and more secure method than traditional perimeter-based access controls such as LANs and VPNs, in our previous post about Cloud IAP. In this post, we go into the internals of how Cloud IAP works and some of the engineering decisions we made in building it.

How does Cloud IAP work?

When a request comes into App Engine or Cloud Load Balancing HTTP(S), code inside the serving infrastructure for those products checks whether Cloud IAP is enabled for the App Engine app or Google Compute Engine backend service. If it is, the serving infrastructure calls out to the Cloud IAP auth server with some information about the protected resource, such as the GCP project number, the request URL and any Cloud IAP credentials present in the request headers or cookies.

If the request has valid credentials, the auth server can use those credentials to get the identity (email address and user ID) of the user. Using that identity information, the auth server calls Cloud Identity & Access Management (Cloud IAM) to check whether the user is authorized for the resource.

Authenticating with OpenID Connect

The credential that Cloud IAP relies on is an OpenID Connect (OIDC) token. That token can come from either a cookie (GCP_IAAP_AUTH_TOKEN1) or an Authorization: bearer header. To initiate the flow needed to get this token, Cloud IAP needs an OAuth2 client ID and secret. When you turn on Cloud IAP from Cloud Console, we silently create an OAuth2 client in your project and configure Cloud IAP to use it. If you use GCP APIs or the Cloud SDK to enable Cloud IAP, you’ll need to configure an OAuth2 client manually.

Anyone who interacts with a Cloud IAP-secured application from a web browser receives a cookie with their credentials. When the Cloud IAP auth server sees a request with missing or invalid credentials, it redirects the user into Google’s OpenID Connect flow. By using the OIDC flow, users get control over which applications can see their identity. The auth server handles the OAuth redirect and completes the OpenID Connect flow.

To protect against Cross-Site Request Forgery attacks, the auth server also generates a random nonce when redirecting the user into the OAuth flow. Auth server stores that nonce in a GCP_IAAP_XSRF_NONCE cookie, as well as signed with a key private to the auth server in the OAuth flow state parameter (along with the original URL requested by the user, also signed.) When processing an OAuth redirect, the auth server verifies the signature on the state parameter and checks that its nonce value matches the one from the cookie.

Robot parade

To support access from scripts and programs, the auth server also looks for an OIDC token in an Authorization header. The process to obtain an OIDC token given an OAuth2 access token or a service account private key is a bit complex; the IAP documentation provides sample code for authenticating from a service account or mobile app. If you want to know what’s going on behind the scenes there, or want to roll your own, the steps automated by that sample code are:
  1. Create a JWT with the following claims:
    1. aud: https://www.googleapis.com/oauth2/v4/token
    2. exp: Some time in the future.
    3. iat: The current time.
    4. iss: Your service account’s email address.
    5. target_audience: Either the base URL (protocol, domain and optional port; no path) or OAuth2 client ID for your Cloud IAP-protected application. (This controls the aud claim in the resulting OpenID Connect token. Cloud IAP validates this claim to prevent a token intended for use in one application from being used with another application.)
  2. If you have a service account private key, use it to sign the JWT. If you only have an access token, use the App Engine standard environment App Identity API or Cloud IAM signBlob API to sign it.
  3. POST it to the URL in the aud claim by Using OAuth 2.0 for Server to Server Applications.

Authorization with Cloud IAM

The Cloud IAP access list displayed in Cloud Console is really just part of your project’s Cloud IAM policy. You can use all standard Cloud IAM capabilities to manipulate it, including the IAM API and granting the Cloud IAP role at the folder and organization levels of the Cloud IAM hierarchy.

The role that grants access to Cloud IAP is roles/iap.httpsResourceAccessor. Unlike many other Cloud IAM roles, none of the broad roles like Owner or Editor grant the permissions associated with this role. This was done to better enable scenarios where security administrators are responsible for configuring the access policy, but they're not intended to use the application. (Yes, they can always grant themselves access, but this way it’s something they have to go out of their way to do. If application owners got access automatically, they might unintentionally access the application.)

Propagating identity

Many applications protected by Cloud IAP will want to know the user’s identity, either to perform additional access control or as part of a user preferences system. Cloud IAP provides a few ways to do this. Two of them are straightforward:
  1. For applications using the Google App Engine standard environment, Cloud IAP supports the App Engine Users API. Existing code using this API typically works with no modifications, and Cloud IAP even uses the same user IDs as Users API.
  2. Cloud IAP sends the user’s email address and ID in two HTTP headers.
The third way requires a few additional steps to ensure maximum security for your application. For applications that can’t use the Users API and so have to go with option 2, relying on unauthenticated HTTP headers is a security risk2. If you accidentally disable Cloud IAP, anyone could potentially connect to your application and set those headers to arbitrary values! If your application runs on Compute Engine or Google Container Engine, anyone who can connect directly to a VM running your application could then bypass Cloud IAP and set those headers to whatever they want. As discussed earlier, Cloud IAP access control is enforced inside the HTTP(S) load balancer, so if someone can bypass the load balancer, they can bypass Cloud IAP! This could happen if you’ve misconfigured your firewall rules, or because the attacker was able to SSH into the instance or another instance on the network.

So, Cloud IAP provides a third HTTP header, which contains a JSON Web Token (JWT) signed with a Cloud IAP private key. This JWT closely resembles the OpenID Connect token, but it’s signed by Cloud IAP instead of by the Google account service. We considered just passing through the OpenID Connect token that Cloud IAP used to authenticate the user, but by minting our own token, we’re free to add additional methods for users to authenticate to Cloud IAP in the future.

We hope this provides you a solid understanding of how Cloud IAP works behind the scenes, as well as some of the simplicity it offers. Spend a few minutes reading the IAP quickstarts to learn how to use it, and stay tuned for a steady stream of security and identity content.


1 Yes, there’s an extra A.
2 The Users API, on the other hand, is safe. Cloud IAP uses a protected internal channel to set the identity information consumed by this API.

Cloud Identity-Aware Proxy: Protect application access on the cloud


Whether your application is lift-and-shift or cloud-native, administrators and developers want to provide simple protected application access for only those corporate users that should have access to it.

At Google Cloud Next '17 last month, we launched Cloud Identity-Aware Proxy (Cloud IAP), which controls access to cloud applications running on Google Cloud Platform by verifying a user’s identity and determining whether that user is allowed to access the application.

Cloud IAP acts as the internet front end for your application, and you gain the benefits of group-based access control to your application and TLS termination and DoS protections from Google Cloud Load Balancer, which underlies Cloud IAP. Users and developers access the application as a public internet URL  no VPN clients to start up or manage.

With Cloud IAP, your developers can focus on writing custom code for their applications and deploy it to the internet with more protection from unauthorized access simply by selecting the application and adding users and groups to an access list. Google takes care of the rest.

How Cloud IAP works

As an administrator, you enable Cloud IAP protections by synchronizing your end-users’ identities to Google’s Cloud Identity Solution. You then define simple access policies for HTTPs web applications by selecting the users and groups who should be able to access them. Your developers, meanwhile, write and deploy HTTPs web applications to the internet behind Cloud Load Balancer, which passes incoming requests to Cloud IAP to perform identity checks and apply access policies. If the user is not yet signed-in, they're prompted to do so before the policy is applied.

Cloud IAP is ideal if you need a fast and reliable way to access your applications more securely. No more hiding behind walled gardens of VPNs. Take advantage of Cloud IAP and let developers do what they're good at, while giving security teams the peace of mind of increased protection of valuable enterprise data.

Cloud IAP is one of the suite of tools that enables you to implement the context-aware secure access described by Google’s BeyondCorp. You should also consider complementing Cloud IAP access control with phishing protection provided by our Security Key Management feature.

Cloud IAP pricing

Cloud IAP user- and group-based access control is available today at no cost. In the future, look for us to add features above and beyond controlling access based on users and groups. And stay tuned for further posts on getting started with Cloud IAP.