Project Strobe was started to help users have control over their data while giving developers more explicit rules of the road to ensure everyone is confident that their data is secure. One result of this effort has been to expand our app verification program to cover more apps and more types of data access. It is important to understand how the process works so that you can optimally build your app and streamline the verification process. Here we walk you through the process of preparing your app for OAuth verification.
Getting prepared for verification
The first thing you should do is confirm whether your app needs verification. App verification is only required if you want to launch your app widely to consumer or enterprise users and the app requests sensitive or restricted scopes. Apps that use non-sensitive scopes, are under development, or are built just for your own G Suite users are not required to go through verification. If the app is just for users within your own organization, choose the ‘Internal’ application type to restrict the app to use within your own organization and skip verification.
Once you initiate app verification, it is not easy to make updates to your app's Google API configuration. If you make any changes while in the process, you will need to start over again, so it’s critical that you get your app ready before initiating verification to avoid delays.
Determining if your app is using sensitive or restricted scopes
The first thing you need to do is look at your code on each platform to determine which OAuth scopes (Google APIs) your service needs. Be sure to do this on every client; we often see that apps will request different scopes on different platforms, and then initiate app verification on a subset of scopes than your clients actually use. Often, you can find the scopes by searching your code for the string “www.googleapis.com/auth”. Not all legacy scopes contain that string so you may also want to find the code related to the Google API library you’re using (on the specific platform) to see what scopes are being requested, or look at our directory of scopes.
Once you have identified all of the scopes that your apps use, you can check to see whether they are sensitive or restricted by going to the Cloud Console (APIs & Services -> Credentials -> OAuth consent screen -> Scopes for Google APIs) and pressing the ‘Add scope’ button. This will bring up the following window:
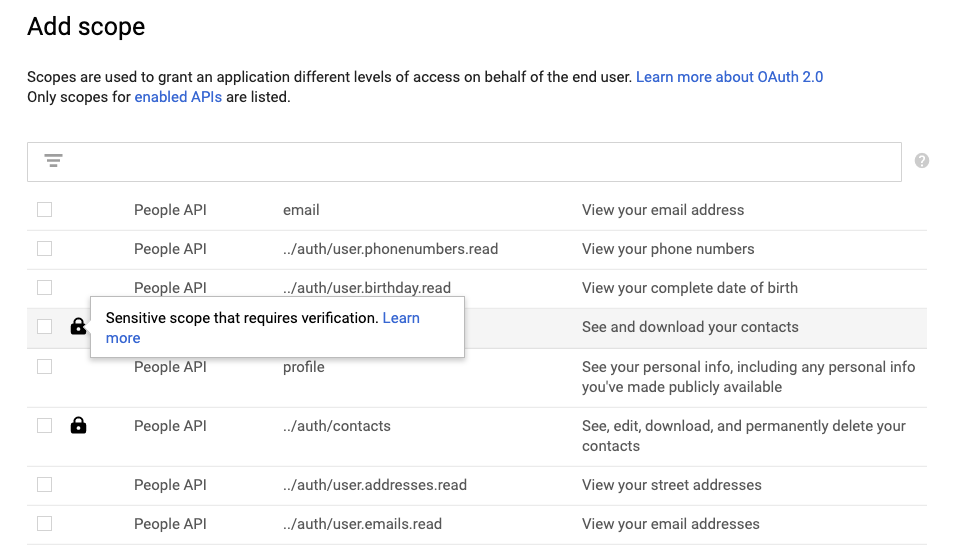
If the scope has a lock icon, it means that the scope is either sensitive or restricted and that you’ll need to go through app verification before you can widely launch to Google users.
[Note that the tool only lists scopes for APIs that you’ve enabled for your project. If you don’t see a scope listed, you’ll first need to enable the corresponding API for your project from the API Library. The fact that you’re not seeing the scope used in your code may mean that you have clients set up in different projects.]
Setting up the right project structure
Apps are reviewed and approved at the project level so you’ll want to make sure that you’ve configured your clients properly before starting app verification. If you have multiple projects, each one will have to independently go through app verification.
When to add multiple clients to a project: You may have multiple clients for your app to support different platforms like Android, Web and iOS. Ideally, all of these clients should be in the same project because it will smooth out the cross-client consent experience. When clients are in the same project, users only need to provide consent to one of the clients. Other clients can automatically get tokens without forcing the user to go through the consent flow for the same requested scopes again. The user is agreeing to share data with your service regardless of which platform they happen to be using and your service terms should be the same across platforms.
When to separate clients into separate projects: Your company may also have multiple apps that you publish to users. You may or may not want to host the clients related to your different apps in the same project. Generally, if the different apps use the same login system, have the same privacy policy and users recognize the brand of the publisher of all the apps, then it makes sense to have all the clients in the same project. For example, if PersonalFinance Corp has accounting, budgeting and tax apps that all share the same login, privacy policy and users recognize the PersonalFinance Corp brand, then it is best to structure those all in the same project. However, if CoolGames publisher has lots of titles that have different login systems and different privacy policies, or users are more familiar with the individual game titles than the CoolGames brand, then you should use separate projects.
Reorganizing projects: It is not possible to move or reorganize clients once they are created. If you want to make changes, you can either choose to create new clients in a centralized project or get each app verified independently. If you create new clients in a centralized project, you’ll update your apps to use the new client and abandon the old clients. The issue you may encounter with this approach is that your app may have to obtain user consent all over again (if the user hasn’t also consented to your other client). Alternately, you can leave your clients in separate projects; however, each project will have to go through app verification independently and users will have to consent to each of your clients individually.
Setting up test vs production projects: For many developers, it is also helpful to have a parallel test project to your production project. This allows you to easily change scopes or other app properties and test behavior without having to go through app verification.
Configuring your project
If your app does need to be verified, you’ll want to make sure the information about your project is up-to-date to avoid delay.
Project Owners
As we roll out changes across our API ecosystem, it is important to make sure your projects have up-to-date contact information. We often need to send notifications about changes, and have had developers miss important updates because of incorrect contact information which has resulted in their app being unexpectedly disabled. One way to help ensure your team gets notifications is to create a Google Group that aliases to a stable group within your company (and be sure to configure the group to receive emails from non-members). Another option is to create an Organizational Resource in the Cloud Console so that your client assets can be centrally administered and recovered when owners leave the company. It’s also very good practice to ensure the owners of the Android/iOS/Web clients are also owners or editors of the project. Domain verification is also required for every app, so you will also want to add your DNS administrator to the project so that person can easily go through the process.
To update project owners, use Cloud IAM in the Cloud Console (Cloud Console -> IAM and admin -> IAM).
Branding Info and Domain Verification
Branding info includes your app’s name and logo. It is critical that these are accurate because users use these to decide whether they know and trust your app. In the verification process, we will validate that you own the brand and logo and that it matches the information on your web site. If you make changes, your previously approved branding will continue to be shown until the new information can be verified.

You will also need to verify the domain associated with your brand. This is true even if you only have Android/iOS versions of your app because you must have a website to publicly host your privacy policy. You start the domain verification process by linking your domain to your project in the Cloud Console (APIs & Services -> Domain verification). You’ll then need to go to the Search Console to prove that you own and control the domain.
Domain verification is a key security feature for your web clients. If you have web clients in your project, each of those must have their Authorized Redirect URIs or Authorized JavaScript Origins match an already verified domain. This enables us to guarantee that OAuth tokens are only returned to your application.
Scopes
Since you’ve already identified the scopes that your app uses, you should now check to see if you can change scopes to minimize your data access. Our API User Data Policy requires that you only request information that your app needs and that you’re clear to the user about how you will use it. It’s inappropriate to gain access to Google user data for alternate purposes such as advertising and market research.
In particular, you’ll want to try to avoid the use of restricted scopes. The verification process for restricted scopes can take several weeks longer than sensitive scopes. It also requires significant documentation and may involve a third-party security assessment that you must pay for. Currently, only specific Gmail scopes are restricted, but we have announced that most Drive scopes are also becoming restricted in early 2020.
If your app does need to access a restricted scope, consider architecting your app such that the Google user data is only ever stored client-side on the user’s device (like a contact manager app). Storing data in the cloud or on your own servers will require you to obtain a third-party security assessment (at your expense), and could also result in significant work to resolve any security issues found during the assessment.
Once you’ve decided on the scopes your app will need, make sure that they are registered with your project and reflected in your app’s code. We’ve seen many cases where a developer’s code calls a different set of scopes than those that have been registered in the Cloud Console. If your app does this, your users will see an unverified app error. Many developers request troubleshooting help because their users are unexpectedly seeing these errors even though their app was approved. Inevitably, it is because their code does not match what was verified. Similarly, if you need to add new scopes to your application, you’ll need to get those scopes approved before you launch the functionality into your production app (a test client is going to be essential here).
While you’re thinking about scopes, you should also consider how and when you are asking your users for consent. The best practice is to not request scopes at sign-in, but to use incremental authorization to allow a user to access a particular feature when they want it. This is a great way to build trust because the user interacts in a particular feature, can see the benefit of the feature, and understands why granting a particular permission will make the feature more useful.
Privacy Policy
Our goal in verifying apps is to ensure that any data users choose to share with third-parties is well-managed and meets users’ expectations about how it will be used. Your privacy policy is your public contract to your users and a critical proof to us that users’ expectations will be met.
You must include a link to your privacy policy on your website. If the domain where you host that policy isn’t verified, we won’t verify your app. If your app is purely mobile, with no server-side component, you will still need a privacy policy, but it may be very simple and describe that your app only stores data on a user’s device.
Google can not provide guidance on your privacy policy, but if your app requests restricted scopes, we will scrutinize your policy to understand how you plan to use that data and ensure that it conforms to our requirements. Make sure you understand the Limited Use requirements, and consult with your legal counsel to ensure that your privacy policy is consistent with the requirements. To ensure clarity in how your app handles email content, we also recommend adding the following statement to your application’s home page: “App’s use of information received from Gmail APIs will adhere to Google's Limited Use Requirements.” This is needed when your privacy policy is not specific in how email content is used.
Submitting your app for verification
Once you have your project(s) configured with all the appropriate information, you can submit your app for verification. We have three different types of app verification depending on the scopes you request, each taking a different amount of time to complete. If you start your verification with one set of scopes and later decide you need different scopes, you usually need to finish your existing verification before you can start the process again. This could cause frustration and lengthen your overall verification process.
Brand Verification (2-3 days)
Brand Verification is our simplest process and validates that your brand name and logo belong to you. It is an optional step if your app is requesting non-sensitive scopes like Google Sign-In and typically takes just 2 to 3 business days. If your app doesn’t go through brand verification, users will only see your domain name listed on the consent page.
Sensitive Scope Verification (3-5 days)
Starting in June 2019, we greatly expanded the classification of sensitive scopes and started requiring more extensive verification for new apps that are accessing those scopes. Existing apps that are already accessing sensitive scopes need to go through this verification process in the latter half of 2019.
Sensitive scope verification involves brand and domain validation, checking that the privacy policy is prominently available from your application home page. We also review your app and privacy policy against our API Services: User Data Policy and check for deceptive practices. The privacy policy must disclose the manner in which your application accesses, uses, stores, or shares Google user data. Your use of Google user data must be limited to the practices disclosed in your published privacy policy.
A YouTube or accessible Drive video will also be required to understand how users will experience your request for scopes, showing specifically how they’ll benefit from granting you access. The identity of your app needs to be clear from the video (including the app’s client ID), and you’ll need to highlight the value proposition you communicate to the user before requesting the scopes.
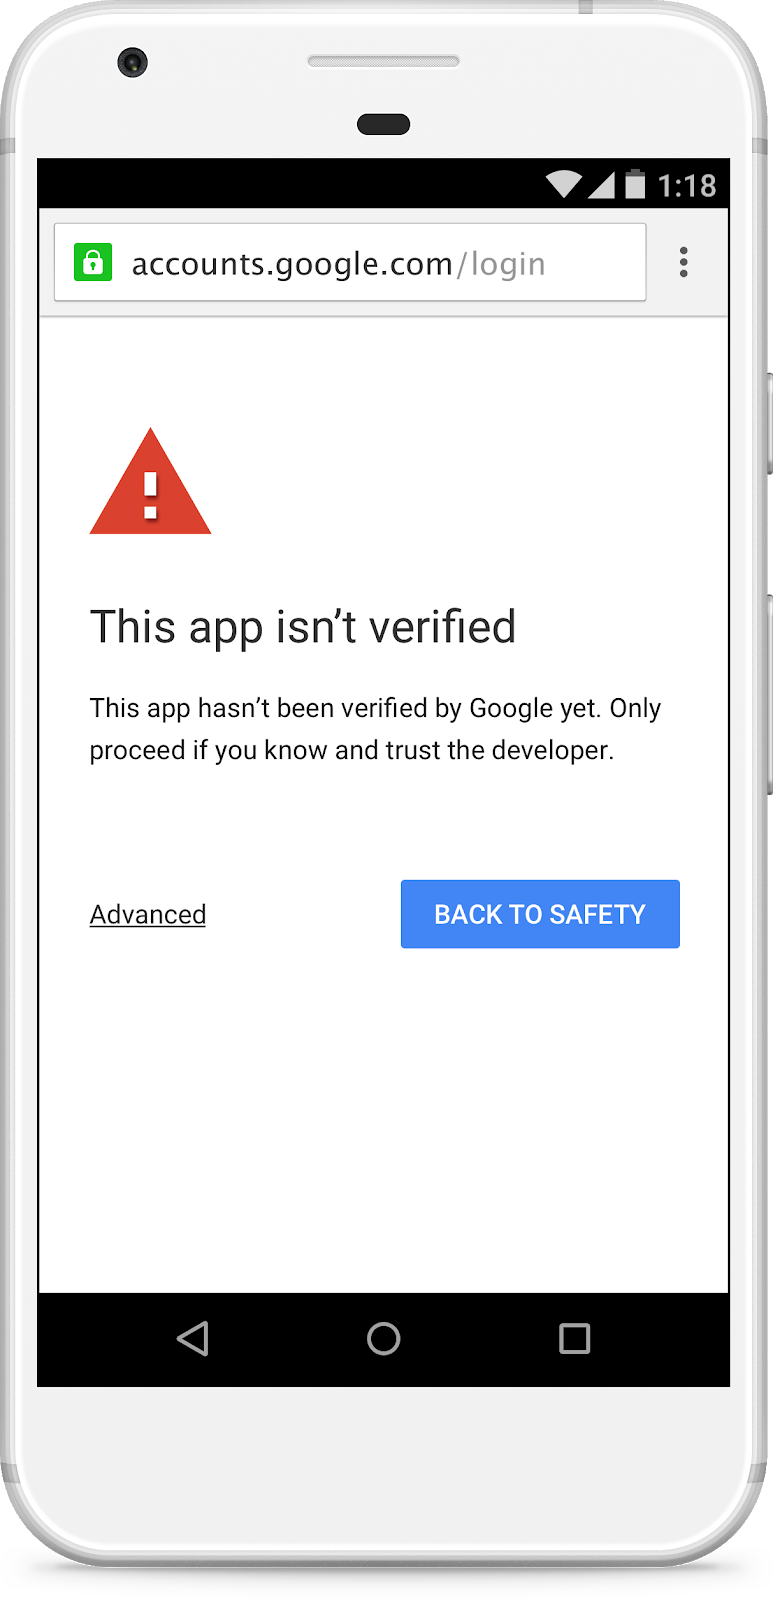
Until verification is completed, users will see an unverified app page when your app requests a scope requiring verification. Up to 100 users may choose to grant access while your app is unverified. After that, users will be blocked from granting access to your app until verification is complete.
Sensitive scope verification usually takes 3 to 5 business days if there aren’t any issues with your app.
Restricted Scope Verification (4-6 weeks)
Restricted scope verification is a much more involved process. In addition to going through all the steps for a sensitive scope verification, your app will also have a much more rigorous privacy policy review to ensure that your use of Google user data conforms to our Limited Use requirements. Only permitted application types will be considered for access to restricted scopes. Finally, if your app stores data on a server, you will need to pass an annual security assessment.
We do error validation before allowing you to click the ‘Submit for Verification’ button. Here are some common reasons why the button is not clickable:
- No verified domain
- Privacy policy URL, authorized redirect URIs or origins for your client do not match an authorized domain
- No new scopes added to the project that require verification
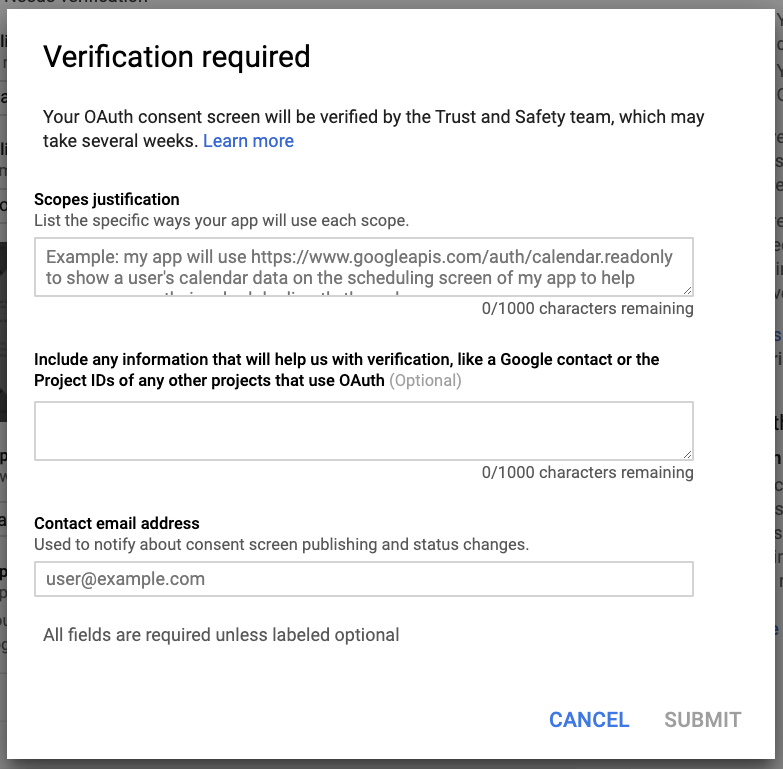
When you submit your app for verification, you will need to provide a written explanation for why your app needs the requested scopes. This explanation should include the nature of the feature and how the user will benefit from using it. It’s also best to include a link to your YouTube video in the original submission to save some back and forth with the review team.
You’ll also be asked again what email should receive questions and notifications about the verification process. Make sure you provide an address that you pay attention to and can receive emails from outside your domain. Questions will go to the person who initiated verification (not necessarily project owners) and the contact email address provided in the verification form. We’ve seen many requests delayed because the developer hasn’t responded to questions from the verification team.
Responding to verification questions
Apps with sensitive and restricted scopes often need to answer questions from the verification team. If you believe it has taken a long time to get a response from the verification team, you should search your inbox for messages from ‘api-oauth-dev-verification-reply’ to ensure that you haven’t missed anything.
By following these guidelines for submitting your app for verification, you can greatly streamline the process of getting your app approved and released to the Google user community. If you have any follow-up questions, be sure to scan the OAuth API Verification FAQ.