Category Archives: Google Cloud Platform Blog

Product updates, customer stories, and tips and tricks on Google Cloud Platform

Guest post: How Seenit uses Google Cloud Platform and Couchbase to power our video collaboration platform


Editor’s Note: In this guest post, Seenit CTO Dave Starling walks us through how they use Google Cloud Platform (GCP) and Couchbase to build their innovative crowdsourced video platform.

Since we started Seenit in 2014, our goal has been to give businesses the tools to tell interesting stories through crowdsourced video. But getting there wasn’t simple. What we envisioned for Seenit didn’t exist at the time we started, challenging us to define our product architecture from ground zero. We learned a lot, which is why today I thought I’d share a little on how we’re using Couchbase and GCP to bring Seenit to life.

When we first began looking at what we wanted to build as a platform, we came up with a list of requirements for our database and cloud provider. We chose to run Couchbase on GCP because it offered us distributed architecture that’s highly scalable and available globally. Our clients are typically large enterprises, sometimes in dozens of countries all over the world. We wanted to make sure that everyone, no matter where they are, could get a consistently good user experience.

By applying Couchbase’s N1QL and Full Text Search (FTS) with Google Cloud Machine Learning APIs, our customers can easily filter submissions by objects, words or phrases. And because everything is on GCP, we can duplicate our entire platform within minutes on 12 VMs.

Here’s how it works:

  1. We use Google Compute Engine to autoscale between two and 20 servers.
  2. Google Cloud Storage allows for unified object storage and retrieval. Near-infinite scalability means the service is capable of handling everything from small applications to builds of exabyte-scale systems.
  3. Couchbase’s Full Text Search (FTS) enables us to examine all the words in every document and match them with designated criteria.
  4. Cloud Machine Learning APIs sort clips by objects, gender of speakers and sentiment. The APIs all speak the same language so communication is seamless.

Last year, when we began looking for a machine learning platform, we wanted something that would talk JSON, store JSON and search JSON. We knew a machine learning platform that did all of that would integrate nicely into our Couchbase system. TensorFlow fit our criteria. We love that it isn’t restricted. We can build our own domain-specific models and use Google tools to train them.

Although TensorFlow is an open source machine learning platform, we use it through Cloud Machine Learning Engine. It’s a fully managed service, which is great for us because that way we don’t need to build and manage our own hardware. This allows us to do a lot of manipulation and extract a lot of really interesting data. It’s fully integrated in Couchbase, especially in full text search but also into N1QL, so we can search and extract intelligence and provide value to our customers. It’s a serverless architecture with the advantage of the custom hardware that Google started doing.

It’s also been great that we feel engaged with the community and product and engineering teams. As a startup, it’s important to feel like you can stand on the shoulders of giants, so to speak. The support we get from organizations like Google and Couchbase allow us to do lots of things that we otherwise wouldn’t be able to do with the resources we had.

There’s plenty more to share, but I’ll stop here. If you want to learn more, you might want to check out the joint talk GCP Product Manager Anil Dhawan and I recently gave at Couchbase Connect.

I also recommend checking out Couchbase and other tools on Cloud Launcher. You can use free trial credits to play around and even deploy something of your own. Good luck!

How to build a conversational app using Cloud Machine Learning APIs, Part 1


For consumers, conversational apps (such as chatbot) are among the most visible examples of machine learning in action. For developers, building a conversational app is instructive for understanding the value that machine-learning APIs bring to the process of creating completely new user experiences.

In this two-part post, we'll show you how to build an example “tour guide” app for Apple iOS that can see, listen, talk and translate via API.AI (a developer platform for creating conversational experiences) and Google Cloud Machine Learning APIs for Speech, Vision and Translate. You'll also see how easy it is to support multiple languages on these platforms.
The two parts will focus on the following topics:

Part 1
  • Overview
  • Architecture
  • API.AI intents
  • API.AI contexts

Part 2
This post is Part 1. Part 2 will be published in the following weeks.

Architecture


Using API.AI

API.AI is a platform for building natural and rich conversational experiences. For our example, it will handle all core conversation flows in the tour guide app. (Note that API.AI provides great documentation and a sample app for its iOS SDK. SDKs for other platforms are also available, so you could easily extend this tour guide app to support Android.)

Create Agent
The first step is to create a “Tour Guide Agent.”

Create Intents
To engage users in a conversation, we first need to understand what users are saying to the agent. We do that with intents and entities. Intents map what your users say to what your conversational experience should do. Entities are used to extract parameter values from use queries.

Each intent contains a set of examples of user input and the desired automated response. To do that, you need to predict what users will say to open the conversation, and then enter those phrases in the “Add user expression” box. This list doesn’t need to be comprehensive. API.AI uses machine learning to train the agent to understand more variations of these examples. Later on, you can train the API.AI agent to understand more variations. For example, go to the Default Welcome Intent and add some user expressions “how are you,” “hello,” “hi” to open the conversation.

The next step after that is to add some more text responses.
Next, it’s time to work on contexts.

Contexts
Contexts represent the current context of a user’s request. They're helpful for differentiating phrases that may be vague or have different meanings depending on the user’s preferences or geographic location, the current page in an app or the topic of conversation. Let’s look at an example.

User: Where am I?
Bot: Please upload a nearby picture and I can help find out where you are.
[User uploads a picture of Golden Gate Bridge.]
Bot: You are near Golden Gate Bridge.
User: How much is the ticket?
Bot: Golden Gate Bridge is free to visit.
User: When does it close today?
Bot: Golden Gate Bridge is open 24 hours a day, 7 days a week.
User: How do I get there?
[Bot shows a map to Golden Gate Bridge.]

In the above conversation, when user asks “How much is the ticket?” and “When does it close today?” or “How do I get there?”, the bot understands that the context is around Golden Gate Bridge.

The next thing to do is to weave intents and contexts together. For our example, each box in the diagram below is an intent and a context; the arrows indicate the relationships between them.


Output Contexts
Contexts are tied to user sessions (a session ID that you pass in API calls). If a user expression is matched to an intent, the intent can then set an output context to be shared by this expression in the future. You can also add a context when you send the user request to your API.AI agent. In our example, the where intent sets the where output context so that Location intent will be matched in the future.

Input Contexts
Input contexts limit intents to be matched only when certain contexts are set. In our example, location’s input context is set to where. The location intent is matched only when we're under where context.

Here are the steps to generate these intents and contexts:

First, create where intent and add where output context. This is the root in the context tree and has no input context.
Second, create location intent. Add where input context. Reset where output context and add location output context. In our tour guide app, the input context of location is where. When the location intent is detected, the where context needs to be reset so that any subsequent conversation won’t trigger this context again. This is done by setting the lifespan of the output context where to 0. By default, a context has a lifespan of 5 requests or 10 minutes.

Next, create ticket intent. Add location input context. Add location output context so that hours and map intents can continue to use the location context as input context.

You can pass the parameter from the input context with the format of #context.parameter; e.g., pass the location string from intent inquiry-where-location to inquiry.where.location.ticket in the format #inquiry-where-location.location.
Finally, create hours and map intents similar to ticket intent.

Next time


In Part 2, we’ll cover how to use Webhook integrations in API.AI to pass information from a matched intent into a Cloud Functions web service and then get a result. Finally, we’ll cover how to integrate Cloud Vision/Speech/Translation API, including support for Chinese language.

You can download the source code from github.

Three steps to Compute Engine startup-time bliss: Google Cloud Performance Atlas


Scaling to millions of requests, with less headaches, is one of the joys of working on Google Cloud Platform (GCP). With Compute Engine, you can leverage technologies like Instance Groups and Load Balancing to make it even easier. However, there comes a point with VM-based applications where the time it takes to boot up your instance can be problematic if you’re also trying to scale to handle a usage spike.

Before startup time causes woes in your application, let’s take a look at three simple steps to find what parts of bootup are taking the most time and how you can shorten your boot time.

Where does the time go?

One of the most important first steps to clearing up your startup time performance is to profile the official boot stages at a macro level. This gives you a sense of how long Compute Engine is taking to create your instance, vs. how much time your code is taking to run. While the official documentation lists the three startup phases as provisioning, staging and running, it’s a little easier to do performance testing on request, provisioning and booting, since we can time each stage externally, right from Cloud Shell.

  • Request is the time between asking for a VM and getting a response back from the Create Instance API acknowledging that you’ve asked for it. We can directly profile this by timing how long it takes GCP to respond to the insert instance REST command.
  • Provisioning is the time GCE takes to find space for your VM on its architecture; you can find this by polling the Get Instance API on a regular basis, and wait for the “status” flag to change from “provisioning” to “running.”
  • Boot time is when your startup scripts, and other custom code, executes; all the way up to the point when the instance is available. Fellow Cloud Developer Advocate Terry Ryan likes to profile this stage by repeatedly polling the endpoint, and timing the change between receiving 500, 400 and 200 status codes

An example graph generated by timing the request, provision and boot stages, measured 183 times

Profiling your startup scripts

Barring some unforeseen circumstance, the majority of boot-up time for your instances usually happens during the boot phase, when your instance executes its startup scripts. As such, it’s extremely helpful to profile your boot scripts in order to see which phases are creating performance bottlenecks.

Timing your startup scripts is a little trickier than it may seem at first glance. Chances are that your code is integrated into a very powerful tooling system (like Stackdriver Custom Metric API, statsd or brubeck) to help you profile and monitor performance. However applying each one to the startup scripts can create a difficult interaction and boot time overhead, which could skew your profiling results, thus making the testing meaningless.

One neat trick that gets the job done is wrapping each section of your startup script with the SECONDS command (if you're on a linux build), then append the time elapsed for each stage to a file, and set up a new endpoint to serve that file when requested.

This allows you to poll the endpoint from an external location and get data back without too much heavy lifting or modification to your service. This method will also give you a sense of what stages of your script are taking the most boot time.
An example graph generated by timing each stage in a linux startup script

Moving to custom images

For most developers, most of the time that a startup script runs is bringing down packages and installing applications to allow the service to run properly. That’s because many instances are created with public images  preconfigured combinations of OS and bootloaders. These images are great when you want to get up and running fast, but as you start building production-level systems, you’ll soon realize that the large portion of bootup time is no longer booting the OS, but the user-executed startup sequence that grabs packages and binaries and initializes them.

You can address this by creating custom images for your instance. Create a custom image by taking a snapshot of the host disk information (post-boot and install), and store it in a distribution location. Later, when the target instance is booted, the image information is copied right to the hard drive. This is ideal for situations where you've created and modified a root persistent disk to a certain state and would like to save that state to reuse it with new instances. It’s also good when your setup includes installing (and compiling) a number of big libraries, or pieces of software.
An example graph generated by timing the startup phases of the instance. Notice that the graph on the right side is in sub-second scale.

Every millisecond counts

When you’re trying to scale to millions of requests per second, being serviced by thousands of instances, small change in boot time can make a big difference in costs, response time and most importantly, the perception of performance by your users.

If you’d like to know more about ways to optimize your Google Cloud applications, check out the rest of the Google Cloud Performance Atlas blog posts and videos because when it comes to performance, every millisecond counts.

Cloud Shell’s code editor now in beta


Last October we added an experimental web-based code editor to Cloud Shell that makes it easier to edit source code within the browser. Today we're happy to announce that this feature is in beta, and we've made additional improvements that will make writing code in Cloud Shell even more delightful.

The editor now lives side-by-side with the Cloud Shell window, so you don’t have to switch between tabs when going from editing to building and testing. You can launch the editor by clicking on the icon in Cloud Shell, or going directly to this URL.
Whether you're working on an existing software project, learning or exploring a new API or open-source library, Cloud Shell makes it extremely easy to start writing code, all from within your browser.

The editor is based on the open-source Eclipse Orion project, which comes with several convenience features. Here are just a few:
  • Key bindings to navigate, format or edit code. To see the available key bindings go to Options > Keyboard Shortcuts or type Alt+Shift+? (or Ctrl+Shift+? on Mac OS X).
  • Syntax highlighting for JavaScript, HTML, CSS and Java; basic content assist for JavaScript, CSS and HTML files. Type Ctrl+Space to open content assist at the current cursor position in the editor.

  • Find and replace

  • Font and UI customization

The Cloud Shell code editor in action


In the previous blogpost we showed you how to deploy and debug an App Engine application using Cloud Shell. Here's a quick tutorial on how to test and modify a NodeJS app written with the Express.js framework.

  1. Open Cloud Shell by clicking on the Shell icon on the top right section of the toolbar.
  2. Get sample code. Clone the repository that contains the Google Cloud Platform (GCP) Node samples by typing the following command in the prompt, and navigate to the directory for the Hello World code:
  3. git clone 
    https://github.com/GoogleCloudPlatform/nodejs-docs-samples
    
    cd nodejs-docs-samples/appengine/hello-world
  4. Install dependencies and start the app.
  5. npm install
    
    npm start
  6. Preview the app. Click on the web preview icon on the top right of the screen, and click to open port 8080:
  7. Modify the app to show the current time.
    • Open the code editor from the Cloud Shell toolbar.
    • In the file tree to the left of the editor navigate to the directory ~/nodejs-docs-samples/appengine/hello-world and, click on app.js
    • Starting at line 23, replace the contents of the app.get function to the snippet below (changes are indicated in bold). As you start to type date.toTimeString(), you’ll see the autocomplete functionality suggest all the functions available under the Date object.
      app.get('/', (req, res) => {
        var date = new Date();
        var time = date.toTimeString();
        res.status(200).send('Hello, world! It is now ' + time).end();
      });
      
    • On the bottom shell panel, type ctrl+c to stop the previously running app, and then restart the app
    • npm start
    • Refresh the tab showing the "Hello World" message to see the new output.
Congratulations! You’ve just successfully created a new NodeJS application  all without ever once leaving your browser. If you’d like to learn more about this example, including how to deploy the app to run App Engine flexible environment, click here. To learn more about Cloud Shell, click here.

CIO’s guide to data analytics and machine learning


Editor's Note: Download the new CIO's guide to data analytics and machine learning here.

Breakthroughs in artificial intelligence (AI) have captured the imaginations of business and technical leaders alike: computers besting human world-champions in board games with more positions than there are atoms in the universe, mastering popular video games, and helping diagnose skin cancer. The AI techniques underlying these breakthroughs are finding diverse application across every industry. Early adopters are seeing results; particularly encouraging is that AI is starting to transform processes in established industries, from retail to financial services to manufacturing.

However, an organization’s effectiveness in applying these breakthroughs is anchored in the basics: a disciplined foundation in capturing, preparing and analyzing data. Data scientists spend up to 80% of their time on the “data wrangling,” “data munging” and “data janitor” work required well before the predictive capabilities promised by AI can be realized.

Capturing, preparing and analyzing data creates the foundation for successful AI initiatives. To help business and IT leaders create this virtuous cycle, Google Cloud has prepared a CIO’s guide to data analytics and machine learning that outlines key enabling technologies at each step. Crucially, the guide illustrates how managed cloud services greatly simplify the journey — regardless of an organization’s maturity in handling big data.

This is important because, for many companies, the more fundamental levels of data management present a larger challenge than new capabilities like AI. “Management teams often assume they can leapfrog best practices for basic data analytics by going directly to adopting artificial intelligence and other advanced technologies,” noted Oliver Wyman consultants Nick Harrison and Deborah O’Neill in a recent Harvard Business Review article (aptly titled If Your Company Isn’t Good at Analytics, It’s Not Ready for AI). “Like it or not, you can’t afford to skip the basics.

Building on new research and Google’s own contributions to big data since the beginning, this guide walks readers through each step in the data management cycle, illustrating what’s possible alongside examples.

Specifically, the CIO’s guide to data analytics and machine learning is designed to help business and IT leaders address some of the essential questions companies face in modernizing data strategy:

For my most important business processes, how can I capture raw data to ensure a proper foundation for future business questions? How can I do this cost-effectively?

  • What about unstructured data outside of my operational/transactional databases: raw files, documents, images, system logs, chat and support transcripts, social media?
  • How can I tap the same base of raw data I’ve collected to quickly get answers as new business questions arise?
  • Rather than processing historical data in batch, what about processes where I need a real-time view of the business? How can I easily handle data streaming in real time?
  • How can I unify the scattered silos of data across my organization to provide a current, end-to-end view? What about data stored off-premises in the multiple cloud and SaaS providers I work with?
  • How can I disseminate this capability across my organization — especially to business users, not just developers and data scientists?

Because managed cloud services deal with an organization's sensitive data, security is a top consideration at each step of the data management cycle. From data ingestion into the cloud, followed by storage, preparation and ongoing analysis as additional data flows in, techniques like data encryption and the ability to connect your network directly to Google’s reflect data security best practices that keep data assets safe as they yield insights.

Wherever your company is on its path to data maturity, Google Cloud is here to help. We welcome the opportunity to learn more about your challenges and how we can help you unlock the transformational potential of data.

How to get started with Cloud Spanner in 5 minutes


The general availability of Cloud Spanner is really good news for developers. For the first time, you have direct access to horizontally-scaling, cloud-native infrastructure that provides global transactions (think apps that involve payments, inventory, ticketing, or financial trading) and that defaults to the “gold standard” of strong/external consistency without compromising latency. Try that with either a traditional RDBMS or non-relational database.


Thanks to the GCP Free Trial that offers $300 in credits for one year, you can get your feet wet with a single-node Cloud Spanner cluster over the course of a couple weeks. Here’s how to do that, using the Spanner API via gcloud. (Click here for the console-based approach.)


  1. In Cloud Console, go to the Projects page and either create a new project or open an existing project by clicking on the project name.
  2. Open a terminal window and set your project as the default for gcloud. Do this by substituting your project ID (not project name) with the command:

gcloud config set project [MY_PROJECT_ID]

  1. Enable billing for your project.
  2. Enable the Cloud Spanner API for your project.
  3. Set up authentication and authorization (Cloud Spanner uses OAuth 2.0 out of the box) with the following command:


    gcloud auth application-default login

    API client libraries now automatically pick up the created credentials. You need to run the command only once per local user environment. (Note: This approach is suitable for local development; for production use, you’ll want to use a different method for auth.)
  4. Next, create a single-node instance:


    gcloud spanner instances create test-instance
    --config=regional-us-central1 \
    --description="Test Instance" --nodes=1

  5. Finally, create a database. To create a database called test-db:


    gcloud spanner databases create test-db --instance=test-instance

Alternatively, you can download sample data and interact with it using the language of your choice.

That’s it — you now have your very own Cloud Spanner database. Again, your GCP credit should allow you to run it cost-free for a couple weeks. From there, you can download sample data and interact with it using the language of your choice.

TCP BBR congestion control comes to GCP – your Internet just got faster


We're excited to announce that Google Cloud Platform (GCP) now features a cutting-edge new congestion control algorithm, TCP BBR, which achieves higher bandwidths and lower latencies for internet traffic. This is the same BBR that powers TCP traffic from google.com and that improved YouTube network throughput by 4 percent on average globally  and by more than 14 percent in some countries.

"BBR allows the 500,000 WordPress sites on our digital experience platform to load at lightning speed. According to Google’s tests, BBR's throughput can reach as much as 2,700x higher than today's best loss-based congestion control; queueing delays can be 25x lower. Network innovations like BBR are just one of the many reasons we partner with GCP. Jason Cohen, Founder and CTO, WP Engine

GCP customers, like WP Engine, automatically benefit from BBR in two ways:

  • From GCP services to cloud users: First, when GCP customers talk to GCP services like Cloud Bigtable, Cloud Spanner or Cloud Storage, the traffic from the GCP service to the application is sent using BBR. This means speedier access to your data.
  • From Google Cloud to internet users: When a GCP customer uses Google Cloud Load Balancing or Google Cloud CDN to serve and load balance traffic for their website, the content is sent to users' browsers using BBR. This means faster webpage downloads for users of your site.

At Google, our long-term goal is to make the internet faster. Over the years, we’ve made changes to make TCP faster, and developed the Chrome web browser and the QUIC protocol. BBR is the next step. Here's the paper describing the BBR algorithm at a high level, the Internet Drafts describing BBR in detail and the BBR code for Linux TCP and QUIC.

What is BBR?


BBR ("Bottleneck Bandwidth and Round-trip propagation time") is a new congestion control algorithm developed at Google. Congestion control algorithms  running inside every computer, phone or tablet connected to a network  that decide how fast to send data.

How does a congestion control algorithm make this decision? The internet has largely used loss-based congestion control since the late 1980s, relying only on indications of lost packets as the signal to slow down. This worked well for many years, because internet switches’ and routers’ small buffers were well-matched to the low bandwidth of internet links. As a result, buffers tended to fill up and drop excess packets right at the moment when senders had really begun sending data too fast.

But loss-based congestion control is problematic in today's diverse networks:

  • In shallow buffers, packet loss happens before congestion. With today's high-speed, long-haul links that use commodity switches with shallow buffers, loss-based congestion control can result in abysmal throughput because it overreacts, halving the sending rate upon packet loss, even if the packet loss comes from transient traffic bursts (this kind of packet loss can be quite frequent even when the link is mostly idle).
  • In deep buffers, congestion happens before packet loss. At the edge of today's internet, loss-based congestion control causes the infamous “bufferbloat” problem, by repeatedly filling the deep buffers in many last-mile links and causing seconds of needless queuing delay.

We need an algorithm that responds to actual congestion, rather than packet loss. BBR tackles this with a ground-up rewrite of congestion control. We started from scratch, using a completely new paradigm: to decide how fast to send data over the network, BBR considers how fast the network is delivering data. For a given network connection, it uses recent measurements of the network's delivery rate and round-trip time to build an explicit model that includes both the maximum recent bandwidth available to that connection, and its minimum recent round-trip delay. BBR then uses this model to control both how fast it sends data and the maximum amount of data it's willing to allow in the network at any time.

Benefits for Google Cloud customers


Deploying BBR has resulted in higher throughput, lower latency and better quality of experience across Google services, relative to the previous congestion control algorithm, CUBIC. Take, for example, YouTube’s experience with BBR. Here, BBR yielded 4 percent higher network throughput, because it more effectively discovers and utilizes the bandwidth offered by the network. BBR also keeps network queues shorter, reducing round-trip time by 33 percent; this means faster responses and lower delays for latency-sensitive applications like web browsing, chat and gaming. Moreover, by not overreacting to packet loss, BBR provides 11 percent higher mean-time-between-rebuffers. These represent substantial improvements for all large user populations around the world, across both desktop and mobile users.

These results are particularly impressive because YouTube is already highly optimized; improving the experience for users watching video has long been an obsession here at Google. Ongoing experiments provide evidence that even better results are possible with continued iteration and tuning.

The benefits of BBR translate beyond Google and YouTube, because they're fundamental. A few synthetic microbenchmarks illustrate the nature (though not necessarily the typical magnitude) of the advantages:

  • Higher throughput: BBR enables big throughput improvements on high-speed, long-haul links. Consider a typical server-class computer with a 10 Gigabit Ethernet link, sending over a path with a 100 ms round-trip time (say, Chicago to Berlin) with a packet loss rate of 1%. In such a case, BBR's throughput is 2700x higher than today's best loss-based congestion control, CUBIC (CUBIC gets about 3.3 Mbps, while BBR gets over 9,100 Mbps). Because of this loss resiliency, a single BBR connection can fully utilize a path with packet loss. This makes it a great match for HTTP/2, which uses a single connection, and means users no longer need to resort to workarounds like opening several TCP connections to reach full utilization. The end result is faster traffic on today's high-speed backbones, and significantly increased bandwidth and reduced download times for webpages, videos or other data.
  • Lower latency: BBR enables significant reductions in latency in last-mile networks that connect users to the internet. Consider a typical last-mile link with 10 Megabits of bandwidth, a 40 ms round-trip time, and a typical 1000-packet bottleneck buffer. In a scenario like this, BBR keeps queuing delay 25x lower than CUBIC (CUBIC has a median round-trip time of 1090 ms, versus just 43 ms for BBR). BBR reduces queues and thus queuing delays on last-mile links while watching videos or downloading software, for faster web surfing and more responsive video conferencing and gaming. Because of this ability to curb bufferbloat, one might say that BBR could also stand for BufferBloat Resilience, in addition to Bottleneck Bandwidth and Round-trip propagation time.

GCP is continually evolving, leveraging Google technologies like Espresso, Jupiter, Andromeda, gRPC, Maglev, Cloud Bigtable and Spanner. Open source TCP BBR is just the latest example of how Google innovations provide industry-leading performance.

If you're interested in participating in discussions, keeping up with the latest BBR-related news, watching videos of talks about BBR or pitching in on open source BBR development or testing, join the public bbr-dev e-mail group.

Help keep your Google Cloud service account keys safe


Google Cloud Platform (GCP) offers robust service account key management capabilities to help ensure that only authorized and properly authenticated entities can access resources running on GCP.

If an application runs entirely on GCP, managing service account keys is easy  they never leave GCP, and GCP performs tasks like key rotation automatically. But many applications run on multiple environments  local developer laptops, on-premises databases and even environments running in other public clouds. In that case, keeping keys safe can be tricky.

Ensuring that account keys aren’t exposed as they move across multiple environments is paramount to maintaining application security. Read on to learn about best practices you can follow when managing keys in a given application environment.

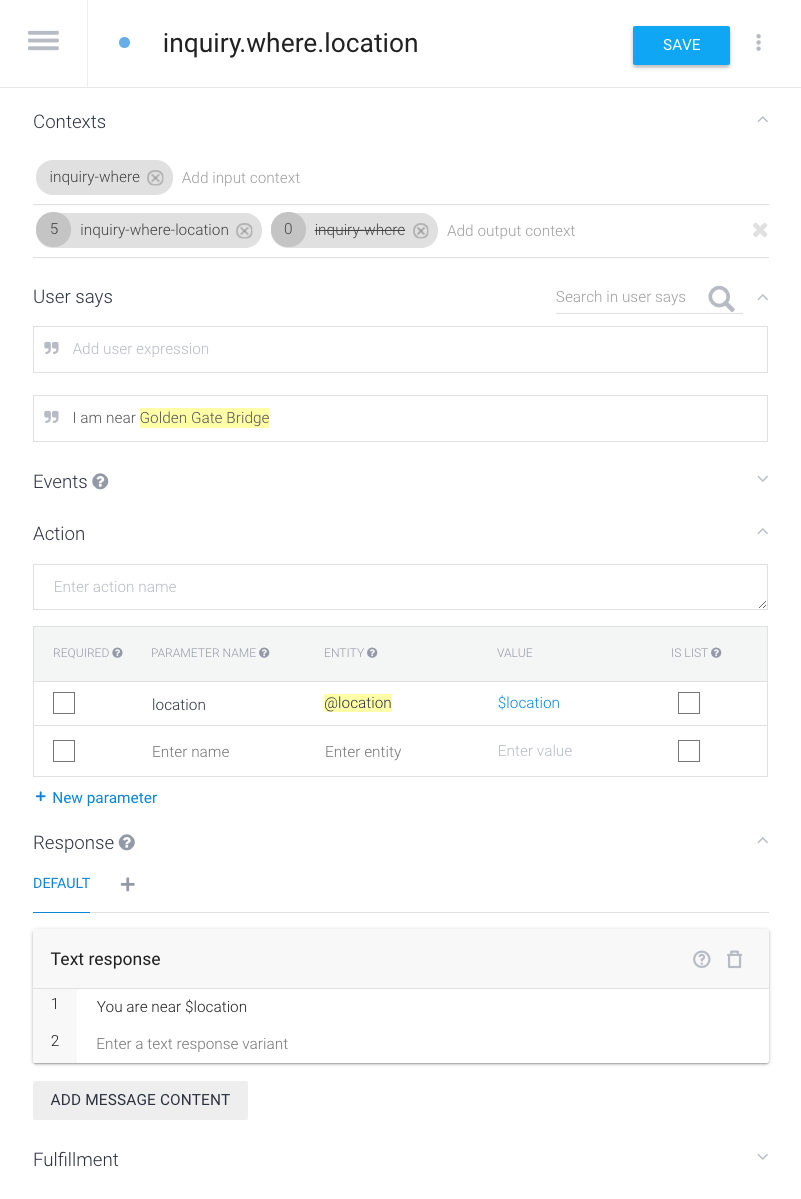
Introducing the service account

When using an application to access Cloud Platform APIs, we recommend you use a service account, an identity whose credentials your application code can use to access other GCP services. You can access a service account from code running on GCP, in your on-premises environment or even another cloud.

If you’re running your code on GCP, setting up a service account is simple. In this example, we’ll use Google Compute Engine as the target compute environment.
Now that you have a service account, you can launch instances to run from it. (Note: You can also temporarily stop an existing instance and restart it with an alternative service account).
  • Next, install the client library for the language in which your application is written. (You can also use the SDK but the client libraries are the most straightforward and recommended approach.) With this, your application can use the service account credentials to authenticate applications running on the instance. You don’t need to download any keys because you are using a Compute Engine instance, and we automatically create and rotate the keys.

Protecting service account keys outside GCP

If your application is running outside GCP, follow the steps outlined above, but install the client library on the destination virtual or physical machine. When creating the service account, make sure that you're following the principles of least-privilege. This is good practice in all cases, but it becomes even more important when you download credentials, as GCP no longer manages the key, increasing the risk of it being inadvertently exposed.

In addition, you’ll need to create a new key pair for the service account, and download the private key (which is not retained by Google). Note that with external keys, you're responsible for security of the private key and other management operations such as key rotation.

Applications need to be able to use external keys to be authorized to call Google Cloud APIs. Using the Google API client libraries facilitates this. Google API client libraries use Application Default Credentials for a simple way to get authorization credentials when they're called. When using an application outside of GCP, you can authenticate using the service account for which the key was generated by pointing the GOOGLE_APPLICATION_CREDENTIALS environment variable to the location where you downloaded the key.


Best practices when downloading service account keys

Now you have a key that can gain access to GCP resources, you need to ensure that you manage the key appropriately. The remainder of this post focuses on best practices to avoid exposing keys outside of their intended scope of use. Here are best practices to follow:
  1. If you’ve downloaded the key for local development, make sure it's not granted access to production resources.
  2. Rotate keys using the following IAM Service Account API methods:
    • ServiceAccounts.keys.create()
    • Replace old key with new key
    • ServiceAccounts.keys.delete()
  3. Consider implementing a daily key rotation process and provide developers with a cloud storage bucket from which they can download the new key every day.
  4. Audit service accounts and keys using either the serviceAccount.keys.list() method or the Logs Viewer page in the console.
  5. Restrict who is granted the Service Account Actor and Service Account User role for a service account, as they will have full access to all the resources.
  6. Always use the client libraries and the GOOGLE_APPLICATION_CREDENTIALS for local development.
  7. Prevent developers from committing keys to external source code repositories.
  8. And finally, regularly scan external repositories for keys and take remedial action if any are located.

Now let’s look at ways to implement some of these best practices.

Key rotation

Keyrotator is a simple CLI tool written in Python that you can use as is, or as the basis for a service account rotation process. Run it as a cron job on an admin instance, say, at midnight, and write the new key to Cloud Storage for developers to download in the morning.

It's essential to control access to the Cloud Storage bucket that contains the keys. Here’s how:
  1. Create a dedicated project setup for shared resources.
  2. Create a bucket in the dedicated project; do NOT make it publicly accessible.
  3. Create a group for the developers who need to download the new daily key.
  4. Grant read access to the bucket using Cloud IAM by granting the storage.objectViewer role to your developer group for the project with the storage bucket.
If you wish to implement stronger controls, use the Google Cloud Key Management Service to manage secrets using Cloud Storage.


Prevent committing keys to external source code repositories

You should not need to keep any keys with your code, but accidents happen and keys may inadvertently get pushed out with your code.

One way to avoid this is not to use external repositories and put processes in place to prevent their use. GCP provides private git repositories for this use case.

You can also put in place preventive measures to stop keys from being committed to your git repo. One open-source tool you can use is git-secrets. This is configured as a git hook when installed
It runs automatically when you run the ‘git commit’ command.

You need to configure git-secrets to check for patterns that match service account keys. This is fairly straightforward to configure:

Here's a service account private key when downloaded as a JSON file:

{
 "type": "service_account",
 "project_id": "your-project-id",
 "private_key_id": "randomsetofalphanumericcharacters",
 "private_key": "-----BEGIN PRIVATE KEY-----\thisiswhereyourprivatekeyis\n-----END PRIVATE KEY-----\n",
 "client_email": "[email protected]",
 "client_id": "numberhere",
 "auth_uri": "https://accounts.google.com/o/oauth2/auth",
 "token_uri": "https://accounts.google.com/o/oauth2/token",
 "auth_provider_x509_cert_url": "https://www.googleapis.com/oauth2/v1/certs",
 "client_x509_cert_url": "https://www.googleapis.com/robot/v1/metadata/x509/keyname%40your-project-id.iam.gserviceaccount.com"
}

To locate any service account keys, look for patterns that match the key name such as ‘private_key_id’ and ‘private_key’. Then, to locate any service account files in the local git folder, add the following registered patterns:

git secrets --add 'private_key'
git secrets --add 'private_key_id'

Now, when you try to run ‘git commit’ and it detects the pattern, you'll receive an error message and be unable to do the commit unless mitigating action is taken.
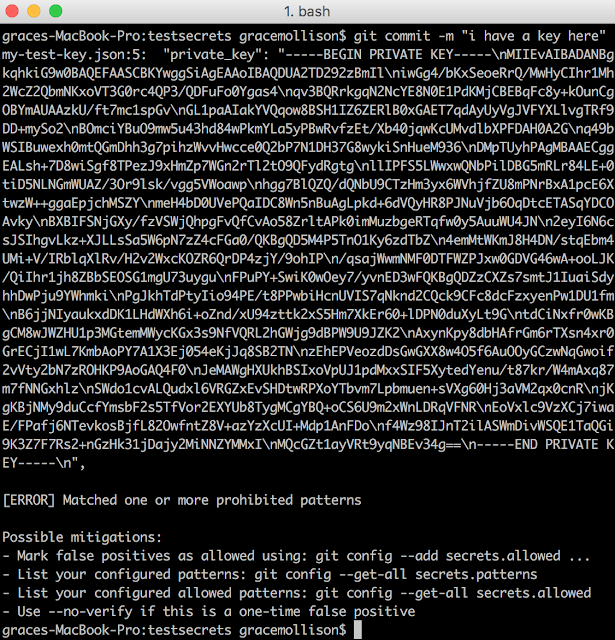
This screenshot shows a (now deleted) key to illustrate what developers see when they try to commit files that may contain private details.

Scan external repositories for keys

To supplement the use of git-secrets you can also run the open-source tool trufflehog. Trufflehog searches a repo’s history for secrets by using entropy analysis (it uses Shannon entropy) to find any keys that may have been uploaded.


Conclusion

In this post, we’ve shown you how to help secure service account keys, whether you're using them to authenticate applications running exclusively on GCP, in your local environment or in other clouds. Follow these best practices to avoid accidentally revealing keys and to control who can access your application resources. To learn more about authentication and authorization on GCP, check out our Authentication Overview.

Introducing Transfer Appliance: Sneakernet for the cloud era


Back in the eighties, when network constraints limited data transfers, people took to the streets and walked their floppy disks where they needed to go. And Sneakernet was born.

In the world of cloud and exponential data growth, the size of the disk and the speed of your sneakers may have changed, but the solution is the same: Sometimes the best way to move data is to ship it on physical media.

Today, we’re excited to introduce Transfer Appliance, to help you ingest large amounts of data to Google Cloud Platform (GCP).
Transfer Appliance offers up to 480TB in 4U or 100TB in 2U of raw data capacity in a single rackmount device
Transfer Appliance is a rackable high-capacity storage server that you set up in your data center. Fill it up with data and then ship it to us, and we upload your data to Google Cloud Storage. With capacity of up to one-petabyte compressed, Transfer Appliance helps you migrate your data orders-of-magnitude faster than over a typical network. The appliance encrypts your data at capture, and you decrypt it when it reaches its final cloud destination, helping to get it to the cloud safely.

Like many organizations we talk to, you probably have large amounts of data that you want to use to train machine learning models. You have huge archives and backup libraries taking up expensive space in your data center. Or IoT devices flooding your storage arrays. There’s all this data waiting to get to the cloud, but it’s impeded by expensive, limited bandwidth. With Transfer Appliance, you can finally take advantage of all that GCP has to offer  machine learning, advanced analytics, content serving, archive and disaster recovery  without upgrading your network infrastructure or acquiring third-party data migration tools.

Working with customers, we’ve found that the typical enterprise has many petabytes of data, and available network bandwidth between 100 Mbps and 1 Gbps. Depending on the available bandwidth, transferring 10 PB of that data would take between three and 34 years  much too long.

Estimated transfer times for given capacity and bandwidth
That’s where Transfer Appliance comes in. In a matter of weeks, you can have a petabyte of your data accessible in Google Cloud Storage, without consuming a single bit of precious outbound network bandwidth. Simply put, Transfer Appliance is the fastest way to move large amounts of data into GCP.

Compare the transfer times for 1 petabyte of data.
Customers tell us that space inside the data center is at a premium, and what space there is comes in the form of server racks. In developing Transfer Appliance, we built a device designed for the data center, that slides into a standard 19” rack. Transfer Appliance will only live in your data center for a few days, but we want it to be a good houseguest while it’s there.

Customers have been testing Transfer Appliance for several months, and love what they see:
"Google Transfer Appliance moves petabytes of environmental and geographic data for Makani so we can find out where the wind is the most windy." Ruth Marsh, Technical Program Manager at Makani

"Using a service like Google Transfer Appliance meant I could transfer hundreds of terabytes of data in days not weeks. Now we can leverage all that Google Cloud Platform has to offer as we bring narratives to life for our clients."  Tom Taylor, Head of Engineering at The Mill
Transfer Appliance joins the growing family of Google Cloud Data Transfer services. Initially available in the US, the service comes in two configurations: 100TB or 480TB of raw storage capacity, or up to 200TB or 1PB compressed. The 100TB model is priced at $300, plus shipping via Fedex (approximately $500); the 480TB model is priced at $1800, plus shipping (approximately $900). To learn more visit the documentation.

We think you’re going to love getting to cloud in a matter of weeks rather than years. Sign up to reserve a Transfer Appliance today. You can also sign up here for a GCP free trial.