WebRTC enables real time peer-to-peer video and voice transfer in the browser, making it possible to build, among other things, a working video chat with a small amount of Python and JavaScript. As a web standard, it has several unusual properties which makes it hard to test. A regular web standard generally accepts HTML text and yields a bitmap as output (what you see in the browser). For WebRTC, we have real-time RTP media streams on one side being sent to another WebRTC-enabled endpoint. These RTP packets have been jumping across NAT, through firewalls and perhaps through TURN servers to deliver hopefully stutter-free and low latency media.
WebRTC is probably the only web standard in which we need to test direct communication between Chrome and other browsers. Remember, WebRTC builds on peer-to-peer technology, which means we talk directly between browsers rather than through a server. Chrome, Firefox and Opera have announced support for WebRTC so far. To test interoperability, we set out to build an automated test to ensure that Chrome and Firefox can get a call up. This article describes how we implemented such a test and the tradeoffs we made along the way.
Calling in WebRTC
Setting up a WebRTC call requires passing SDP blobs over a signaling connection. These blobs contain information on the capabilities of the endpoint, such as what media formats it supports and what preferences it has (for instance, perhaps the endpoint has VP8 decoding hardware, which means the endpoint will handle VP8 more efficiently than, say, H.264). By sending these blobs the endpoints can agree on what media format they will be sending between themselves and how to traverse the network between them. Once that is done, the browsers will talk directly to each other, and nothing gets sent over the signaling connection.
Figure 1. Signaling and media connections.
How these blobs are sent is up to the application. Usually the browsers connect to some server which mediates the connection between the browsers, for instance by using a contact list or a room number. The AppRTC reference application uses room numbers to pair up browsers and sends the SDP blobs from the browsers through the AppRTC server.
Test Design
Instead of designing a new signaling solution from scratch, we chose to use the AppRTC application we already had. This has the additional benefit of testing the AppRTC code, which we are also maintaining. We could also have used the small peerconnection_server binary and some JavaScript, which would give us additional flexibility in what to test. We chose to go with AppRTC since it effectively implements the signaling for us, leading to much less test code.We assumed we would be able to get hold of the latest nightly Firefox and be able to launch that with a given URL. For the Chrome side, we assumed we would be running in a browser test, i.e. on a complete Chrome with some test scaffolding around it. For the first sketch of the test, we imagined just connecting the browsers to the live apprtc.appspot.com with some random room number. If the call got established, we would be able to look at the remote video feed on the Chrome side and verify that video was playing (for instance using the video+canvas grab trick). Furthermore, we could verify that audio was playing, for instance by using WebRTC getStats to measure the audio track energy level.
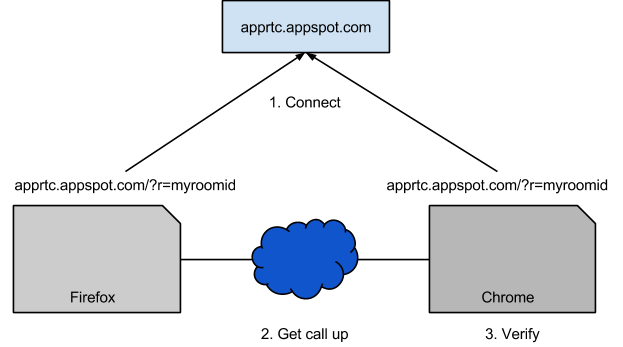
Figure 2. Basic test design.
However, since we like tests to be hermetic, this isn’t a good design. I can see several problems. For example, if the network between us and AppRTC is unreliable. Also, what if someone has occupied myroomid? If that were the case, the test would fail and we would be none the wiser. So to make this thing work, we would have to find some way to bring up the AppRTC instance on localhost to make our test hermetic.
Bringing up AppRTC on localhost
AppRTC is a Google App Engine application. As this hello world example demonstrates, one can test applications locally withgoogle_appengine/dev_appserver.py apprtc_code/
So why not just call this from our test? It turns out we need to solve some complicated problems first, like how to ensure the AppEngine SDK and the AppRTC code is actually available on the executing machine, but we’ll get to that later. Let’s assume for now that stuff is just available. We can now write the browser test code to launch the local instance:
bool LaunchApprtcInstanceOnLocalhost()
  // ... Figure out locations of SDK and apprtc code ...
  CommandLine command_line(CommandLine::NO_PROGRAM);
  EXPECT_TRUE(GetPythonCommand(&command_line));

  command_line.AppendArgPath(appengine_dev_appserver);
  command_line.AppendArgPath(apprtc_dir);
  command_line.AppendArg("--port=9999");
  command_line.AppendArg("--admin_port=9998");
  command_line.AppendArg("--skip_sdk_update_check");

  VLOG(1) << "Running " << command_line.GetCommandLineString();
  return base::LaunchProcess(command_line, base::LaunchOptions(),
                             &dev_appserver_);
}
That’s pretty straightforward [1].
Figuring out Whether the Local Server is Up
Then we ran into a very typical test problem. So we have the code to get the server up, and launching the two browsers to connect to http://localhost:9999?r=some_room is easy. But how do we know when to connect? When I first ran the test, it would work sometimes and sometimes not depending on if the server had time to get up.It’s tempting in these situations to just add a sleep to give the server time to get up. Don’t do that. That will result in a test that is flaky and/or slow. In these situations we need to identify what we’re really waiting for. We could probably monitor the stdout of the dev_appserver.py and look for some message that says “Server is up!” or equivalent. However, we’re really waiting for the server to be able to serve web pages, and since we have two browsers that are really good at connecting to servers, why not use them? Consider this code.
bool LocalApprtcInstanceIsUp() {
  // Load the admin page and see if we manage to load it right.
  ui_test_utils::NavigateToURL(browser(), GURL("localhost:9998"));
  content::WebContents* tab_contents =
      browser()->tab_strip_model()->GetActiveWebContents();
  std::string javascript =
      "window.domAutomationController.send(document.title)";
  std::string result;
  if (!content::ExecuteScriptAndExtractString(tab_contents,
                                              javascript,
                                              &result))
    return false;

  return result == kTitlePageOfAppEngineAdminPage;
}
Here we ask Chrome to load the AppEngine admin page for the local server (we set the admin port to 9998 earlier, remember?) and ask it what its title is. If that title is “Instances”, the admin page has been displayed, and the server must be up. If the server isn’t up, Chrome will fail to load the page and the title will be something like “localhost:9999 is not available”.
Then, we can just do this from the test:
while (!LocalApprtcInstanceIsUp())
  VLOG(1) << "Waiting for AppRTC to come up...";
If the server never comes up, for whatever reason, the test will just time out in that loop. If it comes up we can safely proceed with the rest of test.
Launching the Browsers
A browser window launches itself as a part of every Chromium browser test. It’s also easy for the test to control the command line switches the browser will run under.We have less control over the Firefox browser since it is the “foreign” browser in this test, but we can still pass command-line options to it when we invoke the Firefox process. To make this easier, Mozilla provides a Python library called mozrunner. Using that we can set up a launcher python script we can invoke from the test:
from mozprofile import profile
from mozrunner import runner

WEBRTC_PREFERENCES = {
    'media.navigator.permission.disabled': True,
}

def main():
  # Set up flags, handle SIGTERM, etc
  # ...
  firefox_profile =
      profile.FirefoxProfile(preferences=WEBRTC_PREFERENCES)
  firefox_runner = runner.FirefoxRunner(
      profile=firefox_profile, binary=options.binary,
      cmdargs=[options.webpage])

  firefox_runner.start()
Notice that we need to pass special preferences to make Firefox accept the getUserMedia prompt. Otherwise, the test would get stuck on the prompt and we would be unable to set up a call. Alternatively, we could employ some kind of clickbot to click “Allow” on the prompt when it pops up, but that is way harder to set up.
Without going into too much detail, the code for launching the browsers becomes
GURL room_url =
    GURL(base::StringPrintf("http://localhost:9999?r=room_%d",
                            base::RandInt(0, 65536)));
content::WebContents* chrome_tab =
    OpenPageAndAcceptUserMedia(room_url);
ASSERT_TRUE(LaunchFirefoxWithUrl(room_url));
Where LaunchFirefoxWithUrl essentially runs this:
run_firefox_webrtc.py --binary /path/to/firefox --webpage http://localhost::9999?r=my_roomNow we can launch the two browsers. Next time we will look at how we actually verify that the call worked, and how we actually download all resources needed by the test in a maintainable and automated manner. Stay tuned!
1The explicit ports are because the default ports collided on the bots we were running on, and the --skip_sdk_update_check was because the SDK stopped and asked us something if there was an update.

