The backbone of any modern, cloud-native application is a flexible, powerful load balancing system, which allows requests to come to a single location, and scatters them appropriately to waiting worker VMs. Coupled with an auto-scaler, a load balancer can also help your applications adapt to sudden spikes in traffic.
If you’re building applications on Google Cloud Platform (GCP), Cloud Load Balancing lets you scale your applications with no pre-warming, distribute your resources across single or multiple regions, and integrates with Cloud CDN. Here are a few tips to help you reduce your maintenance overhead, improve performance and minimize cost, all at the same time.
1. Leverage the HTTP(S) load balancer where you can
A load balancer’s principle features are its ability to handle auto-scaling and distribute packets to your running VMs. Cloud Load Balancing provides a number of options to handle those exact needs, but the HTTP load balancer offers something more: It gets requests off the public internet as quickly as possible, improving performance by redirecting traffic onto Google’s global high-speed network. Visualized, the result is dramatic:
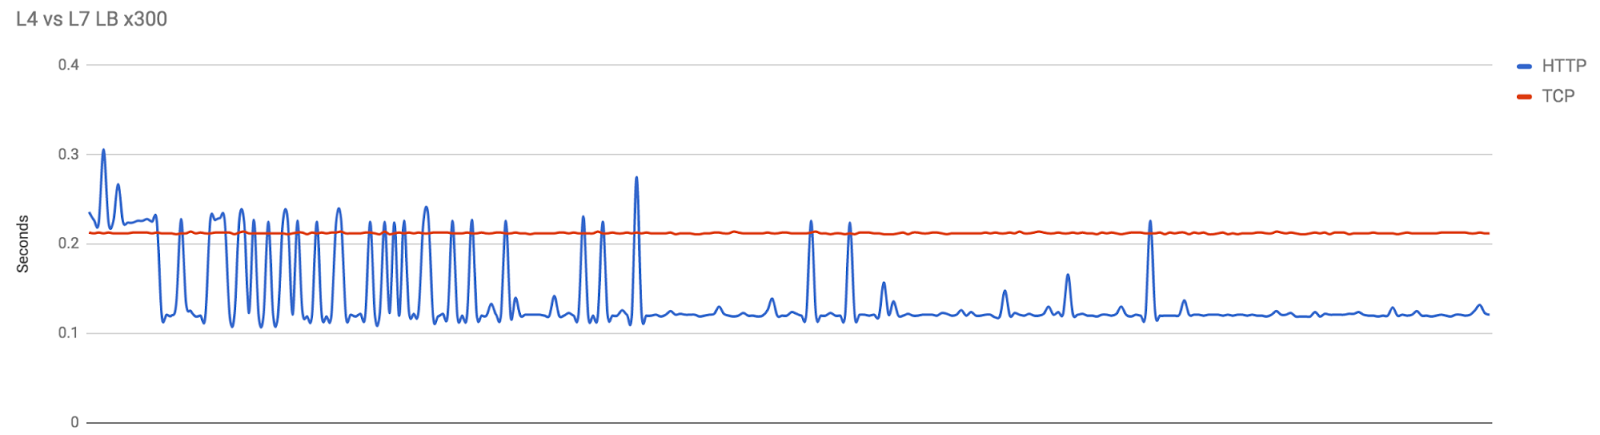
Not only does the HTTP load balancer increase performance because packets spend less time on the internet, but it also uses connections between clients and the Google front end servers, which helps further reduce the networking overhead of TCP requests from your users.
2. Enable Cloud CDN on cachable requests
Caching outbound responses from your applications is critical to reduce repeated costs to fetch and serve assets. Turns out that GCP’s load balancer makes this process a breeze thanks to integration with Cloud CDN. If you enable Cloud CDN for your load balancer, you can automatically cache common requests to reduce latency, as well as the number of requests that the instance needs to serve. As long as the request is cached, it will be served directly at Google's network edge.
Setting up this feature with Cloud Load Balancing is really straightforward. All you need to do is check the “Enable Cloud CDN” button while creating the backend definition for your HTTPs LB and GCP takes care of the rest.

This graph shows the difference in performance of fetching an asset with and without Cloud CDN enabled for the load balancer.

You can see that once the asset gets cached, the response time drops significantly. No extra caching instances needed, all you have to do is check a box!
3. Combine Cloud CDN and Cloud Storage for static assets
Web applications tend to have a variety of static and dynamic assets. Assets that change very rarely, for example, a banner image or a company logo, can be separated, from an asset standpoint, and served more efficiently through caching. Cloud Load Balancing makes this process a little easier.
With Cloud Load Balancing, you can create a host routing path that your designated static-asset URL routes over to fetch assets from a public Cloud Storage bucket that's also cached on Cloud CDN. This helps reduce complexity and overhead in hosting and managing your static assets. Caching these requests via Cloud CDN also produces a very similar looking graph to the previous one:

Every millisecond counts
When building your cloud-native application, it’s always worth considering technologies that can help streamline your designs. With these three tips, Cloud Load Balancing services can help minimize long-term maintenance, improve performance and reduce costs. Not too bad for a few extra mouse clicks ;)
If you’d like to know more about ways to optimize your Google Cloud applications, check out the rest of the Google Cloud Performance Atlas blog posts and videos. Because, when it comes to performance, every millisecond counts.
