Migrating to the Watch Face Format – Amoledwatchfaces’ journey

Posted by Garan Jenkin – Developer Relations Engineer
This post is part of Wear OS Spotlight Week. Today, we’re exploring how Amoledwatchfaces successfully migrated to Watch Face Format, improving customization, extending battery life, and increasing development speed.

Amoledwatchfaces is a leading creator of watch faces for Wear OS using the Watch Face Format (WFF), known for a distinctive information-rich and crisp style. Now well-established on the platform with over 190 watch faces, we talked to Tomáš Marcinčin, owner of Amoledwatchfaces about their successful migration using the format, and the benefits he’s seen in development velocity and performance as a result.

Creating high-quality watch faces without complex code

In previous years, developing watch faces “took a lot of time,” says Tomáš Marcinčin, owner of Amoledwatchfaces. The AndroidX libraries allowed developers to create watch faces, but Tomáš, like others, was left looking for an “easier way to create watch faces,” and crucially one that shifted the focus from coding and onto design.

“My main motivation was to bring users watch faces that are of the same quality as those that are pre-installed. Users were looking for designs that were not too complicated, yet customizable and looked as if they had been designed for that watch.”

Expressing interest in a customized experience

Like many creators, Tomáš started using Watch Face Studio, Samsung’s watch face creation tool, giving designers and developers an easy way to build watch faces for Wear OS quickly.

While successful, as a developer, he found himself wanting more control, and a solution that was somewhere in between Watch Face Studio and full code - this led him to working directly with the format.

Stealth and Apex 2.0 watch faces from Amoledwatchfaces

Migrating to Watch Face Format

Amoledwatchfaces already had a significant back catalog of watch faces, and took on the dual task of both converting all his existing watch faces and producing new ones directly in the format. “I wanted to have every old and new watch face design in WFF.” This would ensure that all Amoledwatchfaces’ watch faces would be available to current and future users.

Tomáš started working directly in Android Studio, gradually refining his build process. Android Studio has recently added support for syntax validation - a feature Tomáš fed directly into and helped test as an early adopter.

Once up and running, Tomáš found that some of the most time-consuming tasks of AndroidX were extremely simple in the format. Notably, adding the level of user customization he - and users - wanted “is very easy.”

As an example, some of Amoledwatchfaces’ users wanted different Always-On Display (AOD) styles - some preferred a dimmed view of the active state, whereas others wanted only the digital clock. Using Variant, and configuration options such as ListConfiguration and BooleanConfiguration, it was straightforward for Tomáš to give users the ability to customize their watch face - something which would have required a significant investment using legacy libraries.

<Variant mode="AMBIENT" target="alpha" value="[CONFIGURATION.aod] == 0
    ? 255 : [CONFIGURATION.aod] == 1 ? 165 : 0" />
Customization of the ambient behavior: Using a ListConfiguration to select between full opacity (255), a middle ground (165) or invisible (0), for a particular component

Overcoming Watch Faces quality and versioning challenges

To shorten the debug cycle and minimize errors, Tomáš uses the WFF validator and memory footprint tools in his Gradle scripts. He also incorporates tools such as PNGQuant into his Gradle builds so that resource usage remains optimized.

However, the biggest challenge is creating different versions of the watch face for the different format versions that devices support. To help solve this issue, Tomáš took advantage of product flavors, which let him define a different build configuration for each version. This way, he was able to support the widest range of users while still using the latest and greatest format features on the most recent devices:

/** Set up flavors for different format versions **/


flavorDimensions += "wff_version"
productFlavors{
   // Wear OS 4
   create("wff1"){
       dimension = "wff_version"
       manifestPlaceholders["wff_version"] = "1"
       versionNameSuffix = "-wff1"
       versionCode = 10000 + (android.defaultConfig.versionCode ?: 0)
       minSdk = 33
       targetSdk = 33
   }


   // … other flavors defined here!


   // Wear OS 6
   create("wff4"){
       dimension = "wff_version"
       manifestPlaceholders["wff_version"] = "4"
       versionCode = 40000 + (android.defaultConfig.versionCode ?: 0)
       versionNameSuffix = "-wff4"
       minSdk = 36
       targetSdk = 36
   }
}
Example of using product flavors in a watch face build file, build.gradle.kts, to support multiple WFF versions

Improving velocity and battery life

Amoledwatchfaces is now seeing their investment in this journey to future-proof their watch faces paying off: “Our watch faces are now simply more customizable and more battery friendly. With 8 custom complication slots where you can combine all different complication types, users can have every possible combination of relevant data at a glance.”

User feedback has been great, according to Tomáš, “people mostly refer to battery life improvements after the switch to Watch Face Format.”

And the format has also had a positive effect on development velocity: “I’m developing watch faces faster and cleaner. Updating projects to newer WFF versions is very easy. Fixing bugs is easy too.”

Our watch faces are now simply more customizable and more battery friendly – Tomáš Marcinčin, owner of Amoledwatchfaces

Making the switch to the format

As announced recently, all developers must migrate to Watch Face Format by January 2026. Amoledwatchfaces has benefitted from being an early adopter and recommends that other developers make the switch early too.

Tomáš adds, “Don’t be afraid of switching to a WFF project, managed completely by you. It may seem hard at first sight but when you learn all the attributes, you can define your perfect progress bar arc or gradient digital clock faster than in other tools.”

He also suggests a hybrid workflow, where you work directly in the format and use other tools and editors such as Watch Face Studio. You can first create your watch face in Watch Face Studio, then extract all the resources from the bundle and continue in your preferred IDE.

This week, we’re also announcing Watch Face Designer, which is a Figma-based plugin that you can use in a similar way: start with your design, then export to your preferred format for further refinement.

What's next for Amoledwatchfaces?

For Tomáš, the journey hasn’t ended, and he’s continuing to strive to delight users even more with each new creation. “There’s always room for improvement. When there's a new WFF version or feature which could benefit watch faces and thus users, I’ll be adding that.”

We’re looking forward to seeing the next creations from Amoledwatchfaces!

Getting started the with Watch Face Format

Further explorations with Watch Face Push

Posted by Garan Jenkin – Developer Relations Engineer
This post is part of Wear OS Spotlight Week. Today, we're exploring the wonderful world of watch faces.

At Google I/O ‘25 we launched Watch Face Push, a new API aimed at enabling watch face marketplaces for watch and phone. Watch Face Push is now available to develop with and use on Wear OS 6 on devices such as the recently-launched Pixel Watch 4.

In this blog post, we’ll show how Watch Face Push (WFP) can be used in a whole host of other ways, including:

    • Dynamically theming a watch face from a photo
    • Presenting rich data or photos from online or connected data sources
    • Complementing a phone app to drive engagement

illustration of using Watch Face Push to build a watch face with dynamic colors, updated from the phone
Illustration of using Watch Face Push to build a watch face with dynamic colors, updated from the phone

The first example we’ll focus on is building a watch face with an accompanying phone app. It can apply a color theme based on a photo taken on the phone - perfect for matching your watch face to your outfit! And it’s perfect for demonstrating how Watch Face Push allows developers to bring dynamic data to the watch face.

Let’s go through some of the main techniques which combine together to make this possible:

The default watch face - bringing components together

A powerful feature of Watch Face Push is the default watch face feature. This allows the developer to provide a watch face that’s installed onto the Wear OS device at the same time as the overall app. This watch face is bundled as an APK and placed in the assets directory in the app.

The system checks for the presence of this APK as the app is being installed, and it checks for the validation key in the app’s manifest.

This enables you to deliver a single package that contains both the watch face and app components, whether that’s a full Wear OS app, where the app is the primary focus, or app components such as complication providers, where the watch face is the primary focus.

In our project structure, we define two modules, wear and watchface. By using a unified versionCode across both, we can keep the app and watch face versions in sync. We use Gradle to build the watch face and generate the validation token. This makes it easy to treat the watch face and the app as part of the same project.

Complication data sources - pipelines for data

Now that we’ve successfully supplied both watch face and app components together, we need a way to provide data.

The watch face is now able to rely on the presence of complication data sources provided by the app. For example, a surfing watch face could bundle with a water temperature complication. This can be set as the default on the watch face using DefaultProviderPolicy and is guaranteed to be present.

Taking it a step further, we can configure the complication to be non-customizable, so that the complication becomes more of a custom data source. We can then use the complication however the watch face may need:

<ComplicationSlot isCustomizable="FALSE" ... >
    <DefaultProviderPolicy
        defaultSystemProvider="NEXT_EVENT"
        defaultSystemProviderType="SHORT_TEXT"
        primaryProvider="<my_component_path>"
        primaryProviderType="SHORT_TEXT" />

   <!-- Rest of complication goes here -->

</ComplicationSlot>

In the case of our watch face, we define a SHORT_TEXT complication service PaletteComplicationService, which sends the following data:

TEXT: <space-delimited list of RGB hex values>
TITLE: CONFIGURED | NOT_CONFIGURED

By using two of the fields on SHORT_TEXT, we’re able to send our color palette to the watch face, along with an indicator of whether the app has been configured (more on why that is important later).

Extracting and manipulating complication data

We’ve demonstrated how using the guaranteed presence of the PaletteComplicationService allows us to ensure the watch face can receive our data, but we still need to define how to use and show the data within watch face elements.

Within the ComplicationSlot element on the watch face, these data items can be accessed as COMPLICATION.TEXT and COMPLICATION.TITLE respectively. The various functions such as abs() and subText() can be used to extract parts of these strings, or convert them into numeric types.

We combine this with the use of REFERENCE to define colors. We can retrieve these colors everywhere on the watch, including outside of the ComplicationSlot:

<ComplicationSlot ...
    isCustomizable="FALSE"
    x="0" y="0" width="1" height="1">
  <DefaultProviderPolicy
      defaultSystemProvider="NEXT_EVENT"
      defaultSystemProviderType="SHORT_TEXT"
    primaryProvider="com.example.palette/com.example.palette.complication.PaletteComplicationService"
      primaryProviderType="SHORT_TEXT" />
  <BoundingBox height="1" width="1" x="0" y="0" />
  <Complication> 

    <!-- Complication data source sends 3 RGB hex values, extract the first: -->
    <PartDraw x="0" y="0" width="1" height="1">
      <Transform target="tintColor" value="extractColorFromColors([COMPLICATION.TEXT], false, 0.0)" />
      <Reference source="tintColor" defaultValue="#000000" name="primary_color" />
      <Line startX="0" startY="0" endX="1" endY="1">
        <Stroke color="#000000" thickness="1" />
      </Line>
    </PartDraw>

    ...
  </Complication>
</ComplicationSlot>

This snippet illustrates creating a very small ComplicationSlot, which will simply serve as a pipeline for our data:

Within the complication, a placeholder PartDraw is created, and the extractColorFromColors() function is used to transform the PartDraw to the first color supplied by the complication. Using the Reference element, this color value is then available to the rest of the watch face as [REFERENCE.primary_color].

In the full example, two more PartDraw elements are used to provide the secondary_color and tertiary_color, simply providing the 0.5 and 1.0 index to the extractColorFromColors function instead of the 0.0 value.

Some of the samples illustrate how you can share different data types beyond just colors, such as numeric values.

Referencing complication data in the watch face

The primary_color, secondary_color and tertiary_color values can now be used elsewhere on the watch face, both in expressions and in transforms. In our example, we use the colors on the watch face hands:

<HourHand resource="hour" x="210" y="75" width="30" height="180" pivotX="0.5"
    pivotY="0.8333" tintColor="[REFERENCE.primary_color]">
</HourHand>

// Similar logic for the minute hand and second hand would refer to
// secondary_color and tertiary_color, respectively.

Keeping the watch face package up to date

A challenge with the default watch face approach is that if the app is updated, the watch face doesn’t automatically get updated with it, even if the new app bundle contains an updated watch face. To address that issue, the app uses a BroadcastReceiver to receive the MY_PACKAGE_REPLACED action. On receiving this, the app can then check whether the watch face is installed and is in need of an upgrade, using Watch Face Push to perform the upgrade if necessary.

For the MY_PACKAGE_REPLACED action to be received, the app must have been run at least once. For this reason, the sample watch faces include an example of ensuring the user launches the app: A “launch app” button is shown on the watch face if the app has not been launched before. This is achieved by using a Condition on the CONFIGURED or NOT_CONFIGURED status described earlier.

For many watch faces, this has an additional purpose: it allows the user to enable additional components, such as a photo downloader in the Photo Album example shown here. You can also use the “first launch” experience to prompt the user to grant permissions or to sign in.

three side-by-side watch faces illistrating the supporting download service from the watch face
Enabling the supporting download service from the watch face

Working with other app components

While the complication data source is the conduit for data, and is the common component in all the examples, the following Android APIs work with complications to achieve the desired functionality:

    • WearableListenerService - both the PaletteWatchFace and the FootballWatchFace have phone companion apps, and the Data Layer is used to send data to the watch. Once received by the WearableListenerService, you can proactively update the data on the watch face using ComplicationDataSourceUpdateRequester.
    • WorkManager - the PhotoAlbumWatchFace example demonstrates how to retrieve photos from an online photo service. WorkManager is used for this, using Constraints to only download images while the device is being charged.
    • ForegroundService - the DeviceDataWatchFace illustrates using a ForegroundService to obtain data from a connected Bluetooth device which is then visualized on the watch face.

samples made using WFP
Additional samples made using WFP, starting top left: Photo Album, Surfing, Connected Device, and Football Team watch faces

Check out the full source for these examples. We look forward to seeing what you can create!

Convert images to video with Veo 3 in Google Vids

What’s changing 

With this launch, you can upload an image into Google Vids and input a prompt to convert the image into a high quality eight-second video with sound. This experience uses Veo 3 to create dynamic and engaging content effortlessly by transforming product photography, logos, and more from static shots to engaging short videos based on your instructions. 

Convert a product image into a dynamic video 

Image:

Text prompt used to animate the image: “Camera stays focused on the bag of coffee as a woman walks into frame holding a cup of coffee.” 

Video:


Animate an image to create an intro/outro scene 

Image:


Text prompt used to animate the image: "Panning shot as more workers wearing safety vests walk into the foreground." 

Video:

Getting started 


Rollout pace 


Availability 

Regions: 
  • For now, the ability to generate a video from an image is not available in the European Economic Area, Switzerland, or the United Kingdom. 

Available for Google Workspace: 
  • Business Starter**, Standard and Plus 
  • Enterprise Starter**, Standard and Plus 
  • Essentials, Enterprise Essentials and Enterprise Essentials Plus 
  • Nonprofits** 
  • Gemini Education or Gemini Education Premium add-on 
  • Customers with a Gemini Business*, Gemini Enterprise* add-on
Also available to: 
  • Google AI Pro and Ultra 
*As of January 15, 2025, we’re no longer offering the Gemini Business and Gemini Enterprise add-ons for sale. Please refer to this announcement for more details. 
**For a limited time, at least through May 31st, 2026, Business Starter, Enterprise Starter and Nonprofit accounts can access generative AI features in Vids. Learn about Google Vids availability. 

Resources 


Deliver your message with AI avatars in Google Vids

What’s changing 

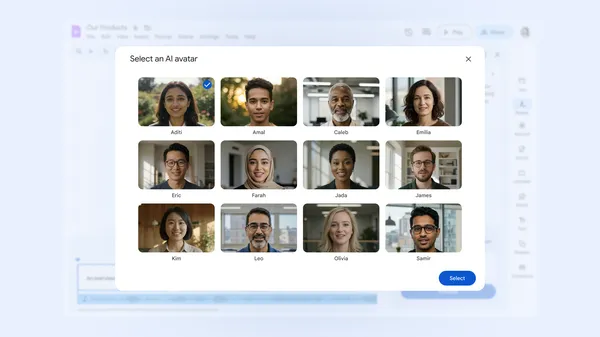
Starting today, you can deliver a polished and consistent message by writing a script and choosing an AI avatar to deliver your content in Google Vids. 

Simply go to vids.new, click “AI Avatars”, type a script in the AI avatar right side panel, choose a persona, and Vids will generate a video for you to preview within minutes. 

Whether you need a reliable way to present information clearly for a dozen training videos or you don’t have time or budget to film the right spokesperson for your video, AI avatars provide a fast, consistent way to narrate your videos. Here are some examples of how you can use AI avatars to meet your video needs: 

  • Increase engagement in safety and upskilling content through training & development videos. 
  • Explain new policies and procedures for your organization with announcement videos. 
  • Create polished walkthroughs for new feature or product demo videos. 


Who’s impacted 

End users 

Why you’d use it 

This new feature provides a fast, consistent way to create polished video content — for onboarding, announcements, product explainers, and more — without the cameras or coordination headache. 

Additional details 

Each week you can generate up to 20 AI avatar generations. Each generation has a maximum length of 30 seconds. The current Vids session must remain open until generation is complete. Limits are subject to change, learn more here. 

Getting started 

  • Admins: Vids will be ON by default and can be disabled at the organizational level. Visit the Help Center to learn more about turning Vids on or off for users. 
  • End users: 
    • You can choose from 12 different preset AI avatars. Each has a different look and built-in voice. When you use these AI avatars, you can add spoken content without the need to record audio. 
    • Vids is currently available in the user’s local language, but the AI features (e.g. Help me create, read-along teleprompter, AI avatars) are only available in English at this time. 
    • Visit the Help Center to learn more about getting started with Google Vids and using AI avatars in Google Vids. 

Rollout pace 


Availability 

Available for Google Workspace: 
  • Business Starter**, Standard and Plus 
  • Enterprise Starter**, Standard and Plus 
  • Essentials, Enterprise Essentials and Enterprise Essentials Plus 
  • Nonprofits** 
  • Gemini Education or Gemini Education Premium add-on 
  • Customers with a Gemini Business*, Gemini Enterprise* add-on
Also available to: 
  • Google AI Pro and Ultra 
*As of January 15, 2025, we’re no longer offering the Gemini Business and Gemini Enterprise add-ons for sale. Please refer to this announcement for more details. 
**For a limited time, at least through May 31st, 2026, Business Starter, Enterprise Starter and Nonprofit accounts can access generative AI features in Vids. Learn about Google Vids availability. 

Resources 


Edit videos more easily using the transcript in Google Vids

What’s changing 

Following our recent announcement of balance sound in Google Vids, we’re excited to introduce an additional editing feature that effortlessly refines your videos and audio. 

We know it's common for people to record themselves and later discover distracting pauses, and “uhms” and “uhs.” Or, after recording, you could decide you want to cut out an entire sentence to shorten a clip. 

Instead of having to record the entire clip over, Gemini in Vids can now generate a transcript of your recording, and then identify and trim filler words and awkward pauses out of the transcript with one click to help you sound your best and eliminate tedious editing tasks. 

Who’s impacted 

End users 

Why you’d use it 

With transcript-based trimming, users can remove filler words, pauses, and unnecessary sections with a single click, producing a polished final video in no time. 

Additional details 

This feature is only available in English. 

Getting started 

  • Admins: Vids will be ON by default and can be disabled at the organizational level. Visit the Help Center to learn more about turning Vids on or off for users. 
  • End users: 
    • To get started, go to vids.google.com in your web browser to create a new vid. 
    • Add a video or audio clip that contains speech in English. Or, record yourself using Insert > Recording, or the Record button in the righthand rail. 
    • Click on the video clip or audio track, and click the transcript editing icon and a side panel will open on the right. 
      • If the transcript is not ready, you will see a “Generating transcript…” message. 
    • Once ready, the transcript will be shown in the side panel. 
      • Filler words will be underlined and shown in red, like “uh.” 
      • Silences are denoted in parentheses with ellipses and their duration, like “(...3s).” 
    • Click on a word or silence and select “Remove.” 
    • When you play back your media, that word will be removed. 
    • Visit the Help Center to learn more about trimming video & audio transcripts in Google Vids. 

Rollout pace 


Availability 

Available for Google Workspace: 
  • Business Starter**, Standard and Plus 
  • Enterprise Starter**, Standard and Plus 
  • Essentials, Enterprise Essentials and Enterprise Essentials Plus 
  • Nonprofits** 
  • Gemini Education or Gemini Education Premium add-on 
  • Customers with a Gemini Business*, Gemini Enterprise* add-on
Also available to: 
  • Google AI Pro and Ultra 
*As of January 15, 2025, we’re no longer offering the Gemini Business and Gemini Enterprise add-ons for sale. Please refer to this announcement for more details. 
**For a limited time, at least through May 31st, 2026, Business Starter, Enterprise Starter and Nonprofit accounts can access generative AI features in Vids. Learn about Google Vids availability. 


Resources 


Edit videos more easily using the transcript in Google Vids

What’s changing 

Following our recent announcement of balance sound in Google Vids, we’re excited to introduce an additional editing feature that effortlessly refines your videos and audio. 

We know it's common for people to record themselves and later discover distracting pauses, and “uhms” and “uhs.” Or, after recording, you could decide you want to cut out an entire sentence to shorten a clip. 

Instead of having to record the entire clip over, Gemini in Vids can now generate a transcript of your recording, and then identify and trim filler words and awkward pauses out of the transcript with one click to help you sound your best and eliminate tedious editing tasks. 

Who’s impacted 

End users 

Why you’d use it 

With transcript-based trimming, users can remove filler words, pauses, and unnecessary sections with a single click, producing a polished final video in no time. 

Additional details 

This feature is only available in English. 

Getting started 

  • Admins: Vids will be ON by default and can be disabled at the organizational level. Visit the Help Center to learn more about turning Vids on or off for users. 
  • End users: 
    • To get started, go to vids.google.com in your web browser to create a new vid. 
    • Add a video or audio clip that contains speech in English. Or, record yourself using Insert > Recording, or the Record button in the righthand rail. 
    • Click on the video clip or audio track, and click the transcript editing icon and a side panel will open on the right. 
      • If the transcript is not ready, you will see a “Generating transcript…” message. 
    • Once ready, the transcript will be shown in the side panel. 
      • Filler words will be underlined and shown in red, like “uh.” 
      • Silences are denoted in parentheses with ellipses and their duration, like “(...3s).” 
    • Click on a word or silence and select “Remove.” 
    • When you play back your media, that word will be removed. 
    • Visit the Help Center to learn more about trimming video & audio transcripts in Google Vids. 

Rollout pace 


Availability 

Available for Google Workspace: 
  • Business Starter**, Standard and Plus 
  • Enterprise Starter**, Standard and Plus 
  • Essentials, Enterprise Essentials and Enterprise Essentials Plus 
  • Nonprofits** 
  • Gemini Education or Gemini Education Premium add-on 
  • Customers with a Gemini Business*, Gemini Enterprise* add-on
Also available to: 
  • Google AI Pro and Ultra 
*As of January 15, 2025, we’re no longer offering the Gemini Business and Gemini Enterprise add-ons for sale. Please refer to this announcement for more details. 
**For a limited time, at least through May 31st, 2026, Business Starter, Enterprise Starter and Nonprofit accounts can access generative AI features in Vids. Learn about Google Vids availability. 


Resources 


Edit videos more easily using the transcript in Google Vids

What’s changing 

Following our recent announcement of balance sound in Google Vids, we’re excited to introduce an additional editing feature that effortlessly refines your videos and audio. 

We know it's common for people to record themselves and later discover distracting pauses, and “uhms” and “uhs.” Or, after recording, you could decide you want to cut out an entire sentence to shorten a clip. 

Instead of having to record the entire clip over, Gemini in Vids can now generate a transcript of your recording, and then identify and trim filler words and awkward pauses out of the transcript with one click to help you sound your best and eliminate tedious editing tasks. 

Who’s impacted 

End users 

Why you’d use it 

With transcript-based trimming, users can remove filler words, pauses, and unnecessary sections with a single click, producing a polished final video in no time. 

Additional details 

This feature is only available in English. 

Getting started 

  • Admins: Vids will be ON by default and can be disabled at the organizational level. Visit the Help Center to learn more about turning Vids on or off for users. 
  • End users: 
    • To get started, go to vids.google.com in your web browser to create a new vid. 
    • Add a video or audio clip that contains speech in English. Or, record yourself using Insert > Recording, or the Record button in the righthand rail. 
    • Click on the video clip or audio track, and click the transcript editing icon and a side panel will open on the right. 
      • If the transcript is not ready, you will see a “Generating transcript…” message. 
    • Once ready, the transcript will be shown in the side panel. 
      • Filler words will be underlined and shown in red, like “uh.” 
      • Silences are denoted in parentheses with ellipses and their duration, like “(...3s).” 
    • Click on a word or silence and select “Remove.” 
    • When you play back your media, that word will be removed. 
    • Visit the Help Center to learn more about trimming video & audio transcripts in Google Vids. 

Rollout pace 


Availability 

Available for Google Workspace: 
  • Business Starter**, Standard and Plus 
  • Enterprise Starter**, Standard and Plus 
  • Essentials, Enterprise Essentials and Enterprise Essentials Plus 
  • Nonprofits** 
  • Gemini Education or Gemini Education Premium add-on 
  • Customers with a Gemini Business*, Gemini Enterprise* add-on
Also available to: 
  • Google AI Pro and Ultra 
*As of January 15, 2025, we’re no longer offering the Gemini Business and Gemini Enterprise add-ons for sale. Please refer to this announcement for more details. 
**For a limited time, at least through May 31st, 2026, Business Starter, Enterprise Starter and Nonprofit accounts can access generative AI features in Vids. Learn about Google Vids availability. 


Resources