Editor’s Note: We will be (literally) coding a mobile app on the road as part of our cross-country road trip, Code the Road. If you haven’t read our previous posts in the series, be sure to check out our first blog post, Code the Road: Hitting the Road with the Google Maps Android API to get started. Follow along as we build our app on the road and read more from Dong Sun, Maps Deployment Engineer at Google.
As we enter week two of our Code the Road journey and travel across the U.S., we thought: “What would be a better way to remember this amazing trip than by logging and saving our location history to the cloud?” In this post we will extend and build upon the Google Maps application we started in week 1 by:
- Logging locations using the fused location provider, a simple API bundled with Google Play services, that provides high accuracy and low battery usage.
- Saving and retrieving these locations using Firebase, a powerful application platform that enables real-time features without the hassle of networking, scaling, or complicated server code.
- Displaying these recorded locations as markers on the map.
Step 1: Setup Firebase
Set up Firebase and data access. The first thing you need to do is set up Firebase, which will be used to store and retrieve your locations. Get started with the following steps:- Create a Free Firebase account—Sign up for a free account, no credit card required!
- Add the Firebase Android SDK—We used Firebase to store and retrieve location data. Follow this step-by-step guide to add Firebase to your project. Create a Firebase account, install the Firebase SDK, and set up the needed internet permission in your AndroidManifest.xml.
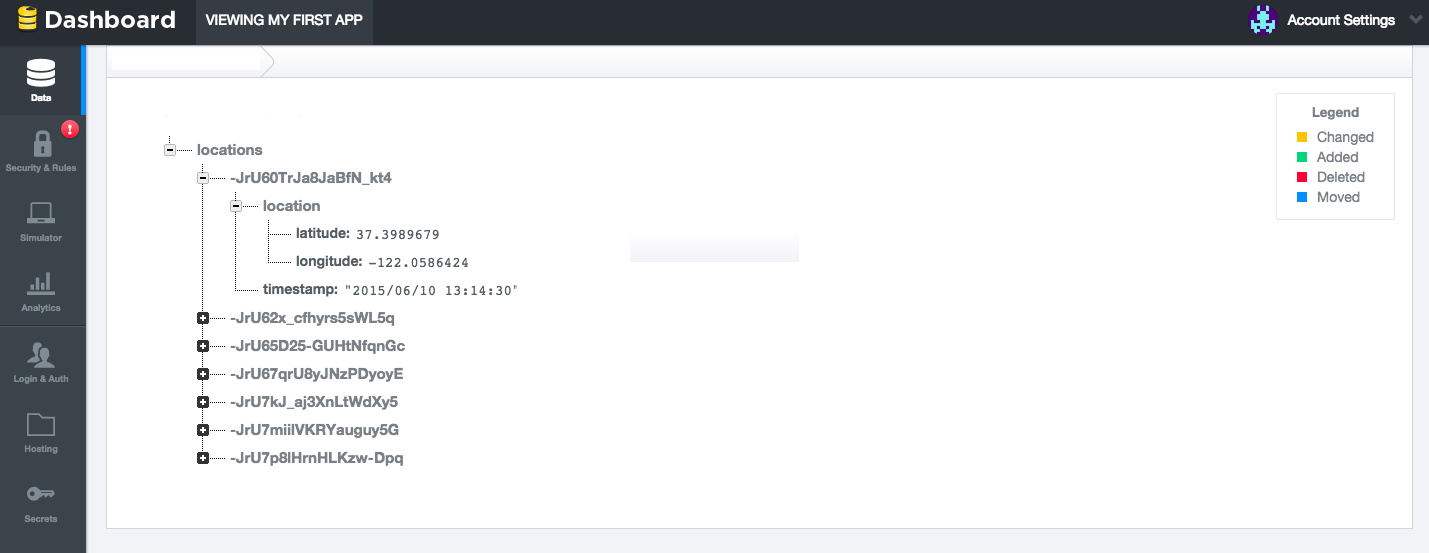
Firebase location data structure. Along with the latitude and longitude information, we will include a timestamp for each saved location. By saving the timestamp, it enables our application to aggregate the data daily, monthly, or any other specified time period. When this data is pushed into Firebase, it will appear as follows in the Firebase dashboard:
Step 2: Capture Location and Save to Firebase
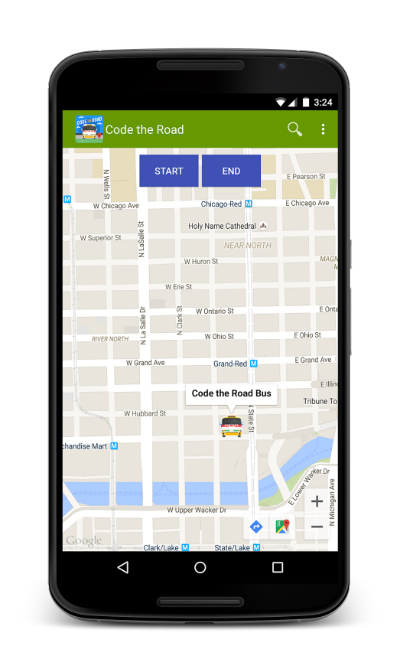
Now that we have Firebase ready and configured, our app needs to get both the initial location as well as location updates to save to Firebase.Add start and stop logging buttons. We will add two buttons on the map application for starting and stopping location logging actions. For details on how to add buttons to the layout, please reference this link.
<uses-permission android:name="android.permission.ACCESS_COARSE_LOCATION"/>
<uses-permission android:name="android.permission.ACCESS_FINE_LOCATION"/>
Implement necessary interfaces. To ensure the app does not become unresponsive when capturing the device’s location, we use an asynchronous process by implementing ConnectionCallbacks, OnConnectionFailedListener, and LocationListener on our MapsActivity. You will need to implement the required methods in the interfaces.
public class MapsActivity extends FragmentActivity
    implements GoogleApiClient.ConnectionCallbacks,
    GoogleApiClient.OnConnectionFailedListener,
    LocationListener {
}
Connect to Google Play Services. In our activity's onCreate() method, we created an instance of the Google API Client using GoogleApiClient.Builder and added the LocationServices API to the client.protected synchronized void buildGoogleApiClient() {
mGoogleApiClient = new GoogleApiClient.Builder(this)
.addConnectionCallbacks(this)
.addOnConnectionFailedListener(this)
.addApi(LocationServices.API)
.build();
}
Get initial device location. Whenever the client is connected to the service, GoogleApiClient.ConnectionCallbacks are called. The OnConnected() method will be invoked asynchronously when the connect request has successfully completed. Once the client is connected, we use the the fused location provider to get the last known location and zoom the map to that location.@Override
public void onConnected(Bundle bundle) {
mLastLocation = LocationServices.FusedLocationApi.getLastLocation(
mGoogleApiClient);
mMap.moveCamera(CameraUpdateFactory.newLatLngZoom(
new LatLng(mLastLocation.getLatitude(),
mLastLocation.getLongitude()),
MAP_ZOOM_LEVEL));
}
Set up location request and update interval. We need to create and configure a LocationRequest object. You will need to set the location request preferences that are appropriate for your application. For example, fitness apps will want high accuracy with small intervals, but an asset tracking app might require lower accuracy with larger intervals.public static final long UPDATE_INTERVAL_IN_MS = 120000; public static final long FASTEST_UPDATE_INTERVAL_IN_MS = UPDATE_INTERVAL_IN_MS / 4; protected LocationRequest mLocationRequest;Request regular location updates. When the “START” button is clicked, we use the method below to start regular location updates.
private void startLogging() {
  mLocationRequest = new LocationRequest();
  mLocationRequest.setInterval(UPDATE_INTERVAL_IN_MS);
  mLocationRequest.setFastestInterval(FASTEST_UPDATE_INTERVAL_IN_MS);
  mLocationRequest.setPriority(LocationRequest.PRIORITY_BALANCED_POWER_ACCURACY);
  if (mGoogleApiClient.isConnected() && !mRequestingLocationUpdates) {
       mRequestingLocationUpdates = true;
       startLocationUpdates();
   }
}

protected void startLocationUpdates() {
    LocationServices.FusedLocationApi.requestLocationUpdates(
           mGoogleApiClient, mLocationRequest, this);
}
The fused location provider invokes the LocationListener.onLocationChanged() callback method when a new location is detected by Google Play Services. We get each location, and save the system time in UTC, latitude and longitude to Firebase.@Override
public void onLocationChanged(Location location) {
mCurrentLocation = location;
DateFormat dateFormat = new SimpleDateFormat("yyyy/MM/dd HH:mm:ss");
dateFormat.setTimeZone(TimeZone.getTimeZone("UTC"));
Date date = new Date();
mLastUpdateTime = dateFormat.format(date).toString();
saveToFirebase();
// Retrieve saved locations and draw as marker on map
drawLocations();
// Update UI to draw bread crumb with the latest bus location.
mMap.clear();
LatLng mLatlng = new LatLng(mCurrentLocation.getLatitude(),
mCurrentLocation.getLongitude());
MarkerOptions mMarkerOption = new MarkerOptions()
.position(mLatlng)
.title(mLastUpdateTime))
.icon(BitmapDescriptorFactory.fromResource(R.drawable.code_the_road_small));
Marker mMarker = mMap.addMarker(mMarkerOption);
}
Save location info to Firebase. The Firebase Android SDK offers offline capability so Firebase applications work even when network connection is temporarily lost. Learn more about the offline capabilities of Firebase. We first need to create a connection to our Firebase instance:myFirebaseRef = new Firebase("<YOUR-FIREBASE-APP>");
We then use the Firebase push() function that generates a unique ID every time a new child is added to the specified Firebase reference.private void saveToFirebase() {
Map mLocations = new HashMap();
mLocations.put("timestamp", mLastUpdateTime);
Map mCoordinate = new HashMap();
mCoordinate.put(“latitude”, mCurrentLocation.getLatitude());
mCoordinate.put(“longitude”, mCurrentLocation.getLongitude());
mLocations.put("location", mCoordinate);
myFirebaseRef.push().setValue(mLocations);
}
Step 3: Fetch Saved Locations and Draw on Map
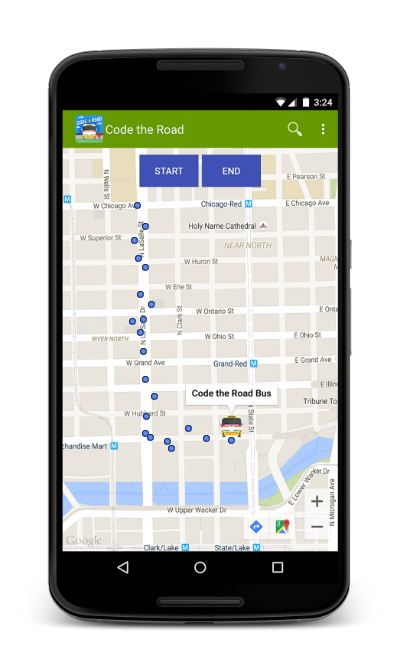
Every location saved after the “START” button was clicked is retrieved from Firebase and drawn on the map as a marker. For better query performance, we added an index rule to index the data element “timestamp.” The app stops logging locations when the user clicks the “STOP” button.private void drawLocations() {
// Get only latest logged locations - since 'START' button clicked
Query queryRef =
myFirebaseRef.orderByChild("timestamp").startAt(startLoggingTime);
// Add listener for a child added at the data at this location
queryRef.addChildEventListener(new ChildEventListener() {
LatLngBounds bounds;
LatLngBounds.Builder builder = new LatLngBounds.Builder();
@Override
public void onChildAdded(DataSnapshot dataSnapshot, String s) {
Map data = (Map ) dataSnapshot.getValue();
String timestamp = (String) data.get("timestamp");
// Get recorded latitude and longitude
Map mCoordinate = (HashMap)data.get("location");
double latitude = (double) (mCoordinate.get("latitude"));
double longitude = (double) (mCoordinate.get("longitude"));
// Create LatLng for each locations
LatLng mLatlng = new LatLng(latitude, longitude);
// Make sure the map boundary contains the location
builder.include(mLatlng);
bounds = builder.build();
// Add a marker for each logged location
MarkerOptions mMarkerOption = new MarkerOptions()
.position(mLatlng)
.title(timestamp)
.icon(BitmapDescriptorFactory.fromResource(R.drawable.measle_blue));
Marker mMarker = mMap.addMarker(mMarkerOption);
markerList.add(mMarker);
// Zoom map to the boundary that contains every logged location
mMap.animateCamera(CameraUpdateFactory.newLatLngBounds(bounds,
MAP_ZOOM_LEVEL));
}
//Override other abstract methods for addChildEventListener below
…
});
}
Now that we can record locations on demand, we could clean up our GPS locations using the snap-to-road function in the Roads API—just remember to proxy the use of this web service through your server. We could also further develop the application to share our location with friends or calculate the distance traveled. In the next few blog posts, we’ll expand our app by adding check-ins using the Places API and adding support for wearable devices.