Tag Archives: serverless

An easier way to move your App Engine apps to Cloud Run

Posted by Wesley Chun (@wescpy), Developer Advocate, Google Cloud

Blue header

An easier yet still optional migration

In the previous episode of the Serverless Migration Station video series, developers learned how to containerize their App Engine code for Cloud Run using Docker. While Docker has gained popularity over the past decade, not everyone has containers integrated into their daily development workflow, and some prefer "containerless" solutions but know that containers can be beneficial. Well today's video is just for you, showing how you can still get your apps onto Cloud Run, even If you don't have much experience with Docker, containers, nor Dockerfiles.

App Engine isn't going away as Google has expressed long-term support for legacy runtimes on the platform, so those who prefer source-based deployments can stay where they are so this is an optional migration. Moving to Cloud Run is for those who want to explicitly move to containerization.

Migrating to Cloud Run with Cloud Buildpacks video

So how can apps be containerized without Docker? The answer is buildpacks, an open-source technology that makes it fast and easy for you to create secure, production-ready container images from source code, without a Dockerfile. Google Cloud Buildpacks adheres to the buildpacks open specification and allows users to create images that run on all GCP container platforms: Cloud Run (fully-managed), Anthos, and Google Kubernetes Engine (GKE). If you want to containerize your apps while staying focused on building your solutions and not how to create or maintain Dockerfiles, Cloud Buildpacks is for you.

In the last video, we showed developers how to containerize a Python 2 Cloud NDB app as well as a Python 3 Cloud Datastore app. We targeted those specific implementations because Python 2 users are more likely to be using App Engine's ndb or Cloud NDB to connect with their app's Datastore while Python 3 developers are most likely using Cloud Datastore. Cloud Buildpacks do not support Python 2, so today we're targeting a slightly different audience: Python 2 developers who have migrated from App Engine ndb to Cloud NDB and who have ported their apps to modern Python 3 but now want to containerize them for Cloud Run.

Developers familiar with App Engine know that a default HTTP server is provided by default and started automatically, however if special launch instructions are needed, users can add an entrypoint directive in their app.yaml files, as illustrated below. When those App Engine apps are containerized for Cloud Run, developers must bundle their own server and provide startup instructions, the purpose of the ENTRYPOINT directive in the Dockerfile, also shown below.

Starting your web server with App Engine (app.yaml) and Cloud Run with Docker (Dockerfile) or Buildpacks (Procfile)

Starting your web server with App Engine (app.yaml) and Cloud Run with Docker (Dockerfile) or Buildpacks (Procfile)

In this migration, there is no Dockerfile. While Cloud Buildpacks does the heavy-lifting, determining how to package your app into a container, it still needs to be told how to start your service. This is exactly what a Procfile is for, represented by the last file in the image above. As specified, your web server will be launched in the same way as in app.yaml and the Dockerfile above; these config files are deliberately juxtaposed to expose their similarities.

Other than this swapping of configuration files and the expected lack of a .dockerignore file, the Python 3 Cloud NDB app containerized for Cloud Run is nearly identical to the Python 3 Cloud NDB App Engine app we started with. Cloud Run's build-and-deploy command (gcloud run deploy) will use a Dockerfile if present but otherwise selects Cloud Buildpacks to build and deploy the container image. The user experience is the same, only without the time and challenges required to maintain and debug a Dockerfile.

Get started now

If you're considering containerizing your App Engine apps without having to know much about containers or Docker, we recommend you try this migration on a sample app like ours before considering it for yours. A corresponding codelab leading you step-by-step through this exercise is provided in addition to the video which you can use for guidance.

All migration modules, their videos (when available), codelab tutorials, and source code, can be found in the migration repo. While our content initially focuses on Python users, we hope to one day also cover other legacy runtimes so stay tuned. Containerization may seem foreboding, but the goal is for Cloud Buildpacks and migration resources like this to aid you in your quest to modernize your serverless apps!

Containerizing Google App Engine apps for Cloud Run

Posted by Wesley Chun (@wescpy), Developer Advocate, Google Cloud

Google App Engine header

An optional migration

Serverless Migration Station is a video mini-series from Serverless Expeditions focused on helping developers modernize their applications running on a serverless compute platform from Google Cloud. Previous episodes demonstrated how to migrate away from the older, legacy App Engine (standard environment) services to newer Google Cloud standalone equivalents like Cloud Datastore. Today's product crossover episode differs slightly from that by migrating away from App Engine altogether, containerizing those apps for Cloud Run.

There's little question the industry has been moving towards containerization as an application deployment mechanism over the past decade. However, Docker and use of containers weren't available to early App Engine developers until its flexible environment became available years later. Fast forward to today where developers have many more options to choose from, from an increasingly open Google Cloud. Google has expressed long-term support for App Engine, and users do not need to containerize their apps, so this is an optional migration. It is primarily for those who have decided to add containerization to their application deployment strategy and want to explicitly migrate to Cloud Run.

If you're thinking about app containerization, the video covers some of the key reasons why you would consider it: you're not subject to traditional serverless restrictions like development language or use of binaries (flexibility); if your code, dependencies, and container build & deploy steps haven't changed, you can recreate the same image with confidence (reproducibility); your application can be deployed elsewhere or be rolled back to a previous working image if necessary (reusable); and you have plenty more options on where to host your app (portability).

Migration and containerization

Legacy App Engine services are available through a set of proprietary, bundled APIs. As you can surmise, those services are not available on Cloud Run. So if you want to containerize your app for Cloud Run, it must be "ready to go," meaning it has migrated to either Google Cloud standalone equivalents or other third-party alternatives. For example, in a recent episode, we demonstrated how to migrate from App Engine ndb to Cloud NDB for Datastore access.

While we've recently begun to produce videos for such migrations, developers can already access code samples and codelab tutorials leading them through a variety of migrations. In today's video, we have both Python 2 and 3 sample apps that have divested from legacy services, thus ready to containerize for Cloud Run. Python 2 App Engine apps accessing Datastore are most likely to be using Cloud NDB whereas it would be Cloud Datastore for Python 3 users, so this is the starting point for this migration.

Because we're "only" switching execution platforms, there are no changes at all to the application code itself. This entire migration is completely based on changing the apps' configurations from App Engine to Cloud Run. In particular, App Engine artifacts such as app.yaml, appengine_config.py, and the lib folder are not used in Cloud Run and will be removed. A Dockerfile will be implemented to build your container. Apps with more complex configurations in their app.yaml files will likely need an equivalent service.yaml file for Cloud Run — if so, you'll find this app.yaml to service.yaml conversion tool handy. Following best practices means there'll also be a .dockerignore file.

App Engine and Cloud Functions are sourced-based where Google Cloud automatically provides a default HTTP server like gunicorn. Cloud Run is a bit more "DIY" because users have to provide a container image, meaning bundling our own server. In this case, we'll pick gunicorn explicitly, adding it to the top of the existing requirements.txt required packages file(s), as you can see in the screenshot below. Also illustrated is the Dockerfile where gunicorn is started to serve your app as the final step. The only differences for the Python 2 equivalent Dockerfile are: a) require the Cloud NDB package (google-cloud-ndb) instead of Cloud Datastore, and b) start with a Python 2 base image.

Image of The Python 3 requirements.txt and Dockerfile

The Python 3 requirements.txt and Dockerfile

Next steps

To walk developers through migrations, we always "START" with a working app then make the necessary updates that culminate in a working "FINISH" app. For this migration, the Python 2 sample app STARTs with the Module 2a code and FINISHes with the Module 4a code. Similarly, the Python 3 app STARTs with the Module 3b code and FINISHes with the Module 4b code. This way, if something goes wrong during your migration, you can always rollback to START, or compare your solution with our FINISH. If you are considering this migration for your own applications, we recommend you try it on a sample app like ours before considering it for yours. A corresponding codelab leading you step-by-step through this exercise is provided in addition to the video which you can use for guidance.

All migration modules, their videos (when published), codelab tutorials, START and FINISH code, etc., can be found in the migration repo. We hope to also one day cover other legacy runtimes like Java 8 so stay tuned. We'll continue with our journey from App Engine to Cloud Run ahead in Module 5 but will do so without explicit knowledge of containers, Docker, or Dockerfiles. Modernizing your development workflow to using containers and best practices like crafting a CI/CD pipeline isn't always straightforward; we hope content like this helps you progress in that direction!

Automatic Deployment of Hugo Sites on Firebase Hosting and Drafts on Cloud Run

Posted by James Ward, Developer Advocate

Recently I completed the migration of my blog from Wordpress to Hugo and I wanted to take advantage of it now being a static site by hosting it on a Content Delivery Network (CDN). With Hugo the source content is plain files instead of rows in a database. In the case of my blog those files are in git on GitHub. But when the source files change, the site needs to be regenerated and redeployed to the CDN. Also, sometimes it is nice to have drafts available for review. I setup a continuous delivery pipeline which deploys changes to my prod site on Firebase Hosting and drafts on Cloud Run, using Cloud Build. Read on for instructions for how to set all this up.

Step 1a) Setup A New Hugo Project

If you do not have an existing Hugo project you can create a GitHub copy (i.e. fork) of my Hugo starter repo:

Step 1b) Setup Existing Hugo Project

If you have an existing Hugo project you'll need to add some files to it:

.firebaserc

{
"projects": {
"production": "hello-hugo"
}
}

cloudbuild-draft.yaml

steps:
- name: 'gcr.io/cloud-builders/git'
entrypoint: '/bin/sh'
args:
- '-c'
- |
# Get the theme git submodule
THEME_URL=$(git config -f .gitmodules --get-regexp '^submodule\..*\.url$' | awk '{ print $2 }')
THEME_DIR=$(git config -f .gitmodules --get-regexp '^submodule\..*\.path$' | awk '{ print $2 }')
rm -rf themes
git clone $$THEME_URL $$THEME_DIR

- name: 'gcr.io/cloud-builders/docker'
entrypoint: '/bin/sh'
args:
- '-c'
- |
docker build -t gcr.io/$PROJECT_ID/$REPO_NAME-$BRANCH_NAME:$COMMIT_SHA -f - . << EOF
FROM klakegg/hugo:latest
WORKDIR /workspace
COPY . /workspace
ENTRYPOINT hugo -D -p \$$PORT --bind \$$HUGO_BIND --renderToDisk --disableLiveReload --watch=false serve
EOF
docker push gcr.io/$PROJECT_ID/$REPO_NAME-$BRANCH_NAME:$COMMIT_SHA

- name: 'gcr.io/cloud-builders/gcloud'
args:
- run
- deploy
- --image=gcr.io/$PROJECT_ID/$REPO_NAME-$BRANCH_NAME:$COMMIT_SHA
- --platform=managed
- --project=$PROJECT_ID
- --region=us-central1
- --memory=512Mi
- --allow-unauthenticated
- $REPO_NAME-$BRANCH_NAME

cloudbuild.yaml

steps:
- name: 'gcr.io/cloud-builders/git'
entrypoint: '/bin/sh'
args:
- '-c'
- |
# Get the theme git submodule
THEME_URL=$(git config -f .gitmodules --get-regexp '^submodule\..*\.url$' | awk '{ print $2 }')
THEME_DIR=$(git config -f .gitmodules --get-regexp '^submodule\..*\.path$' | awk '{ print $2 }')
rm -rf themes
git clone $$THEME_URL $$THEME_DIR

- name: 'gcr.io/cloud-builders/curl'
entrypoint: '/bin/sh'
args:
- '-c'
- |
curl -sL https://github.com/gohugoio/hugo/releases/download/v0.69.2/hugo_0.69.2_Linux-64bit.tar.gz | tar -zxv
./hugo

- name: 'gcr.io/cloud-builders/wget'
entrypoint: '/bin/sh'
args:
- '-c'
- |
# Get firebase CLI
wget -O firebase https://firebase.tools/bin/linux/latest
chmod +x firebase
# Deploy site
./firebase deploy --project=$PROJECT_ID --only=hosting

firebase.json

{
"hosting": {
"public": "public"
}
}


Step 2) Setup Cloud Build Triggers

In the Google Cloud Build console, connect to your newly forked repo: Select the newly forked repo: Create the default push trigger: Edit the new trigger: Set the trigger to only fire on changes to the ^master$ branch: Create a new trigger: Give it a name like drafts-trigger, specify the branch selector as .* (i.e. any branch), and the build configuration file type to "Cloud Build configuration file" with a value of cloudbuild-draft.yaml Setup permissions for the Cloud Build process to manage Cloud Run and Firebase Hosting by visiting the IAM management page, locate the member with the name ending with @cloudbuild.gserviceaccount.com, and select the "pencil" / edit button: Add a role for "Cloud Run Admin" and another for "Firebase Hosting Admin": Your default "prod" trigger isn't read to test yet, but you can test the drafts on Cloud Run by going back to the Cloud Build Triggers page, and clicking the "Run Trigger" button on the "drafts-trigger" line. Check the build logs by finding the build in the Cloud Build History. Once the build completes visit the Cloud Run console to find your newly created service which hosts the drafts version of your new blog. Note that the service name includes the branch so that you can see drafts from different branches.

Step 3) Setup Firebase Hosting

To setup your production / CDN'd site, login to the firebase console and select your project:

Now you'll need your project id, which can be found in the URL on the Firebase Project Overview page. The URL for my project is:

console.firebase.google.com/project/jw-demo/overview

Which means my project id is: jw-demo

Now copy your project id go into your GitHub fork, select the .firebaserc file and click the "pencil" / edit button:

Replace the hello-hugo string with your project id and commit the changes. This commit will trigger two new builds, one for the production site and one for the drafts site on Cloud Run. You can check the status of those builds on the Cloud Build History page. Once the default trigger (the one for Firebase hosting) finishes, check out your Hugo site running on Firebase Hosting by navigating to (replacing YOUR_PROJECT_ID with the project id you used above): https://YOUR_PROJECT_ID.web.app/

Your prod and drafts sites are now automatically deploying on new commits!

Step 4) (Optional) Change Hugo Theme

There are many themes for Hugo and they are easy to change. Typically themes are pulled into Hugo sites using git submodules. To change the theme, edit your .gitmodules file and set the subdirectories and url. As an example, here is the content when using the mainroad theme:

[submodule "themes/mainroad"]
path = themes/mainroad
url = https://github.com/vimux/mainroad.git

You will also need to change the theme value in your config.toml file to match the directory name in the themes directory. For example:

theme = "mainroad"

Note: At the time of writing this, Cloud Build does not clone git submodules so the cloudbuild.yaml does the cloning instead.

Step 5) (Optional) Setup Local Editing

To setup local editing you will first need to clone your fork. You can do this with the GitHub desktop app. Or from the command line:

git clone --recurse-submodules https://github.com/USER/REPO.git

Once you have the files locally, install Hugo, and from inside the repo's directory, run:

hugo -D serve

This will serve the drafts in the site. You can check out the site at: localhost:1313

Committing non-draft changes to master and pushing those changes to GitHub will kick off the build which will deploy them on your prod site. Committing draft to any branch will kick off the build which will deploy them on a Cloud Run site.

Hopefully that all helps you with hosting your Hugo sites! Let me know if you run into any problems.

13 Most Common Google Cloud Reference Architectures

Posted by Priyanka Vergadia, Developer Advocate

Google Cloud is a cloud computing platform that can be used to build and deploy applications. It allows you to take advantage of the flexibility of development while scaling the infrastructure as needed.

I'm often asked by developers to provide a list of Google Cloud architectures that help to get started on the cloud journey. Last month, I decided to start a mini-series on Twitter called “#13DaysOfGCP" where I shared the most common use cases on Google Cloud. I have compiled the list of all 13 architectures in this post. Some of the topics covered are hybrid cloud, mobile app backends, microservices, serverless, CICD and more. If you were not able to catch it, or if you missed a few days, here we bring to you the summary!

Series kickoff #13DaysOfGCP

#1: How to set up hybrid architecture in Google Cloud and on-premises

Day 1

#2: How to mask sensitive data in chatbots using Data loss prevention (DLP) API?

Day 2

#3: How to build mobile app backends on Google Cloud?

Day 3

#4: How to migrate Oracle Database to Spanner?

Day 4

#5: How to set up hybrid architecture for cloud bursting?

Day 5

#6: How to build a data lake in Google Cloud?

Day 6

#7: How to host websites on Google Cloud?

Day 7

#8: How to set up Continuous Integration and Continuous Delivery (CICD) pipeline on Google Cloud?

Day 8

#9: How to build serverless microservices in Google Cloud?

Day 9

#10: Machine Learning on Google Cloud

Day 10

#11: Serverless image, video or text processing in Google Cloud

Day 11

#12: Internet of Things (IoT) on Google Cloud

Day 12

#13: How to set up BeyondCorp zero trust security model?

Day 13

Wrap up with a puzzle

Wrap up!

We hope you enjoy this list of the most common reference architectures. Please let us know your thoughts in the comments below!

Sip a cup of Java 11 for your Cloud Functions

Posted by Guillaume Laforge, Developer Advocate for Google Cloud

With the beta of the new Java 11 runtime for Google Cloud Functions, Java developers can now write their functions using the Java programming language (a language often used in enterprises) in addition to Node.js, Go, or Python. Cloud Functions allow you to run bits of code locally or in the cloud, without provisioning or managing servers: Deploy your code, and let the platform handle scaling up and down for you. Just focus on your code: handle incoming HTTP requests or respond to some cloud events, like messages coming from Cloud Pub/Sub or new files uploaded in Cloud Storage buckets.

In this article, let’s focus on what functions look like, how you can write portable functions, how to run and debug them locally or deploy them in the cloud or on-premises, thanks to the Functions Framework, an open source library that runs your functions. But you will also learn about third-party frameworks that you might be familiar with, that also let you create functions using common programming paradigms.

The shape of your functions

There are two types of functions: HTTP functions, and background functions. HTTP functions respond to incoming HTTP requests, whereas background functions react to cloud-related events.

The Java Functions Framework provides an API that you can use to author your functions, as well as an invoker which can be called to run your functions locally on your machine, or anywhere with a Java 11 environment.

To get started with this API, you will need to add a dependency in your build files. If you use Maven, add the following dependency tag in pom.xml:

<dependency>
<groupId>com.google.cloud.functions</groupId>
<artifactId>functions-framework-api</artifactId>
<version>1.0.1</version>
<scope>provided</scope>
</dependency>

If you are using Gradle, add this dependency declaration in build.gradle:

compileOnly("com.google.cloud.functions:functions-framework-api")

Responding to HTTP requests

A Java function that receives an incoming HTTP request implements the HttpFunction interface:

import com.google.cloud.functions.*;
import java.io.*;

public class Example implements HttpFunction {
@Override
public void service(HttpRequest request, HttpResponse response)
throws IOException {
var writer = response.getWriter();
writer.write("Hello developers!");
}
}

The service() method provides an HttpRequest and an HttpResponse object. From the request, you can get information about the HTTP headers, the payload body, or the request parameters. It’s also possible to handle multipart requests. With the response, you can set a status code or headers, define a body payload and a content-type.

Responding to cloud events

Background functions respond to events coming from the cloud, like new Pub/Sub messages, Cloud Storage file updates, or new or updated data in Cloud Firestore. There are actually two ways to implement such functions, either by dealing with the JSON payloads representing those events, or by taking advantage of object marshalling thanks to the Gson library, which takes care of the parsing transparently for the developer.

With a RawBackgroundFunction, the responsibility is on you to handle the incoming cloud event JSON-encoded payload. You receive a JSON string, so you are free to parse it however you like, with your JSON parser of your choice:

import com.google.cloud.functions.Context;
import com.google.cloud.functions.RawBackgroundFunction;

public class RawFunction implements RawBackgroundFunction {
@Override
public void accept(String json, Context context) {
...
}
}

But you also have the option to write a BackgroundFunction which uses Gson for unmarshalling a JSON representation into a Java class (a POJO, Plain-Old-Java-Object) representing that payload. To that end, you have to provide the POJO as a generic argument:

import com.google.cloud.functions.Context;
import com.google.cloud.functions.BackgroundFunction;

public class PubSubFunction implements BackgroundFunction<PubSubMsg> {
@Override
public void accept(PubSubMsg msg, Context context) {
System.out.println("Received message ID: " + msg.messageId);
}
}

public class PubSubMsg {
String data;
Map<String, String> attributes;
String messageId;
String publishTime;
}

The Context parameter contains various metadata fields like timestamps, the type of events, and other attributes.

Which type of background function should you use? It depends on the control you need to have on the incoming payload, or if the Gson unmarshalling doesn’t fully fit your needs. But having the unmarshalling covered by the framework definitely streamlines the writing of your function.

Running your function locally

Coding is always great, but seeing your code actually running is even more rewarding. The Functions Framework comes with the API we used above, but also with an invoker tool that you can use to run functions locally. For improving developer productivity, having a direct and local feedback loop on your own computer makes it much more comfortable than deploying in the cloud for each change you make to your code.

With Maven

If you’re building your functions with Maven, you can install the Function Maven plugin in your pom.xml:

<plugin>
<groupId>com.google.cloud.functions</groupId>
<artifactId>function-maven-plugin</artifactId>
<version>0.9.2</version>
<configuration>
<functionTarget>com.example.Example</functionTarget>
</configuration>
</plugin>

On the command-line, you can then run:

$ mvn function:run

You can pass extra parameters like --target to define a different function to run (in case your project contains several functions), --port to specify the port to listen to, or --classpath to explicitly set the classpath needed by the function to run. These are the parameters of the underlying Invoker class. However, to set these parameters via the Maven plugin, you’ll have to pass properties with -Drun.functionTarget=com.example.Example and -Drun.port.

With Gradle

With Gradle, there is no dedicated plugin, but it’s easy to configure build.gradle to let you run functions.

First, define a dedicated configuration for the invoker:

configurations { 
invoker
}

In the dependencies, add the Invoker library:

dependencies {
invoker 'com.google.cloud.functions.invoker:java-function-invoker:1.0.0-beta1'
}

And then, create a new task to run the Invoker:

tasks.register("runFunction", JavaExec) {
main = 'com.google.cloud.functions.invoker.runner.Invoker'
classpath(configurations.invoker)
inputs.files(configurations.runtimeClasspath,
sourceSets.main.output)
args('--target',
project.findProperty('runFunction.target') ?:
'com.example.Example',
'--port',
project.findProperty('runFunction.port') ?: 8080
)
doFirst {
args('--classpath', files(configurations.runtimeClasspath,
sourceSets.main.output).asPath)
}
}

By default, the above launches the function com.example.Example on port 8080, but you can override those on the command-line, when running gradle or the gradle wrapper:

$ gradle runFunction -PrunFunction.target=com.example.HelloWorld \
-PrunFunction.port=8080

Running elsewhere, making your functions portable

What’s interesting about the Functions Framework is that you are not tied to the Cloud Functions platform for deploying your functions. As long as, in your target environment, you can run your functions with the Invoker class, you can run your functions on Cloud Run, on Google Kubernetes Engine, on Knative environments, on other clouds when you can run Java, or more generally on any servers on-premises. It makes your functions highly portable between environments. But let’s have a closer look at deployment now.

Deploying your functions

You can deploy functions with the Maven plugin as well, with various parameters to tweak for defining regions, memory size, etc. But here, we’ll focus on using the cloud SDK, with its gcloud command-line, to deploy our functions.

For example, to deploy an HTTP function, you would type:

$ gcloud functions deploy exampleFn \
--region europe-west1 \
--trigger-http \
--allow-unauthenticated \
--runtime java11 \
--entry-point com.example.Example \
--memory 512MB

For a background function that would be notified of new messages on a Pub/Sub topic, you would launch:

$ gcloud functions deploy exampleFn \
--region europe-west1 \
--trigger-topic msg-topic \
--runtime java11 \
--entry-point com.example.PubSubFunction \
--memory 512MB

Note that deployments come in two flavors as well, although the above commands are the same: functions are deployed from source with a pom.xml and built in Google Cloud, but when using a build tool other than Maven, you can also use the same command to deploy a pre-compiled JAR that contains your function implementation. Of course, you’ll have to create that JAR first.

What about other languages and frameworks?

So far, we looked at Java and the plain Functions Framework, but you can definitely use alternative JVM languages such as Apache Groovy, Kotlin, or Scala, and third-party frameworks that integrate with Cloud Functions like Micronaut and Spring Boot!

Pretty Groovy functions

Without covering all those combinations, let’s have a look at two examples. What would an HTTP function look like in Groovy?

The first step will be to add Apache Groovy as a dependency in your pom.xml:

<dependency>
<groupId>org.codehaus.groovy</groupId>
<artifactId>groovy-all</artifactId>
<version>3.0.4</version>
<type>pom</type>
</dependency>

You will also need the GMaven compiler plugin to compile the Groovy code:

<plugin>
<groupId>org.codehaus.gmavenplus</groupId>
<artifactId>gmavenplus-plugin</artifactId>
<version>1.9.0</version>
<executions>
<execution>
<goals>
<goal>addSources</goal>
<goal>addTestSources</goal>
<goal>compile</goal>
<goal>compileTests</goal>
</goals>
</execution>
</executions>
</plugin>

When writing the function code, just use Groovy instead of Java:

import com.google.cloud.functions.*

class HelloWorldFunction implements HttpFunction {
void service(HttpRequest request, HttpResponse response) {
response.writer.write "Hello Groovy World!"
}
}

The same explanations regarding running your function locally or deploying it still applies: the Java platform is pretty open to alternative languages too! And the Cloud Functions builder will happily build your Groovy code in the cloud, since Maven lets you compile this code thanks to the Groovy library.

Micronaut functions

Third-party frameworks also offer a dedicated Cloud Functions integration. Let’s have a look at Micronaut.

Micronaut is a “modern, JVM-based, full-stack framework for building modular, easily testable microservice and serverless applications”, as explained on its website. It supports the notion of serverless functions, web apps and microservices, and has a dedicated integration for Google Cloud Functions.

In addition to being a very efficient framework with super fast startup times (which is important, to avoid long cold starts on serverless services), what’s interesting about using Micronaut is that you can use Micronaut’s own programming model, including Dependency Injection, annotation-driven bean declaration, etc.

For HTTP functions, you can use the framework’s own @Controller / @Get annotations, instead of the Functions Framework’s own interfaces. So for example, a Micronaut HTTP function would look like:

import io.micronaut.http.annotation.*;

@Controller("/hello")
public class HelloController {

@Get(uri="/", produces="text/plain")
public String index() {
return "Example Response";
}
}

This is the standard way in Micronaut to define a Web microservice, but it transparently builds upon the Functions Framework to run this service as a Cloud Function. Furthermore, this programming model offered by Micronaut is portable across other environments, since Micronaut runs in many different contexts.

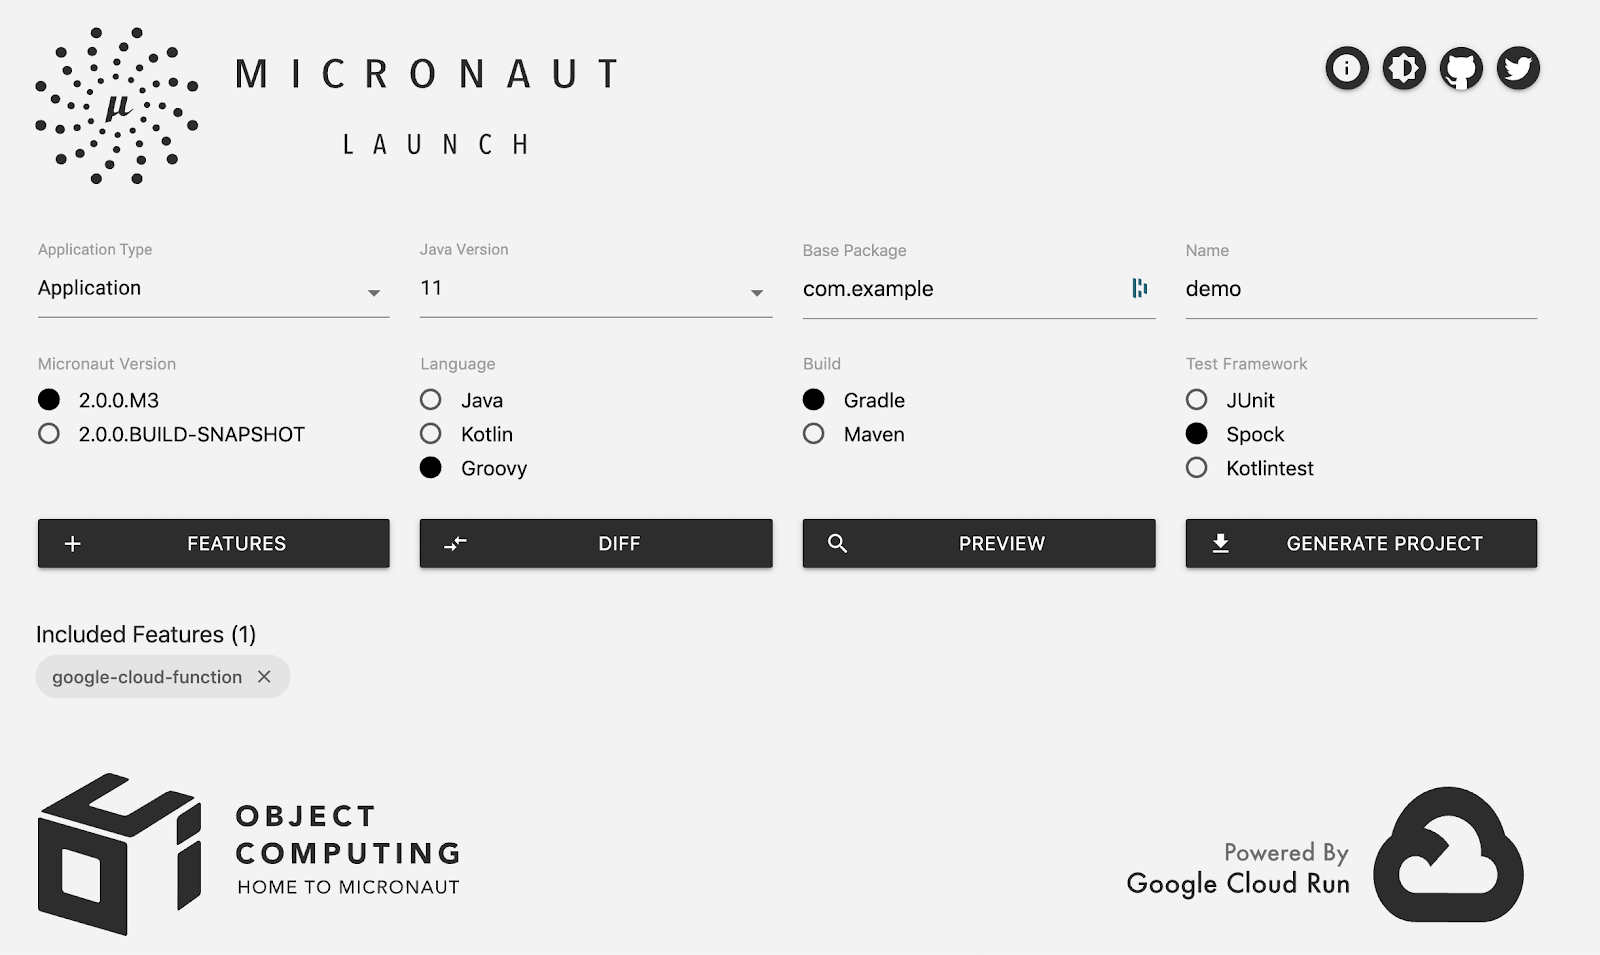
Last but not least, if you are using the Micronaut Launch project (hosted on Cloud Run) which allows you to scaffold new projects easily (from the command-line or from a nice UI), you can opt for adding the google-cloud-function support module, and even choose your favorite language, build tool, or testing framework:

Micronaut Launch

Be sure to check out the documentation for the Micronaut Cloud Functions support, and Spring Cloud Function support.

What’s next?

Now it’s your turn to try Cloud Functions for Java 11 today, with your favorite JVM language or third-party frameworks. Read the getting started guide, and try this for free with Google Cloud Platform free trial. Explore Cloud Functions’ features and use cases, take a look at the quickstarts, perhaps even contribute to the open source Functions Framework. And we’re looking forward to seeing what functions you’re going to build on this platform!

Knative momentum continues, hits another adoption milestone

Released just four months ago by Google Cloud in collaboration with several vendors, Knative, an open source platform based on Kubernetes which provides the building blocks for serverless workloads, has already gained broad support.

The number of contributors has doubled, more than a dozen companies have contributed each month, and community contributions have increased over 45% since the 0.1 release. It’s an encouraging signal that validates the need for such a project, and suggests that ongoing development will be driven by healthy discussions among users and contributors.

Knative 0.2 Release 

In recent 0.2 release, the first major release since the project’s launch in July, we incorporated 323 pull requests from eight different companies. Knative 0.2 added a new Eventing resource model to complement the Serving and Build components. There were also lots of improvements under-the-hood, such as the implementation of pluggable routing and better support for autoscaling.

KubeCon North America

Continuing the theme, there are 10 sessions about Knative by speakers from seven different companies this week at KubeCon in Seattle. The sessions cover a variety of topics spanning from introductory overview sessions to advanced autoscaler customization. The number of companies represented by speakers illustrates the breadth of the growing Knative community.

Growing Ecosystem 

Another sign of Knative’s momentum is the growing ecosystem. A number of enterprise platform developers have begun using Knative to create serverless solutions on Kubernetes for their own hybrid cloud use-cases. Their use of the Knative API makes for a consistent developer experience and enables workload portability. For example, Pivotal, a top contributor to the Knative project, has adopted Knative alongside Kubernetes which helps them dedicate more resources higher in the stack:
"Since the release of Knative, we've been collaborating on an open functions platform to help companies run their new workloads on every cloud. That’s why we’re excited to launch the alpha of Pivotal Function Service." – Onsi Fakhouri, SVP of Engineering at Pivotal
Similarly, TriggerMesh has launched a hosted serverless management platform that runs on top of Knative, enabling developers to deploy and manage their functions from a central console.
"Knative provides us with the critical building blocks we need to create our serverless management platform." – Sebastien Goasguen, Co-founder, TriggerMesh
We’re excited by the speed with which Knative is being adopted and the broad cross section of the industry that is already contributing to the project. If you haven’t already jumped in, we invite you to get involved! Come visit github.com/knative and join the growing Knative community.

By Mark Chmarny, Knative Team