Tag Archives: Google Maps API

GRAS helps build sustainable and ethical supply chains using Google Maps APIs and Google Cloud Platform


Editor's note: This is the first in a series of “Mapping a better world” blog posts highlighting ways in which organizations are using location data to affect positive local and global change. Google Maps APIs continues to create opportunities and tools to support our community.

Today we hear from Dr. Norbert Schmitz, managing director of Meo Carbon Solutions. Read how Meo Carbon Solutions and Google for Work Premier Partner Wabion used Google Maps APIs and Google Cloud Platform to develop Global Risk Assessment Services (GRAS). The tool provides reliable information about the ecological and social risks of expanding agriculture into natural habitats.


In the European Union, companies that sell biofuels must get certifications to show that producing their fuel — often made from agricultural crops — does not cause deforestation, the loss of biodiversity or the loss of carbon stocks. We established GRAS to provide a single tool to gather and visualize this data required to support a credible certification.

Through GRAS, we’ve made this information accessible not only to governments and NGOs, but also to businesses, financial institutions and individuals. For example, a U.S. company buying soybean oil from Brazil can use GRAS to verify the ecological and social risk exposure of the mills and the farmers supplying the mills.

We decided the most effective way to present this complex set of information was to build a web app that would overlay data from multiple sources on top of a map. Using this tool, auditors can compare before-and-after maps of a certain area, and based on changes to the habitat, either grant or deny certifications.

To build GRAS, we partnered with IT consultant Wabion, a Google for Work Premier Partner. After testing several map solutions, we chose Google Maps because of its high performance, ability to easily integrate data from multiple sources, flexible APIs, solid support and large user community.


The GRAS website combines mapping information with data from dozens of government agencies, nongovernmental organizations (NGOs) and other global databases. It uses the Google Maps JavaScript API to display the base maps for the site. The API also visualizes layers and more than 100 types of data — including agriculture, deforestation and social welfare — on top of the maps.

Users can upload and visualize their own data sets. The Google Maps Geocoding API verifies map locations, and the Google Maps Places API autocomplete makes it easy for site users to choose locations that they want to learn about.
A GRAS visualization of biodiversity risk in Brazil


GRAS is powered by the Google Cloud Platform — specifically, Google App Engine and Google Compute Engine. Combining these services with the Google Maps APIs lets us handle geodata in a 10-terabyte database, which hosts more than 100 layers, many of them extremely large.

We’ve recently expanded GRAS beyond our original mission to provide insights for other industries by expanding the data layered on top of maps. We’ve included new information on biodiversity, land-use changes, and available carbon stock. We’ve also been able to incorporate numerous measurements of social health — ranging from the Global Slavery Index to the Global Hunger Index and the UNICEF index of access to drinking water and sanitation.

Through GRAS, we’ve made this information accessible not only to governments and NGOs, but also to businesses, financial institutions and individuals. For example, a U.S. company buying soybean oil from Brazil can use GRAS to verify the ecological and social risk exposure of the mills and the farmers supplying the mills.

Far exceeding our initial vision, the GRAS website combines transparency with the power of technology to help users in wide-ranging industries, —from food, to chemicals and energy — operate environmentally and socially sound supply chains.


Maps Zen — Not lost


Editor's Note: Gone are the days when users were impressed with a marker on a map. The Maps Zen blog post series covers integrations of Google Maps APIs to help your apps provide great maps user experiences. What’s a zen pattern? Simply put, a design pattern that results in harmonious user experiences.


Maps are awesome because they show us where to go. But how are your users getting to their chosen destination? The Directions API web service provides step-by-step directions from point A to B and can get your user where they’re going. Being a web service, it is protected by an API key and thus it should not consumed in the mobile app - proxy it via your server as shown here.

The Directions API can give you walking, cycling and driving directions as expected. But it also gives great public transport directions. When guiding users to a destination, it’s best to show them the path on a map.

Polylines are a great way to show a path but rather than have them simply appear on the map, it’s nicer to animate them in place. In the image below, the intended path grows providing a clear distinction about the direction of travel.

So now we’re showing users where to go and how to get there. But once they’re at their destination, our app’s work is not done. In Shibuya, a city in Tokyo, Japan, there are many tall buildings whose shops visible from the road. It can be really hard to tell which one of those is the destination. In effect, users can be left feeling lost after they get to their destination. Thankfully, there’s a Maps API for that!

Street View is a great way to visualize the user’s destination, or any address really. Adding Street View adds a real-world visual element to your app and provides meaningful context for users. Users will generally expect that they can interact with a Street View since they’re likely to pan and scan around the location so be sure to leave not to disable interactivity with the StreetViewPanorama.

You can add a StreetViewPanorama into your app by including it in your XML layouts, like so.
<fragment
    android:id="@+id/streetview"
    android:name=
        "com.google.android.gms.maps.StreetViewPanoramaFragment"
    android:layout_width="match_parent"
    android:layout_height="match_parent"/>

You can provide a location for the StreetViewPanorama using the following Java code.
streetViewPanorama.setPosition(targetLatLng);
StreetViewPanoramaCamera camera =
    new StreetViewPanoramaCamera(zoom, tilt, bearing);
mStreetViewPanorama.animateTo(camera, duration);

With guided directions and the addition of Street View in your apps, users are given a visual representation of their destination. They’re no longer lost on the way there and they’re not lost when they get there.

Maps Zen — Visualize


Editor's Note: Gone are the days when users were impressed with a marker on a map. The Maps Zen blog post series covers integrations of Google Maps APIs to help your apps provide great maps user experiences. What’s a zen pattern? Simply put, a design pattern that results in harmonious user experiences.


Markers are much more useful than identifying points on a map. Markers can also be used as a way to visually convey information about a place. If a user is searching for a well rated restaurant, they’d fire up your app to find that there’s a bunch of restaurants in their vicinity. But it’s not easy to tell which ones are actually worth visiting. To see the ratings for each place, they’d end up having to tap each one first.

Here’s an how marker selection and marker animations can be a great way to show this information. In this example, markers that lack colour rate poorly and the vibrant colorful markers are the highly rated ones. There’s also animated steam on some markers also helping to highlight the best rated restaurants!

To achieve the steam animation, the marker icon is being changed by calling the setIcon() method periodically. A delay of 32ms roughly corresponds to 30 marker icon updates a second — animating the icon at 30 frames per second.
mAnimHandler.post(new Runnable() {
@Override
public void run() {
marker.setIcon(mSteamFrames.nextFrame());
// Next frame in 32 ms
mAnimHandler.postDelayed(this, 32);
}
});

To desaturate the marker icons, a ColorMatrixColorFilter from the Android framework being used. First, setup the color filter based on the restaurant rating scale via a ColorMatrix. In this case, any restaurant that has a 3 star rating will be presented as having an entirely grayscale icon. Restaurants with a 4.5 star or higher rating will be presented in full color. The restaurant scale is set it to a Paint object and the filter is applied to the marker image using a canvas.
ColorMatrix desatMatrix = new ColorMatrix();
desatMatrix.setSaturation(restaurantRating);

ColorFilter paintColorFilter = new
ColorMatrixColorFilter(desatMatrix);
Paint paint = new Paint();

paint.setColorFilter(paintColorFilter);

Canvas canvas = new Canvas(newImage);
canvas.drawBitmap(oldImage, 0, 0, paint);

Markers are great for showing points on a map but sometimes you can end up with too many. In this case, we have too well rated many restaurants around us - sure, it’s a nice problem to have but it’s not helping the user choose a restaurant. In such situations, you need to display many markers but still keep the view comprehensible. We’re going to look at two ways to overcome these issues.

The first is through the use of marker clustering. As the zoom levels of the map change, markers are aggregated making for a much more digestible view. Now as the map zooms out, markers will combine, showing how many restaurants are in the surrounding areas.

This visual effect may seem like a lot of work, but it is not. The Android Maps Util library provides a four-step implementation of marker clustering:

1. Add the library to your gradle config.
compile 'com.google.maps.android:android-maps-utils:0.3+'
2. Implement ClusterItem interface in your main data class.
public interface ClusterItem {
LatLng getPosition();
}
3. Instantiate the cluster manager and register it for a couple of map listeners.
mClusterManager = new ClusterManager<>(this, mMap);
mMap.setOnCameraChangeListener(mClusterManager);
mMap.setOnMarkerClickListener(mClusterManager);
4. Replace your marker management code with calls to the cluster manager - the cluster manager will manage adding and removing the markers for you.
mClusterManager.addItem(clusterItem);
5. You can optionally customise the effect further by providing custom aggregate markers (showing images instead of a count for example).

Let’s look at the second method to show marker aggregation - it looks really cool! Here, the count of markers are replaced with a heat map showing the concentration of these markers.

Achieving this effect is also just four simple steps using the Android Maps Utils library, thanks to its heatmaps.

1. Add the library to your gradle config.
compile 'com.google.maps.android:android-maps-utils:0.3+'
2. Instantiate a HeatMapTileProvider and pass it your LatLngs.
mHeatmapTileProvider = new HeatmapTileProvider.Builder()
.data(mLatLngCollection)
.build();
3. Use it to create a map overlay.
mTileOverlay = mMap.addTileOverlay(
new TileOverlayOptions().tileProvider(mHeatmapTileProvider));
4. You can optionally customize this further by specifying the gradient and the radius of the heatmap.

It’s worth keeping in mind that information overload is a common problem with mobile apps. Location apps, in particular suffer from poor user experiences when dealing lots of places. The Android Maps Utils library offers beautiful visualizations enabling you to build amazing maps.

Maps Zen — Framing your shots


Gone are the days when users were impressed with a marker on a map. The Maps Zen blog post series covers integrations of Google Maps APIs to help your apps provide great maps user experiences. What’s a zen pattern? Simply put, a design pattern that results in harmonious user experiences.


Movie & television directors have fascinating jobs — shooting movies seems like a lot of fun, right? The idea that you’re in control of the camera, framing each shot and creating an evocative scene can be really inspirational. Maps developers have the same creative direction over UI. We get to build maps scenes to create evocative user experiences.

The Maps API provides a sophisticated camera, which enables you to frame your maps in three dimensions. Its has expected capabilities such as projections, zooming and panning but additionally you can rotate, tilt and animate the camera. With that in mind, here’s a map — one that you’ve seen many times before. It’s top down, displaying a certain region, at a pre-determined zoom level.

Lets take that same location and adjust its bearing and tilt. This feels like much more like a real place. The user feels a greater sense of depth; a feeling that there’s a bigger world out there.

When directing the camera for something like a house hunting app, the map can be presented in a way that shows more of the surrounding area. First, the map type has been changed to satellite mode and as a result, the nearby beach is more impactful.

As we select the next house in the search results, the camera animates to its next location and during this journey, we’re effectively flying over the area retaining location context. There are also changes to the zoom, bearing and tilt. Once again, the user gets a strong sense of depth and a feeling of exploration. This is crucial in a house hunting scenario since it’s all about location!

To accomplish such camera angles, check out the bearing and tilt methods on the CameraPosition builder. When transitioning from one CameraPosition to another, you’ll achieve a greater impact if you animate it to place rather that instantly moving there — to do this, use the animateCamera method on the GoogleMap object.
CameraPosition.Builder
target(LatLng location)
zoom(float zoom)
bearing(float bearing)
tilt(float tilt)

map.AnimateCamera(
CameraUpdate.newCameraPosition(cameraPosition),
durationInMs,
callback);

Camera framing and animations are powerful tools. As a camera director, it's important frame your shot in order to evoke the desired emotion.

Maps Zen — Seeing the Lite


Gone are the days when users were impressed with a marker on a map. This is the first in a series of Maps Zen blog posts covering integrations of Google Maps APIs to help your apps provide great maps user experiences. What’s a zen pattern? Simply put, a design pattern that results in harmonious user experiences.

A common UI pattern is showing a collection of places. At first glance it seems pretty easy. You could just throw together a list of place names and you’re done, right? Its not quite that simple. Here are two ways to visualize locations using the Google Maps Android API.

First is on the map itself. Here, we remove the UI and let the map markers be the primary point of interaction. This makes for a very immersive experience, however it's only effective if the markers fit comfortably on one screen. If the user has to zoom or scroll, the emphasis of your collection is lost. For example, “Train stations near me” works well since the results are co-located.

The second method of displaying a list of places that are spread out —it uses map thumbnails. The Maps Android API offers Lite mode — an ideal mode for such scenarios.

Lite mode provides a static map; effectively just the image of a map without the ability for the user to pan, or tilt the camera. This limited functionality, however, comes with some big benefits — it’s super fast and uses less memory. Additionally, you still get click listeners, markers and polylines. Lite mode makes it possible to show lists of maps — they are just images so you can instantiate many of these.

Enabling Lite mode is simple. If you’re creating your maps in Java, on creation, simply specify litemode in the GoogleMapOptions object as shown below.
GoogleMapOptions options = new GoogleMapOptions().liteMode(true);
If your map is declared via layouts, add the xml property in your layouts as shown below. Be sure to include the map namespace since it makes the litemode attribute available.
<fragment xmlns:android="http://schemas.android.com/apk/res/android"
    xmlns:map="http://schemas.android.com/apk/res-auto"
    android:name="com.google.android.gms.maps.MapFragment"
    android:id="@+id/map"
    android:layout_width="match_parent"
    android:layout_height="match_parent"
    map:liteMode="true"/>
At some point, you may need to replace the lite mode map with the fully-interactive one. In that situation, you can gracefully transition into a regular map triggered by a touch event. In the image below, Android Lollipop transitions are being used across screens. You can see the big map dissolve and the grid implode in place. For users on older versions of Android, a reasonable fallback is to instantiate a MapFragment and animate it into place.

With this technique, we’re able to mix and match Lite mode and regular maps seamlessly. I hope you’ve now seen the lite — Lite mode that is. It enables you to show multiple maps simultaneously whilst keeping your app performant.

Streamlining code in the JavaScript Maps API

Since the Google Maps JS API v3 launched in 2009, we have added lots of new features. And we’ve also made occasional modifications to the API to minimize and simplify common code pathways for developers.


Today we want to announce two small, but useful, changes we have recently made. The first lessens the amount of code required to create a map. The second evolves the API towards a more standard pattern of using plain JavaScript objects.


The first change was introduced quietly a few versions ago, and made the Map Type an optional parameter (defaulting to the standard ROADMAP type) when instantiating a new map.


The second change is available in versions 3.16 of the API and above, and introduces a new way of creating a location: instead of google.maps.LatLng(37.5, -122.5), you can now simply pass in a plain JavaScript object like {lat: 37.5, lng: -122.5}.


Let’s take a look at how these changes affect the original code from our launch announcement above:


Original:
var myOptions = {
     zoom: 8,
     center: new google.maps.LatLng(-34.397, 150.644),
     mapTypeId: google.maps.MapTypeId.ROADMAP
   };


New
   var myOptions = {
     zoom: 8,
     center: {lat: -34.397, lng: 150.644}
   };


Note that since the order of the values no longer matters, the following is equally valid:
     center: {lng: 150.644, lat: -34.397}
The end result is less code needed to instantiate a basic map, less opportunity for confusion regarding coordinate ordering, and a more flexible way to create locations.


Note that google.maps.LatLng will continue to work, and there’s no need to modify any of your existing code. These new features are simply designed to help those getting started, and help you create more streamlined and readable code.


As always, we love to get feedback on how even minor changes like this affect your workflow. You can comment on this post or on our Google+ Page. And as always, you can get help on StackOverflow. Check out our support page for the right tags to use.

Posted by Josh Livni, Maps API Team

Ghost markers in your neighborhood? New features for the Google Maps Android API v2

A new version of Google Play services is currently rolling out to devices. You can start developing for it now using the latest Google Play services SDK along with the new Android 4.4 (KitKat) emulator. Read on to find out about the new features added for the Google Maps Android API v2.


Whether your app tracks ghost sightings, shows witch flight paths, or guides users to the nearest zombie-proof safehold, sometimes the best way to highlight important information is to de-emphasise some elements of your app. The new alpha property for Markers allows you to fade markers in and out as they become more or less important.

You can further tailor the map to your use case using the new setBuildingsEnabled() method to control the visibility of 3D buildings. This is especially useful when you want to highlight your own content. We’ve also made it possible to easily change ground overlay images with the new setImage() method.


Lastly, we’ve added an OnMapLoadedCallback callback interface to notify you when the map has finished rendering. The following example code shows how this callback can be combined with the snapshot feature to ensure the snapshot captures the fully rendered map:

We’re always interested to hear how you’re using the Maps APIs, so let us know if you’ve got something cool to show by tagging +Google Maps API on your posts (or comment right here!). For technical questions that aren’t answered in the developer documentation, check out the Google Maps developer community on Stack Overflow. Don’t forget to tell us what you’d like to see in the next release using the Google Maps API issue tracker.

Posted by Daniel Schramm, Associate Product Manager, Google Maps Mobile APIs

Sun Surveyor shines with Street View

In this guest blog post, we hear from Adam Ratana, a hobbyist photographer and software engineer by day, and developer of the Android and iOS Sun Surveyor apps by night. In this tutorial, Adam talks about his creative implementation of custom polylines on Street View panoramas in the Google Maps SDK for iOS.

 As a photography enthusiast, I’m always looking to capture images at the magic hour. My goal when creating Sun Surveyor was to give users an immersive way of visualizing the location of the sun and the moon, making it easy for anyone to figure out when the natural lighting is just right for the perfect shot.

When I set out to build Sun Surveyor, I knew I wanted to give users an easy way of visualizing the location of the sun and the moon. Sun Surveyor has an augmented reality (AR) feature, which overlays sun and moon paths on top of the device camera’s view. This is useful for understanding how light will change over time at a particular location. While I also created a Map View to show the paths on a Google Map for remote locations, it was not as intuitive as augmented reality.

Visualizing the sun and moon paths in augmented reality and map views

When Street View launched in the Google Maps SDK for iOS in v1.4.0 (July, 2013), I couldn’t wait to visualize the sun and moon paths within an interactive panorama. Street View panoramas bridge the gap between Sun Surveyor’s Map View and AR experiences by giving users an augmented reality experience, wherever they want to go.

Sun and moon paths with Street View panoramas

Implementing a sun path Overlay on Street View
I took a creative approach to working with the Google Maps SDK for iOs.  While polylines can be implemented in Map View, this isn’t yet possible in a Street View panorama. To display paths and other items that move with the Street View panorama, I needed to:
  1. Create an overlay on top of the panorama upon which to draw the items
  2. Synchronize the positions of the overlay items with the panorama as it moves
  3. Determine which data are visible and where on the screen to draw them
For this tutorial, I have provided a sample project that will get anyone started doing the same. Let’s walk through the steps.

I. Creating an Overlay

In our main UIViewController, we add a subclass of UIView for the overlay, make its background color transparent, and place the GMSPanoramaView below it in the view hierarchy.


Representing Overlay Items
We represent the overlay items with a protocol having two methods: updateWithPanoramaView and draw. The updateWithPanoramaView method updates an item’s screen location geometry, while draw draws it to the current graphics context.

We store all items to be drawn in a collection, update their positions based on the panorama position, and draw the collection in our view’s standard drawRect method.

If we want to make sure these items are drawn in a certain order that might change based on the data, we can add z-indexes to them and then sort the collection by z-index after we update them and before drawing.

II. Syncing the Overlay with the Panorama
To make sure this overlay view stays updated as the panorama moves beneath it, we can update the view’s data in an implementation of GMSPanoramaViewDelegate’s didMoveCamera method. We can use a CADisplayLink to ensure the overlay view is redrawn at regular intervals, and use a flag to make sure it is only redrawn when necessary.


Optimization
CoreGraphics can be a bottleneck. [UIBezierPath strokePath] and [NSString drawAtPoint] are expensive as you can see by profiling with Instruments. For performance intensive applications, an alternative is to use OpenGL. Avoiding overdraw is always a good idea, so the first optimization, if needed, is to carefully examine what is being drawn to the screen, and draw only what is necessary.

III. Mapping data to the panorama view
The GMSProjection class has a pointForCoordinate method that returns the screen pixel location for a coordinate on the Map. This is useful for overlaying elements on top of a GMSMapView, and is used in the Sun Surveyor Map View to draw text related to sun and moon paths on top of the Map.

GMSPanoramaView has a similar method, pointForOrientation. This method allows us to query the panorama for a screen pixel location given a GMSOrientation (bearing and pitch tuple) relative to the panorama location, where the camera is stationed, at ground level. This is useful to make sure an item we overlay onto the view remains in the same location relative to the scene, even as the camera moves and the view shifts.

Because the camera has a Field of View that determines what is visible on the screen, some orientations are not visible (such as behind the camera position). pointForOrientation helpfully returns NAN (not a number) for such orientations, so we know the given orientation is not visible.

With sun path data already expressed in terms of orientation relative to the ground level of the viewer, drawing corresponding paths with screen pixel locations is easy. We map our data with pointForOrientation, and draw what is visible by checking the result for NAN.


The sample project uses a panorama of Sydney, Australia, looking west, with a sun path for 12/20/2013.


Bonus: altering the Field of View
Version 1.4.1 of the SDK added support for changing the GMSPanoramaCamera’s field of view (FOV). The field of view determines how much of the scene is visible on a device screen, as well as how much distortion around the edges of the view is present. Smaller values for FOV are the equivalent of having a telephoto lens on a real camera: it brings distant objects closer.


Left: FOV of 60 degrees. Middle: 90 degrees (default). Right: 130 degrees.


Street View Panoramas are awesome and easy
The Street View panorama viewer in the Google Maps SDK for iOS is an example of a great API. The GMSPanoramaView class is simple to understand and use. In the course of a weekend, I was able to deliver a fun, interactive and highly requested feature to Sun Surveyor’s iOS users. I can’t wait to see what people are able to do with this new Street View Panorama feature in my app, and I look forward to seeing all the other implementations that others develop!

Stonehenge, as seen from a Street View panorama in Sun Surveyor


Posted by Monica Tran, Google Maps API

Sun Surveyor visualizes the sun and moon in a variety of ways for photographers, filmmakers, solar industry professionals, architects, homebuyers, gardeners, and anyone needing to predict or understand the movement of the sun and moon.

Adam Ratana is a Carnegie Mellon University graduate living in, and loving, Pittsburgh, PA. He produces dance music as a member of Pittsburgh Track Authority, enjoys photography, traveling with his wife, and writing fun software in his free time. Adam also enjoys attending the Pittsburgh Cocoaheads chapter meetings.

Map of the Week: Orbitz

In today’s guest blog post, we hear from Monika Szymanski and Mike Kelley, of Orbitz' Android engineering team, who recently migrated from version 1 to version 2 of the Google Maps Android API

About Orbitz
Nearly 30% of Orbitz.com hotel bookings are now made via mobile devices, fueled in part by the growth of the Android platform. The recently released 3rd-generation update of the Orbitz - Flights, Hotels, Cars app for Android brings major speed and ease of use improvements along with the latest Android UI design patterns to the app. The Google Maps Android API v2 is also integrated into the hotel search experience. Read on to find out how we did it, with tips and sample code along the way.

Migrating from v1 to v2 of the Google Maps Android API 
While users of the Orbitz.com Android app will notice some changes to the app’s user interface for maps, the changes to our code are more than skin deep. New classes offered in v2 of the Google Maps Android API like MapFragment and SupportMapFragment, the transition from ItemizedOverlays to Markers, and the addition of a well-supported info window pattern have made including a Google Map in an Android app much easier.

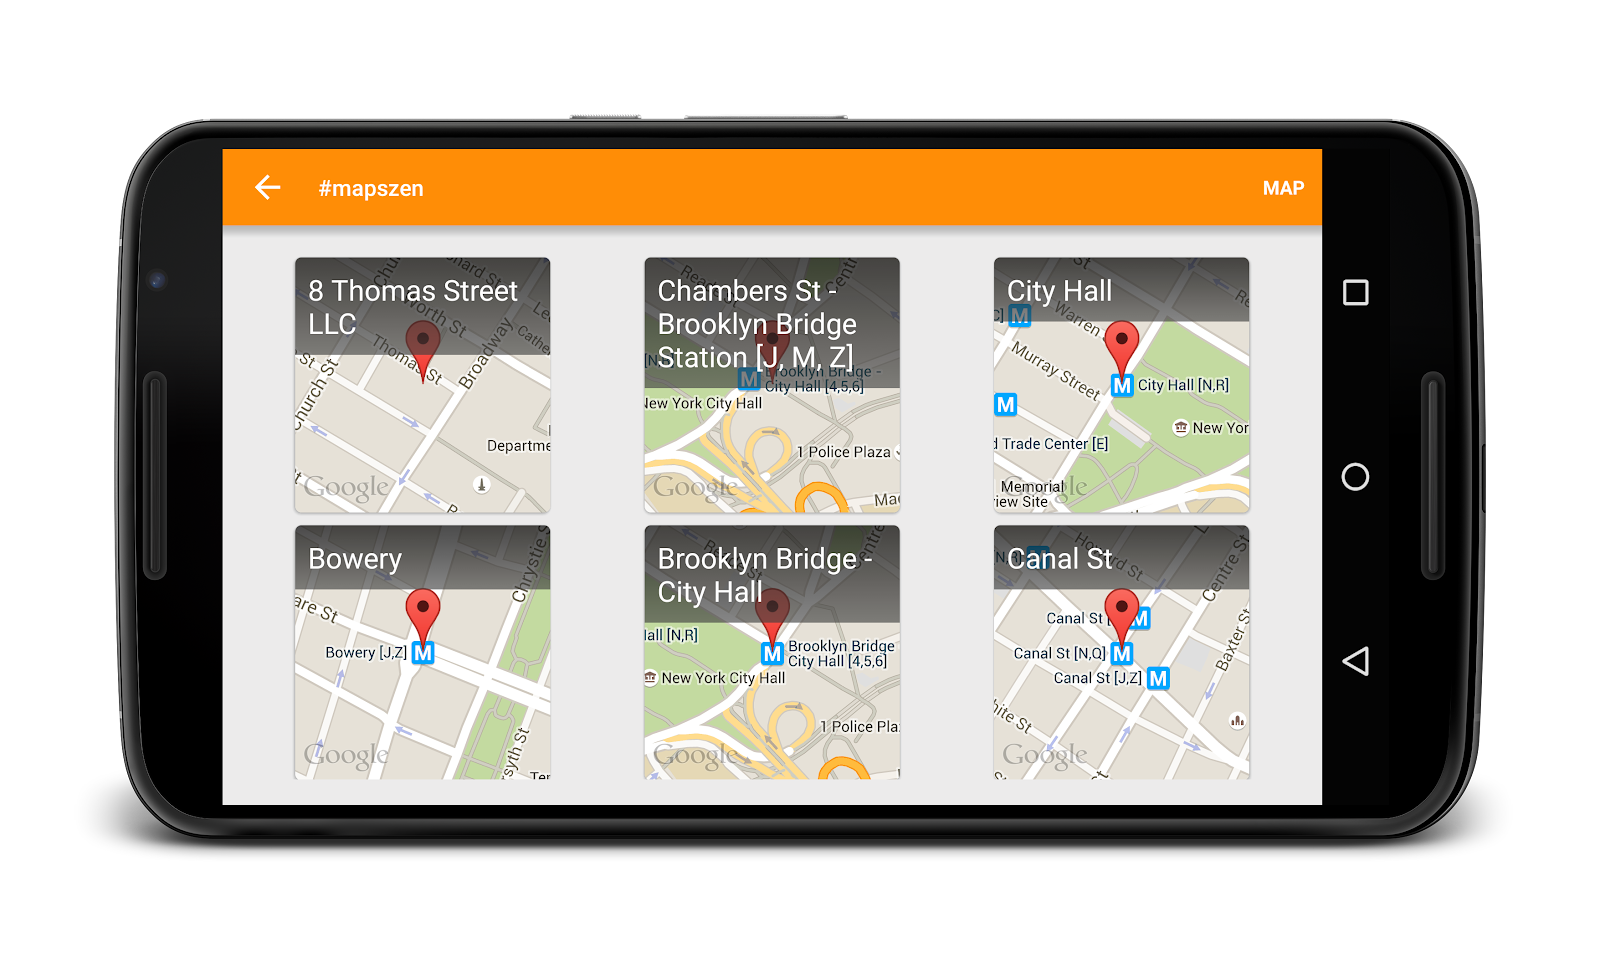
Say hello to the 3rd generation of Orbitz - Flights, Hotels, Cars app, using the Google Maps Android API v2

Featuring Fragments 
Prior to the introduction of MapFragment (and SupportMapFragment)  in v2, we had to write a lot of code to manually show/hide the map view in our app. Only one instance of MapView could be created per activity, so we had to be overly clever about persisting that instance in our Activity. Lack of proper Fragment support was a common pain point for developers integrating v1 of the Google Maps Android API in their application.

When Fragment support was added in v2, we essentially rewrote our map code to take advantage of the new features of MapFragment. Let’s start by taking a look at our hotel results Activity layout:

You’ll notice that we’re not including the actual fragment in the layout - we add the Fragment at runtime, because we don’t want to pay the cost of the fragment transaction and add all the markers on the map, unless the user requests it.

You’ll also notice a bit of a hack at the bottom of the layout. In testing, we found that the MapFragment would leave a black box artifact on the screen on certain devices when the user opened our sliding menu navigation. Adding a simple FrameLayout “above” the map seems to fix the problem.

Extending SupportMapFragment makes it much easier to separate the map display logic from our Activity and list fragment. Our SupportMapFragment (and its inner classes) is responsible for:
  • Adding markers representing each available hotel 
  • Customizing the GoogleMap UI options 
  • Centering and animating the map to show the added markers 
  • Showing an info window when a marker is clicked 
  • Launching an Intent to display more details when an info window is clicked 
Next up, we’ll talk about how we add markers to the map and keep memory usage down.

Managing Markers 
One of the challenges in migrating from v1 to v2 of the Google Maps Android API was figuring out the best way to know which hotel’s info to display when a marker is tapped. To solve this, we place each <Marker, Hotel> pair in a HashMap when adding the markers to the Google Map. Later, we can use this HashMap to look up a marker's corresponding hotel info.

The code snippets below illustrate how we do it.


This HashMap allows us to look up the selected hotel in our InfoWindowAdapter, enabling us to display more information about it.


We place quite a few markers on the map for hotel results and each marker can have a different custom image. It's really easy to run out of memory and we were getting quite a few OutOfMemoryExceptions early in development. To manage memory more effectively, we made sure we didn't create a new new Bitmap and BitmapDescriptor for every marker placed on the map. We also ensured that the resources were recycled after we were done with them.


When the user taps a marker, we want to show more information; that’s where info windows come in handy. 

Introducing Info Windows 
Aside from simply viewing the location of all available hotels on a map, users are typically interested in the name and price of the hotel. The architecture for implementing this information window changed considerably from version 1 to version 2 of the Google Maps Android API. 

Before: Info windows in the Google Maps Android API v1
When using v1 of the Google Maps Android API, our app displayed more detailed hotel information in a custom info view when the user tapped on a hotel marker. That custom view displayed the hotel name and price, and triggered a custom animation when the view was added to the screen. This animation made it appear that the view was growing from inside the pin on the map.

We achieved this effect by setting the LayoutParams to MapView.LayoutParams.BOTTOM_CENTER and MapView.LayoutParams.MODE_MAP, which centered the bottom of the custom view on top of the tapped hotel marker.

With the introduction of the Google Maps Android API v2, MapView.LayoutParams.MODE_MAP was removed, so we explored alternative treatments to show the hotel information when the user clicks on a result. For our purposes, the best alternative was to use the new info window interface. 

After: Info windows in the Google Maps Android API v2
Creating an InfoWindowAdapter is pretty straightforward. The API provides two ways to populate the info window; either by supplying the contents of the info window (shown in the default window stylec) or creating a full View. Because we wanted to have a custom window background, loaded from a 9-patch, we opted to build a complete View for the info window by overriding the getInfoContents() method to return null, and by returning a custom View from getInfoWindow().

Here’s a sample of our code:


We could further simplify this code by having our HotelView take a Hotel model as a parameter in the constructor. 

A caveat with info windows is that even though they are populated by the returned View, the info window is not treated like a *live* View object. The system will call the view’s draw() method only once, then use that cached rendering as the user continues to interact with the map. Our existing animation didn’t work in the Google Maps Android API v2, but we decided to be consistent with the platform and remove the animation rather than try to hack around this limitation.

We <3 Google Maps Android API v2
Upgrading from version 1 to version 2 of the Google Maps Android API was virtually painless and fun to do! The introduction of MapFragment helped us separate the map display logic from the rest of the code and made code reuse much easier. Using custom info views was very straightforward with the new info window interface. We look forward to adding even more Google Map features to our app.

Posted by Monica Tran, Maps Developer Marketing

Monika Szymanski is a Lead Engineer on the Android team at Orbitz, where she works on apps that are friendly, fast, and easy to use. In her free time, she enjoys outdoors, running, red wine, and anything chocolate.

Mike Kelley is a Software Engineer at Orbitz, where he works on Android travel tools to help people travel smarter. He's a Michigan grad, transportation and technology enthusiast and craft beer buff. Some of Mike's ideas and projects live online at theelfismike.com.

Orbitz Worldwide (NYSE: OWW) is a leading global online travel company that uses innovative technology to enable leisure and business travelers to search for, plan and book a broad range of travel products and services including airline tickets, hotels, car rentals, cruises, and vacation packages. Orbitz Worldwide owns a portfolio of consumer brands that includes Orbitz, CheapTickets, ebookers, and HotelClub. Also within the Orbitz Worldwide family, Orbitz Partner Network delivers private label travel solutions to a broad range of partners including many of the world's largest airlines, and Orbitz for Business delivers managed corporate travel solutions for corporations.

Interactive Map of the Paris Metro

Interesting Maps API Components used: Geometry Library, KMLLayer, Styled Maps, Polylines, InfoWindows, Symbols, Markers

This week we are featuring a sample app by the French web development house Medusis. They have put together a custom directions application that guides you between Paris metro stations. It is available in both French and English. It is a beautiful app that uses several interesting features of the Maps API, some of which may not be immediately obvious.

The map is centered, naturally, on the city of Paris. The Paris Metro network is shown using a KMLLayer object. That way they can load in a large amount of unchanging data. You’ll also notice that the base map is styled to mute it to emphasize the metro lines, while preserving access to the Google base map data.


To find directions you can either use the drop down boxes in the top left or simply click on the stations. Notice that a couple of things happen. The KMLLayer that loaded the original layers switches to a grayscale KML file, to allow the use of Polylines to emphasize only the routes needed.


Each station also gets an InfoWindow that has the icons of the Metro lines serving that station. Each trip can be made of more than one Metro line. The portion of the line used in a particular trip is highlighted by using a Polyline. Markers for hubs and the origin and destination are highlighted using a Circle Symbol.


The map uses its own algorithm to compute the best route, using our Geometry Library to calculate distances to find the correct route.

This is a great demonstration piece on using the Google Maps API to show custom data. Well done Medusis.

Posted by Mano Marks, Maps Developer Relations Team