Tag Archives: sheets
That’s a wrap: Tips on keeping holiday gifts organized
Because I have an enormous family and am the type of person who squirrels away random gifts over the course of the year, holiday gift giving can get disorganized to say the least. Last year, I decided to stop simply trying to write down my list and keep track of gift shopping and delivering by hand. In lieu of these mental gymnastics, I added some structure to the whole endeavor. And now, ahead of the holiday shopping season, I’m sharing my system with you.
Start the hunt with Google Shopping
Whenever I get an idea for a gift, I’ll head to Google Shopping and search for an item, select the product page and check typical prices across the web to see if I should grab it now or wait. If the price is high or I’m not quite ready to make a decision, I turn on “Track price” so I’ll get a notification if it drops.
But there are also folks on my list who I don’t know as well…and there are a few White Elephant gifts I’ll need, too. For these purposes, I keep an eye on the deals feed on the Shopping tab. I also take note of the price badges on product cards — they’ll tell you things like “$5 off” or “25% off,” which can be helpful so I know if the deal I’m getting is actually a good one or just a small price drop.

Stay organized in Gmail and Sheets
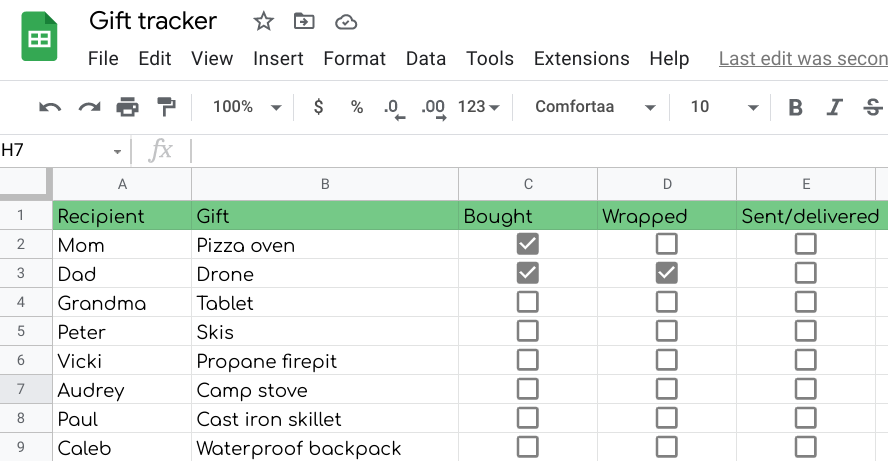
Once I decide on a gift, it goes in my “gift tracker” that I use Google Sheets to make. I keep track of what I bought and whether I’ve wrapped and delivered it or not. (Go ahead and make a copy of my template and create your own if you want.)
And when the actual purchase confirmation or receipt hits my inbox, I add it to a label I’ve made for gifts. All these emails are nested under a designated folder so they aren’t mixed in with the rest of my emails. Plus, that way, if I missed the mark with a present, it’s easy to find the gift receipt…hey, it happens to all of us.
Source: Google Ads & Commerce
That’s a wrap: Tips on keeping holiday gifts organized
Because I have an enormous family and am the type of person who squirrels away random gifts over the course of the year, holiday gift giving can get disorganized to say the least. Last year, I decided to stop simply trying to write down my list and keep track of gift shopping and delivering by hand. In lieu of these mental gymnastics, I added some structure to the whole endeavor. And now, ahead of the holiday shopping season, I’m sharing my system with you.
Start the hunt with Google Shopping
Whenever I get an idea for a gift, I’ll head to Google Shopping and search for an item, select the product page and check typical prices across the web to see if I should grab it now or wait. If the price is high or I’m not quite ready to make a decision, I turn on “Track price” so I’ll get a notification if it drops.
But there are also folks on my list who I don’t know as well…and there are a few White Elephant gifts I’ll need, too. For these purposes, I keep an eye on the deals feed on the Shopping tab. I also take note of the price badges on product cards — they’ll tell you things like “$5 off” or “25% off,” which can be helpful so I know if the deal I’m getting is actually a good one or just a small price drop.
Stay organized in Gmail and Sheets
Once I decide on a gift, it goes in my “gift tracker” that I use Google Sheets to make. I keep track of what I bought and whether I’ve wrapped and delivered it or not. (Go ahead and make a copy of my template and create your own if you want.)
And when the actual purchase confirmation or receipt hits my inbox, I add it to a label I’ve made for gifts. All these emails are nested under a designated folder so they aren’t mixed in with the rest of my emails. Plus, that way, if I missed the mark with a present, it’s easy to find the gift receipt…hey, it happens to all of us.
Source: Google Ads & Commerce
Evolving automations into applications using Apps Script
Posted by Wesley Chun (@wescpy), Developer Advocate, Google Cloud
Editor’s Note: Guest authors Diego Moreno and Sophia Deng (@sophdeng) are from Gigster, a firm that builds dynamic teams made of top global talent who create industry-changing custom software.
Prelude: Data input & management … three general choices
Google Cloud provides multiple services for gathering and managing data. Google Forms paired with Google Sheets are quite popular as they require no engineering resources while being incredibly powerful, providing storage of up to 5 million rows of data and built-in analytics for small team projects.
At the other end of the spectrum, to support a high volume of users or data, Google Cloud provides advanced serverless platforms like Google App Engine (web app-hosting) and Google Cloud Functions (function/service-hosting) that can use Google Cloud Firestore for fast and scalable data storage. These are perfect for professional engineering teams that need autoscaling to respond to any level of user traffic and data input. Such apps can also be packaged into a container and deployed serverlessly on Google Cloud Run.
However, it's quite possible your needs are right in-between. Today, we're happy to present the Gigster story and their innovative use of Google Apps Script—a highly-accessible service conventionally relegated to simple macro and add-on development, but which Gigster used to its advantage, building robust systems to transform their internal operations. Apps Script is also serverless, meaning Gigster didn't have to manage any servers for their application nor did they need to find a place to host its source code.
The Gigster story
Gigster enables distributed teams of software engineers, product managers and designers to build software applications for enterprise clients. Over the past five years, Gigster has delivered thousands of projects, all with distributed software teams. Our group, the Gigster Staffing Operations Team, is responsible for assembling these teams from Gigster’s network of over 1,000 freelancers.
Two years ago, our team began building custom software to automate the multi-stage and highly manual team staffing process. Building internal software has allowed the same-size Staffing Operations Team (3 members!) to enjoy a 60x reduction in time spent staffing each role.
The Apps Script ecosystem has emerged as the most critical component in our toolkit for building this internal software, due to its versatility and ease of deployment. We want to share how one piece of the staffing process has evolved to become more powerful over time thanks to Apps Script. Ultimately, we hope that sharing this journey enables all types of teams to build their own tools and unlock new possibilities.
End-to-end automation in Google Sheets
Staffing is an operationally intensive procedure. Just finding willing and able candidates requires numerous steps:
- Gathering and formatting customer requirements.
- Communicating with candidates through multiple channels.
- Logging candidate responses.
- Processing paperwork for placement
To add complexity, many of these steps require working with different third-party applications. For awhile, we performed every step manually, tracking every piece of data generated in one central Sheet (the “Staffing Broadcast Google Sheet”). At a certain point, this back-and-forth work to log data from numerous applications became unsustainable. Although we leveraged Google Sheets features like Data Validation rules and filters, the Staffing Broadcast Sheet could not alleviate the high degree of manual processes that were required of the team.
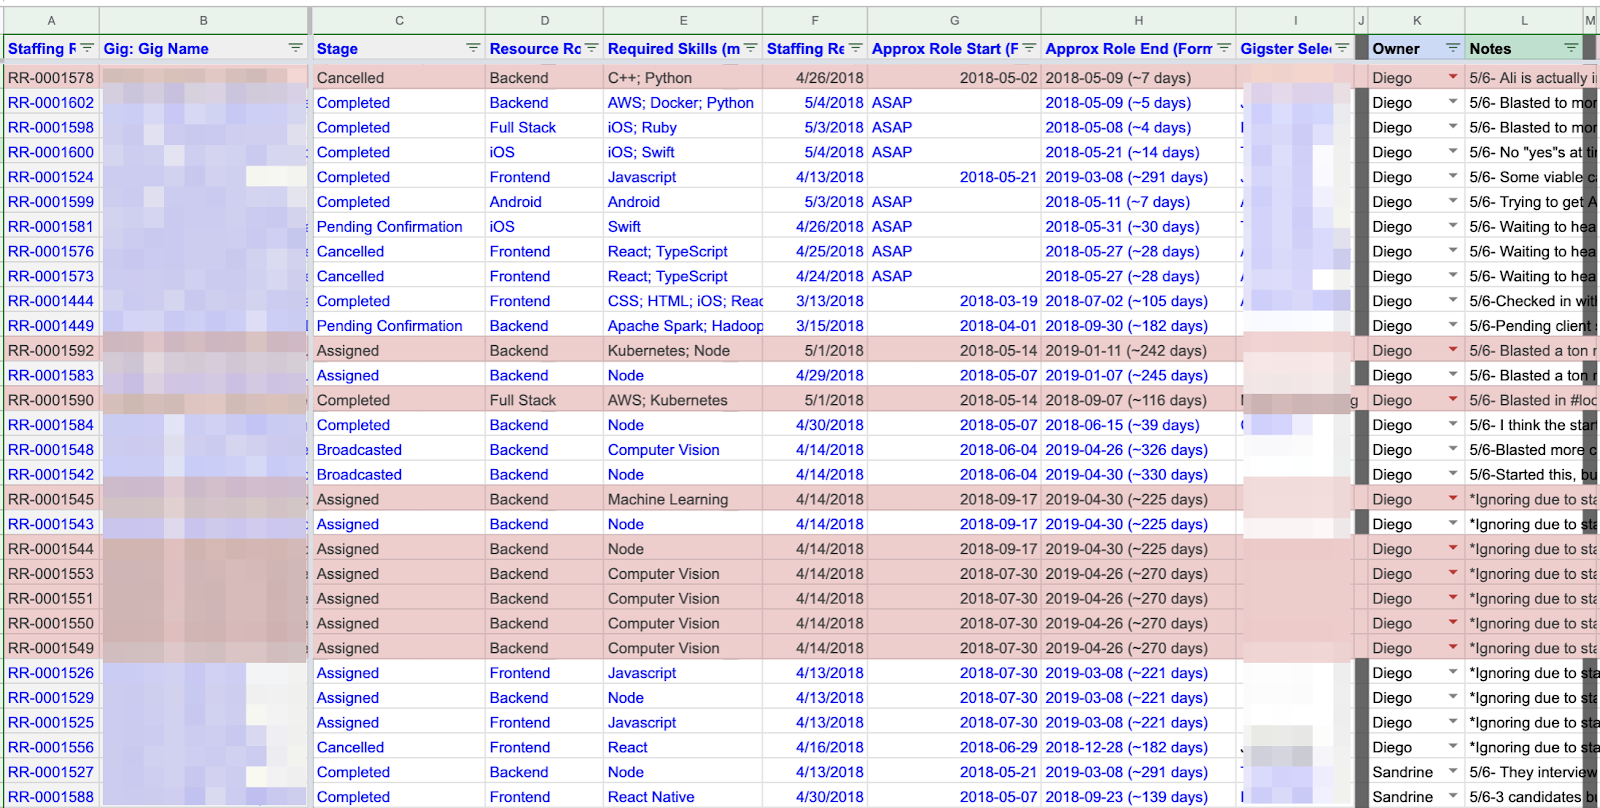
The centralized Staffing Broadcast Google Sheet provided organization, but required a high degree of manual entry for tracking candidate decisions.
The key transformation was integrating Sheets data with third-party APIs via Apps Script. This enabled us to cut out the most time-consuming operations. We no longer had to flip between applications to message candidates, wait for their replies, and then manually track responses.
To interact with these APIs, we built a user interface directly into the Staffing Broadcast Google Sheet. By introducing an information module, as well as drop-down lists and buttons, we were able to define a small set of manual actions versus the much wider list of tasks the tool would perform automatically across multiple applications.

By integrating Google Apps Script with third-party APIs and creating a user interface, we evolved the Staffing Broadcast Tool to centralize and automate almost every step of the staffing process.
doPost() is the key function in our staffing tool that facilitates third-party services triggering our Apps Script automations. Below is a snippet of how we listened to candidates' responses from a third-party messaging application. In this case, queueing the third-party message in a Google Sheet so it can be processed with improved error-handling.
/**
 * Receive POST requests and record to queue.
 */
doPost(e) {
  var payload = e.postData.contents;
  SpreadsheetApp.openById(SPREADSHEET_ID)
    .getSheetByName("Unprocessed")
    .appendRow([payload]);
  return ContentService.createTextOutput(""); // Return 200
}
Almost all manual work associated with finding candidates was automated through the combination of integrations with third-party APIs and having a user interface to perform a small, defined set of actions. Our team’s day-to-day became shockingly simple: select candidates to receive messages within the Staffing Broadcast Tool, then click the “Send Broadcast” button. That’s it. The tool handled everything else.
Leveraging Sheets as our foundation, we fundamentally transformed our spreadsheet into a custom software application. The spreadsheet went from a partially automated datastore to a tool that provided an end-to-end automated solution, requiring only the click of a few buttons to execute.
Evolution into a standalone application
While satisfied, we understood that having our application live in Google Sheets had its limitations, namely, it was difficult for multiple team members to simultaneously use the tool. Using doGet(), the sibling to doPost(), we began building an HTML frontend to the Staffing Broadcast Tool. In addition to resolving difficulties related to multiple users being in a spreadsheet, it also allowed us to build an easier-to-use and more responsive tool by leveraging Bootstrap & jQuery.
Having multiple users in a single Google Sheet can create conflicts, but Apps Script allowed us to build a responsive web app leveraging common libraries like Bootstrap & jQuery that eliminated those problems while providing an improved user experience.
When other teams at Gigster got wind of what we built, it was easy to grant access to others beyond the Staffing Operations Team. Since Apps Script is part of the G Suite developer ecosystem, we relied on Google’s security policies to help deploy our tools to larger audiences.
While this can be done through Google’s conventional sharing tools, it can also be done with built-in Apps Script functions like Session.getActiveUser() that allow us to restrict access to specific Google users. In our case, those within our organization plus a few select users.
To this day, we continue to use this third version of the Staffing Broadcast Tool in our daily operations as it supports 100% of all client projects at Gigster.
Conclusion
By fundamentally transforming the Staffing Broadcast Tool with Apps Script, Gigster’s Staffing Operations Team increased its efficiency while supporting the growth of our company. Inspired by these business benefits, we applied this application-building approach using Apps Script for multiple tools, including candidate searching, new user onboarding, and countless automations.
Our team’s psychological shift about how we view what we are capable of, especially as a non-engineering team, has been the most valuable part of this journey. By leveraging an already familiar ecosystem to build our own software, we have freed team members to become more self-sufficient and valuable to our customers.
To get started on your Apps Script journey, we recommend you check out the Apps Script Fundamentals playlist and the official documentation. And if you're a freelancer looking to build software applications for clients, we’re always looking for talented software engineers, product managers or designers to join Gigster’s Talent Network.
Thank you to Sandrine Bitton, the third member of the Staffing Operations Team, for all her help in the development of the Staffing Broadcast Tool.
Source: Google Developers Blog
Version control to Major Tom—keeping track of work in G Suite
How many times have you worked in a document only to realize halfway through that you’re editing an outdated version? Beyond being frustrating, this can cause confusion and slow down your project. One of the great things about working in cloud-native tools like G Suite is that everything is automatically saved. You never have to worry if you’re working on the most up-to-date version of a document because your apps do that for you.
But for the times that you need to go back and see changes, it’s simple. Go to File > Version history > See version history and view a complete list of changes to your document in one place. You can restore previous versions of a document there, too.
Another trick is to simply click the text at the top of your navigation bar that says “last edit was…” or “all changes saved” in Google Docs. If you hover over that text, it will actually tell you what the last change to the document was and who made it. Or if you’re returning to a document, you can click “See new changes” and the Doc will highlight edits that have been made since your last visit.
Read on for more tips on how to keep track of work in G Suite.
Take it a step further
Beyond viewing versions, there are other cool things you can do to keep track of work in G Suite. You can:
1. Make copies of specific versions.
This is great for sharing “before” and “after” versions of your work with your boss. You can make copies of specific versions within version history. Click the three dot icon next to your selected version and choose “make a copy” to have a second record.
2. Name specific versions of your work.
In version history, you can keep track of your work by naming individual versions in your list. Because all of your changes are saved in the cloud, it’s easy to go back and change version names instead of having ten different versions of a “Final” document floating in email threads. Bonus points for creative names!
3. See who’s viewed your work and when.
If you’ve ever wondered who specifically has looked at your work, there’s a way for you to view activity within Google Docs, Sheets or Slides. Those folks who use paid versions can go to Tools > Activity dashboard and see detail about the number of people reviewing their document, who specifically has reviewed and viewership trends. If you want to get there quicker, you can use this keyboard shortcut to see the activity dashboard: Ctrl + Alt/Option + T, then click Z.
4. Set up notifications to see when changes are made in Sheets.
If you’re working in a spreadsheet to track a project, you may want to see regular updates for when changes are made. You can set up notifications to alert you of changes immediately after someone changes data in a cell. Select Tools > Notification rules and choose the settings you prefer.
Don’t let version issues slow down your work. Use these tips to maneuver past mix-ups.
Source: The Official Google Blog
Version control to Major Tom—keeping track of work in G Suite
How many times have you worked in a document only to realize halfway through that you’re editing an outdated version? Beyond being frustrating, this can cause confusion and slow down your project. One of the great things about working in cloud-native tools like G Suite is that everything is automatically saved. You never have to worry if you’re working on the most up-to-date version of a document because your apps do that for you.
But for the times that you need to go back and see changes, it’s simple. Go to File > Version history > See version history and view a complete list of changes to your document in one place. You can restore previous versions of a document there, too.
Another trick is to simply click the text at the top of your navigation bar that says “last edit was…” or “all changes saved” in Google Docs. If you hover over that text, it will actually tell you what the last change to the document was and who made it. Or if you’re returning to a document, you can click “See new changes” and the Doc will highlight edits that have been made since your last visit.
Read on for more tips on how to keep track of work in G Suite.
Take it a step further
Beyond viewing versions, there are other cool things you can do to keep track of work in G Suite. You can:
1. Make copies of specific versions.
This is great for sharing “before” and “after” versions of your work with your boss. You can make copies of specific versions within version history. Click the three dot icon next to your selected version and choose “make a copy” to have a second record.
2. Name specific versions of your work.
In version history, you can keep track of your work by naming individual versions in your list. Because all of your changes are saved in the cloud, it’s easy to go back and change version names instead of having ten different versions of a “Final” document floating in email threads. Bonus points for creative names!
3. See who’s viewed your work and when.
If you’ve ever wondered who specifically has looked at your work, there’s a way for you to view activity within Google Docs, Sheets or Slides. Those folks who use paid versions can go to Tools > Activity dashboard and see detail about the number of people reviewing their document, who specifically has reviewed and viewership trends. If you want to get there quicker, you can use this keyboard shortcut to see the activity dashboard: Ctrl + Alt/Option + T, then click Z.
4. Set up notifications to see when changes are made in Sheets.
If you’re working in a spreadsheet to track a project, you may want to see regular updates for when changes are made. You can set up notifications to alert you of changes immediately after someone changes data in a cell. Select Tools > Notification rules and choose the settings you prefer.
Don’t let version issues slow down your work. Use these tips to maneuver past mix-ups.
Source: Drive
ICYMI in May: here’s what happened in G Suite
While Laurel vs. Yanny dominated office chatter this past month, businesses also got their first taste of working in the all-new Gmail. Packed with advanced security features, more integrations and new applications of Google’s artificial intelligence, Gmail is already receiving positive feedback like this, this and this from users.
To experiment with the new Gmail in your personal Gmail accounts, go to Settings in the top right of your inbox and select “Try the new Gmail.” It’s also available for G Suite businesses to use in the Early Adopter Program (EAP).

We all have that one coworker who we rely on for tips on how to master spreadsheets, draft functions, organize email and more. We want to empower anyone who uses G Suite to become the go-to “pro” in the office. To help, we’re kicking off a bimonthly series called “G Suite Pro Tips.”
This month, a Google developer expert breaks down how to combine data from one spreadsheet into another spreadsheet in less than two minutes:


→ Now you can work offline with ease in the new Gmail. Open Gmail in Chrome browser and search, write, delete or archive up to three months worth of messages.
→ We’ve made it easier for IT admins to export and download a copy of data securely from core services like Gmail, Google Docsand more. Navigate to the Tools section in the right-side slideout menu of the Admin console and select “Data Export.”
→ We made some minor changes to Drive’s user interface (UI), stuff like colors and fonts.

→ We're rolling out Hangouts Meet to new regions. Welcome Colombia, Croatia, Lithuania and Portugal! We’re also automatically enabling Hangouts Meet (instead of Classic Hangouts) for all G Suite domains. Now, you’ll see Meet video meeting details in your Google Calendar events.
→ We’ve expanded Braille support for Sheets on Windows computers. Now you can use Braille on ChromeOS, Windows and Mac systems. Learn more.
→ Jamboard is now Bluetooth-enabled. Connect Bluetooth Conferencing devices (speaker and microphone combined) for your next jam session.
Check out a full recap of all product updates in May (PDF version).Source: Drive
ICYMI in May: here’s what happened in G Suite
While Laurel vs. Yanny dominated office chatter this past month, businesses also got their first taste of working in the all-new Gmail. Packed with advanced security features, more integrations and new applications of Google’s artificial intelligence, Gmail is already receiving positive feedback like this, this and this from users.
To experiment with the new Gmail in your personal Gmail accounts, go to Settings in the top right of your inbox and select “Try the new Gmail.” It’s also available for G Suite businesses to use in the Early Adopter Program (EAP).
We all have that one coworker who we rely on for tips on how to master spreadsheets, draft functions, organize email and more. We want to empower anyone who uses G Suite to become the go-to “pro” in the office. To help, we’re kicking off a bimonthly series called “G Suite Pro Tips.”
This month, a Google developer expert breaks down how to combine data from one spreadsheet into another spreadsheet in less than two minutes:
→ Now you can work offline with ease in the new Gmail. Open Gmail in Chrome browser and search, write, delete or archive up to three months worth of messages.
→ We’ve made it easier for IT admins to export and download a copy of data securely from core services like Gmail, Google Docsand more. Navigate to the Tools section in the right-side slideout menu of the Admin console and select “Data Export.”
→ We made some minor changes to Drive’s user interface (UI), stuff like colors and fonts.
→ We're rolling out Hangouts Meet to new regions. Welcome Colombia, Croatia, Lithuania and Portugal! We’re also automatically enabling Hangouts Meet (instead of Classic Hangouts) for all G Suite domains. Now, you’ll see Meet video meeting details in your Google Calendar events.
→ We’ve expanded Braille support for Sheets on Windows computers. Now you can use Braille on ChromeOS, Windows and Mac systems. Learn more.
→ Jamboard is now Bluetooth-enabled. Connect Bluetooth Conferencing devices (speaker and microphone combined) for your next jam session.
Source: Drive
G Suite Pro Tips: how to sync one spreadsheet to another in Google Sheets
When it comes to analyzing data at work, we often have to pull information from several different sources in order to see the big picture. But if you need to manage product inventory or report on quarterly sales figures, spending time flipping between spreadsheets or manually copying and pasting data into one place can take up too much time. There’s a better option.
With G Suite—Google’s suite of cloud-based collaboration and productivity apps—there are a ton of ways you can skip repetitive tasks, including in Google Sheets.
Today, we’re kicking off a tips series to help you become a G Suite pro—starting with how to combine data from one spreadsheet into another. Check it out.
Combining data from two Google Sheets in four steps
With Sheets, it’s easy to combine data into one spreadsheet to create a single source of truth.
Step 1: Identify the spreadsheets you want to combine.
Pull up the two spreadsheets that you’d like to import data between. You should have the original spreadsheet (Ex: “Sales Revenue”) and the one you want to add information into (Ex: “Product Inventory”).
Step 2: Grab two things from the original sheet.
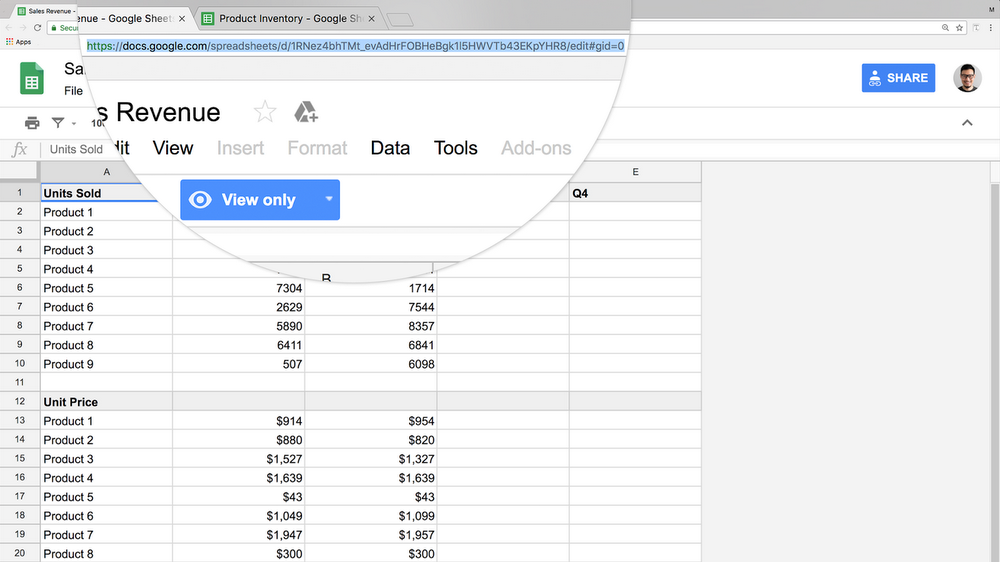
You need two pieces of information from the original spreadsheet in order to move the data: the spreadsheet URL and the range of cells where you want to pull the data from. In this example, our original spreadsheet’s name is “Sales Revenue.”
First, highlight and copy the full spreadsheet URL from the original spreadsheet (Note: you can also use the spreadsheet “key,” which is a code hidden inside the URL between the “d/” and “/edit.” It looks like a jumbled mix of letters and numbers.).
Next, before you switch to the new spreadsheet, make sure to note the range of cells where you want to pull the data from in the original spreadsheet. For example, A:1 to C:10.
Step 3: Use a Google Sheets function to port your data over.
Now we use the IMPORTRANGE function. First, click into the new spreadsheet where you’d like to add data into. In this example, it’s named “Product Inventory.” Insert columns or rows into the spreadsheet where you want to put data.
Next, type =IMPORTRANGE in the cell (you can choose to use all caps or not, it doesn’t matter.). The function will then ask you for three things:
- The URL of the original spreadsheet (or the spreadsheet key, both options work.)
- The name of the specific tab in your spreadsheet that you’re pulling information out of
- The range of cells for data you need
It will look similar to this:
=IMPORTRANGE(“https://docs.google.com/spreadsheets/d/1RNez4bhTMt_evAdHrFOBHeBgk1l5HAWVTb43EKpYHR8/edit#gid=0,””Sales Revenue by Quarter!A1:C10”)
It’s important to note that you have to use the specific name of the tab in the sheet in the formula. So for this example, the name of the original spreadsheet housing multiple datasets is called “Sales Revenue,” but the name of the specific tab with our data in it is called “Sales Revenue by Quarter.” We want to use the specific tab’s name to avoid our function breaking in the future when new sheets or tabs are created.
Oh and another trick: don’t forget to add the exclamation point (!) before the data range. That’s important, too.
Step 4: Import your data.
After you’ve added your IMPORTRANGE formula, you can click enter.
If it’s the first time you’ve imported data from that particular spreadsheet, a pop-up might appear. Don’t worry! This security check makes sure you’re okay with granting any collaborators on this spreadsheet access to data that lives in another spreadsheet. It will ask you to “Allow access” when you see the #REF in your cell. Go ahead and click yes.
Voilà! Your data will appear in the new spreadsheet.
Focus on work that’s important
Google Sheets has more than 400 functions you can use to help speed up work. To learn more about how cloud-based tools like Sheets can help businesses uncover insights quicker—and, as a result, encourage employees to spend time on strategic work—check out this post.Source: The Official Google Blog
Think macro: record actions in Google Sheets to skip repetitive work
Since their debut nearly 40 years ago, spreadsheets have remained core to how businesses get work done. From analyzing quarterly revenue to updating product inventory, spreadsheets are critical to helping companies gather and share data to inform quicker decisions—but what else can you do if they’re in the cloud?
We’ve been focused on making Google Sheets better for businesses for this reason, which is why we’ve recently added new features to help teams analyze and visualize their data. Today we’re adding more updates to Sheets, including a way to record macros in the cloud to automate repetitive tasks, as well as more formatting options. Check it out.
Record macros in Sheets, skip mundane tasks
We want to help companies automate work by approaching macros differently: cloud-first. Starting today, you can record macros in Sheets. Let’s say you need to format new data imports or build the same chart across multiple sheets of quarterly data. Repeating the same steps manually can take hours, but the Sheets macro recorder lets you record those actions and play them back on command without having to write any code.Here’s how it works: when you record a macro, Sheets converts the macro actions into an Apps Script automatically. If you want to update your macro, you can simply edit the script directly instead of having to re-record the macro from scratch. You can also write your own Apps Script functions and import them as new macros.
The best part about Sheets Macros is that they’re built for use in cloud-based files, which means that teams can run macros at the same time that others are working in the sheet without interrupting them. For example, a finance team having a budget meeting can run macros while reviewing the same spreadsheet. It also means that coworkers or clients won’t be forced to download sensitive files to use your macros. Since your Sheets files are in the cloud, you can keep tighter controls over who can view and re-share your data.
More updates to Sheets
You may have noticed that over the past few years we’ve put effort toward building Sheets features to help businesses view, analyze and share their data more easily. This includes adding new chart types (waterfall and 3D), ways to embed charts while keeping data up-to-date in Docs and Slides (even if you move files), more functions (up to 400+ now), additional formatting, print options and more.
Today, we’re adding even routinely requested features, including the ability to add printing page breaks, custom paper sizes, more options for row and column grouping and a way to add checkboxes in cells. We’ve also made it possible for you to group your data by time frame (like week, month or year) when you create pivot tables.
Speaking of pivot tables, our engineering team has also been hard at work bringing the power of Google’s artificial intelligence into Sheets to help teams know what their data knows. You might have noticed that we recently added intelligent pivot tables in Sheets to help analyze and find new insights, no matter how skilled you are at data analytics.
Companies like Whirlpool Corporation and Sanmina are using Sheets for more collaborative data analysis. These latest additions are designed to make Sheets a go-to resource for businesses and will roll out over the next few weeks. Learn more about Sheets on our Learning Center.