Posted by Wesley Chun (@wescpy), Developer Advocate, Google Cloud
 |
Introduction
Recently, we discussed containerizing App Engine apps for Cloud Run, with or without Docker. But what about Cloud Functions… can App Engine users take advantage of that platform somehow? Back in the day, App Engine was always the right decision, because it was the only option. With Cloud Functions and Cloud Run joining in the serverless product suite, that's no longer the case.
Back when App Engine was the only choice, it was selected to host small, single-function apps. Yes, when it was the only option. Other developers have created huge monolithic apps for App Engine as well… because it was also the only option. Fast forward to today where code follows more service-oriented or event-driven architectures. Small apps can be moved to Cloud Functions to simplify the code and deployments while large apps could be split into smaller components, each running on Cloud Functions.
Refactoring App Engine apps for Cloud Functions
Small, single-function apps can be seen as a microservice, an API endpoint "that does something," or serve some utility likely called as a result of some event in a larger multi-tiered application, say to update a database row or send a customer email message. App Engine apps require some kind web framework and routing mechanism while Cloud Function equivalents can be freed from much of those requirements. Refactoring these types of App Engine apps for Cloud Functions will like require less overhead, helps ease maintenance, and allow for common components to be shared across applications.
Large, monolithic applications are often made up of multiple pieces of functionality bundled together in one big package, such as requisitioning a new piece of equipment, opening a customer order, authenticating users, processing payments, performing administrative tasks, and so on. By breaking this monolith up into multiple microservices into individual functions, each component can then be reused in other apps, maintenance is eased because software bugs will identify code closer to their root origins, and developers won't step on each others' toes.
Migration to Cloud Functions
In this latest episode of Serverless Migration Station, a Serverless Expeditions mini-series focused on modernizing serverless apps, we take a closer look at this product crossover, covering how to migrate App Engine code to Cloud Functions. There are several steps you need to take to prepare your code for Cloud Functions:
- Divest from legacy App Engine "bundled services," e.g., Datastore, Taskqueue, Memcache, Blobstore, etc.
- Cloud Functions supports modern runtimes; upgrade to Python 3, Java 11, or PHP 7
- If your app is a monolith, break it up into multiple independent functions. (You can also keep a monolith together and containerize it for Cloud Run as an alternative.)
- Make appropriate application updates to support Cloud Functions
The first three bullets are outside the scope of this video and its codelab, so we'll focus on the last one. The changes needed for your app include the following:
- Remove unneeded and/or unsupported configuration
- Remove use of the web framework and supporting routing code
- For each of your functions, assign an appropriate name and install the request object it will receive when it is called.
Regarding the last point, note that you can have multiple "endpoints" coming into a single function which processes the request path, calling other functions to handle those routes. If you have many functions in your app, separate functions for every endpoint becomes unwieldy; if large enough, your app may be more suited for Cloud Run. The sample app in this video and corresponding code sample only has one function, so having a single endpoint for that function works perfectly fine here.
This migration series focuses on our earliest users, starting with Python 2. Regarding the first point, the
app.yamlfile is deleted. Next, almost all Flask resources are removed except for the template renderer (the app still needs to output the same HTML as the original App Engine app). All app routes are removed, and there's no instantiation of the Flaskappobject. Finally for the last step, the main function is renamed more appropriately tovisitme()along with a request object parameter.This "migration module" starts with the (Python 3 version of the) Module 2 sample app, applies the steps above, and arrives at the migrated Module 11 app. Implementing those required changes is illustrated by this code "diff:"

Migration of sample app to Cloud Functions Next steps
If you're interested in trying this migration on your own, feel free to try the corresponding codelab which leads you step-by-step through this exercise and use the video for additional guidance.
All migration modules, their videos (when published), codelab tutorials, START and FINISH code, etc., can be found in the migration repo. We hope to also one day cover other legacy runtimes like Java 8 as well as content for the next-generation Cloud Functions service, so stay tuned. If you're curious whether it's possible to write apps that can run on App Engine, Cloud Functions, or Cloud Run with no code changes at all, the answer is yes. Hope this content is useful for your consideration when modernizing your own serverless applications!
Source: Google Developers Blog
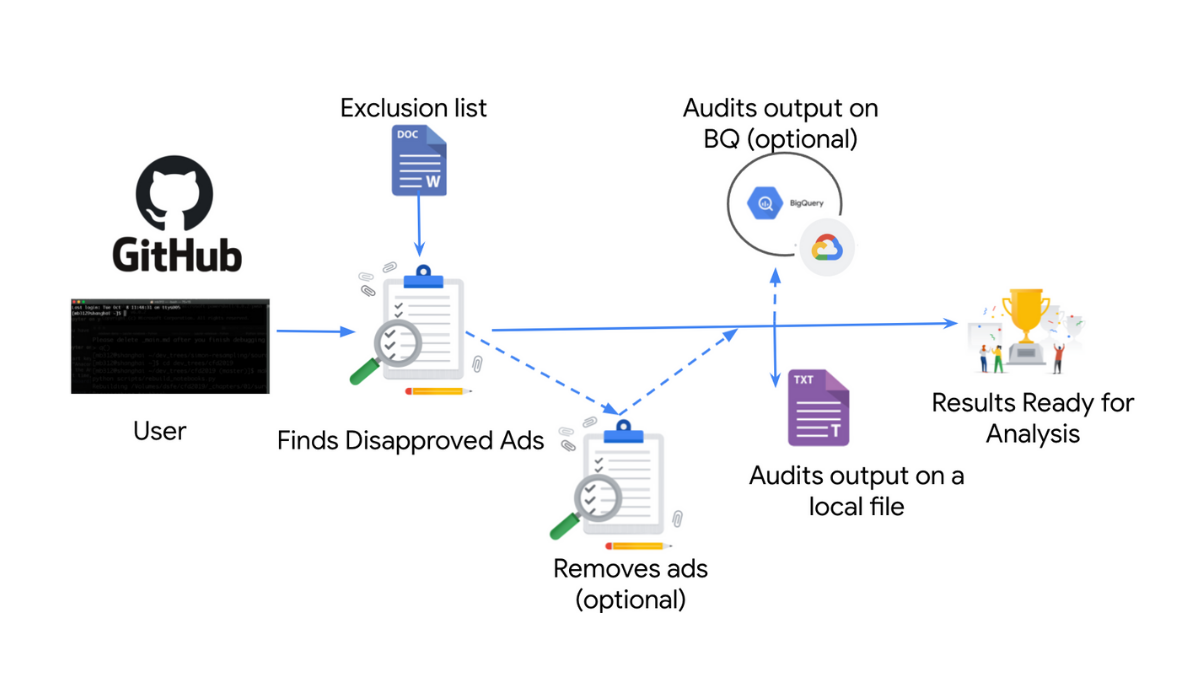
“Disapproved Ads Auditor” tool
Posted by Nir Kalush, Dvir Kalev, Chen Yoveg, Elad Ben-David
Ads Review Tool
This tool flags (and optionally deletes) policy violating ads across your accounts. Advertisers can learn from the output to ensure their ads are compliant with Google Ads Policies at all times.
Business Challenge:
Advertisers operating at scale need a solution to holistically review policy violating ads across their accounts so they can ensure compliance with Google’s Ad Policies. As Google introduces more policies and enforcement mechanisms, advertisers need to continue checking their accounts to ensure they comply with Google’s Ads Policies.
Solution Overview:
“Disapproved Ads Auditor” is a tool that enables advertisers to review at scale all disapproved ads across their Google Ads accounts. This view allows advertisers to proactively audit their accounts , analyze the ad disapprovals holistically and identify learnings to minimize and reduce submission of potentially policy violating ads.
The tool is based on a Python script, which can be run in either of the following modes:
- “Audit Mode”- export an output of disapproved ads across your accounts
- “Remove Mode” - delete currently disapproved ads and log details.
There are a few output files (see here) which are saved locally under the “output” folder and there is an optional feature to export on BigQuery for further data analysis (“Disapproved Ads Auditor” dataset).
Skills Required:
- Python 3.9+
- BigQuery API
- Google Ads API
- OAuth 2.0
Google Products Used:
- Google Ads
- BigQuery
Estimated time to implement the solution: ~2h
Implementation instructions: View on github
Impact:
“Disapproved Ads Auditor” tool automates auditing ads across your accounts to provide you insights into non compliant ads. You can take the learnings from the output to ensure ads are compliant with Google Ads Policies and avoid creating non compliant ads. Moreover, you can optionally remove disapproved ads.
Source: Google Developers Blog
Migrating App Engine push queues to Cloud Tasks
Posted by Wesley Chun (@wescpy), Developer Advocate, Google Cloud
Introduction
The previous Module 7 episode of Serverless Migration Station gave developers an idea of how App Engine push tasks work and how to implement their use in an existing App Engine ndb Flask app. In this Module 8 episode, we migrate this app from the App Engine Datastore (
ndb) and Task Queue (taskqueue) APIs to Cloud NDB and Cloud Tasks. This makes your app more portable and provides a smoother transition from Python 2 to 3. The same principle applies to upgrading other legacy App Engine apps from Java 8 to 11, PHP 5 to 7, and up to Go 1.12 or newer.Over the years, many of the original App Engine services such as Datastore, Memcache, and Blobstore, have matured to become their own standalone products, for example, Cloud Datastore, Cloud Memorystore, and Cloud Storage, respectively. The same is true for App Engine Task Queues, whose functionality has been split out to Cloud Tasks (push queues) and Cloud Pub/Sub (pull queues), now accessible to developers and applications outside of App Engine.
Migrating App Engine push queues to Cloud Tasks video
Migrating to Cloud NDB and Cloud Tasks
The key updates being made to the application:
- Add support for Google Cloud client libraries in the app's configuration
- Switch from App Engine APIs to their standalone Cloud equivalents
- Make required library adjustments, e.g., add use of Cloud NDB context manager
- Complete additional setup for Cloud Tasks
- Make minor updates to the task handler itself
The bulk of the updates are in #3 and #4 above, and those are reflected in the following "diff"s for the main application file:
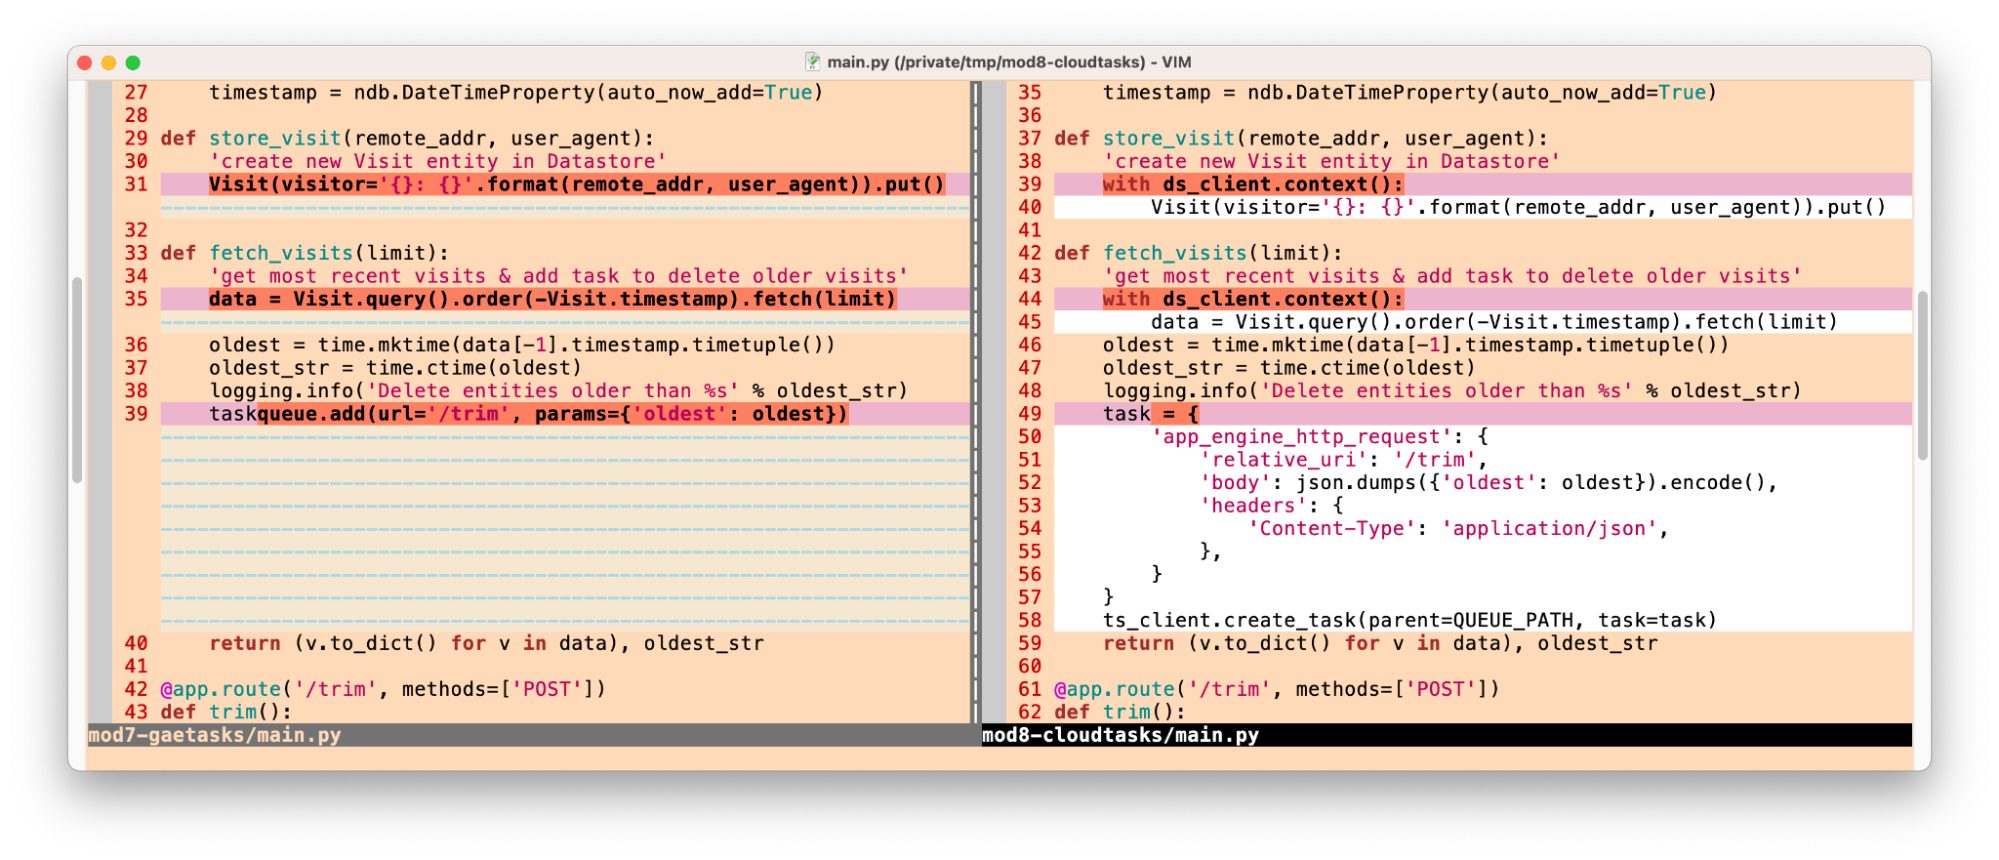
Primary differences switching to Cloud NDB & Cloud Tasks
With these changes implemented, the web app works identically to that of the Module 7 sample, but both the database and task queue functionality have been completely swapped to using the standalone/unbundled Cloud NDB and Cloud Tasks libraries… congratulations!
Next steps
To do this exercise yourself, check out our corresponding codelab which leads you step-by-step through the process. You can use this in addition to the video, which can provide guidance. You can also review the push tasks migration guide for more information. Arriving at a fully-functioning Module 8 app featuring Cloud Tasks sets the stage for a larger migration ahead in Module 9. We've accomplished the most important step here, that is, getting off of the original App Engine legacy bundled services/APIs. The Module 9 migration from Python 2 to 3 and Cloud NDB to Cloud Firestore, plus the upgrade to the latest version of the Cloud Tasks client library are all fairly optional, but they represent a good opportunity to perform a medium-sized migration.
All migration modules, their videos (when available), codelab tutorials, and source code, can be found in the migration repo. While the content focuses initially on Python users, we will cover other legacy runtimes soon so stay tuned.
Source: Google Developers Blog
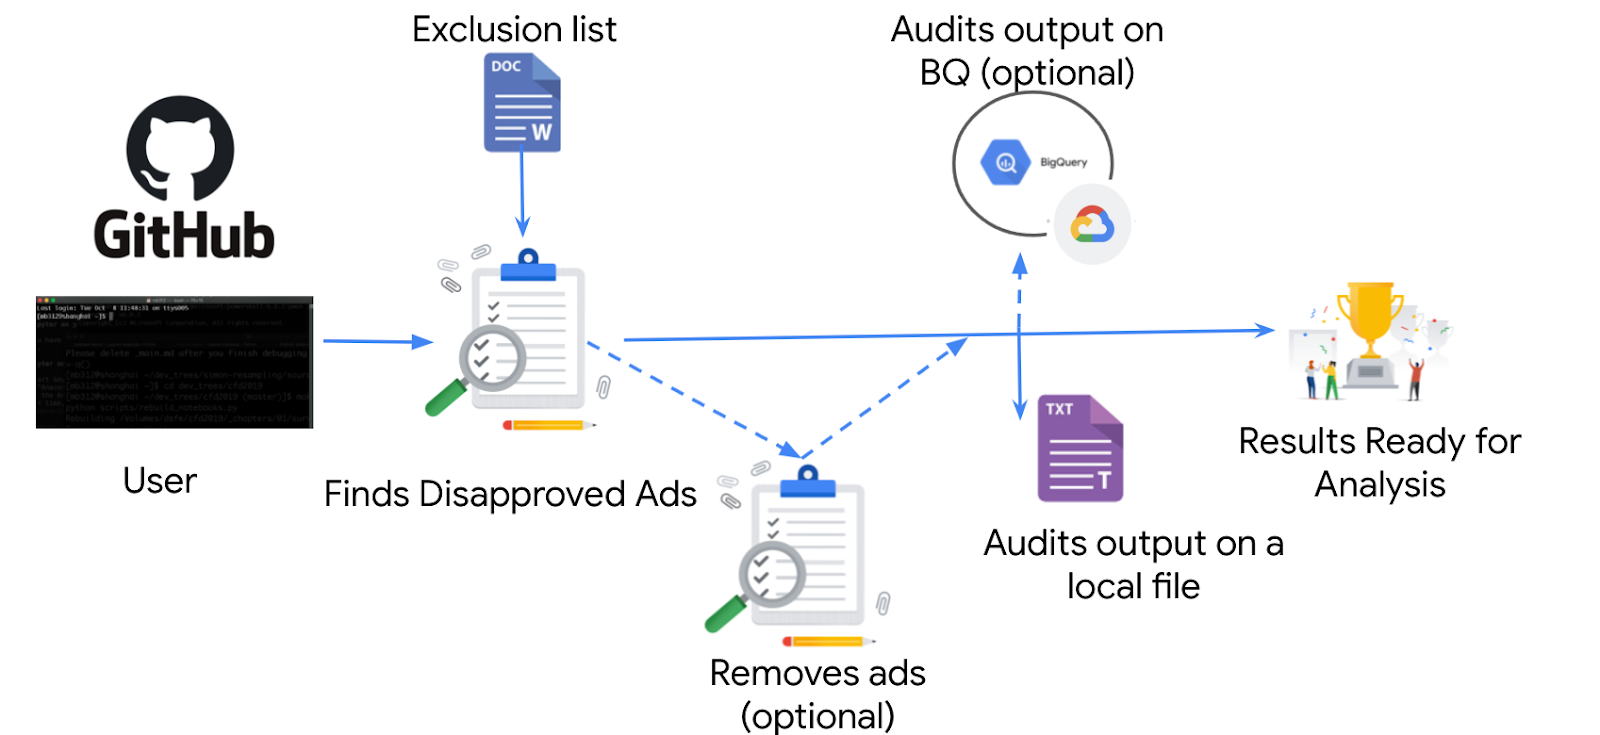
“Bowling” automatic disapproved ads remover
Posted by Elad Ben-David, Nir Kalush, Dvir Kalev, Chen Yogev, Tzahi Zilberstein, Eliran Drucker

Tagline:
In light of the new policy that might cause accounts suspension, Bowling is a mitigation tool allowing clients to act and remove disapproved ads before risking account suspension.
The tool audits (and offers the option to delete) disapproved ads that may lead eventually to account suspension in perpetuity.Business Challenge:
Starting Oct 2021 Google is introducing a new strike-based system to enforce against advertisers who repeatedly violate Google Ads policies (read more about the change here).
An advertiser’s first policy violation will result in a warning. If we detect continued violation of our policies advertisers will receive a notice they got a strike on the account, with a maximum of three strikes. The penalties applied with each strike will progressively rise. Temporary account holds will be applied for the first and second strikes, while the third strike will cause an account suspension.
Advertisers with hundreds of accounts and billions of search keywords lack the bandwidth to monitor each violation, thus might receive repeated strikes and get suspended.
Solution Overview:
“3 Strike Bowling” is an automated solution which identifies and gathers all relevant disapproved apps and includes the option to remove violating ads, in order to ensure compliance and avoid account suspension.
*The user can define an exclusion list of policy topics to ignore and not remove.It’s a simple Python script, which can be run in either of the following modes:
- “Audit Mode”- export all the disapproved ads without deleting them;
- “Remove Mode” - delete all the disapproved ads and log the disapproved ads’ details.
There are a few output files (see here) which are saved locally under the “output” folder and optionally on BigQuery as well ( “google_3_strikes” dataset).
Skills Required:
- Install technical prerequisites.
- In high level: Python 3.9+, Google Ads API, OAuth 2.0
- Run one command line via the terminal.
Google Products Used:
- Google Ads API
- BigQuery API (optional)
Estimated time to implement the solution: ~2h
Implementation instructions: View on github
Source: Google Developers Blog
How to use App Engine push queues in Flask apps
Posted by Wesley Chun (@wescpy), Developer Advocate, Google Cloud

Introduction
Since its original launch in 2008, many of the core Google App Engine services such as Datastore, Memcache, and Blobstore, have matured to become their own standalone products: for example, Cloud Datastore, Cloud Memorystore, and Cloud Storage, respectively. The same is true for App Engine Task Queues with Cloud Tasks. Today's Module 7 episode of Serverless Migration Station reviews how App Engine push tasks work, by adding this feature to an existing App Engine ndb Flask app.
App Engine push queues in Flask apps video
That app is where we left off at the end of Module 1, migrating its web framework from App Engine
webapp2to Flask. The app registers web page visits, creating a Datastore Entity for each. After a new record is created, the ten most recent visits are displayed to the end-user. If the app only shows the latest visits, there is no reason to keep older visits, so the Module 7 exercise adds a push task that deletes all visits older than the oldest one shown. Tasks execute asynchronously outside the normal application flow.Key updates
The following are the changes being made to the application:
- Add use of App Engine Task Queues (
taskqueue) API - Determine oldest visit displayed, logging and saving that timestamp
- Create task to delete old visits
- Update web page template to display timestamp threshold
- Log how many and which visits (by Entity ID) are deleted
Except for #4 which occurs in the HTML template file, these updates are reflected in the "diff"s for the main application file:
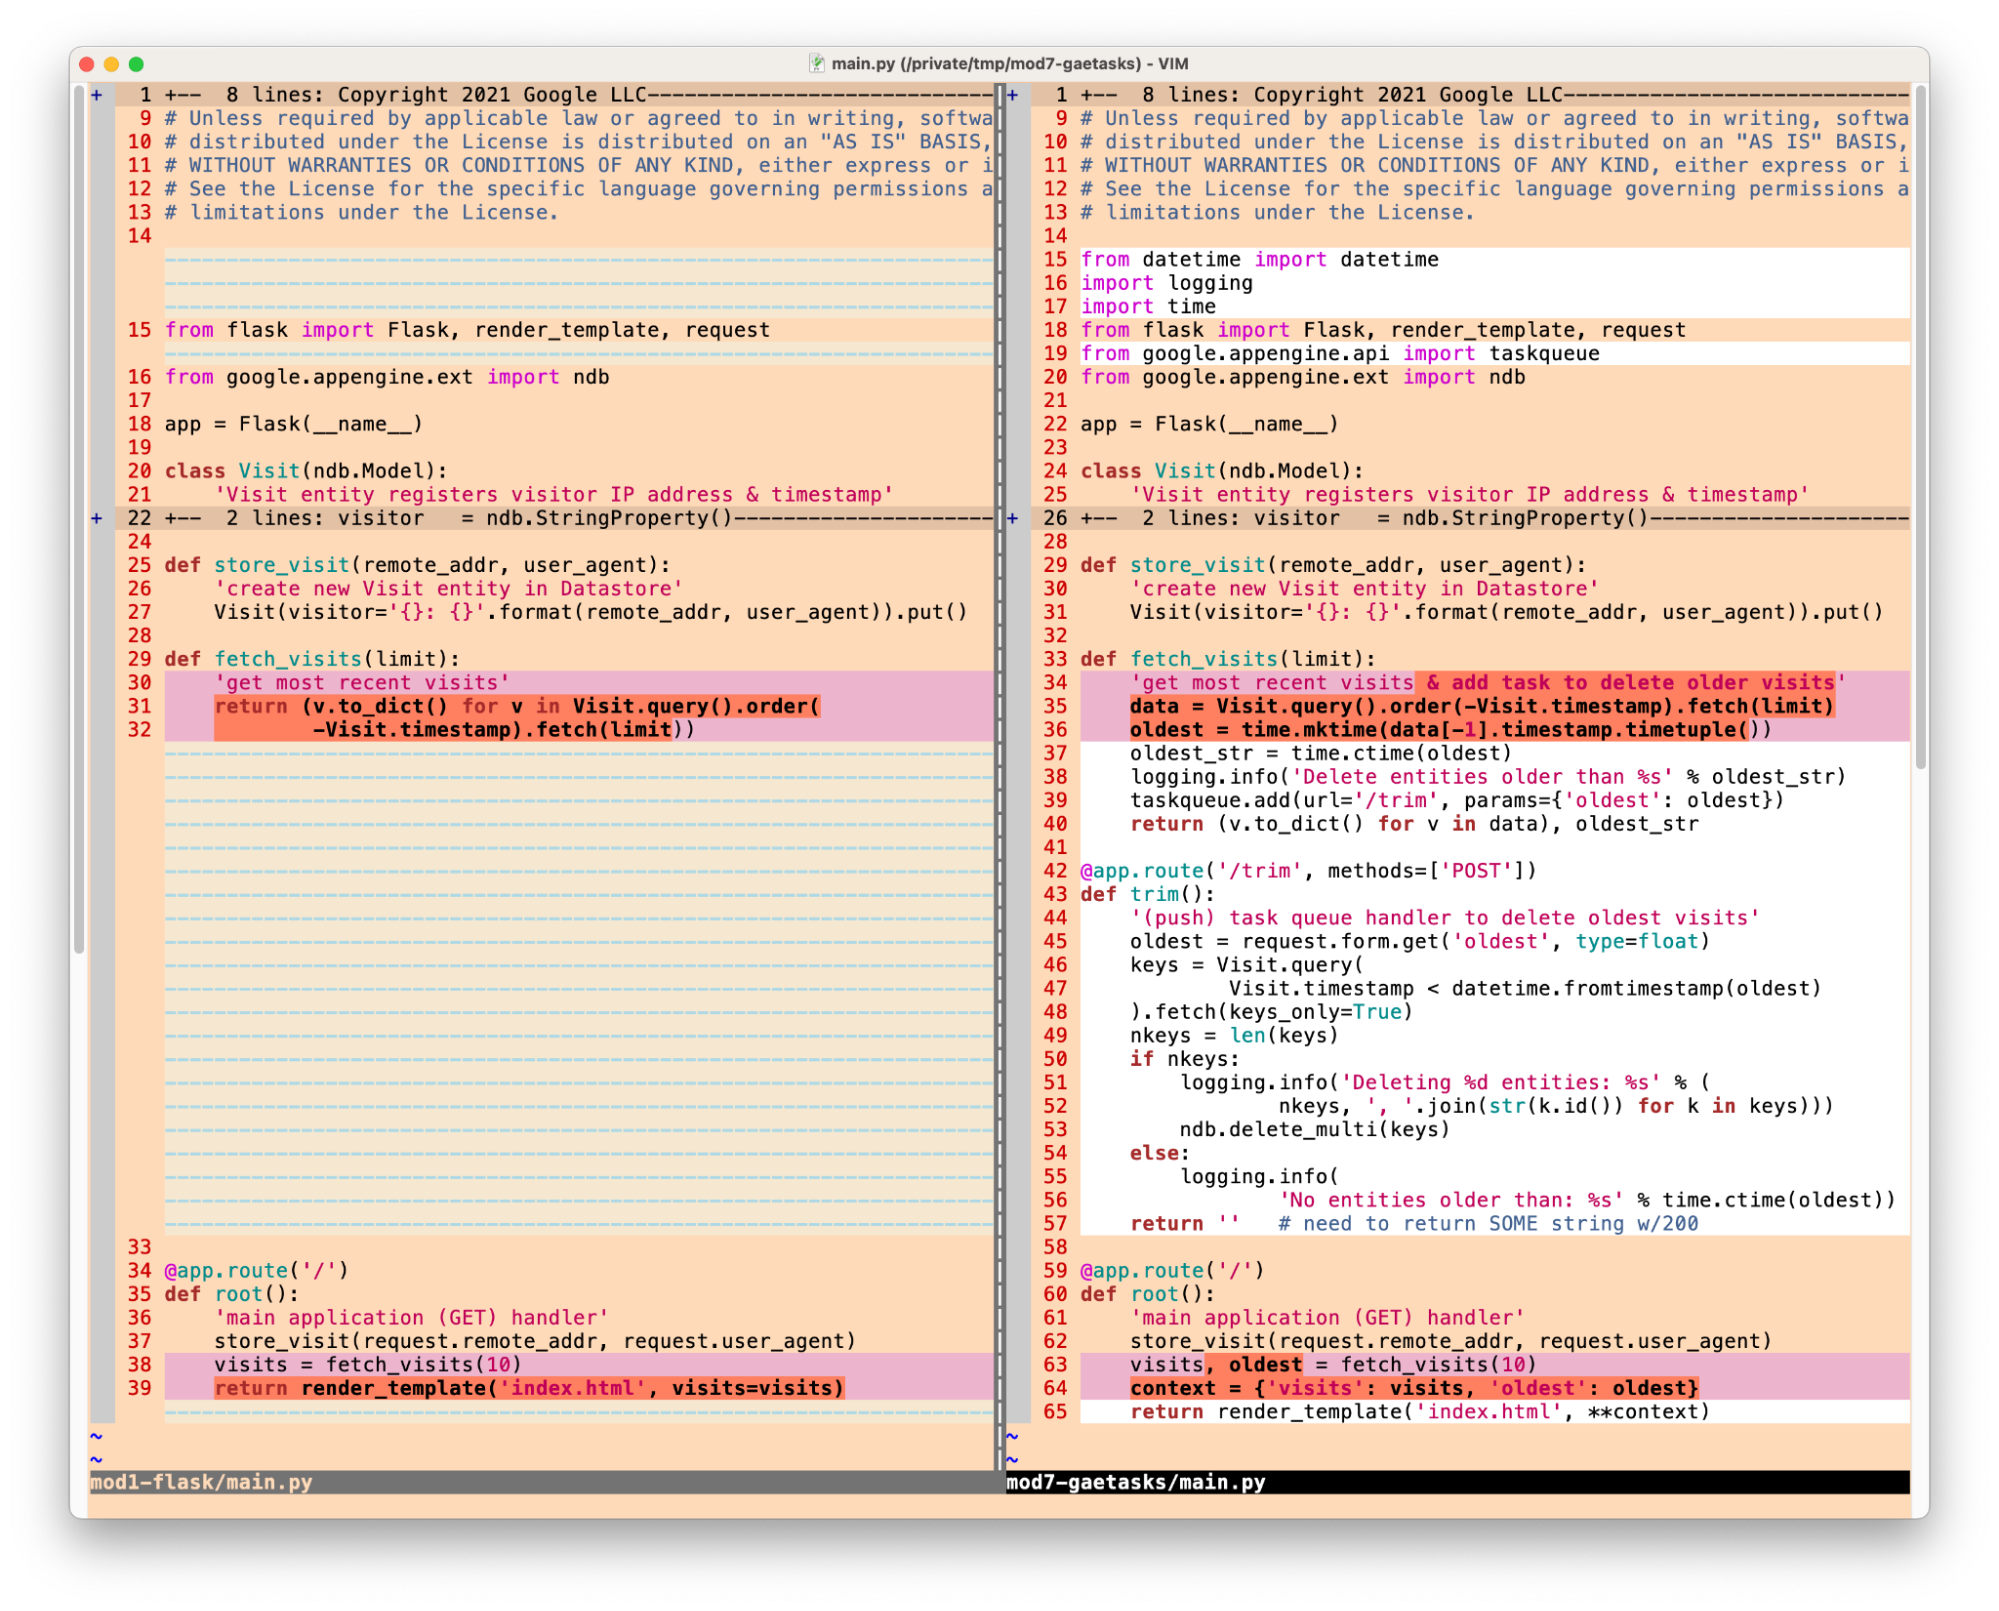
Adding App Engine push tasks application source code differences
With these changes implemented, the web app now shows the end-user which visits will be deleted by the new push task:
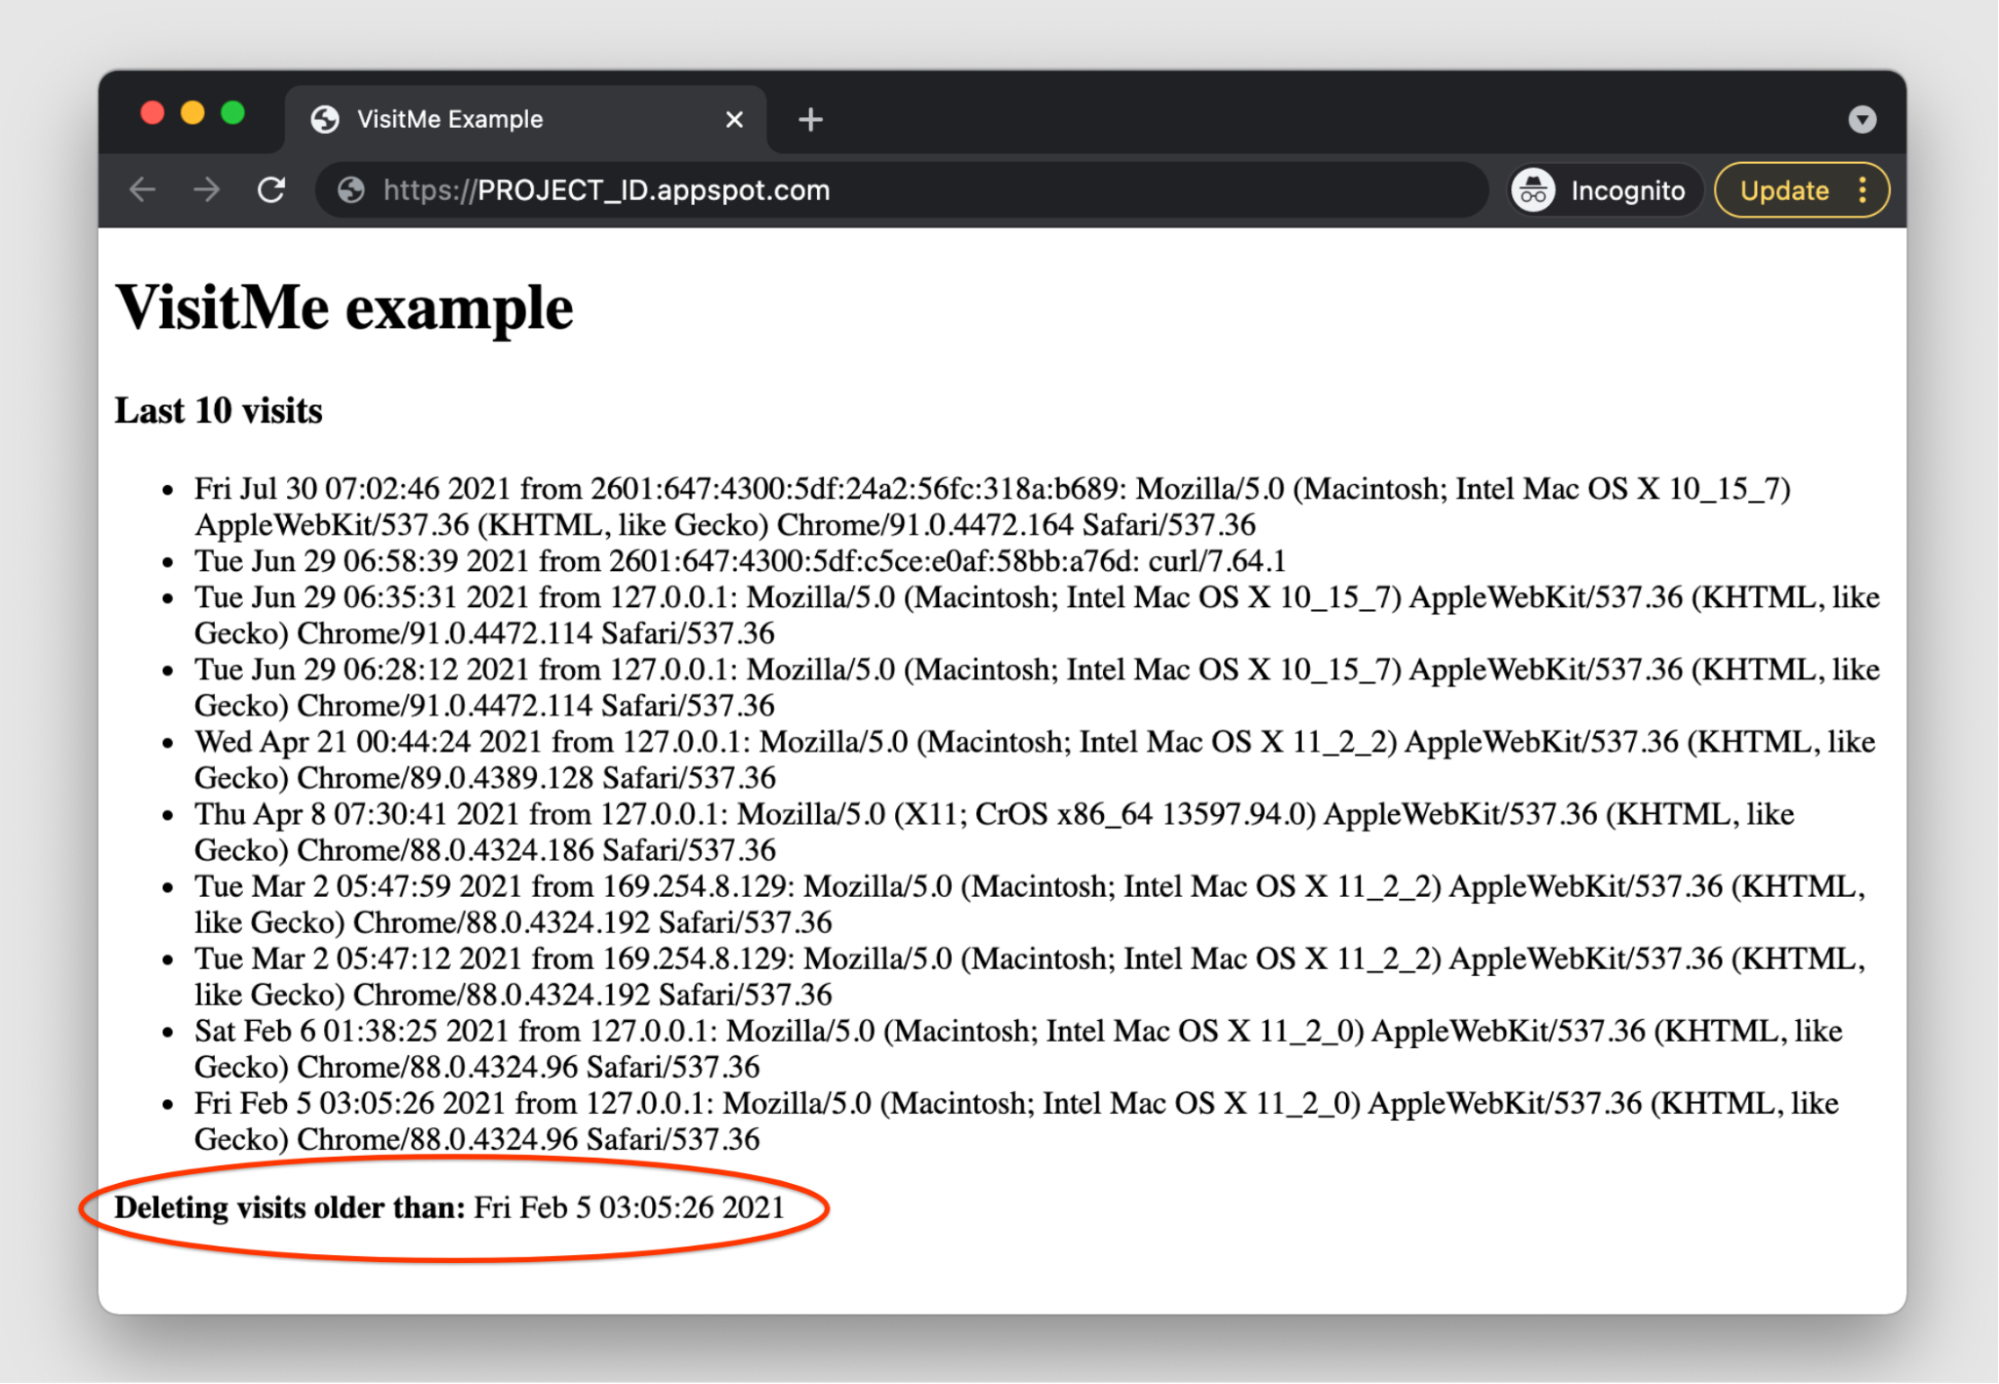
Sample application output
Next steps
To do this exercise yourself, check out our corresponding codelab which leads you step-by-step through the process. You can use this in addition to the video, which can provide guidance. You can also review the push queue documentation for more information. Arriving at a fully-functioning Module 7 app featuring App Engine push tasks sets the stage for migrating it to Cloud Tasks (and Cloud NDB) ahead in Module 8.
All migration modules, their videos (when available), codelab tutorials, and source code, can be found in the migration repo. While the content focuses initially on Python users, we will cover other legacy runtimes soon so stay tuned.
Source: Google Developers Blog
Exploring serverless with a nebulous app: Deploy the same app to App Engine, Cloud Functions, or Cloud Run
Posted by Wesley Chun (@wescpy), Developer Advocate, Google Cloud

Introduction
Google Cloud offers three distinct ways of running your code or application in a serverless way, each serving different use cases. Google App Engine, our first Cloud product, was created to give users the ability to deploy source-based web applications or mobile backends directly to the cloud without the need of thinking about servers or scaling. Cloud Functions came later for scenarios where you may not have an entire app, great for one-off utility functions or event-driven microservices. Cloud Run is our latest fully-managed serverless product that gives developers the flexibility of containers along with the convenience of serverless.
As all are serverless compute platforms, users recognize they share some similarities along with clear differences, and often, they ask:
- How different is deploying code to App Engine, Cloud Functions, or Cloud Run?
- Is it challenging to move from one to another if I feel the other may better fit my needs?
We're going to answer these questions today by sharing a unique application with you, one that can be deployed to all three platforms without changing any application code. All of the necessary changes are done in configuration.
More motivation
Another challenge for developers can be trying to learn how to use another Cloud product, such as this request, paraphrased from a user:
- I have a Google App Engine app
- I want to call the Cloud Translation API from that app
Sounds simple enough. This user went straight to the App Engine and Translation API documentation where they were able to get started with the App Engine Quickstart to get their app up and going, then found the Translation API setup page and started looking into permissions needed to access the API. However, they got stuck at the Identity and Access Management (IAM) page on roles, being overwhelmed at all the options but no clear path forward. In light of this, let's add a third question to preceding pair outlined earlier:
- How do you access Cloud APIs from a Cloud serverless platform?
The application
The app consists of a simple web page prompting the user for a phrase to translate from English to Spanish. The translated results along with the original phrase are presented along with an empty form for a follow-up translation if desired. While the majority of this app's deployments are in Python 3, there are still many users working on upgrading from Python 2, so some of those deployments are available to help with migration planning. Taking this into account, this app can be deployed (at least) eight different ways:- Local (or hosted) Flask server (Python 2)
- Local (or hosted) Flask server (Python 3)
- Google App Engine (Python 2)
- Google App Engine (Python 3)
- Google Cloud Functions (Python 3)
- Google Cloud Run (Python 2 via Docker)
- Google Cloud Run (Python 3 via Docker)
- Google Cloud Run (Python 3 via Cloud Buildpacks)

Nebulous serverless sample app files
Diving straight into the application, let's look at its primary function,translate():@app.route('/', methods=['GET', 'POST'])
def translate(gcf_request=None):
local_request = gcf_request if gcf_request else request
text = translated = None
if local_request.method == 'POST':
text = local_request.form['text'].strip()
if text:
data = {
'contents': [text],
'parent': PARENT,
'target_language_code': TARGET[0],
}
rsp = TRANSLATE.translate_text(request=data)
translated = rsp.translations[0].translated_text
context = {
'orig': {'text': text, 'lc': SOURCE},
'trans': {'text': translated, 'lc': TARGET},
}
return render_template('index.html', **context)Core component (
translate()) of sample application
Some key app components:- Upon an initial request (GET), an HTML template is rendered featuring a simple form with an empty text field for the text to translate.
- The form POSTs back to the app, and in this case, grabs the text to translate, sends the request to the Translation API, receives and displays the results to the user along with an empty form for another translation.
- There is a special "
ifdef" for Cloud Functions near the top to receive a request object because a web framework isn't used like you'd have with App Engine or Cloud Run, so Cloud Functions provides one for this reason.
requirements.txtfile* is used in all configurations, whether to install third-party packages locally, or to direct the Cloud Build system to automatically install those libraries during deployment. Beyondrequirements.txt, things start to differ:- App Engine has an
app.yamlfile and possibly anappengine_config.pyfile. - Cloud Run has either a
Dockerfile(Docker) orProcfile(Cloud Buildpacks), and possibly aservice.yamlfile. - Cloud Functions, the "simplest" of the three, has no configuration outside of a package requirements file (
requirements.txt,package.json, etc.).

"My Google Translate" MVP app (Cloud Run edition)
Next steps
The sample app can be run locally or on your own hosting server, but now you also know how to deploy it to each of Cloud's serverless platforms and what those subtle differences are. You also have a sense of the differences between each platform as well as what it takes to switch from one to another. For example, if your organization is moving to implement containerization into your software development workflow, you can migrate your existing App Engine apps to Cloud Run using Docker or using Cloud Buildpacks if you don't want to think about containers or Dockerfiles. Lastly, you now know how to access Cloud APIs from these platforms. Lastly, you now know how to access Cloud APIs from these platforms.The user described earlier was overwhelmed at all the IAM roles and options available because this type of detail is required to provide the most security options for accessing Cloud services, but when prototyping, the fastest on-ramp is to use the default service account that comes with Cloud serverless platforms. These help you get that prototype working while allowing you to learn more about IAM roles and required permissions. Once you've progressed far enough to consider deploying to production, you can then follow the best practice of "least privileges" and create your own (user-managed) service accounts with the minimal permissions required so your application functions properly.
To dive in, the code and codelabs (free, self-paced, hands-on tutorials) for each deployment are available in its open source repository. An active Google Cloud billing account is required to deploy this application to each of our serverless platforms even though you can do all of them without incurring charges. More information can be found in the "Cost" section of the repo'sREADME. We hope this sample app teaches you more about the similarities and differences between our plaforms, shows you how you can "shift" applications comfortably between them, and provides a light introduction to another Cloud API. Also check out my colleague's post featuring similar content for Node.js.Source: Google Developers Blog
An easier way to move your App Engine apps to Cloud Run
Posted by Wesley Chun (@wescpy), Developer Advocate, Google Cloud
An easier yet still optional migration
In the previous episode of the Serverless Migration Station video series, developers learned how to containerize their App Engine code for Cloud Run using Docker. While Docker has gained popularity over the past decade, not everyone has containers integrated into their daily development workflow, and some prefer "containerless" solutions but know that containers can be beneficial. Well today's video is just for you, showing how you can still get your apps onto Cloud Run, even If you don't have much experience with Docker, containers, nor
Dockerfiles.App Engine isn't going away as Google has expressed long-term support for legacy runtimes on the platform, so those who prefer source-based deployments can stay where they are so this is an optional migration. Moving to Cloud Run is for those who want to explicitly move to containerization.
Migrating to Cloud Run with Cloud Buildpacks video
So how can apps be containerized without Docker? The answer is buildpacks, an open-source technology that makes it fast and easy for you to create secure, production-ready container images from source code, without a
Dockerfile. Google Cloud Buildpacks adheres to the buildpacks open specification and allows users to create images that run on all GCP container platforms: Cloud Run (fully-managed), Anthos, and Google Kubernetes Engine (GKE). If you want to containerize your apps while staying focused on building your solutions and not how to create or maintainDockerfiles, Cloud Buildpacks is for you.In the last video, we showed developers how to containerize a Python 2 Cloud NDB app as well as a Python 3 Cloud Datastore app. We targeted those specific implementations because Python 2 users are more likely to be using App Engine's
ndbor Cloud NDB to connect with their app's Datastore while Python 3 developers are most likely using Cloud Datastore. Cloud Buildpacks do not support Python 2, so today we're targeting a slightly different audience: Python 2 developers who have migrated from App Engine ndb to Cloud NDB and who have ported their apps to modern Python 3 but now want to containerize them for Cloud Run.Developers familiar with App Engine know that a default HTTP server is provided by default and started automatically, however if special launch instructions are needed, users can add an
entrypointdirective in theirapp.yamlfiles, as illustrated below. When those App Engine apps are containerized for Cloud Run, developers must bundle their own server and provide startup instructions, the purpose of theENTRYPOINTdirective in theDockerfile, also shown below.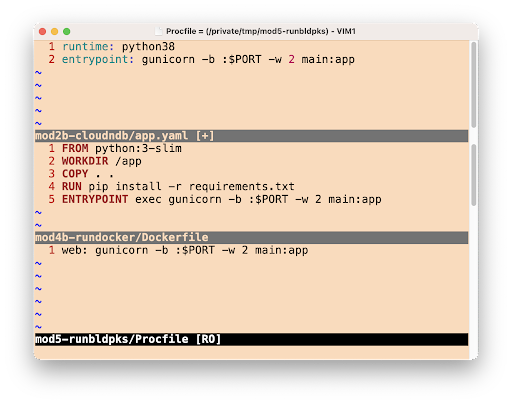
Starting your web server with App Engine (
app.yaml) and Cloud Run with Docker (Dockerfile) or Buildpacks (Procfile)In this migration, there is no
Dockerfile. While Cloud Buildpacks does the heavy-lifting, determining how to package your app into a container, it still needs to be told how to start your service. This is exactly what aProcfileis for, represented by the last file in the image above. As specified, your web server will be launched in the same way as inapp.yamland theDockerfileabove; these config files are deliberately juxtaposed to expose their similarities.Other than this swapping of configuration files and the expected lack of a
.dockerignorefile, the Python 3 Cloud NDB app containerized for Cloud Run is nearly identical to the Python 3 Cloud NDB App Engine app we started with. Cloud Run's build-and-deploy command (gcloud run deploy) will use aDockerfileif present but otherwise selects Cloud Buildpacks to build and deploy the container image. The user experience is the same, only without the time and challenges required to maintain and debug aDockerfile.Get started now
If you're considering containerizing your App Engine apps without having to know much about containers or Docker, we recommend you try this migration on a sample app like ours before considering it for yours. A corresponding codelab leading you step-by-step through this exercise is provided in addition to the video which you can use for guidance.
All migration modules, their videos (when available), codelab tutorials, and source code, can be found in the migration repo. While our content initially focuses on Python users, we hope to one day also cover other legacy runtimes so stay tuned. Containerization may seem foreboding, but the goal is for Cloud Buildpacks and migration resources like this to aid you in your quest to modernize your serverless apps!
Source: Google Developers Blog
Containerizing Google App Engine apps for Cloud Run
Posted by Wesley Chun (@wescpy), Developer Advocate, Google Cloud

An optional migration
Serverless Migration Station is a video mini-series from Serverless Expeditions focused on helping developers modernize their applications running on a serverless compute platform from Google Cloud. Previous episodes demonstrated how to migrate away from the older, legacy App Engine (standard environment) services to newer Google Cloud standalone equivalents like Cloud Datastore. Today's product crossover episode differs slightly from that by migrating away from App Engine altogether, containerizing those apps for Cloud Run.
There's little question the industry has been moving towards containerization as an application deployment mechanism over the past decade. However, Docker and use of containers weren't available to early App Engine developers until its flexible environment became available years later. Fast forward to today where developers have many more options to choose from, from an increasingly open Google Cloud. Google has expressed long-term support for App Engine, and users do not need to containerize their apps, so this is an optional migration. It is primarily for those who have decided to add containerization to their application deployment strategy and want to explicitly migrate to Cloud Run.
If you're thinking about app containerization, the video covers some of the key reasons why you would consider it: you're not subject to traditional serverless restrictions like development language or use of binaries (flexibility); if your code, dependencies, and container build & deploy steps haven't changed, you can recreate the same image with confidence (reproducibility); your application can be deployed elsewhere or be rolled back to a previous working image if necessary (reusable); and you have plenty more options on where to host your app (portability).
Migration and containerization
Legacy App Engine services are available through a set of proprietary, bundled APIs. As you can surmise, those services are not available on Cloud Run. So if you want to containerize your app for Cloud Run, it must be "ready to go," meaning it has migrated to either Google Cloud standalone equivalents or other third-party alternatives. For example, in a recent episode, we demonstrated how to migrate from App Engine ndb to Cloud NDB for Datastore access.
While we've recently begun to produce videos for such migrations, developers can already access code samples and codelab tutorials leading them through a variety of migrations. In today's video, we have both Python 2 and 3 sample apps that have divested from legacy services, thus ready to containerize for Cloud Run. Python 2 App Engine apps accessing Datastore are most likely to be using Cloud NDB whereas it would be Cloud Datastore for Python 3 users, so this is the starting point for this migration.
Because we're "only" switching execution platforms, there are no changes at all to the application code itself. This entire migration is completely based on changing the apps' configurations from App Engine to Cloud Run. In particular, App Engine artifacts such as
app.yaml,appengine_config.py, and thelibfolder are not used in Cloud Run and will be removed. ADockerfilewill be implemented to build your container. Apps with more complex configurations in theirapp.yamlfiles will likely need an equivalentservice.yamlfile for Cloud Run — if so, you'll find this app.yaml to service.yaml conversion tool handy. Following best practices means there'll also be a.dockerignorefile.App Engine and Cloud Functions are sourced-based where Google Cloud automatically provides a default HTTP server like
gunicorn. Cloud Run is a bit more "DIY" because users have to provide a container image, meaning bundling our own server. In this case, we'll pickgunicornexplicitly, adding it to the top of the existingrequirements.txtrequired packages file(s), as you can see in the screenshot below. Also illustrated is theDockerfilewheregunicornis started to serve your app as the final step. The only differences for the Python 2 equivalentDockerfileare: a) require the Cloud NDB package (google-cloud-ndb) instead of Cloud Datastore, and b) start with a Python 2 base image.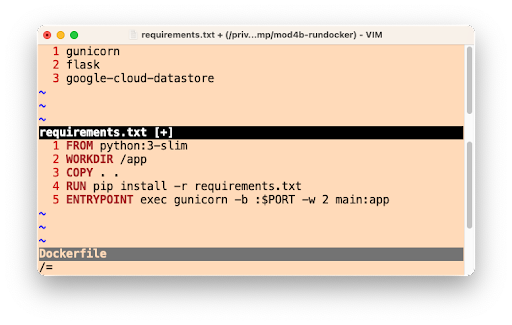
The Python 3
requirements.txtandDockerfileNext steps
To walk developers through migrations, we always "START" with a working app then make the necessary updates that culminate in a working "FINISH" app. For this migration, the Python 2 sample app STARTs with the Module 2a code and FINISHes with the Module 4a code. Similarly, the Python 3 app STARTs with the Module 3b code and FINISHes with the Module 4b code. This way, if something goes wrong during your migration, you can always rollback to START, or compare your solution with our FINISH. If you are considering this migration for your own applications, we recommend you try it on a sample app like ours before considering it for yours. A corresponding codelab leading you step-by-step through this exercise is provided in addition to the video which you can use for guidance.
All migration modules, their videos (when published), codelab tutorials, START and FINISH code, etc., can be found in the migration repo. We hope to also one day cover other legacy runtimes like Java 8 so stay tuned. We'll continue with our journey from App Engine to Cloud Run ahead in Module 5 but will do so without explicit knowledge of containers, Docker, or
Dockerfiles. Modernizing your development workflow to using containers and best practices like crafting a CI/CD pipeline isn't always straightforward; we hope content like this helps you progress in that direction!Source: Google Developers Blog
Cloud NDB to Cloud Datastore migration
Posted by Wesley Chun (@wescpy), Developer Advocate, Google Cloud
An optional migration
Serverless Migration Station is a mini-series from Serverless Expeditions focused on helping users on one of Google Cloud's serverless compute platforms modernize their applications. The video today demonstrates how to migrate a sample app from Cloud NDB (or App Engine
ndb) to Cloud Datastore. While Cloud NDB suffices as a current solution for today's App Engine developers, this optional migration is for those who want to consolidate their app code to using a single client library to talk to Datastore.Cloud Datastore started as Google App Engine's original database but matured to becoming its own standalone product in 2013. At that time, native client libraries were created for the new product so non-App Engine apps as well as App Engine second generation apps could access the service. Long-time developers have been using the original App Engine service APIs to access Datastore; for Python, this would be App Engine ndb. While the legacy
ndbservice is still available, its limitations and lack of availability in Python 3 are why we recommend users switch to standalone libraries like Cloud NDB in the preceding video in this series.While Cloud NDB lets users break free from proprietary App Engine services and upgrade their applications to Python 3, it also gives non-App Engine apps access to Datastore. However, Cloud NDB's primary role is a transition tool for Python 2 App Engine developers. Non-App Engine developers and new Python 3 App Engine developers are directed to the Cloud Datastore native client library, not Cloud NDB.
As a result, those with a collection of Python 2 or Python 3 App Engine apps as well as non-App Engine apps may be using completely different libraries (
ndb, Cloud NDB, Cloud Datastore) to connect to the same Datastore product. Following the best practices of code reuse, developers should consider consolidating to a single client library to access Datastore. Shared libraries provide stability and robustness with code that's constantly tested, debugged, and battle-proven. Module 2 showed users how to migrate from App Enginendbto Cloud NDB, and today's Module 3 content focuses on migrating from Cloud NDB to Cloud Datastore. Users can also go straight fromndbdirectly to Cloud Datastore, skipping Cloud NDB entirely.Migration sample and next steps
Cloud NDB follows an object model identical to App Engine
ndband is deliberately meant to be familiar to long-time Python App Engine developers while use of the Cloud Datastore client library is more like accessing a JSON document store. Their querying styles are also similar. You can compare and contrast them in the "diffs" screenshot below and in the video.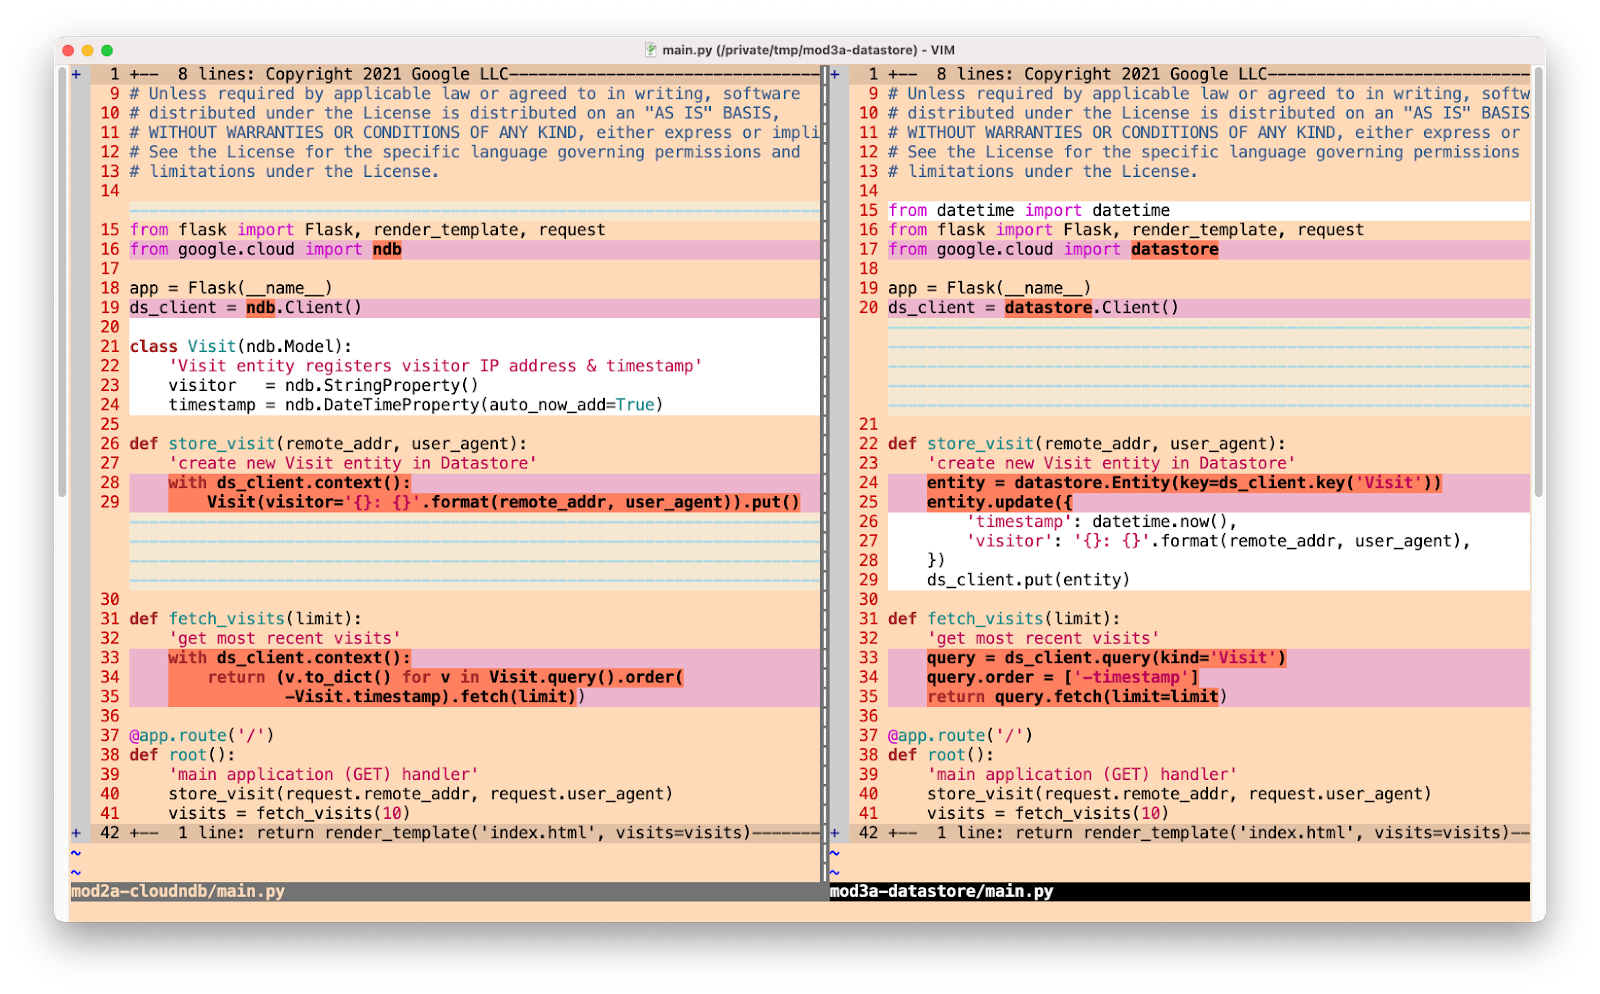
The "diffs" between the Cloud NDB and Cloud Datastore versions of the sample app
All that said, this migration is optional and only useful if you wish to consolidate to using a single client library. If your Python App Engine apps are stable with
ndbor Cloud NDB, and you don't have any code using Cloud Datastore, there's no real reason to move unless Cloud Datastore has a compelling feature inaccessible from your current client library. If you are considering this migration and want to try it on a sample app before considering for yours, see the corresponding codelab and use the video for guidance.It begins with the Module 2 code completed in the previous codelab/video; use your solution or ours as the "START". Both Python 2 (Module 2a folder) and Python 3 (Module 2b folder) versions are available. The goal is to arrive at the "FINISH" with an identical, working app but using a completely different Datastore client library. Our Python 2 FINISH can be found in the Module 3a folder while Python 3's FINISH is in the Module 3b folder. If something goes wrong during your migration, you can always rollback to START, or compare your solution with our FINISH. We will continue our Datastore discussion ahead in Module 6 as Cloud Firestore represents the next generation of the Datastore service.
All of these learning modules, corresponding videos (when published), codelab tutorials, START and FINISH code, etc., can be found in the migration repo. We hope to also one day cover other legacy runtimes like Java 8 and others, so stay tuned. Up next in Module 4, we'll take a different turn and showcase a product crossover, showing App Engine developers how to containerize their apps and migrate them to Cloud Run, our scalable container-hosting service in the cloud. If you can't wait for either Modules 4 or 6, try out their respective codelabs or access the code samples in the table at the repo above. Migrations aren't always easy, and we hope content like this helps you modernize your apps.
Source: Google Developers Blog
Migrating from App Engine ndb to Cloud NDB
Posted by Wesley Chun (@wescpy), Developer Advocate, Google Cloud
Migrating to standalone services
Today we're introducing the first video showing long-time App Engine developers how to migrate from the App Engine ndb client library that connects to Datastore. While the legacy App Engine
ndbservice is still available for Datastore access, new features and continuing innovation are going into Cloud Datastore, so we recommend Python 2 users switch to standalone product client libraries like Cloud NDB.This video and its corresponding codelab show developers how to migrate the sample app introduced in a previous video and gives them hands-on experience performing the migration on a simple app before tackling their own applications. In the immediately preceding "migration module" video, we transitioned that app from App Engine's original
webapp2framework to Flask, a popular framework in the Python community. Today's Module 2 content picks up where that Module 1 leaves off, migrating Datastore access from App Enginendbto Cloud NDB.Migrating to Cloud NDB opens the doors to other modernizations, such as moving to other standalone services that succeed the original App Engine legacy services, (finally) porting to Python 3, breaking up large apps into microservices for Cloud Functions, or containerizing App Engine apps for Cloud Run.
Moving to Cloud NDB
App Engine's Datastore matured to becoming its own standalone product in 2013, Cloud Datastore. Cloud NDB is the replacement client library designed for App Engine
ndbusers to preserve much of their existing code and user experience. Cloud NDB is available in both Python 2 and 3, meaning it can help expedite a Python 3 upgrade to the second generation App Engine platform. Furthermore, Cloud NDB gives non-App Engine apps access to Cloud Datastore.As you can see from the screenshot below, one key difference between both libraries is that Cloud NDB provides a context manager, meaning you would use the Python
withstatement in a similar way as opening files but for Datastore access. However, aside from moving code insidewithblocks, no other changes are required of the original App Enginendbapp code that accesses Datastore. Of course your "YMMV" (your mileage may vary) depending on the complexity of your code, but the goal of the team is to provide as seamless of a transition as possible as well as to preserve "ndb"-style access.
The "diffs" between the App Engine ndb and Cloud NDB versions of the sample app
Next steps
To try this migration yourself, hit up the corresponding codelab and use the video for guidance. This Module 2 migration sample "STARTs" with the Module 1 code completed in the previous codelab (and video). Users can use their solution or grab ours in the Module 1 repo folder. The goal is to arrive at the end with an identical, working app that operates just like the Module 1 app but uses a completely different Datastore client library. You can find this "FINISH" code sample in the Module 2a folder. If something goes wrong during your migration, you can always rollback to START, or compare your solution with our FINISH. Bonus content migrating to Python 3 App Engine can also be found in the video and codelab, resulting in a second FINISH, the Module 2b folder.
All of these learning modules, corresponding videos (when published), codelab tutorials, START and FINISH code, etc., can be found in the migration repo. We hope to also one day cover other legacy runtimes like Java 8 and others, so stay tuned! Developers should also check out the official Cloud NDB migration guide which provides more migration details, including key differences between both client libraries.
Ahead in Module 3, we will continue the Cloud NDB discussion and present our first optional migration, helping users move from Cloud NDB to the native Cloud Datastore client library. If you can't wait, try out its codelab found in the table at the repo above. Migrations aren't always easy; we hope this content helps you modernize your apps and shows we're focused on helping existing users as much as new ones.
Source: Google Developers Blog