Tag Archives: navigation

Prepare your app to support predictive back gestures

Posted by Jason Tang, Product Management, Diego Zuluaga, Developer Relations, and Michael Mauzy, Developer Documentation

Since we introduced gesture navigation in Android 10, users have signaled they want to understand where a back gesture will take them before they complete it.

As the first step to addressing this need, we've been developing a predictive back gesture. When a user starts their gesture by swiping back, we’ll show an animated preview of the destination UI, and the user can complete the gesture to navigate to that UI if they want – as shown in the following example.

Although the predictive back gesture won’t be visible to users in Android 13, we’re making an early version of the UI available as a developer option for testing starting in Beta 4. We plan to make the UI available to users in a future Android release, and we’d like all apps to be ready. We’re also working with partners to ensure it’s consistent across devices.

Read on for details on how to try out the new gesture and support it in your apps. Adding support for predictive back gesture is straightforward for most apps, and you can get started today.

We also encourage you to submit your feedback.

Try out the predictive back gesture in Beta 4

To try out the early version of the predictive back gesture available through the developer option, you’ll need to first update your app to support the predictive back gesture, and then enable the developer option.

Update your app to support predictive back gesture

To help make predictive back gesture helpful and consistent for users, we're moving to an ahead-of-time model for back event handling by adding new APIs and deprecating existing APIs.

The new platform APIs and updates to AndroidX Activity 1.6+ are designed to make your transition from unsupported APIs (KeyEvent#KEYCODE_BACK and OnBackPressed) to the predictive back gesture as smooth as possible.

The new platform APIs include OnBackInvokedCallback and OnBackInvokedDispatcher, which AndroidX Activity 1.6+ supports through the existing OnBackPressedCallback and OnBackPressedDispatcher APIs.

You can start testing this feature in two to four steps, depending on your existing implementation.

To begin testing this feature:


1. Upgrade to AndroidX Activity 1.6.0-alpha05. By upgrading your dependency on AndroidX Activity, APIs that are already using the OnBackPressedDispatcher APIs such as Fragments and the Navigation Component will seamlessly work when you opt-in for the predictive back gesture. 

// In your build.gradle file:
dependencies {

  // Add this in addition to your other dependencies
  implementation "androidx.activity:activity:1.6.0-alpha05"


2. Opt-in for the predictive back gesture. Opt-in your app by setting the EnableOnBackInvokedCallback flag to true at the application level in the AndroidManifest.xml.

<application

    ...

    android:enableOnBackInvokedCallback="true"

    ... >

...

</application>


If your app doesn’t intercept the back event, you're done at this step.

Note: Opt-in is optional in Android 13, and it will be ignored after this version.

3. Create a callback to intercept the system Back button/event. If possible, we recommend using the AndroidX APIs as shown below. For non-AndroidX use cases, check the platform API mentioned above.

This snippet implements handleOnBackPressed and adds the OnBackPressedCallback to the OnBackPressedDispatcher at the activity level.

 val onBackPressedCallback = objectOnBackPressedCallback(true) {

   override fun handleOnBackPressed() {

     // Your business logic to handle the back pressed event

   }

 }

 requireActivity().onBackPressedDispatcher

   .addCallback(onBackPressedCallback)


4. When your app is ready to stop intercepting the system Back event, disable the onBackPressedCallback callback.
 

onBackPressedCallback.isEnabled = webView.canGoBack()


Note: Your app may require using the platform APIs (OnBackInvokedCallback and OnBackPressedDispatcher) to implement the predictive back gesture. Read our documentation for details.

Enable the developer option to test the predictive back gesture

Once you’ve updated your app to support the predictive back gesture, you can enable a developer option (supported in Android 13 Beta 4 and higher) to see it for yourself.

To test this animation, complete the following steps:
  1. On your device, go to Settings > System > Developer options.
  2. Select Predictive back animations.
  3. Launch your updated app, and use the back gesture to see it in action.

Learn more

In addition to our detailed documentation, try out our predictive back gesture codelab in an actual implementation.

If you need a refresher on system back and predictive back gesture on Android, we recommend watching Basics for System Back.


Thank you again for all the feedback and being a part of the Android Community - we love collaborating together to provide the best experience for our users.

Improving urban GPS accuracy for your app

Posted by Frank van Diggelen, Principal Engineer and Jennifer Wang, Product Manager

At Android, we want to make it as easy as possible for developers to create the most helpful apps for their users. That’s why we aim to provide the best location experience with our APIs like the Fused Location Provider API (FLP). However, we’ve heard from many of you that the biggest location issue is inaccuracy in dense urban areas, such as wrong-side-of-the-street and even wrong-city-block errors.

This is particularly critical for the most used location apps, such as rideshare and navigation. For instance, when users request a rideshare vehicle in a city, apps cannot easily locate them because of the GPS errors.

The last great unsolved GPS problem

This wrong-side-of-the-street position error is caused by reflected GPS signals in cities, and we embarked on an ambitious project to help solve this great problem in GPS. Our solution uses 3D mapping aided corrections, and is only feasible to be done at scale by Google because it comprises 3D building models, raw GPS measurements, and machine learning.

The December Pixel Feature Drop adds 3D mapping aided GPS corrections to Pixel 5 and Pixel 4a (5G). With a system API that provides feedback to the Qualcomm® Snapdragon™ 5G Mobile Platform that powers Pixel, the accuracy in cities (or “urban canyons”) improves spectacularly.

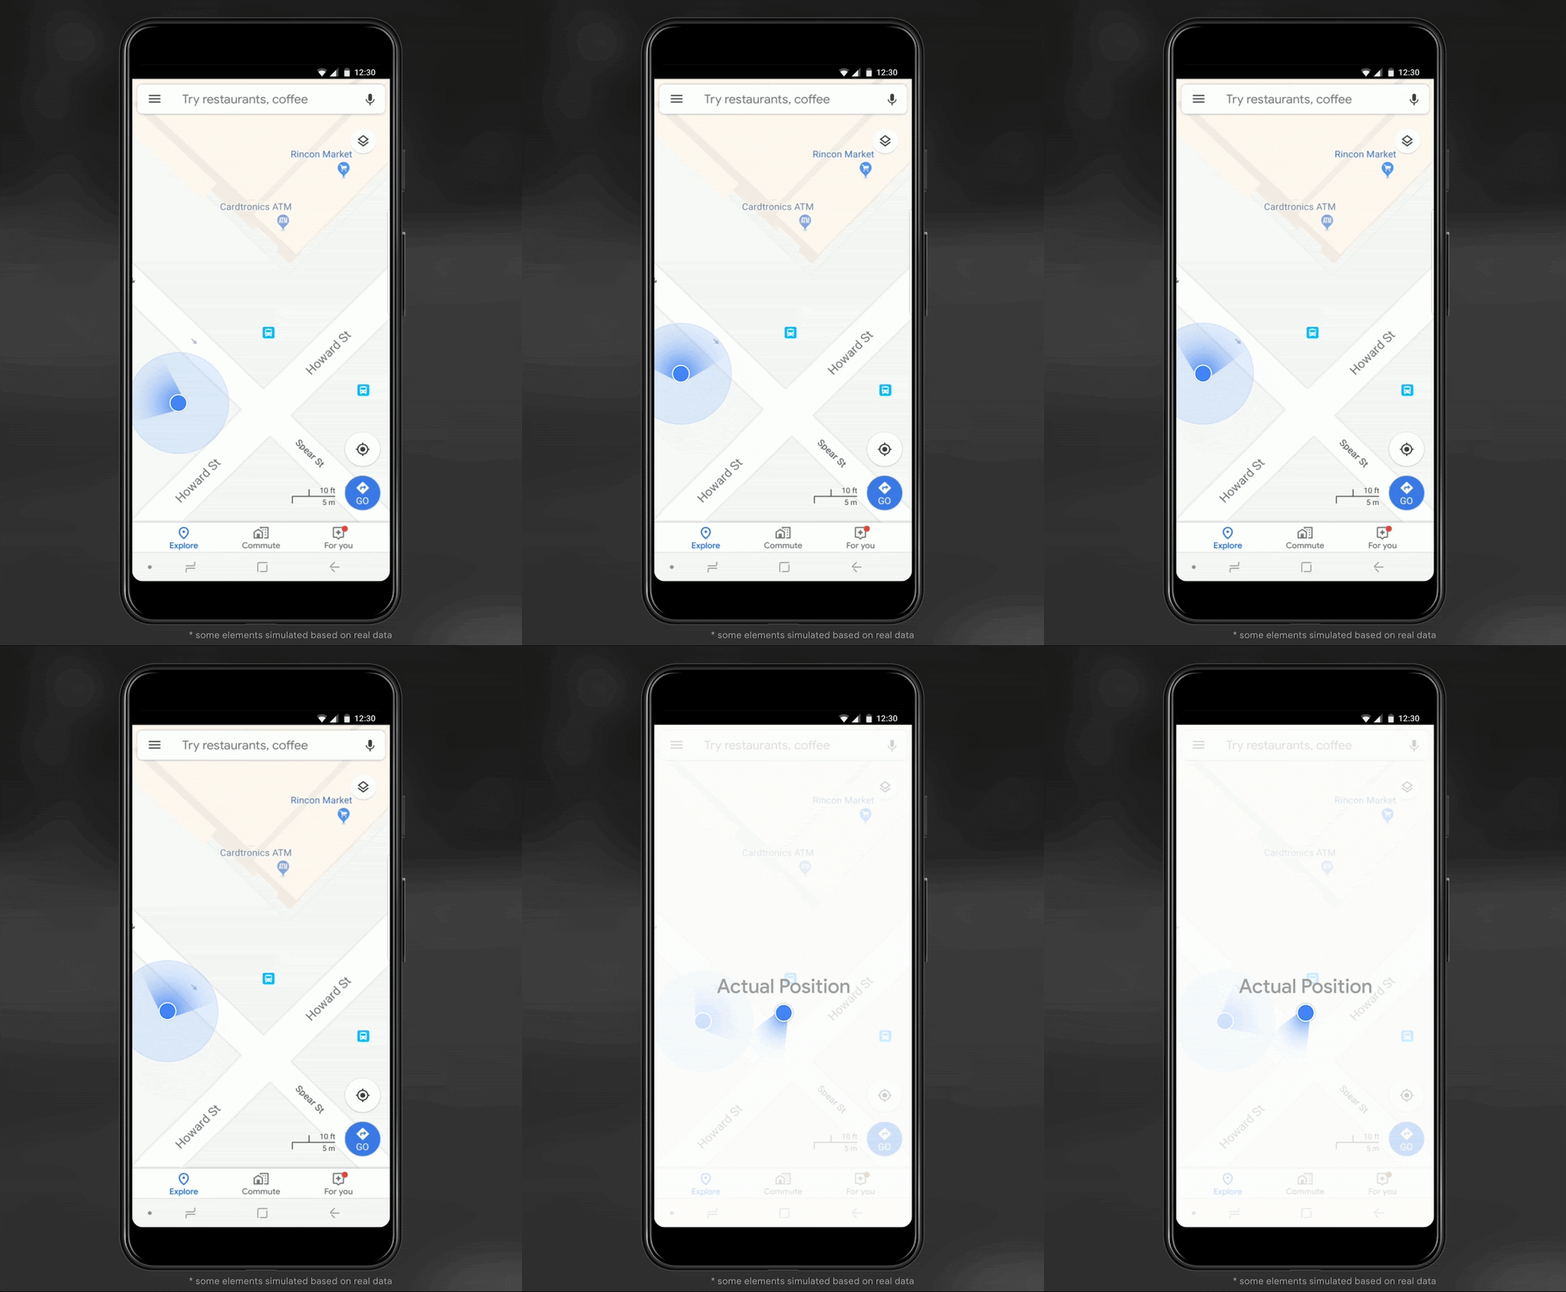
Picture of a pedestrian test, with Pixel 5 phone, walking along one side of the street, then the other. Yellow = Path followed, Red = without 3D mapping aided corrections, Blue = with 3D mapping aided corrections.  The picture shows that without 3D mapping aided corrections, the GPS results frequently wander to the wrong side of the street (or even the wrong city block), whereas, with 3D mapping aided corrections, the position is many times more accurate.

Picture of a pedestrian test, with Pixel 5 phone, walking along one side of the street, then the other. Yellow = Path followed, Red = without 3D mapping aided corrections, Blue = with 3D mapping aided corrections.

Why hasn’t this been solved before?

The problem is that GPS constructively locates you in the wrong place when you are in a city. This is because all GPS systems are based on line-of-sight operation from satellites. But in big cities, most or all signals reach you through non line-of-sight reflections, because the direct signals are blocked by the buildings.

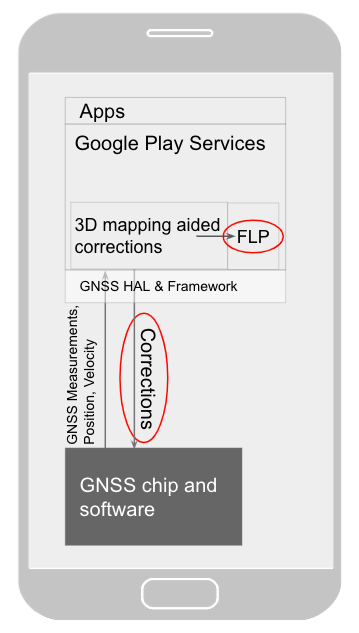
Diagram of the 3D mapping aided corrections module in Google Play services, with corrections feeding into the FLP API.   3D mapping aided corrections are also fed into the GNSS chip and software, which in turn provides GNSS measurements, position, and velocity back to the module.

The GPS chip assumes that the signal is line-of-sight and therefore introduces error when it calculates the excess path length that the signals traveled. The most common side effect is that your position appears on the wrong side of the street, although your position can also appear on the wrong city block, especially in very large cities with many skyscrapers.

There have been attempts to address this problem for more than a decade. But no solution existed at scale, until 3D mapping aided corrections were launched on Android.

How 3D mapping aided corrections work

The 3D mapping aided corrections module, in Google Play services, includes tiles of 3D building models that Google has for more than 3850 cities around the world. Google Play services 3D mapping aided corrections currently supports pedestrian use-cases only. When you use your device’s GPS while walking, Android’s Activity Recognition API will recognize that you are a pedestrian, and if you are in one of the 3850+ cities, tiles with 3D models will be downloaded and cached on the phone for that city. Cache size is approximately 20MB, which is about the same size as 6 photographs.

Inside the module, the 3D mapping aided corrections algorithms solve the chicken-and-egg problem, which is: if the GPS position is not in the right place, then how do you know which buildings are blocking or reflecting the signals? Having solved this problem, 3D mapping aided corrections provide a set of corrected positions to the FLP. A system API then provides this information to the GPS chip to help the chip improve the accuracy of the next GPS fix.

With this December Pixel feature drop, we are releasing version 2 of 3D mapping aided corrections on Pixel 5 and Pixel 4a (5G). This reduces wrong-side-of-street occurrences by approximately 75%. Other Android phones, using Android 8 or later, have version 1 implemented in the FLP, which reduces wrong-side-of-street occurrences by approximately 50%. Version 2 will be available to the entire Android ecosystem (Android 8 or later) in early 2021.

Android’s 3D mapping aided corrections work with signals from the USA’s Global Positioning System (GPS) as well as other Global Navigation Satellite Systems (GNSSs): GLONASS, Galileo, BeiDou, and QZSS.

Our GPS chip partners shared the importance of this work for their technologies:

“Consumers rely on the accuracy of the positioning and navigation capabilities of their mobile phones. Location technology is at the heart of ensuring you find your favorite restaurant and you get your rideshare service in a timely manner. Qualcomm Technologies is leading the charge to improve consumer experiences with its newest Qualcomm® Location Suite technology featuring integration with Google's 3D mapping aided corrections. This collaboration with Google is an important milestone toward sidewalk-level location accuracy,” said Francesco Grilli, vice president of product management at Qualcomm Technologies, Inc.

“Broadcom has integrated Google's 3D mapping aided corrections into the navigation engine of the BCM47765 dual-frequency GNSS chip. The combination of dual frequency L1 and L5 signals plus 3D mapping aided corrections provides unprecedented accuracy in urban canyons. L5 plus Google’s corrections are a game-changer for GNSS use in cities,” said Charles Abraham, Senior Director of Engineering, Broadcom Inc.

“Google's 3D mapping aided corrections is a major advancement in personal location accuracy for smartphone users when walking in urban environments. MediaTek’s Dimensity 5G family enables 3D mapping aided corrections in addition to its highly accurate dual-band GNSS and industry-leading dead reckoning performance to give the most accurate global positioning ever for 5G smartphone users,” said Dr. Yenchi Lee, Deputy General Manager of MediaTek’s Wireless Communications Business Unit.

How to access 3D mapping aided corrections

Android’s 3D mapping aided corrections automatically works when the GPS is being used by a pedestrian in any of the 3850+ cities, on any phone that runs Android 8 or later. The best way for developers to take advantage of the improvement is to use FLP to get location information. The further 3D mapping aided corrections in the GPS chip are available to Pixel 5 and Pixel 4a (5G) today, and will be rolled out to the rest of the Android ecosystem (Android 8 or later) in the next several weeks. We will also soon support more modes including driving.

Android’s 3D mapping aided corrections cover more than 3850 cities, including:

  • North America: All major cities in USA, Canada, Mexico.
  • Europe: All major cities. (100%, except Russia & Ukraine)
  • Asia: All major cities in Japan and Taiwan.
  • Rest of the world: All major cities in Brazil, Argentina, Australia, New Zealand, and South Africa.

As our Google Earth 3D models expand, so will 3D mapping aided corrections coverage.

Google Maps is also getting updates that will provide more street level detail for pedestrians in select cities, such as sidewalks, crosswalks, and pedestrian islands. In 2021, you can get these updates for your app using the Google Maps Platform. Along with the improved location accuracy from 3D mapping aided corrections, we hope we can help developers like you better support use cases for the world’s 2B pedestrians that use Android.

Continuously making location better

In addition to 3D mapping aided corrections, we continue to work hard to make location as accurate and useful as possible. Below are the latest improvements to the Fused Location Provider API (FLP):

  • Developers wanted an easier way to retrieve the current location. With the new getCurrentLocation() API, developers can get the current location in a single request, rather than having to subscribe to ongoing location changes. By allowing developers to request location only when needed (and automatically timing out and closing open location requests), this new API also improves battery life. Check out our latest Kotlin sample.
  • Android 11's Data Access Auditing API provides more transparency into how your app and its dependencies access private data (like location) from users. With the new support for the API's attribution tags in the FusedLocationProviderClient, developers can more easily audit their apps’ location subscriptions in addition to regular location requests. Check out this Kotlin sample to learn more.


Qualcomm and Snapdragon are trademarks or registered trademarks of Qualcomm Incorporated.

Qualcomm Snapdragon and Qualcomm Location Suite are products of Qualcomm Technologies, Inc. and/or its subsidiaries.

MAD Skills Navigation Wrap-Up

Posted by Chet Haase

MAD Skills navigation illustration of mobile and desktop with Android logo

It’s a Wrap!

We’ve just finished the first series in the MAD Skills series of videos and articles on Modern Android Development. This time, the topic was Navigation component, the API and tool that helps you create and edit navigation paths through your application.

The great thing about videos and articles is that, unlike performance art, they tend to stick around for later enjoyment. So if you haven’t had a chance to see these yet, check out the links below to see what we covered. Except for the Q&A episode at the end, each episode has essentially identical content in the video and article version, so use whichever format you prefer for content consumption.

Episode 1: Overview

The first episode provides a quick, high-level overview of Navigation Component, including how to create a new application with navigation capability (using Android Studio’s handy application templates), details on the containment hierarchy of a navigation-enabled UI, and an explanation of some of the major APIs and pieces involved in making Navigation Component work.

Or in article form: https://medium.com/androiddevelopers/navigation-component-an-overview-4697a208c2b5

Episode 2: Dialog Destinations

Episode 2 explores how to use the API to navigate to dialog destinations. Most navigation takes place between different fragment destinations, which are swapped out inside of the NavHostFragment object in the UI. But it is also possible to navigate to external destinations, including dialogs, which exist outside of the NavHostFragment.

Or in article form: https://medium.com/androiddevelopers/navigation-component-dialog-destinations-bfeb8b022759

Episode 3: SafeArgs

This episode covers SafeArgs, the facility provided by Navigation component for easily passing data between destinations.

Or in article form: https://medium.com/androiddevelopers/navigating-with-safeargs-bf26c17b1269

Episode 4: Deep Links

This episode is on Deep Links, the facility provided by Navigation component for helping the user get to deeper parts of your application from UI outside the application.

Or in article form: https://medium.com/androiddevelopers/navigating-with-deep-links-910a4a6588c

Episode 5: Live Q&A

Finally, to wrap up the series (as we plan to do for future series), I hosted a Q&A session with Ian Lake. Ian fielded questions from you on Twitter and YouTube, and we discussed everything from feature requests like multiple backstacks (spoiler: it’s in the works!) to Navigation support for Jetpack Compose (spoiler: the first version of this was just released!) to other questions people had about navigation, fragments, Up-vs-Back, saving state, and other topics. It was pretty fun — more like a podcast with cameras than a Q&A.

(There is no article for this one; enjoy the video above)

Sample App: DonutTracker

The application used for most of the episodes above is DonutTracker, an app that you can use for tracking important data about donuts you enjoy (or don’t). Or you can just use it for checking out the implementation details of these Navigation features; your choice.

What’s New in Navigation 2020

Posted by Jeremy Woods, Software Engineer, Android UI Toolkit
Navigation image

The latest versions of the Jetpack Navigation library (2.2.0 and 2.3.0) added a lot of requested features and functionality, including dynamic navigation, navigation back stack entries, a library for navigation testing, additional features for deep linking, and more. Let’s go over the most important changes, see what problems they solve, and learn how to use them!

Dynamic Navigation

We’ve updated Navigation to simplify adding dynamic feature modules for your application.

Previously, implementing navigation between destinations defined in dynamic feature modules required a lot of work. Before you could navigate to the first dynamic destination, you needed to add the Play Core library and the Split Install API to your app. You also needed to check for and download the dynamic module. Once downloaded, you could then finally navigate to the destination. On top of this, if you wanted to have an on-screen progress bar for the module being downloaded, you needed to implement a SplitInstallManager listener.

To address this complexity, we created the Dynamic Navigator library. This library extends the functionality of the Jetpack Navigation library to provide seamless installation of on-demand dynamic feature modules when navigating. The library handles all Play Store interaction for you, and it even includes a progress screen that provides the download status of your dynamic module.
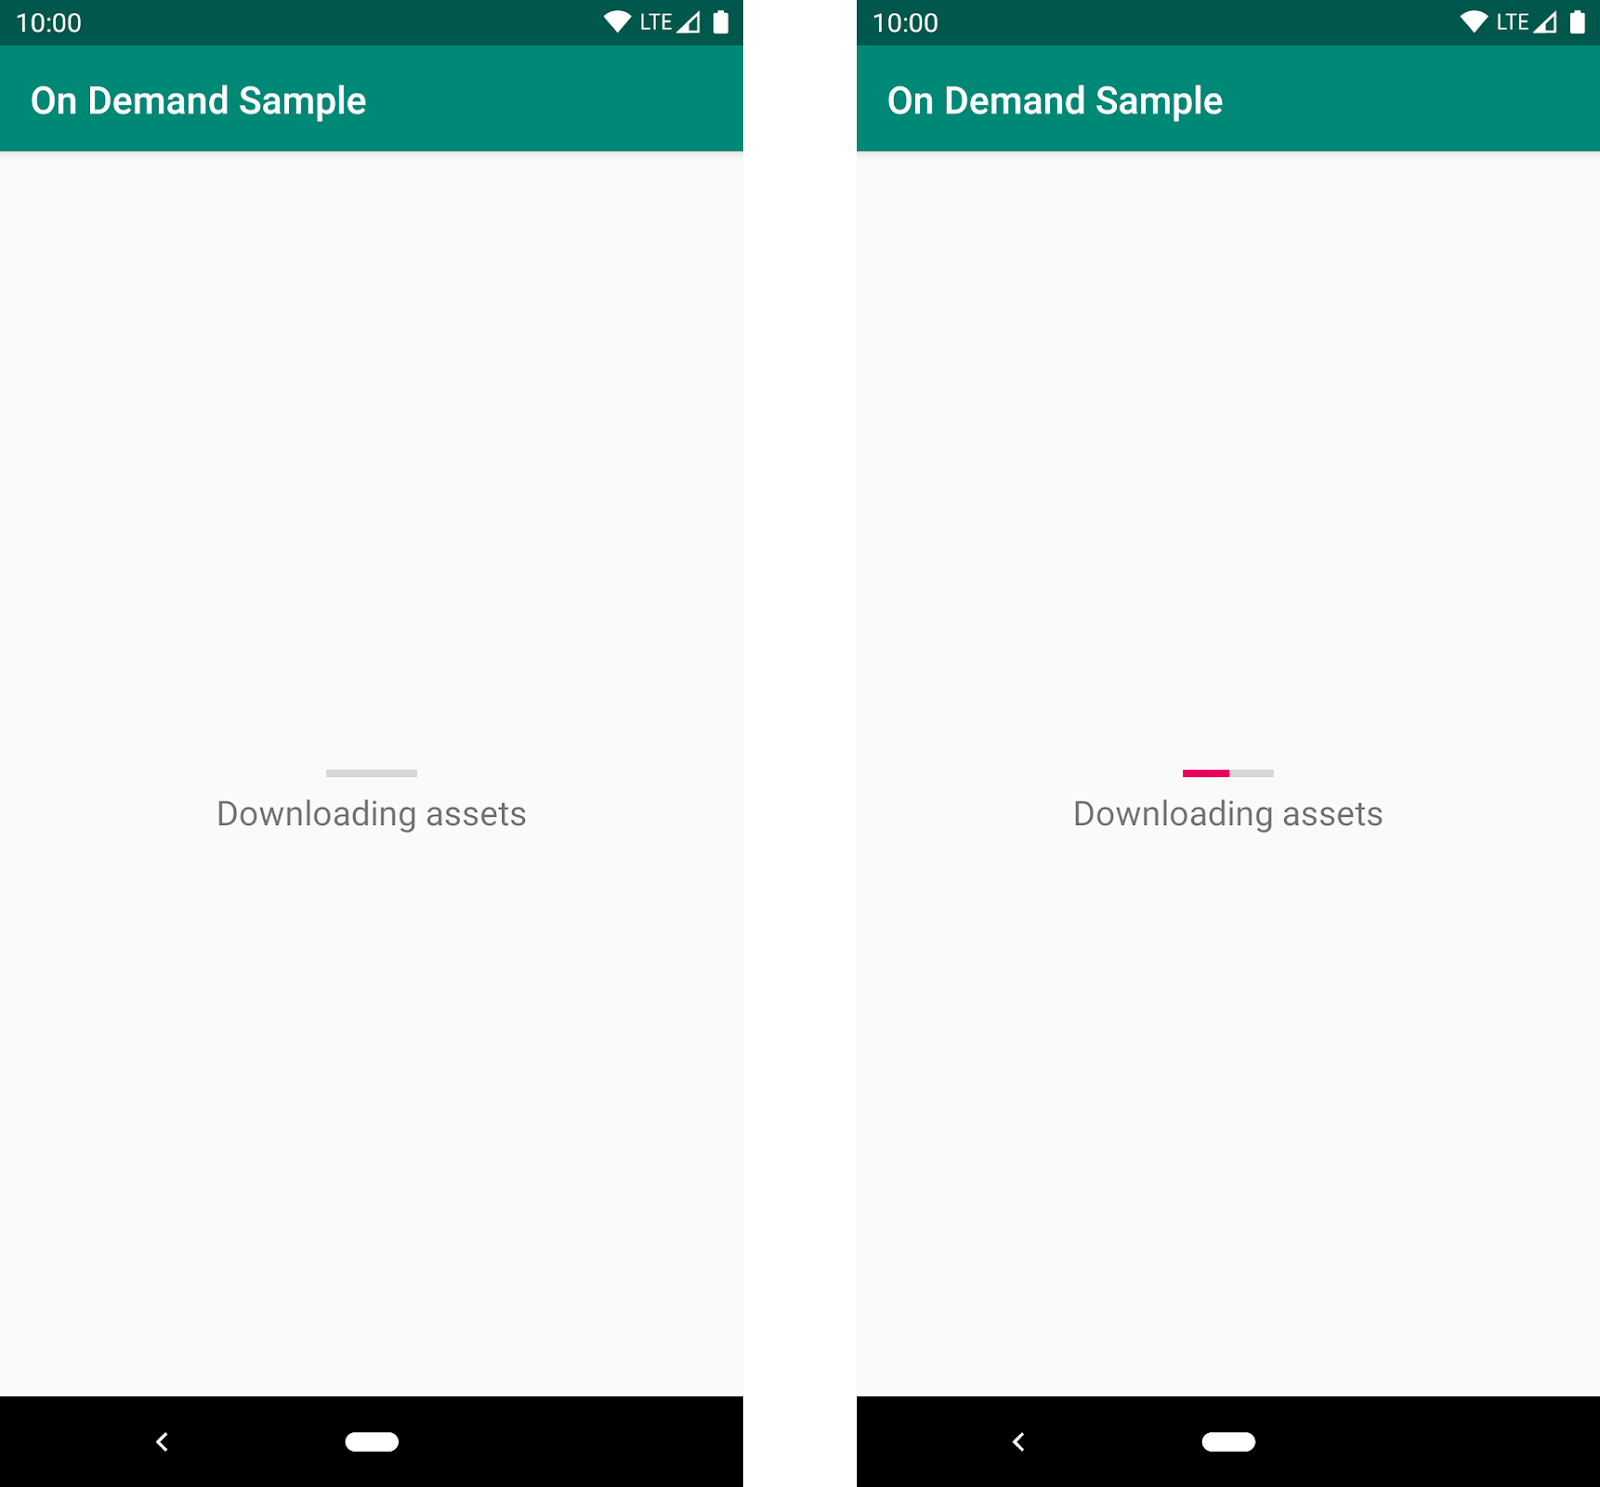
The default UI for showing a progress bar when a user navigates to a dynamic feature for the first time.

The default UI for showing a progress bar when a user navigates to a dynamic feature for the first time. The app displays this screen as the corresponding module downloads

To use dynamic navigation, all you need to do is:

  1. Change instances of NavHostFragment to DynamicNavHostFragment
  2. Add an app:moduleName attribute to the destinations associated with a DynamicNavHostFragment

For more information on dynamic navigation, see Navigate with dynamic feature modules and check out the samples.

NavBackStackEntry: Unlocked

When you navigate from one destination to the next, the previous destination and its latest state is placed on the Navigation back stack. If you return to the previous destination by using navController.popBackBack(), the top back stack entry is removed from the back stack with its state still intact and the NavDestination is restored. The Navigation back stack contains all of the previous destinations that were needed to arrive at the current NavDestination.

We manage the destinations on the Navigation back stack by encapsulating them into the NavBackStackEntry class. NavBackStackEntry is now public. This means that users can go a level deeper than just NavDestinations and gain access to navigation-specific ViewModels, Lifecycles, and SavedStateRegistries. You can now properly scope data sharing or ensure it is destroyed at the appropriate time.

See Navigation and the back stack for more information.

NavGraph ViewModels

Since a NavBackStackEntry is a ViewModelProvider, you can create a ViewModel to share data between destinations at the NavGraph level. Each parent navigation graph of all NavDestinations are on the back stack, so your view model can be scoped appropriately:

val viewModel: MyViewModel by navGraphViewModels(R.id.my_graph)

For more information on navGraph scoped view models, see Share UI-related data between destinations with ViewModel

Returning a Result from a destination

By combining ViewModel and Lifecycle, you can share data between two specific destinations. To do this, NavBackStackEntry provides a SavedStateHandle, a key-value map that can be used to store and retrieve data, even across configuration changes. By using the given SavedStateHandle, you can access and pass data between destinations. For example to pass data from destination A to destination B:

In destination A:

override fun onViewCreated(view: View, savedInstanceState: Bundle?) {
    val navController = findNavController();
    // We use a String here, but any type that can be put in a Bundle is supported
    navController.currentBackStackEntry?.savedStateHandle?.getLiveData<String>("key")?.observe(
        viewLifecycleOwner) { result ->
        // Do something with the result.
    }
}

And in destination B:

navController.previousBackStackEntry?.savedStateHandle?.set("key", result)

See Returning a result to the previous Destination for more details.

Testing your Navigation Flow

Previously, the recommended testing solution for Navigation was Mockito. You would create a mock NavController and verify that navigate() was called at the appropriate time with the correct parameters. Unfortunately, this solution was not enough to test certain areas of Navigation flow, such as ViewModel interaction or the Navigation back stack. The Navigation Library now offers a well-integrated solution for these areas with the Navigation Testing library.

The Navigation Testing library adds TestNavHostController, which gives access to the Navigation back stack in a test environment. This means that you can now verify the state of the entire back stack. When using the TestNavHostController, you can set your own LifecycleOwner, ViewModelStoreOwner, and OnBackPressDispatcher by using the APIs given by NavHostController. By setting these components, you can test them in the context of navigation.

For example, here's how to test a destination that uses a nav graph-scoped ViewModel:

val navController = TestNavHostController(ApplicationProvider.getApplicationContext())

// This allows fragments to use by navGraphViewModels()
navController.setViewModelStore(ViewModelStore())
navController.setGraph(R.navigation.main_nav)

The TestNavHostController also lets you set the current destination. You can move the test directly to the use case being tested without the need to set it up using navigate() calls. This is extremely convenient for writing tests for different navigation scenarios.

When setting the current destination, you might do something like the following:

val navController = TestNavHostController(ApplicationProvider.getApplicationContext())

navController.setGraph(R.navigation.main_nav)
navController.setCurrentDestination(R.id.destination_1)

Remember that when setting the current destination, that destination must be part of your nav graph.

For more information about TestNavHostController, see the Test Navigation docs.

Nav Deep Linking

Deep linking allows you to navigate directly to any destination no matter where you currently are in the NavGraph. This can be very useful for launching your app to a specific destination or jumping between destinations that would otherwise be inaccessible to one another.

When navigating using a deep link, you can now provide deep link query parameters in any order and even leave them out altogether if they have been given a default value or have been made nullable. This means that if you have provided default values for all of the query parameters on a deep link, the deep link can match a URL pattern without including any query parameters.

For example, www.example.com?arg1={arg1}&arg2={arg2} will now match with www.example.com as long as arg1 and arg2 have default values and/or are nullable.

Deep links can also be matched using intent actions and MIME types. Instead of requiring destinations to match by URI, you can provide the deep link with an action or MIME type and match with that instead. You can specify multiple match types for a single deep link, but note that URI argument matching is prioritized first, followed by action, and then mimeType.

You create a deep link by adding it to a destination in XML, using the Kotlin DSL, or by using the Navigation Editor in Android Studio.

Here's how to add a deep link to a destination using XML:

<fragment android:id="@+id/a"
          android:name="com.example.myapplication.FragmentA"
          tools:layout="@layout/a">
        <deeplink app:url="www.example.com"
                app:action="android.intent.action.MY_ACTION"
                app:mimeType="type/subtype"/>
    </fragment>

Here's how to add the same deep link using the Kotlin DSL:

val baseUri = "http://www.example.com/"

fragment<MyFragment>(nav_graph.dest.a) {
   deepLink(navDeepLink {
    uriPattern = "${baseUri}"
    action = "android.intent.action.MY_ACTION"
    mimeType = "type/subtype"
   })
}

You can also add the same deep link using the Navigation Editor in Android Studio versions 4.1 and higher. Note that you must also be using the Navigation 2.3.0-alpha06 dependency or later.
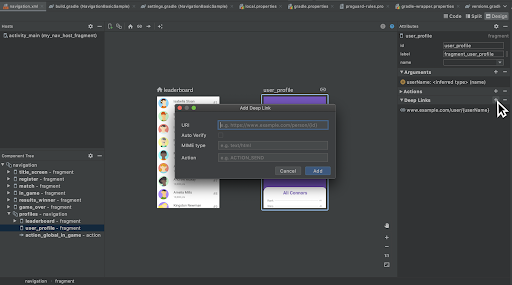
An open dialog in the Navigation Editor for adding a deep link to a destination. There are options to add an URI, a MIME type, and an action, along with a checkBox to Auto Verify

Adding a deep link to a destination in the Navigation Editor

To navigate to a destination using a deep link, you must first build a NavDeepLinkRequest and then pass that deep link request into the Navigation controller's call to navigate():

val deepLinkRequest = NavDeepLinkRequest.Builder
        .fromUri(Uri.parse("http://www.example.com"))
        .setAction("android.intent.action.MY_ACTION")
        .setMimeType("type/subtype")
        .build()
navController.navigate(deeplinkRequest)

For more information on deep links, visit Create a deep link for a destination, as well as the deep linking sections in Navigate to a destination and Kotlin DSL.

Navigation Editor

Android Studio 4.0 includes new features for the Navigation Editor. You can now edit your destinations using a split pane view. This means you can edit the XML or design and see the changes in real time.
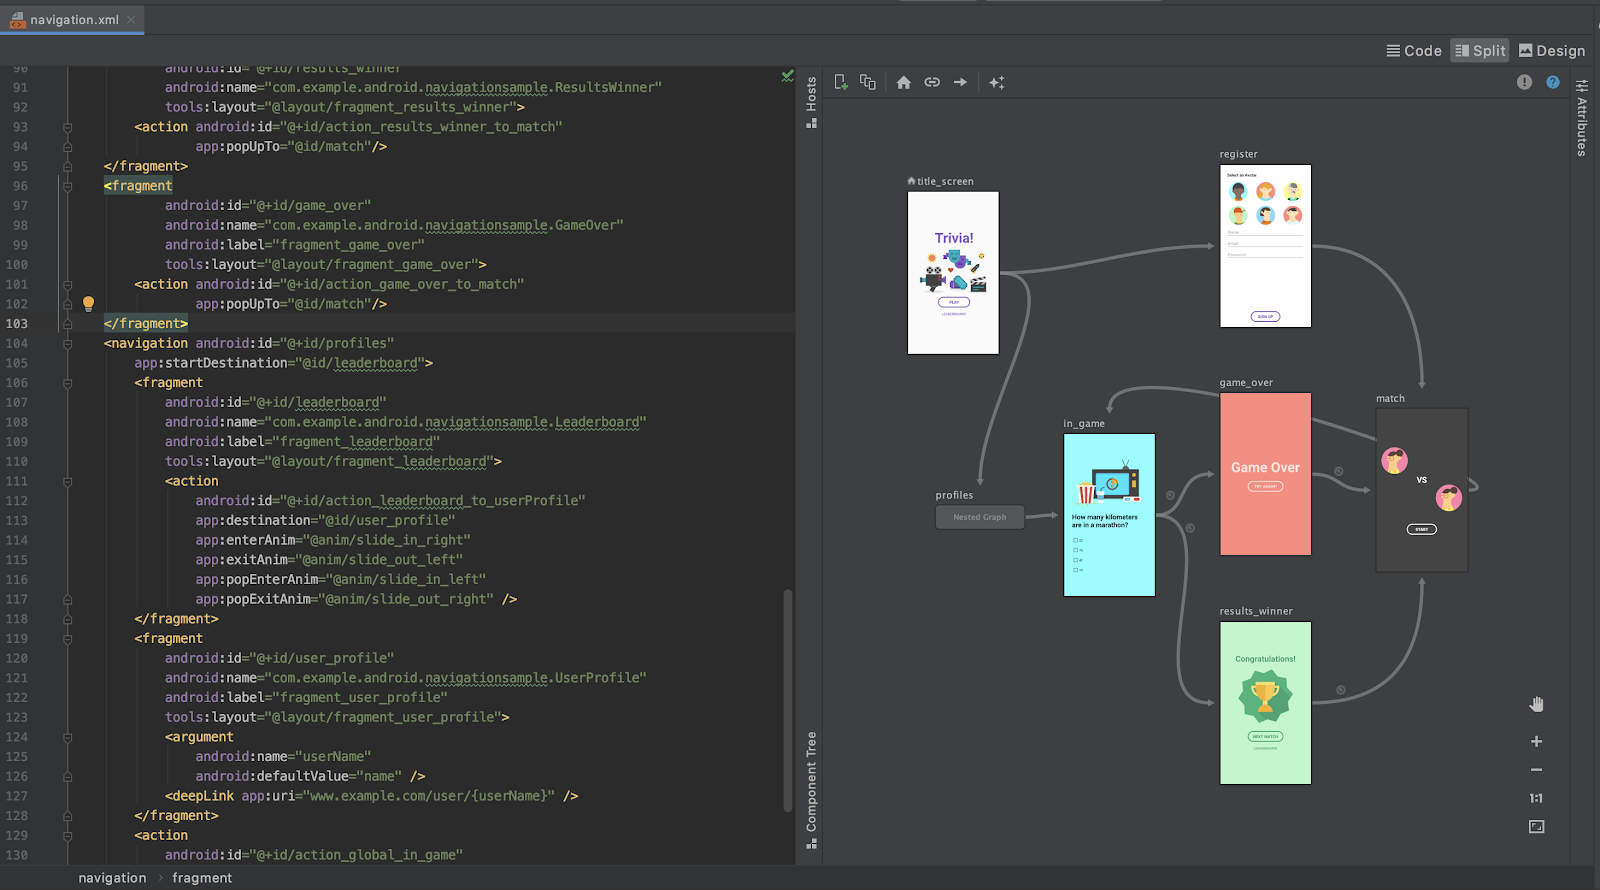
The Navigation Editor opened in split pane mode with the navigation.xml file on the left and the corresponding nav graph on the right. The nav graph has 6 destination, and a nested graph

Viewing a navigation.xml file in split view mode

In Android Studio 4.1, the Navigation Editor introduced the component tree. This allows you to traverse the entire nav graph, freely going in and out of nested graphs.
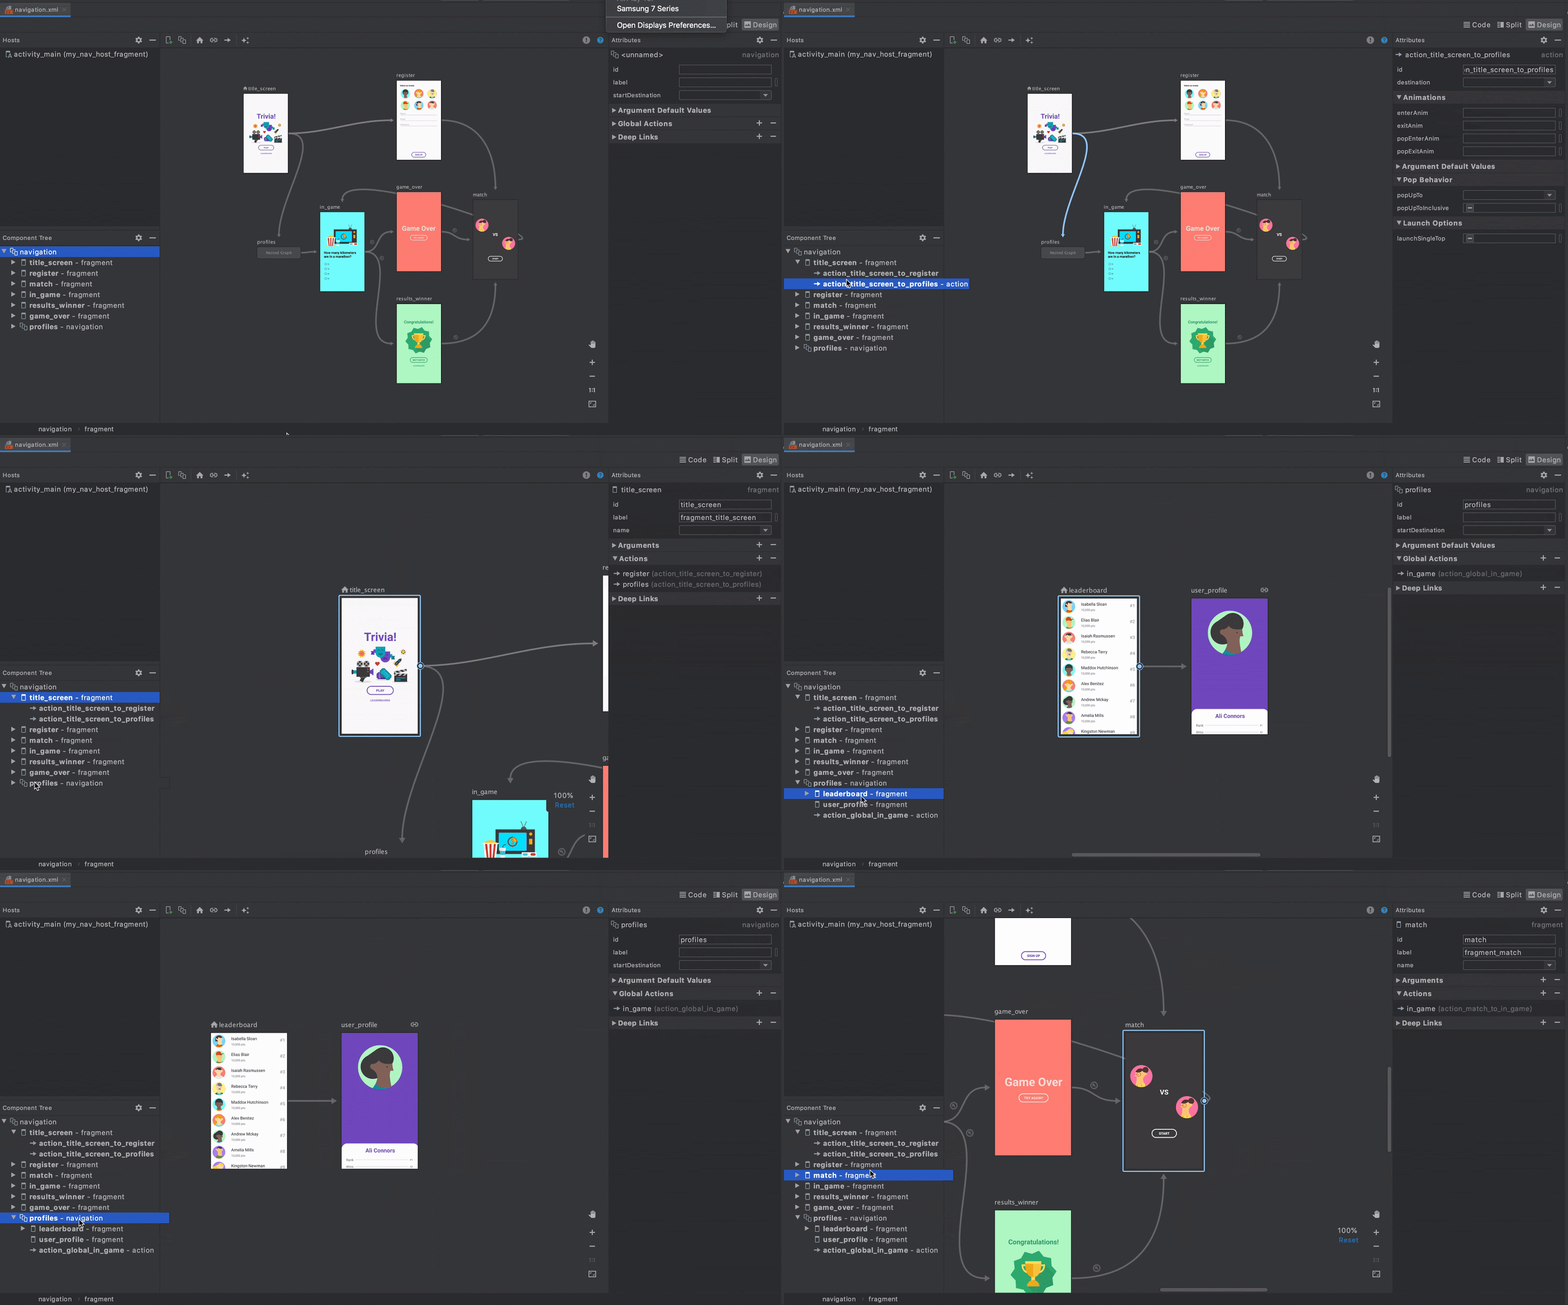
An open component tree of a nav graph in the Navigation Editor. It starts viewing the entire graph, then moves to the title screen before going into the nested profiles graph. After cycling through the destinations in the profiles graph, it goes back to fragments in the original graph

Navigating through a graph in the Navigation Editor

Additional Changes

NavigationUI can now use any layout that uses the Openable interface. This means that it is no longer limited to DrawerLayout and allows for customization of the AppBarConfiguration. You can provide your Openable and use it as the layout instead.

Navigation also provides support for Kotlin DSL. Kotlin DSL can be used to create different destinations, actions, or deep links. For more information see the documentation for Kotlin DSL.

Wrap up

Navigation added lots of useful features over the past year. You can simplify your dynamic feature modules by taking advantage of the Dynamic Navigator library, use a NavBackStackEntry to help correctly scope your data, easily test your navigation flow using the TestNavHostController, or even match your deep link using intent actions and/or MIME types.

For more information about the Jetpack Navigation library, check out the documentation at https://developer.android.com/guide/navigation

Please provide feedback (or file bugs) using the Navigation issuetracker component.

Charting the next 15 years of Google Maps


It’s easy to take for granted how much information about the world is now available at our fingertips. But it wasn’t long ago that traveling to a new place meant fumbling through sheets of turn-by-turn instructions while trying to keep one hand on the steering wheel, with no way to anticipate how bad traffic would be or find a restaurant along the way. It was around that time, 15 years ago, that Google Maps set out on an audacious goal to map the world. 


I remember seeing early versions of Google Maps and being amazed at how easily you could scroll, zoom and search the world. One of my earliest memories of working on Google Maps was as a member of our user experience team, which designs and improves the usability of our products. In a world before smartphones, one of the biggest questions that we agonized over was where to put the Print button on the page so that people could easily take their directions on the go. 


Needless to say, a lot has changed. Google Maps has mapped more than 220 countries, surfaced information for about 200 million places and businesses, and helped billions of people get from point A to point B with confidence. In the beginning, we focused on answering the question: “How do I get from here to there?” Over time, our mission has expanded from helping you navigate to also helping you discover the best places to go and things to do once you’re there. As we celebrate our birthday this week, we’re reflecting on how the definition of what a map can do has broadened, and how machine learning will propel us forward from here. 


Navigating the world: From simple directions to Live View 


Fifteen years ago, printing out directions was considered state-of-the-art. So the idea of getting turn-by-turn driving navigation from your phone while on the road seemed revolutionary. In 2009, Google Maps pioneered turn-by-turn mobile navigation, and we’ve since added directions and navigation for walking, transit, bicycles, two-wheelers, and more--all with the goal of helping you with every trip across every mode of transportation. Since people increasingly use a mix of transportation options in a single trip--like walking to the train station and then taking a rideshare to their final stop--one of our next challenges involves stitching together these navigation options and ETAs for a more seamless experience.


Directions alone aren’t enough. We’re also helping you get there faster and more comfortably by arming you with relevant real-time information like live traffic alerts, predictions for how crowded your bus will be and which bike-sharing locations have available bikes. And we’ve used technology like augmented reality (AR) to help bring the map to life in helpful ways. Last year we introduced Live View, which uses AR, AI and your smartphone camera to show you your surroundings with the directions overlaid. It solves the real pain point of walking halfway down the block toward a place only to realize you’re going the wrong way (I’ve definitely been there!).


Exploring the world once you get there


We’ve always fundamentally believed that a map is much more than masses of land and sea, that a city is more than a web of streets. After all, the things that make my hometown shine are the brunch spot with my favorite veggie scramble, the pet salon that keeps my dog happy while he gets a trim, and the pizza spot with the foosball table that keeps my kids entertained while we wait. A truly helpful map reflects all of those local insights and helps you find places and experiences that are right for you—so that’s been a big focus for us over the last few years. 


Until recently, if you were looking to grab a slice of pizza, you’d get a list of 20 nearby pizza joints. (And way before that, you’d have to search in advance on a desktop to get the list, or if you were already out of the house you had to roam streets seeking the smell of melted cheese!) Now, we can help you find all of the pizza spots nearby, when they're open, how crowded they’ll be, and which one has the best toppings. Once you’ve decided where to go, you can easily make a reservation or call the restaurant. 


Doing this well at scale requires a deep understanding of businesses and places—which is where our active community of users comes in. Every day, people contribute more than 20 million pieces of content to Google, like photos, reviews and ratings. These contributions continually make our map richer and more helpful for everyone. They also power features like popular dishes at restaurants, up-to-date road closures and wheelchair accessible routes. We’re also making it easy for you to get things done at these places within Google Maps—so you can go from finding a yoga studio to booking a class. 


The technology propelling the future of Maps


The world is always changing—new roads are added, bus routes are changed and natural disasters alter accessible routes. That’s why a map needs to be updated, comprehensive and accurate. Major breakthroughs in AI have transformed our approach to mapmaking, helping us bring high-quality maps and local information to more parts of the world faster. 


For instance, we worked with our data operations team to manually trace common building outlines, then trained our machine learning models to recognize building edges and shapes. Thanks to this technique, we’ve mapped as many buildings in the last year as we did in the previous 10. Elsewhere, machine learning helps us recognize handwritten building numbers that would be hard even for a passerby in a car to see. This is especially important when mapping areas where formal street signs and house numbers are uncommon. In Lagos, Nigeria alone, machine learning has helped us add 20,000 street names, 50,000 addresses, and 100,000 new businesses—lighting up the map with local places and businesses where there once was little detailed information. 


The map of the next 15 years 


As we celebrate our birthday and look ahead to the next 15 years, we’re rolling out a few new updates, including a refreshed look for the app and more information about your transit rides. And we’ve updated our Google Maps icon to reflect our journey.


When we set out to map the world, we knew it would be a challenge. But 15 years in, I’m still in awe of what a gargantuan task it is. It requires building and curating an understanding of everything there is to know about the physical world, and then bringing that information to people in a way that helps you navigate, explore and get things done in your world. The real world is infinitely detailed and always changing, so our work of reflecting it back to you is never done. 

Posted by Jen Fitzpatrick, Senior Vice President, Google Maps

Google Maps is turning 15! Celebrate with a new look and features


In 2005, we set out to map the world. Since then we’ve pushed the limits of what a map can do: from helping you easily navigate from point A to B, to helping you explore and get things done in the world. With more than 1 billion people turning to Google Maps to see and explore the world, we're celebrating our 15th birthday with a new look and product updates based on feedback from you.


A fresh look from the inside out
Starting today, you'll see an updated Google Maps app for Android and iOS that gives you everything you need at your fingertips with five easy-to-access tabs: Explore, Commute, Saved, Contribute and Updates.
  • Explore: Looking for a place nearby to grab lunch, enjoy live music or play arcade games? In the Explore tab, you’ll find information, ratings, reviews and more for about 200 million places around the world, including local restaurants, nearby attractions and city landmarks. 
  • Commute: Whether you’re traveling by car or public transit, the Commute tab is there to make sure you’re on the most efficient route. Set up your daily commute to get real-time traffic updates, travel times and suggestions for alternative routes.
  • Saved: People have saved more than 6.5 billion places on Google Maps—from the new bakery across town to the famous restaurant on your upcoming vacation. Now you can view all of these spots in one convenient place, as well as find and organize plans for an upcoming trip and share recommendations based on places you've been.
  • Contribute: Hundreds of millions of people each year contribute information that helps keep Google Maps up to date. With the new Contribute tab, you can easily share local knowledge, such as details about roads and addresses, missing places, business reviews and photos. Each contribution goes a long way in helping others learn about new places and decide what to do.
  • Updates: The new Updates tab provides you with a feed of trending, must-see spots from local experts and publishers, like The Infatuation. In addition to discovering, saving and sharing recommendations with your network, you can also directly chat with businesses to get questions answered.


Our five tabs provide easier access to everything you need in Google Maps.


We’re also updating our look with a new Google Maps icon that reflects the evolution we’ve made mapping the world. It’s based on a key part of Google Maps since the very beginning—the pin— and represents the shift we’ve made from getting you to your destination to also helping you discover new places and experiences.


And because we can’t resist a good birthday celebration, keep an eye out for our celebratory party-themed car icon, available for a limited time when you navigate with Google Maps.

Look out for our new icon on your phone and browser.


Made for you, on the go
We’re constantly evolving to help you get around—no matter how you choose to travel. Our new transit features in the Google Maps app help you stay informed when you’re taking public transportation.


Last year, we introduced crowdedness predictions to help you see how crowded your bus, train or subway is likely to be based on past rides. To help you plan your travels, we’re adding new insights about your route from past riders, so you’ll be able to see important details, such as: 
  • Temperature: For a more comfortable ride, check in advance if the temperature is considered by past riders as on the colder or warmer side.
  • Accessibility: If you have special needs or require additional support, you can identify public transit lines with staffed assistance, accessible entrance and seating, accessible stop-button or hi-visible LED.
  • Women’s Section: In regions where transit systems have designated women's sections or carriages, we'll help surface this information along with whether other passengers abide by it.
  • Security Onboard: Feel safer knowing if security monitoring is on board—whether that’s with a security guard present, installed security cameras or an available helpline.
  • Number of carriages available: In Japan only, you can pick a route based on the number of carriages so that it increases your chances of getting a seat.


    These useful bits of information come from past riders who've shared their experiences and will appear alongside public transit routes when available. To help future riders, you can answer a short survey within Google Maps about your experience on recent trips. We’ll start rolling this out globally in March, with availability varying by region and municipal transportation agency.

    New trip attributes help you make informed decisions about your travel plans.


    A sense of direction
    Last year, we introduced Live View to help you quickly decide which way to go when you start a walking route with Google Maps. By combining Street View’s real-world imagery, machine learning and smartphone sensors, Live View in Google Maps shows you your surroundings with the directions overlaid in augmented reality. 


    Over the coming months, we’ll be expanding Live View and testing new capabilities, starting with better assistance whenever you’re searching for a place. You’ll be able to quickly see how far away and in which direction a place is.


    Live View will soon help you get oriented in the right direction in new ways.


    A big thank you to everyone for placing your trust in us and for being with us on this wild ride over the last 15 years. See you out there on the journey!

    Posted by Dane Glasgow, Vice President of Product, Google Maps

    Gesture Navigation: A Backstory

    Posted by Allen Huang and Rohan Shah, Product Managers on Android UI

    mobile ui

    One of the biggest changes in Android Q is the introduction of a new gesture navigation. Just to recap - with the new system navigation mode - users can navigate back (left/right edge swipe), to the home screen (swipe up from the bottom), and trigger the device assistant (swipe in from the bottom corners) with gestures rather than buttons.

    By moving to a gesture model for system navigation, we can provide more of the screen to apps to enable a more immersive experience.

    We wanted to give folks an inside look at how we’ve approached this challenge, the rationale, and some of the trade-offs as well. There is some nerding out on design around gestures ahead, but hopefully it provides some insight into our process and how we balance the developer and OEM ecosystem in service of users. If you’re looking for more detail on how to handle these changes as an app developer, check out Chris’s “Going edge-to-edge” article series.

    Why gestures?

    One of the amazing things about Android is the opportunity for app developers and Android partners to try new, innovative approaches on the phone.

    In the last 3 years, we’ve seen gesture navigation patterns proliferate on handheld devices (though gestures have been around as early as 2009!).

    This trend was led by innovative Android partners and Android apps trying some very cool ideas (for example: Fluid NG, XDA).

    When we started researching this more, we honed in on the user benefits:

    1. Gestures can be a faster, more natural and ergonomic way to navigate your phone
    2. Gestures are more intentional than software buttons that you might trigger just by grabbing your phone
    3. Gestures enable a more immersive experience for apps by minimizing how much the system draws over app content, i.e. HOME/BACK buttons and the bar they sit on - especially as hardware trends towards bigger screens and smaller bezels

    It wasn’t all roses though - we also saw issues with many of the gesture modes:

    1. Gestures don’t work for every user
    2. Gestures are harder to learn and can take some adjustment
    3. Gestures can interfere with an app’s navigation pattern

    But most of all, we realized that there was a larger issue of fragmentation when different Android phones had different gestures, especially for Android developers.

    Over the last year, we worked with partners like Samsung, Xiaomi, HMD Global, OPPO, OnePlus, LG, Motorola, and many others to standardize gesture navigation going forward. To ensure a consistent user and developer experience, the Android Q gestures will be the default gesture navigation for new Q+ devices.

    Understanding that these gestures don’t work for every user, especially those with more limited dexterity and mobility, three-button navigation will continue to be an option on every Android device.

    So why these gestures?

    We started with research to understand how users held their phones, what typical reach looked like, and what parts of the phone users used the most. From there, we built many prototypes that we tested across axes like desirability, speed-of-use, ergonomics, and more. And we put our ultimate design through a range of studies - how quickly users learned the system, how quickly users got used to the system, how users felt about it.

    A unique element of Android navigation since the very beginning is the Back button. It is appreciated by many users that find Android easier to navigate and learn (despite many debates on what the “correct” behavior is) -- and it's used a lot! In fact, 50% more than even Home. So one of our design goals was to make sure the back gesture was ergonomic, dependable, and intuitive -- and we prioritized this goal above other less frequent navigation such as drawers and recents.

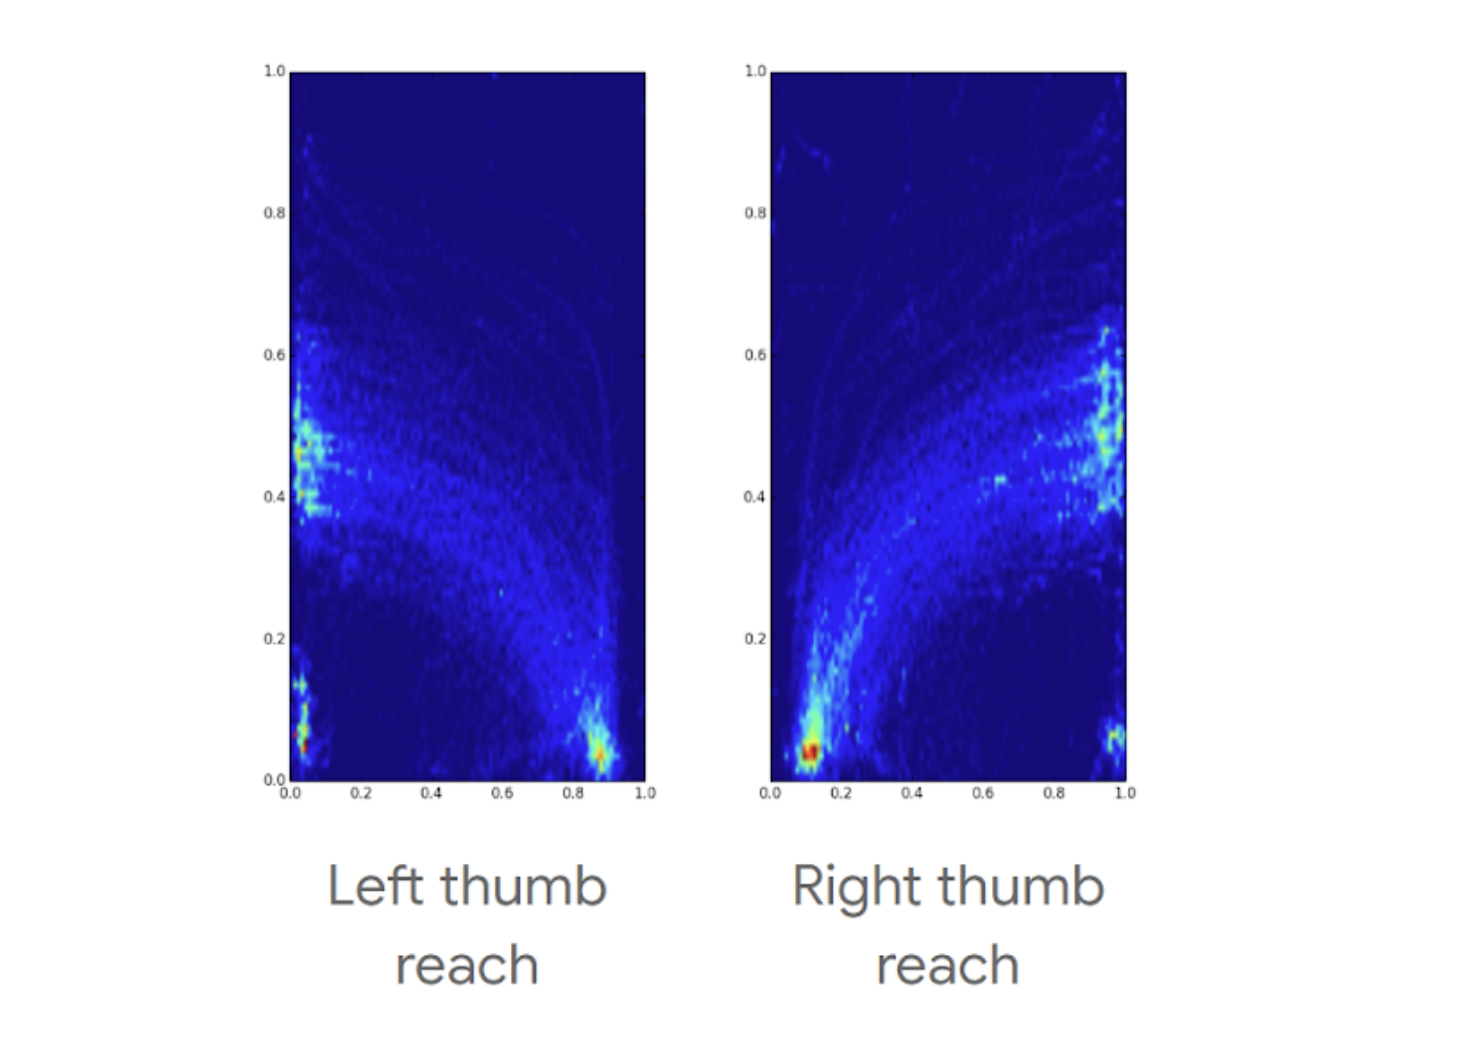
    Looking at the reachability charts below, we designed our two core gestures (Back and Home) to coincide with the most reachable/comfortable areas and movement for thumbs.

    Phone screen heatmaps showing where users can comfortably do gestures, holding the phone in only one hand

    Phone screen heatmaps showing where users can comfortably do gestures, holding the phone in only one hand

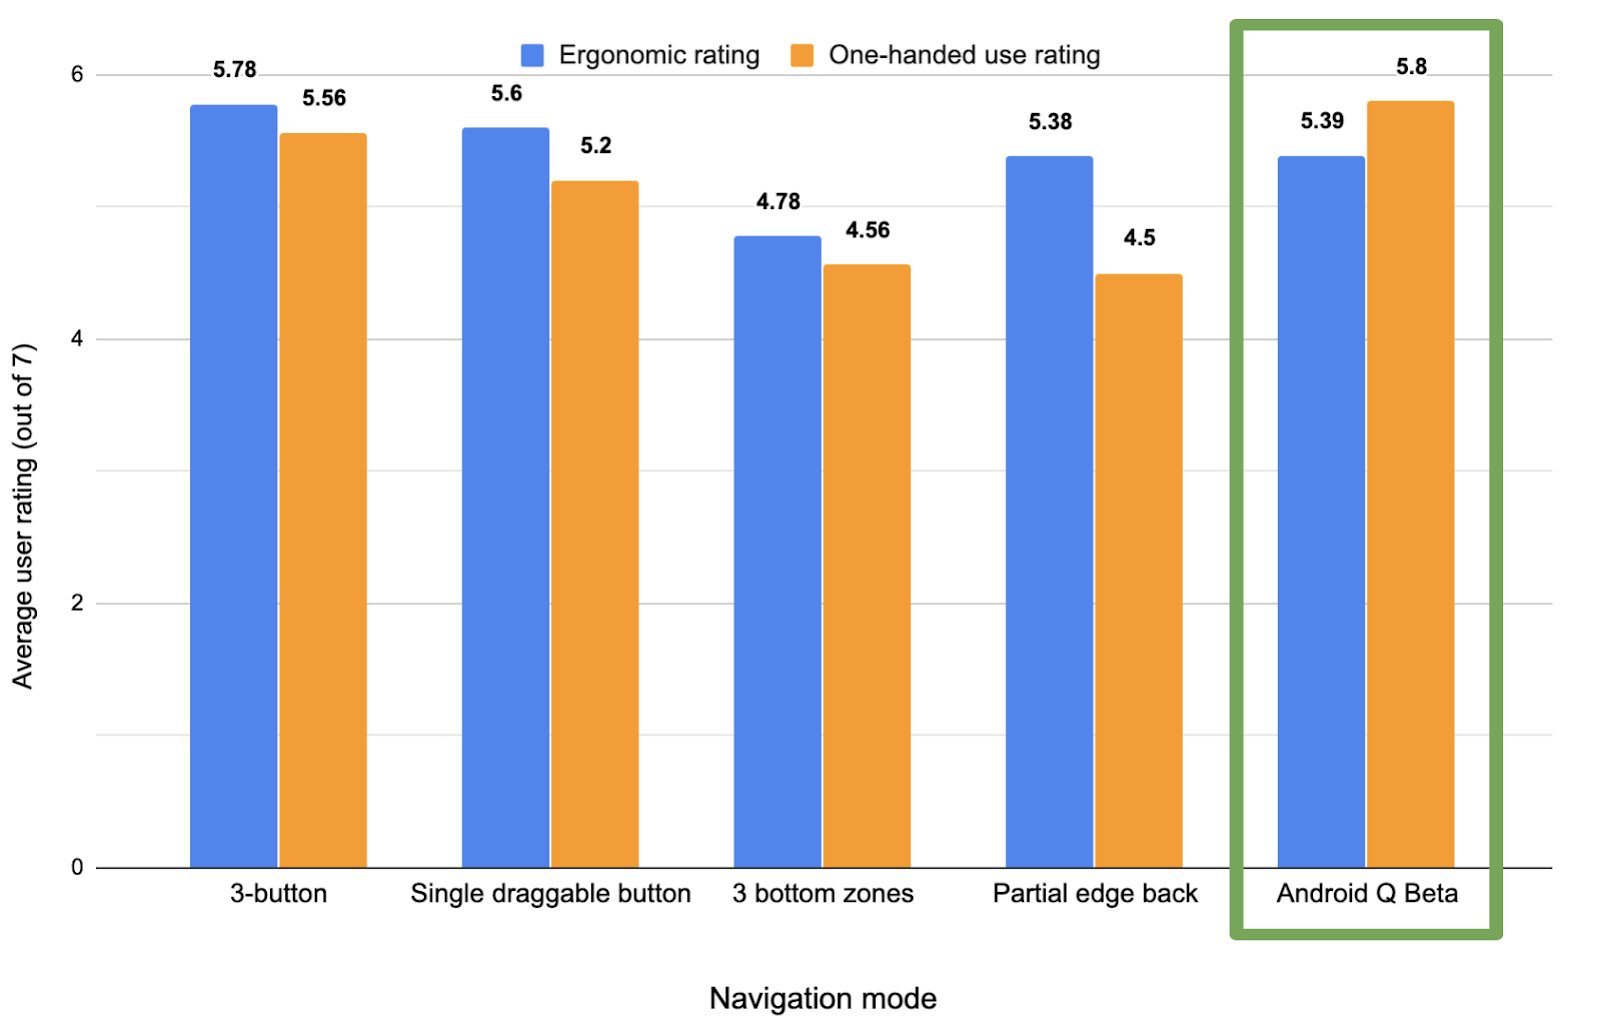
    As mentioned, we built prototypes of many different gesture models, comparing user ratings and timed user tasks on what ultimately became the Q model to several other navigation paradigms. Here’s a few graphs showing the results of our testing:

    Comparison of user ratings for ergonomics and one-handed use across different navigation modes (higher is better)

    Comparison of user ratings for ergonomics and one-handed use across different navigation modes (higher is better)


    Comparison of average time required to complete Home/Back tasks across various navigation modes (lower is better)

    Comparison of average time required to complete Home/Back tasks across various navigation modes (lower is better)


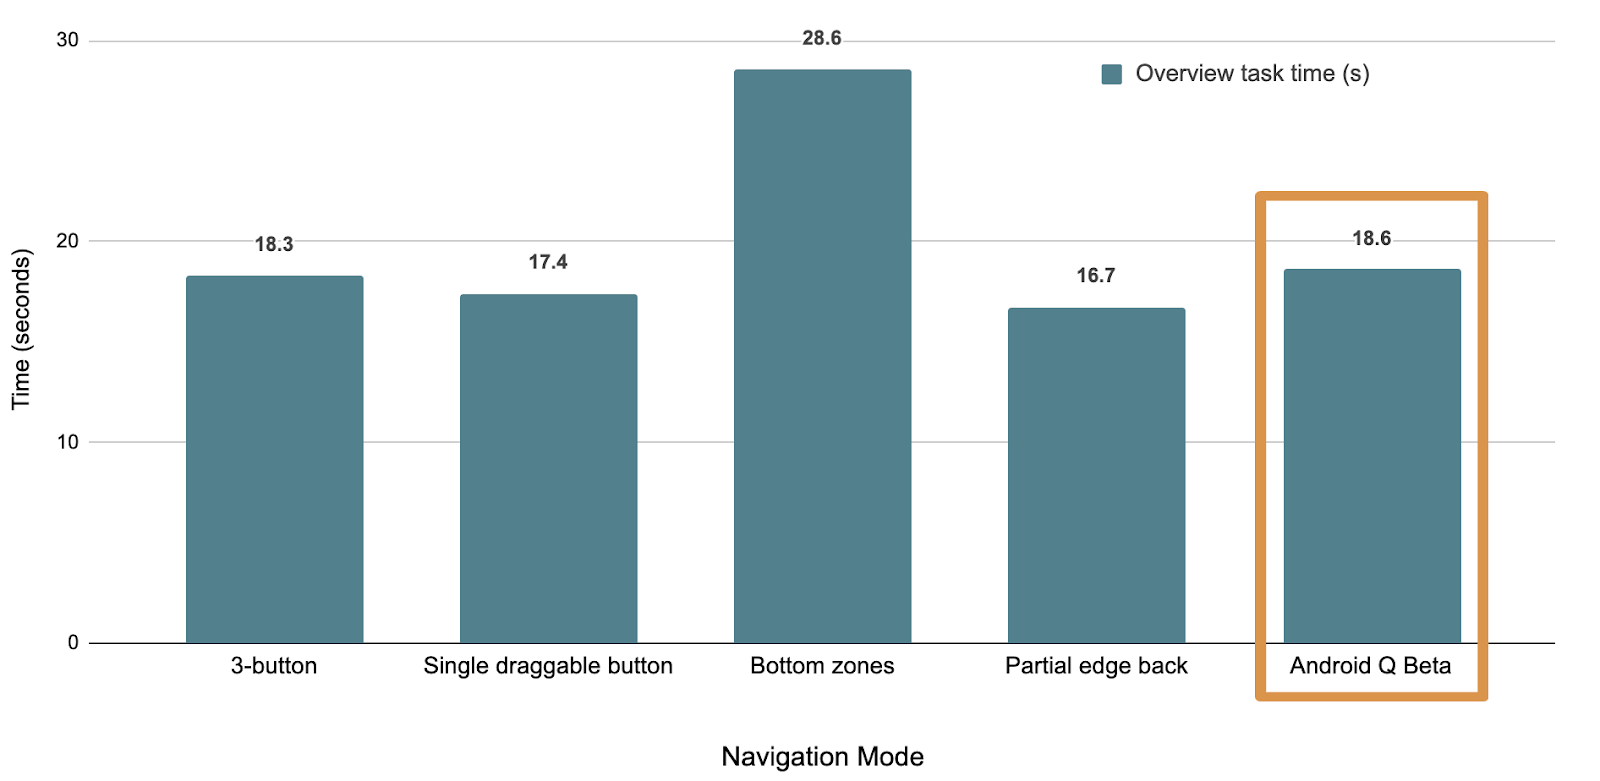
    Comparison of average time required to complete Overview/Recents-based tasks across various navigation modes (lower is better)

    Comparison of average time required to complete Overview/Recents-based tasks across various navigation modes (lower is better)


    Users, on average, performed tasks involving Home and Back more quickly than most other models - even faster than they did with buttons. The model did, however, come at the cost of being able to quickly access Overview/Recent apps, which users go to less than half as often as the Home screen.

    From a more qualitative perspective, users viewed the Q model as more one-handed and reachable, although buttons were still viewed as more ergonomic for more users.

    App Drawers and other App Swipes

    Although we arrived at the side swipe as the gesture for back that best balanced many tradeoffs, it is important to note that there were hard decisions, particularly in how that gesture impacted apps.

    For example, we found that ~3-7% of users (depending on the Google app) swipe to open the App Navigation Drawer - the rest of our users push the hamburger menu to invoke the drawer. This drawer swipe gesture is now overloaded with back and some users will need to adapt to using the hamburger menu. This was a tough choice but given the prolific use of back we optimized for what worked best there.

    Because it’s never a goal to change out behavior on users, we tried several ways to enable users to distinguish the drawer gesture from the Back gesture. However, all these paths led to users pulling in the drawer when they were trying to go Back and having less confidence that Back would work.

    Beyond drawers, gestures are a big change for people and it took on average 1-3 days to adapt - in particular, users struggled with patterns like swiping right or left on a carousel and triggering Back.

    In qualitative studies, we found that after an initial break-in period of 1-3 days, users became fluent and could consistently distinguish between these two gestures. The majority of users did not want to switch back to 3 button nav (even though that remains an option).

    Additional research showed that there is a clear adjustment phase for users to get used to a new system navigation (across many different navigations). In our Q model, we found that usage of Back goes down for the first 1-3 days. After that period, the average # of Back presses/day ends up being the same as 3-button and our P navigation.

    So What Does This Mean for Developers?

    With gestural navigation, we are aiming to move forward and standardize the user experience on Android. The model we landed on is the optimal one for most users, but it also means that some of the gestures conflict with existing app gestures, necessitating developer adjustments to how users interact with your apps. We take our responsibility to Android developers seriously and want to help you in this process.

    There are three key steps to support gesture navigation:

    1. Go edge-to-edge to enable your app to draw across the entire screen
    2. Handle any visual overlaps with the system user interface (i.e. navigation bar)
    3. Resolve any gesture conflicts with the system gestures

    We’ve just published the first article in our “Going edge-to-edge” series on Medium, detailing those steps in turn. The final article in the series will cover some of the common scenarios we’ve seen, and how you can best support them in your apps.

    Thank you all for the feedback -- all of your comments and interactions have helped us improve the gesture navigation experience in Android Q and, more broadly, help make Android better each day.

    What’s New with Android Jetpack

    Posted by Karen Ng, Group Product Manager and Jisha Abubaker, Product Manager, Android

    Last year, we launched Android Jetpack, a collection of software components designed to accelerate Android development and make writing high-quality apps easier. Jetpack was built with you in mind -- to take the hardest, most common developer problems on Android and make your lives easier.

    Jetpack has seen incredible adoption and momentum. Today, 80% of the top 1,000 apps in the Play store are using Jetpack. We’ve also heard feedback from so many of you across our early access developer programs and user studies, as well as Reddit, Stack Overflow, and Slack, that has helped shape these APIs. Very humbly, thank you.

    What’s New in Jetpack

    Today, we are excited to share with you 11 Jetpack libraries that can be used in development now and an early-development, open-source project called Jetpack Compose to simplify UI development.

    Now in Alpha

    CameraX

    We've heard from many of you that developing camera apps or integrating camera functionality within your existing apps is hard. With the new CameraX library, we want to enable you to create great camera-driven experiences in your application without worrying about the underlying device behavior. This API is backwards compatible to Android 5.0 (API 21) or higher, ensuring that the same code works on most devices in the market. While it leverages the capabilities of camera2, it uses a simpler, use case-based approach that is lifecycle-aware eliminating significant amount of boilerplate code vs camera2. Finally, it enables you to access the same functionality as the native camera app on supported devices. These optional Extensions enable features like Portrait, Night, HDR, and Beauty.

    LiveData and Lifecycles w/ coroutines

    We heard you loud and clear and agree that LiveData must support your common one-shot asynchronous operations. With Lifecycle & LiveData KTX, you can do so with Kotlin coroutines that are lifecycle-aware. Kotlin coroutines have been well received by the developer community for how they simplify the way concurrency is handled within Android apps. We want to simplify it even further and enabling you to use them safely by offering coroutine scopes tied to lifecycles, coroutine dispatchers that are lifecycle-aware, and support for simple asynchronous chains with the new liveData builder.

    Benchmark

    The Benchmark library provides you a quick way to benchmark your app code, whether it is written in Kotlin, the Java programming language or native code. We use this library to continuously benchmark Jetpack libraries we release to ensure we do not introduce any latency into your code. You can now do the same right within your development environment in Android Studio, easily measuring database queries, view inflation, or a RecyclerView scroll. The library takes care of what is needed to provide reliable and consistent results like handling warm-up periods, removing outliers, and locking CPU clocks.

    Security

    To maximize security of an application’s data at-rest, the new Security library implements security best practices for you. It provides strong security that balances encryption with performance for consumer apps like banking and chat. It also provides a maximum level of security for apps that require a hardware-backed keystore with user presence and simplifies many operations including key generation and validation.

    ViewModel with SavedState

    ViewModel provided you an easy way to save your UI data in the event of a configuration change. It did not save your app state in the event of process death, and many of you have been relying on SavedInstanceState alongside ViewModel. With the ViewModel with SavedState module, you can eliminate boilerplate code and gain the benefits of using both ViewModel and SavedState with simple APIs to save and retrieve data right from your ViewModel.

    ViewPager2

    ViewPager2, the next generation of ViewPager, is now based on RecyclerView and supports vertical scrolling and RTL (Right-to-Left) layouts. It also provides a much easier way to listen for page data changes with registerOnPageChangeCallback.

    Now in Beta

    ConstraintLayout 2.0

    ConstraintLayout 2.0 brings up new optimizations, and new way of customizing layouts, with the addition of helper classes. As part of ConstraintLayout 2.0, MotionLayout provides an easy way to manage motion and widget animation in your applications. You can easily describe transitions between layouts and animation of properties. MotionLayout is fully declarative in XML, allowing you to describe even complex transitions without requiring any code.

    Biometrics Prompt

    Users are accustomed to biometric credentials on their phones, but if your app requires a biometric login, it is important to make sure that users are provided a consistent and safe way to enter their credentials. The Biometrics library provides a simple system prompt giving the user a trustworthy experience.

    Enterprise

    With the Jetpack Enterprise library, your managed enterprise apps can send feedback back to Enterprise Mobility Management providers in the form of keyed app states, while taking advantage of backwards compatibility with managed configurations.

    Android for Cars

    With the Android for Cars libraries, you can provide your users a driver-optimized version of your app that will be automatically installed onto the vehicle’s infotainment system in vehicles equipped with the Android Automotive OS. It also allows your apps to work with the Android Auto app, providing the driver-optimized version anytime on their device.

    Now in Stable

    And in case you missed it, we announced stable releases of Jetpack WorkManager (background processing) and Jetpack Navigation (in-app navigation) just a few months ago.

    Jetpack Compose

    Today, we open-sourced an early preview of Jetpack Compose, a new unbundled toolkit designed to simplify UI development by combining a reactive programming model with the conciseness and ease-of-use of Kotlin. We have always done our best work when we did it with you - our developer community. That’s why we decided to develop Jetpack Compose in the open, starting today.

    In that vein, we took a step back and chatted with many of you. We heard strong feedback from developers that they like the modern, reactive APIs that Flutter, React Native, Litho, and Vue.js represent. We also heard that developers love Kotlin, with over 53% of professional Android developers using it and with 20% higher language satisfaction ratings than the Java programming language. Kotlin has become the fastest-growing language in terms of number of contributors on GitHub.

    So, we decided to invest in the reactive approach to declarative programming and create an easier way to build UIs with Kotlin.

    We are building Compose with a few core principles:

    • Build with the benefits that Kotlin brings -- concise, safe, and fully interoperable with the Java programming language. Designed to drastically reduce the amount of boilerplate code you have to write, so you can focus on your app code, and help avoid entire classes of errors.
    • Fully declarative for defining UI components, including drawing and creating custom layouts. Simply describe your UI as a set of composable functions, and the framework handles UI optimizations and updates to the view hierarchy under the hood.
    • Provide reusable building blocks that let you build custom widgets easier, and without starting from scratch.
    • Compatible with existing views so you can mix and match and adopt at your own pace with direct access to all of the Android and Jetpack APIs.
    • Material Design out of the box and animations from the start, so it’s easy to create beautiful apps that are full of motion.
    • Accelerate development with tools like live preview and apply changes.

    A Compose application is made up of composable functions that transform application data into a UI hierarchy. A function is all you need to create a new UI component. To create a composable function just add the @Composable annotation to the function name. Under the hood, Compose uses a custom Kotlin compiler plug-in so when the underlying data changes, the composable functions can be re-invoked to generate an updated UI hierarchy. The simple example below prints a string to the screen.

    We know that adopting any new framework is a big change for existing projects and codebases, which is why we’ve designed Compose like all of Jetpack -- with individual components that you can adopt at your own pace and are compatible with existing views.

    If you want to learn more about Jetpack Compose or download its source to try it for yourself, check out http://d.android.com/jetpackcompose

    We'd love to hear from you as we iterate on this exciting future together. Send us feedback by posting comments below, and please file any bugs you run into on AOSP or directly through the feedback buttons in the Android Studio Jetpack Compose build in AOSP. Since this is an early preview, we do not recommend trying this on any production projects.

    Happy Jetpacking!

    Android Jetpack Navigation Stable Release

    Posted by Ian Lake, Software Engineering Lead & Jisha Abubaker, Product Manager

    Cohesive tooling and guidance for implementing predictable in-app navigation

    Today we're happy to announce the stable release of the Android Jetpack Navigation component.

    The Jetpack Navigation component's suite of libraries, tooling and guidance provides a robust, complete navigation framework, freeing you from the challenges of implementing navigation yourself and giving you certainty that all edge cases are handled correctly.

    With the Jetpack Navigation component you can:

    • Handle basic user actions like Up & Back buttons so that they work consistently across devices and screens.
    • Allow users to land on any part of your app via deep links and build consistent and predictable navigation within your app.
    • Improve type safety of arguments passed from one screen to another, decreasing the chances of runtime crashes as users navigate in your app.
    • Add navigation experiences like navigation drawers and bottom navigation consistent with the Material Design guidelines.
    • Visualize and manipulate your navigation flows easily with the Navigation Editor in Android Studio 3.3

    The Jetpack Navigation component adheres to the Principles of Navigation, providing consistent and predictable navigation no matter how simple or complex your app may be.

    Simplify navigation code with Jetpack Navigation Libraries

    The Jetpack Navigation component provides a framework for in-app navigation that makes it possible to abstract away the implementation details, keeping your app code free of navigation boilerplate.

    To get started with the Jetpack Navigation component in your project, add the Navigation artifacts available on Google's Maven repository in Java or Kotlin to your app's build.gradle file:

     dependencies {
        def nav_version = 2.0.0
    
        // Java
        implementation "androidx.navigation:navigation-fragment:$nav_version"
        implementation "androidx.navigation:navigation-ui:$nav_version"
    
        // Kotlin KTX 
        implementation "androidx.navigation:navigation-fragment-ktx:$nav_version"
        implementation "androidx.navigation:navigation-ui-ktx:$nav_version"
      }

    Note: If you have not yet migrated to androidx.*, the Jetpack Navigation stable component libraries are also available as android.arch.* artifacts in version 1.0.0.

    navigation-runtime : This core library powers the navigation graph, which provides the structure of your in-app navigation: the screens or destinations that make up your app and the actions that link them. You can control how you navigate to destinations with a simple navigate() call. These destinations may be fragments, activities or custom destinations.

    navigation-fragment: This library builds upon navigation-runtime and provides out-of-the-box support for fragments as destinations. With this library, fragment transactions are now handled for you automatically.

    navigation-ui: This library allows you to easily add navigation drawers, menus and bottom navigation to your app consistent with the Material Design guidelines.

    Each of these libraries provide an Android KTX artifact with the -ktx suffix that builds upon the Java API, taking advantage of Kotlin-specific language features.

    Tools to help you build predictable navigation workflows

    Available in Android Studio 3.3 and above, the Navigation Editor lets you visually create your navigation graph , allowing you to manage user journeys within your app.

    With integration into the manifest merger tool, Android Studio can automatically generate the intent filters necessary to enable deep linking to a specific screen in your app. With this feature, you can associate URLs with any screen of your app by simply setting an attribute on the navigation destination.

    Navigation often requires passing data from one screen to another. For example, your list screen may pass an item ID to a details screen. Many of the runtime exceptions during navigation have been attributed to a lack of type safety guarantees as you pass arguments. These exceptions are hard to replicate and debug. Learn how you can provide compile time type safety with the Safe Args Gradle Plugin.

    Guidance to get it right on the first try

    Check out our brand new set of developer guides that encompass best practices to help you implement navigation correctly:

    What developers say

    Here's what Emery Coxe, Android Lead @ HomeAway, has to say about the Jetpack Navigation component :

    "The Navigation library is well-designed and fully configurable, allowing us to integrate the library according to our specific needs.

    With the Navigation Library, we refactored our legacy navigation drawer to support a dynamic, runtime-based configuration using custom views. It allowed us to add / remove new screens to the top-level experience of our app without creating any interdependencies between discreetly packaged modules.

    We were also able to get rid of all anti-patterns in our app around top-level navigation, removing explicit casts and hardcoded assumptions to instead rely directly on Navigation. This library is a fundamental component of modern Android development, and we intend to adopt it more broadly across our app moving forward.

    Get started

    Check out the migration guide and the developer guide to learn how you can get started using the Jetpack Navigation component in your app. We also offer a hands-on codelab and a sample app.

    Also check out Google's Digital Wellbeing to see another real-world example of in-app navigation using the Android Jetpack Navigation component.

    Feedback

    Please continue to tell us about your experience with the Navigation component. If you have specific feedback on features or if you run into any issues, please file a bug via one of the following links: