Tag Archives: JavaScript

7 dos and don’ts of using ML on the web with MediaPipe

Posted by Jen Person, Developer Relations Engineer

If you're a web developer looking to bring the power of machine learning (ML) to your web apps, then check out MediaPipe Solutions! With MediaPipe Solutions, you can deploy custom tasks to solve common ML problems in just a few lines of code. View the guides in the docs and try out the web demos on Codepen to see how simple it is to get started. While MediaPipe Solutions handles a lot of the complexity of ML on the web, there are still a few things to keep in mind that go beyond the usual JavaScript best practices. I've compiled them here in this list of seven dos and don'ts. Do read on to get some good tips!


❌ DON'T bundle your model in your app

As a web developer, you're accustomed to making your apps as lightweight as possible to ensure the best user experience. When you have larger items to load, you already know that you want to download them in a thoughtful way that allows the user to interact with the content quickly rather than having to wait for a long download. Strategies like quantization have made ML models smaller and accessible to edge devices, but they're still large enough that you don't want to bundle them in your web app. Store your models in the cloud storage solution of your choice. Then, when you initialize your task, the model and WebAssembly binary will be downloaded and initialized. After the first page load, use local storage or IndexedDB to cache the model and binary so future page loads run even faster. You can see an example of this in this touchless ATM sample app on GitHub.


✅ DO initialize your task early

Task initialization can take a bit of time depending on model size, connection speed, and device type. Therefore, it's a good idea to initialize the solution before user interaction. In the majority of the code samples on Codepen, initialization takes place on page load. Keep in mind that these samples are meant to be as simple as possible so you can understand the code and apply it to your own use case. Initializing your model on page load might not make sense for you. Just focus on finding the right place to spin up the task so that processing is hidden from the user.

After initialization, you should warm up the task by passing a placeholder image through the model. This example shows a function for running a 1x1 pixel canvas through the Pose Landmarker task:

function dummyDetection(poseLandmarker: PoseLandmarker) { const width = 1; const height = 1; const canvas = document.createElement('canvas'); canvas.width = width; canvas.height = height; const ctx = canvas.getContext('2d'); ctx.fillStyle = 'rgba(0, 0, 0, 1)'; ctx.fillRect(0, 0, width, height); poseLandmarker.detect(canvas); }


✅ DO clean up resources

One of my favorite parts of JavaScript is automatic garbage collection. In fact, I can't remember the last time memory management crossed my mind. Hopefully you've cached a little information about memory in your own memory, as you'll need just a bit of it to make the most of your MediaPipe task. MediaPipe Solutions for web uses WebAssembly (WASM) to run C++ code in-browser. You don't need to know C++, but it helps to know that C++ makes you take out your own garbage. If you don't free up unused memory, you will find that your web page uses more and more memory over time. It can have performance issues or even crash.

When you're done with your solution, free up resources using the .close() method.

For example, I can create a gesture recognizer using the following code:

const createGestureRecognizer = async () => { const vision = await FilesetResolver.forVisionTasks( "https://cdn.jsdelivr.net/npm/@mediapipe/[email protected]/wasm" ); gestureRecognizer = await GestureRecognizer.createFromOptions(vision, { baseOptions: { modelAssetPath: "https://storage.googleapis.com/mediapipe-models/gesture_recognizer/gesture_recognizer/float16/1/gesture_recognizer.task", delegate: "GPU" }, }); }; createGestureRecognizer();

Once I'm done recognizing gestures, I dispose of the gesture recognizer using the close() method:

gestureRecognizer.close();

Each task has a close method, so be sure to use it where relevant! Some tasks have close() methods for the returned results, so refer to the API docs for details.


✅ DO try out tasks in MediaPipe Studio

When deciding on or customizing your solution, it's a good idea to try it out in MediaPipe Studio before writing your own code. MediaPipe Studio is a web-based application for evaluating and customizing on-device ML models and pipelines for your applications. The app lets you quickly test MediaPipe solutions in your browser with your own data, and your own customized ML models. Each solution demo also lets you experiment with model settings for the total number of results, minimum confidence threshold for reporting results, and more. You'll find this especially useful when customizing solutions so you can see how your model performs without needing to create a test web page.

Screenshot of Image Classification page in MediaPipe Studio


✅ DO test on different devices

It's always important to test your web apps on various devices and browsers to ensure they work as expected, but I think it's worth adding a reminder here to test early and often on a variety of platforms. You can use MediaPipe Studio to test devices as well so you know right away that a solution will work on your users' devices.


❌ DON'T default to the biggest model

Each task lists one or more recommended models. For example, the Object Detection task lists three different models, each with benefits and drawbacks based on speed, size and accuracy. It can be tempting to think that the most important thing is to choose the model with the very highest accuracy, but if you do so, you will be sacrificing speed and increasing the size of your model. Depending on your use case, your users might benefit from a faster result rather than a more accurate one. The best way to compare model options is in MediaPipe Studio. I realize that this is starting to sound like an advertisement for MediaPipe Studio, but it really does come in handy here!

photo of a whale breeching against a background of clouds in a deep, vibrant blue sky

✅ DO reach out!

Do you have any dos or don'ts of ML on the web that you think I missed? Do you have questions about how to get started? Or do you have a cool project you want to share? Reach out to me on LinkedIn and tell me all about it!

How a group of young developers want to help us vote

Posted by Erica Hanson, Global Program Manager, Google Developer Student Clubs

Stevens Institute of Technology’s Google Developer Student Club. Names left to right: Tim Leonard, Will Escamilla, Rich Bilotti, Justin O'Boyle, Luke Mizus, and Rachael Kondra

The Google Developer Student Club at the Stevens Institute of Technology built their own website that makes local government data user friendly for voters in local districts. The goal: Take obscure budget and transportation information, display it via an easy-to-understand UI, and help voters become more easily informed.

When Tim Leonard first moved to Hoboken, New Jersey to start school at the Stevens Institute of Technology, he was interested in anything but government. A computer science major with a deep interest in startups, one was more likely to find him at a lecture on computational structures than on political science.

However, as the founder of the Google Developer Student Club (DSC) chapter at his university, Tim and his fellow classmates had the opportunity to make the trip into New York City to attend a developer community meetup with Ralph Yozzo, a community organizer from Google Developer Groups (GDG) NYC. While Ralph had given several talks on different technologies and programming techniques, this time he decided to try something new: Government budgets.

A slide from Ralph’s presentation

Titled “Why we should care about budgets,” Ralph’s talk to the young programmers focused on why tracking government spending in their community matters. He further explained how public budgets fund many parts of our lives - from getting to work, to taking care of our health, to going to a good school. However, Ralph informed them that while there are currently laws that attempt to make this data public, a platform that makes this information truly accessible didn’t exist. Instead, most of this information is tucked away in different corners of the internet; unorganized, and hard to understand.

Tim soon realized programming could be the solution and that his team had the chance to grow in a whole new way, outside of the traditional classroom setting. With Ralph’s encouragement, Tim and his team started thinking about how they could build a platform to collect all of this data, and provide a UI that’s easy for any user to interact with. By creating a well-organized website that could pull all of this local information, streamline it, and produce easy-to-understand graphics, the DSC Stevens team imagined they could have an impact on how voters inform themselves before casting their ballots at local elections.

“What if we had a technical approach to local government? Where our site would have actionable metrics that held us accountable for getting information out to the public.”

Tim thought if local voters could easily understand how their representatives were spending their community’s money, they could use it as a new framework to decide how to vote. The next step was to figure out the best way to get started.

An image from the demo site

The DSC Stevens team quickly agreed that their goal should be to build a website about their own city, Hoboken. They named it “Project Crystal” and started taking Google App Engine courses and conducting Node.js server run throughs. With the data they would eventually store and organize, they also dove into Google Cloud demos and workshops on Google Charts. They were determined to build something that would store public information in a different way.

“Bounce rates and click through metrics ensure we evaluate our site like a startup. Instead of selling a product, our platform would focus on getting people to interact with the data that shapes their everyday lives.”

After participating in different courses on how to use Google Cloud, Maps, and Charts, they finally put it all together and created the first version of their idea - an MVP site, built to drive user engagement, that would serve as their prototype.

A video explaining the Project Crystal website

Complete with easy-to-understand budget charts, contact information for different public officials, and maps to help users locate important services, the prototype site has been their first major step in turning complicated data into actionable voting information. Excited about their progress, Tim wants to eventually host the site on Google Cloud so his team can store more data and offer the platform to local governments across the country.

Image of the DSC Steven's team adding Google Charts to their demo site

The DSC Stevens team agrees, access to resources like Project Crystal could change how we vote. They hope with the right technical solutions around data, voters will be better informed, eager to ask more of their representatives, and more willing to participate in the day-to-day work of building their communities, together.

“Our advice to other student developers is to find outlets, like DSC, that enable you to think about helping others. For us, it was figuring out how to use our Google Cloud credits for good.”

Want to start a project of your own? If you’re a university student, join a Developer Student Club near you. If you’re a professional, find the right Google Developer Group for you.

Daring to code: How one young developer found her way in a rural community in Russia

Posted by Jennifer Kohl, Google Developers Global Communities Program Manager

Luiza in her hometown, Magas

Magas is the capital of the Republic of Ingushetia, the smallest region in Russia. Centered between Chechnya and North Ossetia, the area is no stranger to conflict. Even as it rebuilds, the region has seen its unemployment numbers rise to as high as 50 percent. Magas, a mostly rural area, is home to a small population of just under six-thousand people - it’s estimated that under 100 of them are developers.

Yet one day that small group of developers decided to take their first step towards becoming a community. These founders heard of Google Developer Groups (GDG) and had seen their community meetups in action on trips to other larger cities in Russia. Inspired by how GDG brought developers together, they believed starting a community in Magas was just what they all needed to grow.

GDG Magas was up and running immediately, hosting small community events in classrooms and meeting spaces across town. And it was there, at a local meetup, where GDG Magas met Luiza.

Luiza speaking at a University competition

At the time, Luiza was a student at a local university. Equipped with a curious mind, she was hungry to learn more. She often challenged herself to think about how women could grow professionally and personally within traditional cultures. Luiza was interested in technology, a mostly unheard of career path in this small town. At the same time, Women Techmakers, a Google program that provides resources for women in technology, started collaborating with GDG chapters around the world to help women like Luiza get started on their journey.

So together, GDG Magas and Women Techmakers started hosting talks and workshops for women in the community. Eventually, they began running a programming class for beginners, and that’s where Luiza realized she had the space to truly explore her interest in code. The community organized thirteen classes, and each Saturday Luiza would join GDG Magas to learn everything from arrays, to Python, to JavaScript, and more.

“I learned everything a beginner needs: numeral systems, loops, algorithms, and even the basics of web development. I was able to work with GDG mentors to improve my skills both in the backend and frontend. Someone was always there to answer my questions.”

With GDG Magas providing Luiza with this access to learning materials and mentorship, there has been no turning back. Luiza landed a competitive role working for an internet company, will soon give her own talks at GDG events, and is even starting her own Google Developer Student Club as she completes her studies in Magas. Luiza is now at the forefront of helping a rural town become a growing tech scene, taking the lead to shape her future and that of many young developers around her.

GDG Magas and similar developer communities are growing faster than ever, thanks to determined developers just like Luiza.

Ready to find a developer community near you? Join a local Google Developer Group, here.

Automate & Extend with Apps Script (Google Cloud for Student Developers)

Posted by Wesley Chun (@wescpy), Developer Advocate, Google Cloud


In the previous episode of our new Google Cloud for Student Developers video series, we introduced G Suite REST APIs, showing how to enhance your applications by integrating with Gmail, Drive, Calendar, Docs, Sheets, and Slides. However, not all developers prefer the lower-level style of programming requiring the use of HTTP, OAuth2, and processing the request-response cycle of API usage. Building apps that access Google technologies is open to everyone at any level, not just advanced software engineers.

Enhancing career readiness of non-engineering majors helps make our services more inclusive and helps democratize API functionality to a broader audience. For the budding data scientist, business analyst, DevOps staff, or other technical professionals who don't code every day as part of their profession, Google Apps Script was made just for you. Rather than thinking about development stacks, HTTP, or authorization, you access Google APIs with objects.

This video blends a standard "Hello World" example with various use cases where Apps Script shines, including cases of automation, add-ons that extend the functionality of G Suite editors like Docs, Sheets, and Slides, accessing other Google or online services, and custom functions for Google Sheets—the ability to add new spreadsheet functions.

One featured example demonstrates the power to reach multiple Google technologies in an expressive way: lots of work, not much code. What may surprise readers is that this entire app, written by a colleague years ago, is comprised of just 4 lines of code:

function sendMap() {
var sheet = SpreadsheetApp.getActiveSheet();
var address = sheet.getRange('A1').getValue();
var map = Maps.newStaticMap().addMarker(address);
GmailApp.sendEmail('[email protected]',
'Map', 'See below.', {attachments:[map]});
}

Apps Script shields its users from the complexities of authorization and "API service endpoints." Developers only need an object to interface with a service; in this case, SpreadsheetApp to access Google Sheets, and similarly, Maps for Google Maps plus GmailApp for Gmail. Viewers can build this sample line-by-line with its corresponding codelab (a self-paced, hands-on tutorial). This example helps student (and professional) developers...

  1. Build something useful that can be extended into much more
  2. Learn how to accomplish several tasks without a lot of code
  3. Imagine what else is possible with G Suite developer tools

For further exploration, check out this video as well as this one which introduces Apps Script and presents the same code sample with more details. (Note the second video emails the map's link, but the app has been updated to attach it instead; the code has been updated everywhere else.) You may also access the code at its open source repository. If that's not enough, learn about other ways you can use Apps Script from its video library. Finally, stay tuned for the next pair of episodes which will cover full sample apps, one with G Suite REST APIs, and another with Apps Script.

We look forward to seeing what you build with Google Cloud.

Evolving automations into applications using Apps Script

Posted by Wesley Chun (@wescpy), Developer Advocate, Google Cloud

Editor’s Note: Guest authors Diego Moreno and Sophia Deng (@sophdeng) are from Gigster, a firm that builds dynamic teams made of top global talent who create industry-changing custom software.

Prelude: Data input & management … three general choices

Google Cloud provides multiple services for gathering and managing data. Google Forms paired with Google Sheets are quite popular as they require no engineering resources while being incredibly powerful, providing storage of up to 5 million rows of data and built-in analytics for small team projects.

At the other end of the spectrum, to support a high volume of users or data, Google Cloud provides advanced serverless platforms like Google App Engine (web app-hosting) and Google Cloud Functions (function/service-hosting) that can use Google Cloud Firestore for fast and scalable data storage. These are perfect for professional engineering teams that need autoscaling to respond to any level of user traffic and data input. Such apps can also be packaged into a container and deployed serverlessly on Google Cloud Run.

However, it's quite possible your needs are right in-between. Today, we're happy to present the Gigster story and their innovative use of Google Apps Script—a highly-accessible service conventionally relegated to simple macro and add-on development, but which Gigster used to its advantage, building robust systems to transform their internal operations. Apps Script is also serverless, meaning Gigster didn't have to manage any servers for their application nor did they need to find a place to host its source code.

The Gigster story

Gigster enables distributed teams of software engineers, product managers and designers to build software applications for enterprise clients. Over the past five years, Gigster has delivered thousands of projects, all with distributed software teams. Our group, the Gigster Staffing Operations Team, is responsible for assembling these teams from Gigster’s network of over 1,000 freelancers.

Two years ago, our team began building custom software to automate the multi-stage and highly manual team staffing process. Building internal software has allowed the same-size Staffing Operations Team (3 members!) to enjoy a 60x reduction in time spent staffing each role.

The Apps Script ecosystem has emerged as the most critical component in our toolkit for building this internal software, due to its versatility and ease of deployment. We want to share how one piece of the staffing process has evolved to become more powerful over time thanks to Apps Script. Ultimately, we hope that sharing this journey enables all types of teams to build their own tools and unlock new possibilities.

End-to-end automation in Google Sheets

Staffing is an operationally intensive procedure. Just finding willing and able candidates requires numerous steps:

  1. Gathering and formatting customer requirements.
  2. Communicating with candidates through multiple channels.
  3. Logging candidate responses.
  4. Processing paperwork for placement

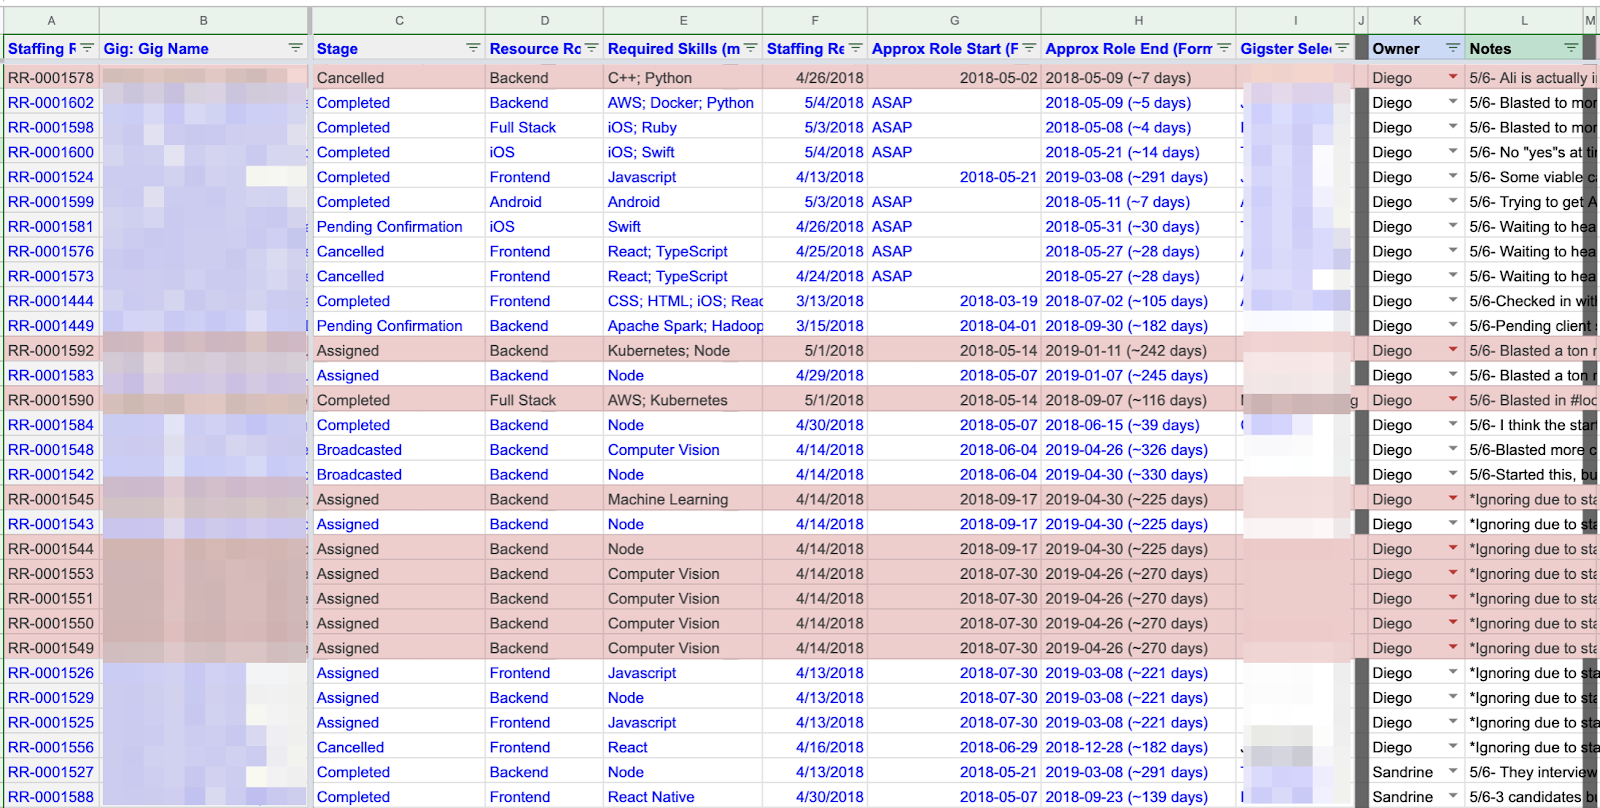
To add complexity, many of these steps require working with different third-party applications. For awhile, we performed every step manually, tracking every piece of data generated in one central Sheet (the “Staffing Broadcast Google Sheet”). At a certain point, this back-and-forth work to log data from numerous applications became unsustainable. Although we leveraged Google Sheets features like Data Validation rules and filters, the Staffing Broadcast Sheet could not alleviate the high degree of manual processes that were required of the team.

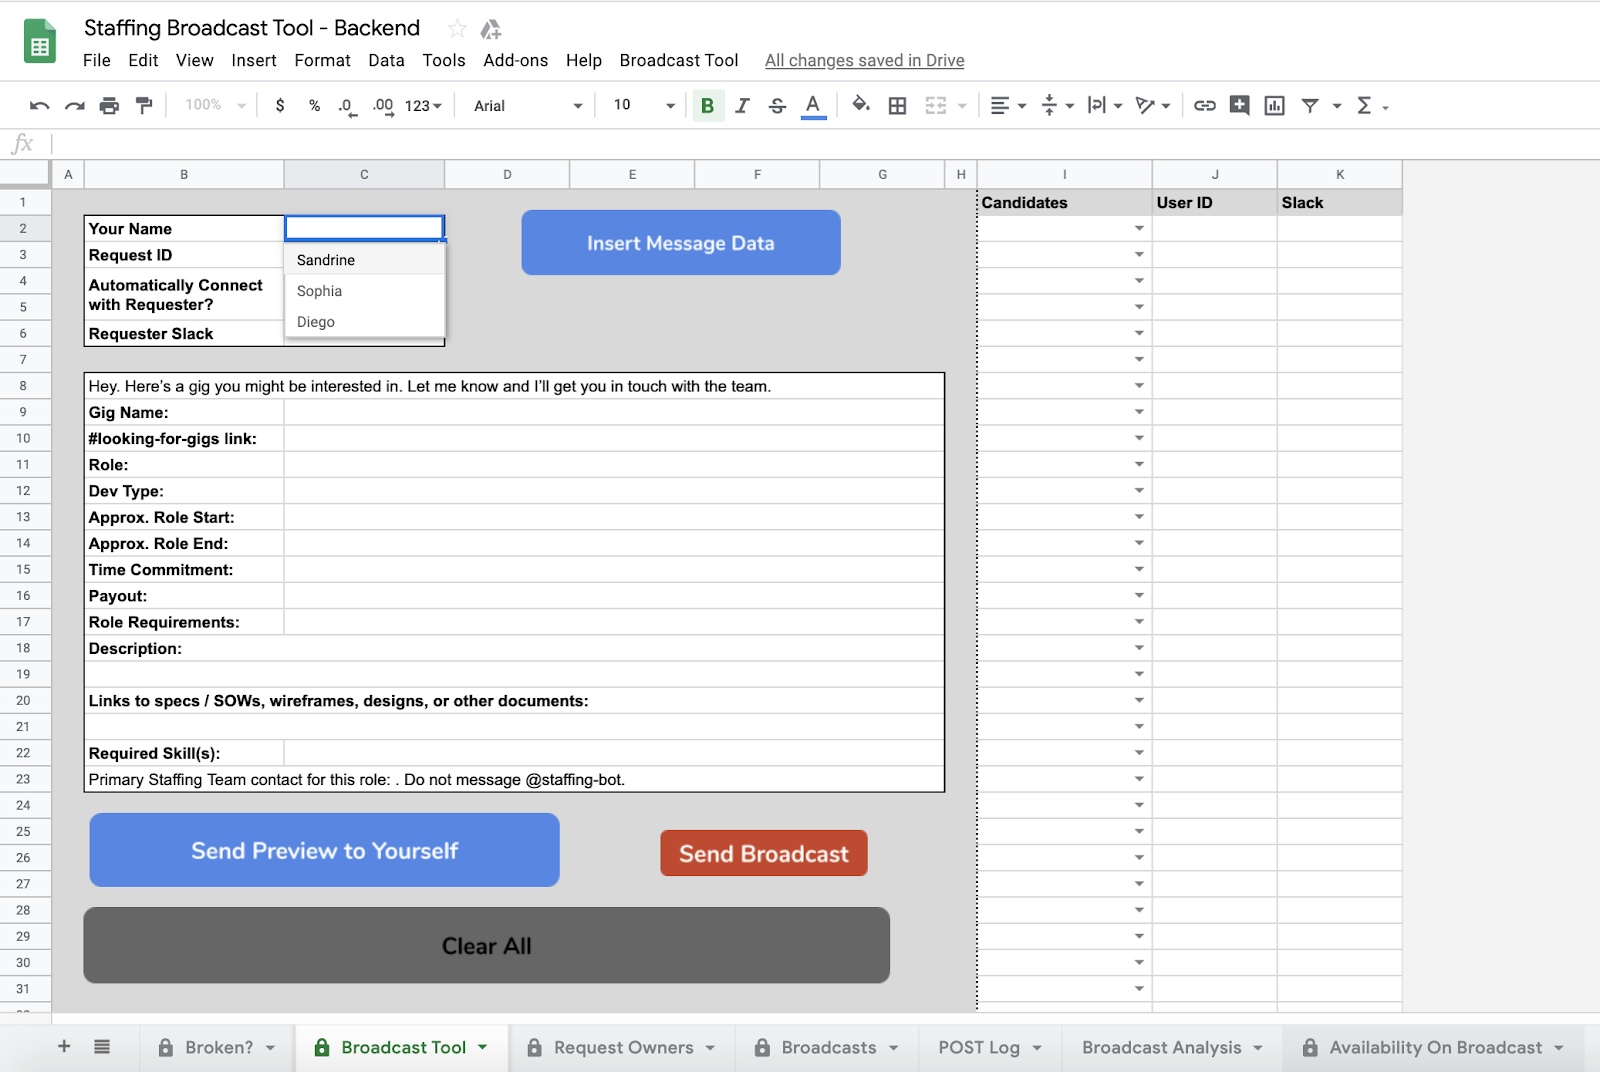
centralized Staffing Broadcast Google Sheet

The centralized Staffing Broadcast Google Sheet provided organization, but required a high degree of manual entry for tracking candidate decisions.

The key transformation was integrating Sheets data with third-party APIs via Apps Script. This enabled us to cut out the most time-consuming operations. We no longer had to flip between applications to message candidates, wait for their replies, and then manually track responses.

To interact with these APIs, we built a user interface directly into the Staffing Broadcast Google Sheet. By introducing an information module, as well as drop-down lists and buttons, we were able to define a small set of manual actions versus the much wider list of tasks the tool would perform automatically across multiple applications.

integrating Apps Script with third-party APIs

By integrating Google Apps Script with third-party APIs and creating a user interface, we evolved the Staffing Broadcast Tool to centralize and automate almost every step of the staffing process.

doPost() is the key function in our staffing tool that facilitates third-party services triggering our Apps Script automations. Below is a snippet of how we listened to candidates' responses from a third-party messaging application. In this case, queueing the third-party message in a Google Sheet so it can be processed with improved error-handling.

/**
* Receive POST requests and record to queue.
*/
doPost(e) {
var payload = e.postData.contents;
SpreadsheetApp.openById(SPREADSHEET_ID)
.getSheetByName("Unprocessed")
.appendRow([payload]);
return ContentService.createTextOutput(""); // Return 200
}

Almost all manual work associated with finding candidates was automated through the combination of integrations with third-party APIs and having a user interface to perform a small, defined set of actions. Our team’s day-to-day became shockingly simple: select candidates to receive messages within the Staffing Broadcast Tool, then click the “Send Broadcast” button. That’s it. The tool handled everything else.

Leveraging Sheets as our foundation, we fundamentally transformed our spreadsheet into a custom software application. The spreadsheet went from a partially automated datastore to a tool that provided an end-to-end automated solution, requiring only the click of a few buttons to execute.

Evolution into a standalone application

While satisfied, we understood that having our application live in Google Sheets had its limitations, namely, it was difficult for multiple team members to simultaneously use the tool. Using doGet(), the sibling to doPost(), we began building an HTML frontend to the Staffing Broadcast Tool. In addition to resolving difficulties related to multiple users being in a spreadsheet, it also allowed us to build an easier-to-use and more responsive tool by leveraging Bootstrap & jQuery.

Having multiple users in a single Google Sheet can create conflicts, but Apps Script allowed us to build a responsive web app leveraging common libraries like Bootstrap & jQuery that eliminated those problems while providing an improved user experience.

When other teams at Gigster got wind of what we built, it was easy to grant access to others beyond the Staffing Operations Team. Since Apps Script is part of the G Suite developer ecosystem, we relied on Google’s security policies to help deploy our tools to larger audiences.

While this can be done through Google’s conventional sharing tools, it can also be done with built-in Apps Script functions like Session.getActiveUser() that allow us to restrict access to specific Google users. In our case, those within our organization plus a few select users.

To this day, we continue to use this third version of the Staffing Broadcast Tool in our daily operations as it supports 100% of all client projects at Gigster.

Conclusion

By fundamentally transforming the Staffing Broadcast Tool with Apps Script, Gigster’s Staffing Operations Team increased its efficiency while supporting the growth of our company. Inspired by these business benefits, we applied this application-building approach using Apps Script for multiple tools, including candidate searching, new user onboarding, and countless automations.

Our team’s psychological shift about how we view what we are capable of, especially as a non-engineering team, has been the most valuable part of this journey. By leveraging an already familiar ecosystem to build our own software, we have freed team members to become more self-sufficient and valuable to our customers.

To get started on your Apps Script journey, we recommend you check out the Apps Script Fundamentals playlist and the official documentation. And if you're a freelancer looking to build software applications for clients, we’re always looking for talented software engineers, product managers or designers to join Gigster’s Talent Network.

Thank you to Sandrine Bitton, the third member of the Staffing Operations Team, for all her help in the development of the Staffing Broadcast Tool.

Wombat Dressing Room, an npm publication proxy on GCP

We're excited to announce that we're open sourcing the service we use on the Google Cloud Client Libraries team for handling npm publications, it's called Wombat Dressing Room. Wombat Dressing Room provides features that help npm work better with automation, while maintaining good security practices.

A tradeoff is often made for automation

npm has top notch security features: CIDR-range restricted tokens, publication notifications, and two-factor authentication, to name a few. Of these, a feature critical to protecting publications is two-factor authentication (2FA).

2FA requires that you provide two pieces of information when accessing a protected resource: "something you know" (for instance, a password); and "something you have" (for instance, a code from an authenticator app). With 2FA, if your password is exposed, an attacker still can't publish a malicious package (unless they also steal the "something you have".)

On my team, a small number of developers manage over 75 Node.js libraries. We see automation as key to making this possible: we've written tools that automate releases, validate license headers, ensure contributors have signed CLAs; we adhere to the philosophy, automate all the things!

It's difficult to automate the step of entering a code off a cellphone. As a result, folks often opt to turn off 2FA in their automation.

What if you could have both automation and the added security of 2FA? This is why we built the Wombat Dressing Room.

A different approach to authentication

With Wombat Dressing Room, rather than an individual configuring two factor authentication in an authenticator app, 2FA is managed by a shared proxy server. Publications are then directed at the Wombat Dressing Room proxy, which provides the following security features:

Per-package publication tokens.

Wombat Dressing Room can generate authentication tokens tied to repositories on GitHub. These tokens are tied to a single GitHub repository, which the user generating the token must have push permissions for.

If a per-package publication token is leaked, an attacker can only hijack the single package that the token is associated with.

Limited lifetime tokens

Wombat Dressing Room can also generate access tokens that have a 24 hour lifespan. In this model, a leaked token is only vulnerable until the 24 hour lifespan is hit.

GitHub Releases as 2FA

In this authentication model, a package can only be published to npm if a GitHub release with a corresponding tag is found on GitHub.

This introduces a true "second factor", as users must prove they have access to both Wombat Dressing Room and the repository on GitHub.

Getting started with Wombat Dressing Room

We've been using Wombat Dressing Room to manage Google Cloud client libraries for over a year now in our fully automated library release process. As of today, the source is available for everyone on GitHub under an Apache 2.0 license.

Wombat Dressing Room runs on Google App Engine, and instructions on getting it up and running can be found in its README.md.

It's my hope that this will help other folks in the community, simplify and automate their release process, while minimizing the attack surface of their libraries.
By Benjamin Coe, works on Node.js client libraries for the Google Cloud Platform, and was the third engineer at npm, Inc.

OpenCensus Web: Unlocking Full End-to-End Observability for Your Entire Stack

OpenCensus Web is a tool to trace and monitor the user-perceived performance of your web pages. It can help determine whether or not your web pages are experiencing performance issues that you might otherwise not know how to diagnose.

Web application owners want to monitor the operational health of their applications so that they can better understand actual user performance; however, capturing relevant telemetry from your web applications is often very difficult. Today, we are introducing OpenCensus Web (OC Web) to make instrumenting and exporting metrics and distributed traces from web applications simple and automatic.

Background

The OpenCensus project provides a set of language-specific instrumentation libraries that collect traces and metrics from applications and export them to tracing and monitoring backends like Prometheus, Zipkin, Jaeger, Stackdriver, and others.

The OpenCensus Web library is an implementation of OpenCensus that focuses on frontend web application code that executes in the browser. OC Web instruments web pages and collects user-side performance data, including latency and distributed traces, which gives developers the information to diagnose frontend issues and monitor overall application health.

Overshadowing the work on OC Web, the wider OpenCensus family of projects is merging with OpenTracing into OpenTelemetry. OpenCensus Web’s functionality will be migrated into OpenTelemetry JS once this project is ready, although OC Web will continue working as an alpha release in the meantime.

Architecture

OC Web interacts with three application components:
  • Frontend web server: renders the initial HTML to the browser including the OC Web library code and configuration. This would typically be instrumented with an OpenCensus server-side library (Go, Java, etc.). We also suggest that you create an endpoint in the server that receives HTTP/JSON traces and proxies to the OpenCensus Agent.
  • Browser JS: the OC Web library code that runs in the browser. This measures user interactions and collects browser data and writes them to the OpenCensus Agent as spans via HTTP/JSON.
  • OpenCensus Agent: receives traces from the frontend web server proxy endpoint or directly from the browser JS, and exports them to a trace backend (e.g. Stackdriver, Zipkin).
OC Web requires the OpenCensus Agent, which will proxy and re-export telemetry to your backend of choice. For more details see the documentation.


Features

Initial page load tracing

You can use OC Web to capture traces of initial page loads, which will even capture events that take place before the OC Web library was loaded by the browser! Initial page load traces show you which resources may be causing poor website performance, and contain data that you can’t typically capture from a distributed tracing system.

To measure the time of the overall initial page load interaction, OC Web waits until after the document load event and generates spans from the initial load performance timings via the browser's Navigation Timing and Resource Timing APIs. Below is a sample trace from OC Web that has been exported to Zipkin and captured from the initial load example app. Notice that there is an overall ‘nav./’ span for the user navigation experience until the browser load event fires.

This example also includes ‘/’ spans for the client and server side measurements of the initial HTML load. These spans are connected by the server sending back a ‘window.traceparent’ variable in the W3C Trace Context format, which is necessary because the browser does not send a trace context header for the initial page load. The server side spans also indicate how much time was spent parsing and rendering the template:

Notice the long js task span in the previous image, which indicates a CPU-bound JavaScript event loop that took 80.095ms, as measured by the Long Tasks browser API.

Span annotations for DOM and network events

Spans captured by OC Web also include detailed annotations for DOM events like `domInteractive` and `first-paint`, as well as network events like domainLookupStart and secureConnectionStart. Here is a similar trace exported to Stackdriver Trace with the annotations expanded:


User Interactions

For single page applications there are often subsequent interactions after the initial load (e.g. user clicks a button or navigates to a different section of the page). Measuring end-user interactions within a browser application adds useful data for your application:
  • Ability to relate an initial page render with subsequent on-page interactions
  • Visibility into slowness as perceived by the end user, for example, an unresponsive page after clicking
Currently, OC Web tracks clicks and route transitions by monkey-patching the Angular Zone.js library. OC Web tracks the subsequent synchronous and asynchronous tasks (e.g. setTimeouts, XHRs, etc.) caused by the interaction even if there are several concurrent interactions.

Automatic tracing for click events

All browser click events are traced as long as the click is done in a DOM element (e.g. button) and the clicked element is not disabled. When the user clicks the element, a new Zone is created to measure this interaction and determine the total time.

To name this root span, we provide developers with the option of adding the attribute data-ocweb-id to elements and give a custom name to the interaction. For the next example, the resulting name will be ‘Save edit user info’:
<button type="submit" data-ocweb-id="Save edit user info">       Save changes </button>
This helps you to identify the traces related to a specific element. Also, this may avoid ambiguity when there are similar interaction. If you don’t add this attribute, OC Web will use the DOM element ID, the tag name plus the event involved in the interaction. For example, clicking this button:
<button id="save_changes"> Save changes </button>
will generate a span named : “button#save_changes click”.

Automatic tracing for route transitions

OC Web traces route transitions between the different sections of your page by monkey-patching the History API. OC Web will name these interactions with the pattern ‘Navigation /path/to/page’. The following screenshot of a trace exported to Stackdriver from the user interaction example shows a Navigation trace which includes several network calls before the route transition is complete:

Creating your own custom spans

OC Web allows you to instrument your web application with custom spans for tasks or code involved in a user interaction. Here is a code snippet that shows how to do this:

import { tracing } from '@opencensus/web-instrumentation-zone';

function handleClick() {
  // Start child span of the current root span on the current interaction.
  // This must run in in code that the button is running.
  const childSpan = tracing.tracer.startChildSpan({
    name: 'name of your child span'
  });
  // Do some operation...
  // Finish the child span at the end of it's operation
  childSpan.end();
}

See the OC Web documentation for more details.

Automatic spans for HTTP requests and Browser performance data

OC Web automatically intercepts and generates spans for HTTP requests generated by user interactions. Additionally, OC Web attaches Trace Context Headers to each intercepted HTTP request, using the W3C Trace Context format. This is only done for same-origin requests or requests that match a provided regex.

If your servers are also instrumented with OpenCensus, these requests will continue to be traced throughout your backend services! This lets you know if the issues are related to either the front-end or the server-side.

OC Web also includes Performance API data to make annotations like domainLookupStart and responseEnd and generates spans for any CORS preflight requests.

The next screenshot shows a trace exported to Stackdriver as result of the user interaction example. There, you can see the several network calls with the automatic generated spans (e.g. ‘Sent./sleep’) with annotations, the server-side spans (e.g. ‘/sleep’ and ‘ocweb.handlerequest’) and CORS Preflight related spans:

Relate user interactions back to the initial page load tracing

OC Web attaches the initial page load trace id to the user interactions as an attribute and a span link. This enables you to do a trace search by attribute to find the initial load trace and its interactions traces via a single attribute query as well as letting you understand the whole navigation of a user through the application for a given page load.

The next screenshot shows a search by initial_load_trace_id attribute containing all user interaction traces after the initial page loaded:


Making it Real

With OC Web and a few lines of instrumentation, you can now export distributed traces from your web application. Start exploring the initial load and user interaction examples and you're welcome to poke around the source code and send us feedback via either Gitter or contributing with Pull Requests!

By Cristian González – OpenCensus Team – Software Engineering intern at Google Summer 2019 and student of Computer and Systems Engineering at Universidad Nacional de Colombia.

Special thanks to Dave Raffensperger for being initial creator of OC Web and guiding me in the process to develop i
t.

Googlebot evergreen rendering in our testing tools

Today we updated most of our testing tools so they are using the evergreen Chromium renderer. This affects our testing tools like the mobile-friendly test or the URL inspection tool in Search Console. In this post we look into what this means and what went into making this update happen.

The evergreen Chromium renderer

At Google I/O this year we were happy to announce the new evergreen Googlebot.

At its core the update is a switch from Chrome 41 as the rendering engine to the latest stable Chromium. Googlebot is now using the latest stable Chromium to run JavaScript and render pages. We will continue to update Googlebot along with the stable Chromium, hence we call it "evergreen".

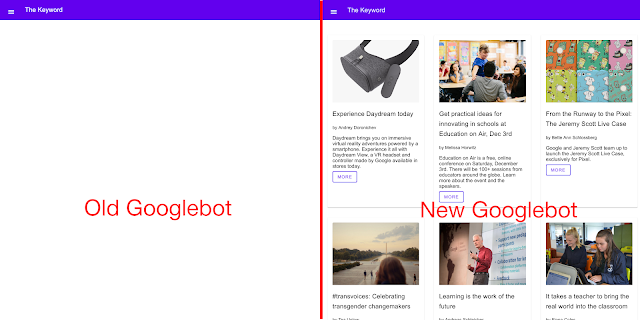
Comparison between the rendering of a JS-powered website in the old and new Googlebot
A JavaScript-powered demo website staying blank in the old Googlebot but working fine in the new Googlebot.

What this means for your websites

We are very happy to bring the latest features of the web platform not only to Googlebot but to the tools that let you see what Googlebot sees as well. This means websites using ES6+, Web Components and 1000+ new web platform features are now rendered with the latest stable Chromium, both in Googlebot and our testing tools.
A comparison showing the old and the new mobile-friendly test. The old mobile-friendly test rendered a blank page and the new one renders the page correctly
While the previous version of the mobile-friendly test doesn't show the page content, the new version does.

What the update changes in our testing tools

Our testing tools reflect how Googlebot processes your pages as closely as possible. With the update to the new Googlebot, we had to update them to use the same renderer as Googlebot.

The change will affect the rendering within the following tools:
We tested these updates and based on the feedback we have switched the tools listed previously to the new evergreen Googlebot. A lot of the feedback came from Googlers and the community. Product Experts and Google Developer Experts helped us make sure the update works well.

Note: The new Googlebot still uses the same user agent as before the update. There will be more information about an update to the user agent in the near future. For now, Googlebot's user agent and the user agent used in the testing tools does not change.

We are excited about this update and are looking forward to your feedback and questions on Twitter, the webmaster forum or in our webmaster office hours.

Search at Google I/O 2019

Google I/O is our yearly developer conference where we have the pleasure of announcing some exciting new Search-related features and capabilities. A good place to start is Google Search: State of the Union, which explains how to take advantage of the latest capabilities in Google Search:

We also gave more details on how JavaScript and Google Search work together and what you can do to make sure your JavaScript site performs well in Search.

Try out new features today

Here are some of the new features, codelabs, and documentation that you can try out today:
The Google I/O sign at Shoreline Amphitheatre at Mountain View, CA

Be among the first to test new features

Your help is invaluable to making sure our products work for everyone. We shared some new features that we're still testing and would love your feedback and participation.
A large crowd at Google I/O

Learn more about what's coming soon

I/O is a place where we get to showcase new Search features, so we're excited to give you a heads up on what's next on the horizon:
Two people posing for a photo at Google I/O, forming a heart with their arms

We hope these cool announcements help & inspire you to create even better websites that work well in Search. Should you have any questions, feel free to post in our webmaster help forums, contact us on Twitter, or reach out to us at any of the next events we're at.

Google I/O 2019 – What sessions should SEOs and webmasters watch?

Google I/O 2019 is starting tomorrow and will run for 3 days, until Thursday. Google I/O is our yearly developers festival, where product announcements are made, new APIs and frameworks are introduced, and Product Managers present the latest from Google to an audience of 7,000+ developers who fly to California.

However, you don't have to physically attend the event to take advantage of this once-a-year opportunity: many conferences and talks are live streamed on YouTube for anyone to watch. Browse the full schedule of events, including a list of talks that we think will be interesting for webmasters to watch (all talks are in English). All the links shared below will bring you to pages with more details about each talk, and links to watch the sessions will display on the day of each event. All times are Pacific Central time (California time).


This list is only a small part of the agenda that we think is useful to webmasters and SEOs. There are many more sessions that you could find interesting! To learn about those other talks, check out the full list of “web” sessions, design sessions, Cloud sessions, machine learning sessions, and more. Use the filtering function to toggle the sessions on and off.

We hope you can make the time to watch the talks online, and participate in the excitement of I/O ! The videos will also be available on Youtube after the event, in case you can't tune in live.

Posted by Vincent Courson, Search Outreach Specialist