Tag Archives: Google Play services

Google Play services discontinuing updates for KitKat (API levels 19 & 20) starting August 2023

Posted by Sarat Tummala, Product Manager, Google Play services

The Android KitKat (KK) platform was first released ~10 years ago and since then, we’ve introduced many innovative improvements and features for Android, which are unavailable on KK. As of July 2023, the active device count on KK is below 1% as more and more users update to the latest Android versions. Therefore, we are no longer supporting KK in future releases of Google Play services. KK devices will not receive versions of the Play Services APK beyond 23.30.99.

Google Play services discontinuing updates for Jelly Bean (API levels 16, 17 & 18)

Posted by Vikas Kansal, Product Manager, Google Play services

The Android Jelly Bean (JB) platform was first released 9 years ago and as of July 2021, the active device count is below 1%. Since then Android has released a lot of improvements and features which are not all backported to Jelly Bean. This results in increased developer and QA time spent on new features that require special handling. Consequently, we are deprecating support for JB in future releases of Google Play services. For devices running JB, Google will no longer update the Play Services APK beyond version 21.30.99, scheduled for the end of August 2021.

What does this mean as an Application developer:

The Google Play services SDKs contain the interfaces to the functionality provided by the Google Play services APK, which runs as background services. The functionality required by the current, released SDK versions is already present on JB devices with Google Play services and will continue to work without change.

Each SDK can be independently released and may update its own minSdkVersion. Individual libraries are not required to change based on this deprecation. Newer SDK components may continue to support API levels 16 through 18 but many will update to require the higher API levels. For applications that support API levels 19 or greater, you will not need to make any changes to your build. For applications that support API levels 16 through 18, you may continue to build and publish your app to devices running JB, but you may encounter build errors when updating to newer SDK versions. The error will look like this:

Error:Execution failed for task ':app:processDebugManifest'.
> Manifest merger failed : uses-sdk:minSdkVersion 16 cannot be smaller than version 19 declared in library [com.google.android.gms:play-services-FOO:19.X.YY]
        Suggestion: use tools:overrideLibrary="com.google.android.gms:play_services" to force usage

Unfortunately, the stated suggestion will not help you provide app updates to devices running JB or older. In order to use the newer SDK, you will need to use one of the following options:

1. Use API level 19 as the minimum supported API level.

This is the recommended course of action. To discontinue support for API levels that will no longer receive Google Play services updates, simply increase the minSdkVersion value in your app's build.gradle to at least 19. If you update your app in this way and publish it to the Play Store, users of devices with less than that level of support will not be able to see or download the update. However, they will still be able to download and use the most recently published version of the app that does target their device.

A very small percentage of all Android devices are using API levels less than 19. We believe that many of these old devices may not be actively being used. If your app still has a significant number of users on older devices, you can use multiple APK support in Google Play to deliver an APK that uses Google Play services 21.30.99. This is described below.

2. Build multiple APKs to support devices with an API level less than 19.

Along with some configuration and code management, you can build multiple APKs that support different minimum API levels, with different versions of Google Play services. You can accomplish this with build variants in Gradle. First, define build flavors for legacy and newer versions of your app. For example, in your build.gradle, define two different product flavors, with two different compile dependencies for the components of Play Services you're using

productFlavors {
    legacy {
        minSdkVersion 16
        versionCode 101  // Min API level 16, v01
    }
    current {
        minSdkVersion 19
        versionCode 1901  // Min API level 19, v01
    }
}

dependencies {
    legacyCompile 'com.google.android.gms:play-services:16.0.0'
    currentCompile 'com.google.android.gms:play-services:17.0.0'
}

In the above situation, there are two product flavors being built against two different versions of play-services-FOO. This will work fine if only APIs are called that are available in the 16.0.0 library. If you need to call newer APIs made available with 17.0.0, you will have to create your own compatibility library for the newer API calls so that they are only built into the version of the application that can use them:

  1. Declare a Java interface that exposes the higher-level functionality you want to perform that is only available in current versions of Play services.
  2. Build two Android libraries that implement that interface. The "current" implementation should call the newer APIs as desired. The "legacy" implementation should no-op or otherwise act as desired with older versions of Play services. The interface should be added to both libraries.
  3. Conditionally compile each library into the app using "legacyCompile" and "currentCompile" dependencies as illustrated for play-services-FOO above.
  4. In the app's code, call through to the compatibility library whenever newer Play APIs are required.

After building a release APK for each flavor, you then publish them both to the Play Store, and the device will update with the most appropriate version for that device. Read more about multiple APK support in the Play Store.

Announcing new SDK versioning in Google Play services and Firebase

Posted by Doug Stevenson, Developer Advocate

Starting today, the Android SDKs for Google Play services and Firebase will be using a new build and versioning scheme. This may require some changes to the way you build your Android app, so be sure to read here thoroughly to get all the details.

Here's a quick summary of what's new in these SDKs:

  • All dependencies now use semantic versioning.
  • Each dependency may be updated individually, removing the need to upgrade them all simultaneously in your app.
  • Each dependency has a faster cycle for bug fixes and new features.

Beginning with version 15 of all Play services and Firebase libraries, version numbers adhere to the semantic versioning scheme. As you know, semver is an industry standard for versioning software components, so you can expect that version number changes for each library indicate the amount of change in the library.

Each Maven dependency matching com.google.android.gms:play-services-* and com.google.firebase:firebase-* is no longer required to have the same version number in order to work correctly at build time and at run time. You will be able to upgrade each dependency independently from each other. As such, a common pattern for specifying the shared version number for Play and Firebase dependencies in Gradle builds will no longer work as expected. The pattern (now anti-pattern) looks like this:

buildscript {
    ext {
        play_version = '15.0.0'
    }
}

dependencies {
    // DON'T DO THIS!!
    // The following use of the above buildscript property is no longer valid.
    implementation "com.google.android.gms:play-services-auth:${play_version}"
    implementation "com.google.firebase:firebase-auth:${play_version}"
    implementation "com.google.firebase:firebase-firestore:${play_version}"
}

The above Gradle configuration defines a buildscript property called play_version with the version of the Play and Firebase SDKs, and uses that to declare dependencies. This pattern has been helpful to keep all the dependency versions together, as previously required. However, this pattern no longer applies starting with version 15 for each library. Each dependency that you use may now be at different versions. You can expect that individual library updates may not be released at the same time - they may be updated independently.

In order to support this change in versioning, the Play services Gradle plugin has been updated. If you're using this plugin, it appears like this at the bottom of build.gradle in your app module:

apply plugin: 'com.google.gms.google-services'

Here is what has changed in this plugin:

  • It checks for compatible versions of Play and Firebase libraries. This is similar to enabling the failOnVersionConflict() ResolutionStrategy.
  • Licensing information is embedded in each individual build artifact. If you use the oss-licenses plugin to manage license requirements, you should update it to the latest.

The first version of this plugin that works with the new versioning system is 3.3.0. When working with the new versions of Play and Firebase libraries, it should be added to your buildscript classpath dependencies as follows:

classpath 'com.google.gms:google-services:3.3.0'

If you're not using this plugin, but you still want strict version checking of your dependencies, you can apply this new Gradle plugin instead:

apply plugin: 'com.google.android.gms.strict-version-matcher-plugin'

In order to use this plugin, you will also need to add the following to your buildscript classpath, obtained from Google's Maven Repository:

classpath 'com.google.android.gms:strict-version-matcher-plugin:1.0.0'

If you're not using Android Studio 3.1 to develop your app, you will need to upgrade in order to get the correct version checking behavior within the IDE. Get the newest version of Android Studio here.

With these changes in place, you are now able to adopt new versions of the various SDKs more freely, without a strict requirement to update everything at once. It also enables the development teams for each SDK to ship fixes and enhancements more quickly. Going forward, you can track the releases for Play services SDKs and Firebase SDKs with the provided links.

Moving Past GoogleApiClient

Posted by Sam Stern, Developer Programs Engineer

The release of version 11.6.0 of the Google Play services SDK moves a number of popular APIs to a new paradigm for accessing Google APIs on Android. We have reworked the APIs to reduce boilerplate, improve UX, and simplify authentication and authorization.

The primary change in this release is the introduction of new Task and GoogleApi based APIs to replace the GoogleApiClient access pattern.

The following APIs are newly updated to eliminate the use of GoogleApiClient:

  • Auth - updated the Google Sign In and Credentials APIs.
  • Drive - updated the Drive and Drive Resource APIs.
  • Fitness - updated the Ble, Config, Goals, History, Recording, Sensors, and Sessions APIs.
  • Games - updated the Achievements, Events, Games, Games Metadata, Invitations, Leaderboards, Notifications, Player Stats, Players, Realtime Multiplayer, Snapshots, Turn Based Multiplayer, and Videos APIs.
  • Nearby - updated the Connections and Messages APIs.

These APIs join others that made the switch in previous releases, such as the Awareness, Cast, Places, Location, and Wallet APIs.

The Past: Using GoogleApiClient

Here is a simple Activity that demonstrates how one would access the Google Drive API using GoogleApiClient using a previous version of the Play services SDK:

public class MyActivity extends AppCompatActivity implements
        GoogleApiClient.OnConnectionFailedListener,
        GoogleApiClient.ConnectionCallbacks {

    private static final int RC_SIGN_IN = 9001;

    private GoogleApiClient mGoogleApiClient;

    @Override
    protected void onCreate(@Nullable Bundle savedInstanceState) {
        super.onCreate(savedInstanceState);

        GoogleSignInOptions options =
               new GoogleSignInOptions.Builder(GoogleSignInOptions.DEFAULT_SIGN_IN)
                        .requestScopes(Drive.SCOPE_FILE)
                        .build();

        mGoogleApiClient = new GoogleApiClient.Builder(this)
                .enableAutoManage(this, this)
                .addConnectionCallbacks(this)
                .addApi(Auth.GOOGLE_SIGN_IN_API, options)
                .addApi(Drive.API)
                .build();
    }

    // ...
    // Not shown: code to handle sign in flow
    // ...

    @Override
    public void onConnectionFailed(@NonNull ConnectionResult connectionResult) {
        // GoogleApiClient connection failed, most API calls will not work...
    }

    @Override
    public void onConnected(@Nullable Bundle bundle) {
        // GoogleApiClient is connected, API calls should succeed...
    }

    @Override
    public void onConnectionSuspended(int i) {
        // ...
    }

    private void createDriveFile() {
        // If this method is called before "onConnected" then the app will crash,
        // so the developer has to manage multiple callbacks to make this simple
        // Drive API call.
        Drive.DriveApi.newDriveContents(mGoogleApiClient)
            .setResultCallback(new ResultCallback<DriveApi.DriveContentsResult>() {
                // ...
            });
    }
}

The code is dominated by the concept of a connection, despite using the simplified "automanage" feature. A GoogleApiClient is only connected when all APIs are available and the user has signed in (when APIs require it).

This model has a number of pitfalls:

  • Any connection failure prevents use of any of the requested APIs, but using multiple GoogleApiClient objects is unwieldy.
  • The concept of a "connection" is inappropriately overloaded. Connection failures can be result from Google Play services being missing or from authentication issues.
  • The developer has to track the connection state, because making some calls before onConnected is called will result in a crash.
  • Making a simple API call can mean waiting for two callbacks. One to wait until the GoogleApiClient is connected and another for the API call itself.

The Future: Using GoogleApi

Over the years the need to replace GoogleApiClient became apparent, so we set out to completely abstract the "connection" process and make it easier to access individual Google APIs without boilerplate.

Rather than tacking multiple APIs onto a single API client, each API now has a purpose-built client object class that extends GoogleApi. Unlike with GoogleApiClient there is no performance cost to creating many client objects. Each of these client objects abstracts the connection logic, connections are automatically managed by the SDK in a way that maximizes both speed and efficiency.

Authenticating with GoogleSignInClient

When using GoogleApiClient, authentication was part of the "connection" flow. Now that you no longer need to manage connections, you should use the new GoogleSignInClient class to initiate authentication:

public class MyNewActivity extends AppCompatActivity {

    private static final int RC_SIGN_IN = 9001;

    private GoogleSignInClient mSignInClient;

    @Override
    protected void onCreate(@Nullable Bundle savedInstanceState) {
        super.onCreate(savedInstanceState);

        GoogleSignInOptions options =
               new GoogleSignInOptions.Builder(GoogleSignInOptions.DEFAULT_SIGN_IN)
                        .requestScopes(Drive.SCOPE_FILE)
                        .build();

        mSignInClient = GoogleSignIn.getClient(this, options);
    }

    private void signIn() {
        // Launches the sign in flow, the result is returned in onActivityResult
        Intent intent = mSignInClient.getSignInIntent();
        startActivityForResult(intent, RC_SIGN_IN);
    }

    @Override
    protected void onActivityResult(int requestCode, int resultCode, Intent data) {
        super.onActivityResult(requestCode, resultCode, data);

        if (requestCode == RC_SIGN_IN) {
            Task<GoogleSignInAccount> task = 
                    GoogleSignIn.getSignedInAccountFromIntent(data);
            if (task.isSuccessful()) {
                // Sign in succeeded, proceed with account
                GoogleSignInAccount acct = task.getResult();
            } else {
                // Sign in failed, handle failure and update UI
                // ...
            }
        }
    }
}

Making Authenticated API Calls

Making API calls to authenticated APIs is now much simpler and does not require waiting for multiple callbacks.

    private void createDriveFile() {
        // Get currently signed in account (or null)
        GoogleSignInAccount account = GoogleSignIn.getLastSignedInAccount(this);

        // Synchronously check for necessary permissions
        if (!GoogleSignIn.hasPermissions(account, Drive.SCOPE_FILE)) {
            // Note: this launches a sign-in flow, however the code to detect
            // the result of the sign-in flow and retry the API call is not
            // shown here.
            GoogleSignIn.requestPermissions(this, RC_DRIVE_PERMS, 
                    account, Drive.SCOPE_FILE);
            return;
        }

        DriveResourceClient client = Drive.getDriveResourceClient(this, account);
        client.createContents()
                .addOnCompleteListener(new OnCompleteListener<DriveContents>() {
                    @Override
                    public void onComplete(@NonNull Task<DriveContents> task) {
                        // ...
                    }
                });
    }

Before making the API call we add an inline check to make sure that we have signed in and that the sign in process granted the scopes we require.

The call to createContents() is simple, but it's actually taking care of a lot of complex behavior. If the connection to Play services has not yet been established, the call is queued until there is a connection. This is in contrast to the old behavior where calls would fail or crash if made before connecting.

In general, the new GoogleApi-based APIs have the following benefits:

  • No connection logic, calls that require a connection are queued until a connection is available. Connections are pooled when appropriate and torn down when not in use, saving battery and preventing memory leaks.
  • Sign in is completely separated from APIs that consume GoogleSignInAccount which makes it easier to use authenticated APIs throughout your app.
  • Asynchronous API calls use the new Task API rather than PendingResult, which allows for easier management and chaining.

These new APIs will improve your development process and enable you to make better apps.

Next Steps

Ready to get started with the new Google Play services SDK?

Happy building!

Reduce friction with the new Location APIs

Posted by Aaron Stacy, Software Engineer, Google Play services

The 11.0.0 release of the Google Play services SDK includes a new way to access LocationServices. The new APIs do not require your app to manually manage a connection to Google Play services through a GoogleApiClient. This reduces boilerplate and common pitfalls in your app.

Read more below, or head straight to the updated location samples on GitHub.

Why not use GoogleApiClient?

The LocationServices APIs allow you to access device location, set up geofences, prompt the user to enable location on the device and more. In order to access these services, the app must connect to Google Play services, which can involve error-prone connection logic. For example, can you spot the crash in the app below?

Note: we'll assume our app has the ACCESS_FINE_LOCATION permission, which is required to get the user's exact location using the LocationServices APIs.

public class MainActivity extends AppCompatActivity implements
        GoogleApiClient.OnConnectionFailedListener {

  @Override
  public void onCreate(@Nullable Bundle savedInstanceState) {
    super.onCreate(savedInstanceState);

    GoogleApiClient client = new GoogleApiClient.Builder(this)
        .enableAutoManage(this, this)
        .addApi(LocationServices.API)
        .build();
    client.connect();

    PendingResult result = 
         LocationServices.FusedLocationApi.requestLocationUpdates(
                 client, LocationRequest.create(), pendingIntent);

    result.setResultCallback(new ResultCallback() {
      @Override
      public void onResult(@NonNull Status status) {
        Log.d(TAG, "Result: " + status.getStatusMessage());
      }
    });
  }

  // ...
}

If you pointed to the requestLocationUpdates() call, you're right! That call throws an IllegalStateException, since the GoogleApiClient is has not yet connected. The call to connect() is asynchronous.

While the code above looks like it should work, it's missing a ConnectionCallbacks argument to the GoogleApiClient builder. The call to request location updates should only be made after the onConnected callback has fired:

public class MainActivity extends AppCompatActivity implements 
        GoogleApiClient.OnConnectionFailedListener,
        GoogleApiClient.ConnectionCallbacks {

  private GoogleApiClient client;

  @Override
  protected void onCreate(@Nullable Bundle savedInstanceState) {
    super.onCreate(savedInstanceState);

    client = new GoogleApiClient.Builder(this)
        .enableAutoManage(this, this)
        .addApi(LocationServices.API)
        .addConnectionCallbacks(this)
        .build();

    client.connect();
  }

  @Override
  public void onConnected(@Nullable Bundle bundle) {
    PendingResult result = 
            LocationServices.FusedLocationApi.requestLocationUpdates(
                    client, LocationRequest.create(), pendingIntent);
    
    result.setResultCallback(new ResultCallback() {
      @Override
      public void onResult(@NonNull Status status) {
        Log.d(TAG, "Result: " + status.getStatusMessage());
      }
    });
  }

  // ...
}

Now the code works, but it's not ideal for a few reasons:

  • It would be hard to refactor into shared classes if, for instance, you wanted to access Location Services in multiple activities.
  • The app connects optimistically in onCreate even if Location Services are not needed until later (for example, after user input).
  • It does not handle the case where the app fails to connect to Google Play services.
  • There is a lot of boilerplate connection logic before getting started with location updates.

A better developer experience

The new LocationServices APIs are much simpler and will make your code less error prone. The connection logic is handled automatically, and you only need to attach a single completion listener:

public class MainActivity extends AppCompatActivity {

  @Override
  protected void onCreate(Bundle savedInstanceState) {
    super.onCreate(savedInstanceState);

    FusedLocationProviderClient client =
            LocationServices.getFusedLocationProviderClient(this);

    client.requestLocationUpdates(LocationRequest.create(), pendingIntent)
        .addOnCompleteListener(new OnCompleteListener() {
          @Override
          public void onComplete(@NonNull Task task) {
            Log.d("MainActivity", "Result: " + task.getResult());
          }
        });
  }
}

The new API immediately improves the code in a few ways:

  • The API calls automatically wait for the service connection to be established, which removes the need to wait for onConnected before making requests.
  • It uses the Task API which makes it easier to compose asynchronous operations.
  • The code is self-contained and could easily be moved into a shared utility class or similar.
  • You don't need to understand the underlying connection process to start coding.

What happened to all of the callbacks?

The new API will automatically resolve certain connection failures for you, so you don't need to write code that for things like prompting the user to update Google Play services. Rather than exposing connection failures globally in the onConnectionFailed method, connection problems will fail the Task with an ApiException:

    client.requestLocationUpdates(LocationRequest.create(), pendingIntent)
        .addOnFailureListener(new OnFailureListener() {
          @Override
          public void onFailure(@NonNull Exception e) {
            if (e instanceof ApiException) {
              Log.w(TAG, ((ApiException) e).getStatusMessage());
            } else {
              Log.w(TAG, e.getMessage());
            }
          }
        });

Try it for yourself

Try the new LocationServices APIs out for yourself in your own app or head over to the android-play-location samples on GitHub and see more examples of how the new clients reduce boilerplate and simplify logic.

Fashion gets a digital upgrade with the Google Awareness API

Posted by Jeremy Brook, Group Creative Business Partner, the ZOO

Last summer, we made the Awareness API available to all developers through Google Play services for the first time, providing a powerful and unified sensing platform that enables apps to be aware of all aspects of a user's environment. By using a combination of context signals, such as location, physical activity, weather and nearby beacons, developers can better understand their users individually and provide more engaging and customized mobile app experiences.
We have already seen some great implementations of the API in obvious scenarios, such as shopping for a new home in the neighborhood or recommending a music playlist while starting a jog. For New York Fashion Week, we explored other creative integrations of the Awareness API and collaborated with H&M Group's digital fashion house Ivyrevel and its Fashion Tech Lab to bring couture into the digital age with the 'Data Dress,' a personalized dress designed entirely based on a user's context signals.

Currently under development, the Android app specifically uses the Snapshot API within the platform to passively monitor each user's daily activity and lifestyle with their permission. Where do you regularly eat out for dinner or hang out with friends? Are they more casual or formal meetups? What's the usual weather when you're outside? After the course of a week, the user's context signals are passed through an algorithm that creates a digitally tailored dress design for the user to purchase.

The Android app is launching in closed alpha stage, and is currently being tested by selected global style influencers including Ivyrevel's co-founder Kenza Zouiten. If you want a truly 'tailored' digital experience, sign up here to participate in a future trial of the app before the public release.


Get the guide to finding success in new markets on Google Play

Posted by Lily Sheringham, Developer Marketing at Google Play

With just a few clicks, you can publish an app to Google Play and access a global audience of more than 1 billion 30 days active users. Finding success in global markets means considering how each market differs, planning for high quality localization, and tailoring your activity to the local audience. The new Going Global Playbook provides best practices and tips, with advice from developers who've successfully gone global.

This guide includes advice to help you plan your approach to going global, prepare your app for new markets, take your app to market, and also include data and insights for key countries and other useful resources.

This ebook joins others that we've recently published including The Building for Billions Playbook and The News Publisher Playbook. All of our ebooks are promoted in the Playbook for Developers app, which is where you can stay up to date with all the news and best practices you need to find success on Google Play.


How useful did you find this blogpost?

Start building Actions on Google

Posted by Jason Douglas, PM Director for Actions on Google

The Google Assistant brings together all of the technology and smarts we've been building for years, from the Knowledge Graph to Natural Language Processing. To be a truly successful Assistant, it should be able to connect users across the apps and services in their lives. This makes enabling an ecosystem where developers can bring diverse and unique services to users through the Google Assistant really important.

In October, we previewed Actions on Google, the developer platform for the Google Assistant. Actions on Google further enhances the Assistant user experience by enabling you to bring your services to the Assistant. Starting today, you can build Conversation Actions for Google Home and request to become an early access partner for upcoming platform features.

Conversation Actions for Google Home

Conversation Actions let you engage your users to deliver information, services, and assistance. And the best part? It really is a conversation -- users won't need to enable a skill or install an app, they can just ask to talk to your action. For now, we've provided two developer samples of what's possible, just say "Ok Google, talk to Number Genie " or try "Ok Google, talk to Eliza' for the classic 1960s AI exercise.

You can get started today by visiting the Actions on Google website for developers. To help create a smooth, straightforward development experience, we worked with a number of development partners, including conversational interaction development tools API.AI and Gupshup, analytics tools DashBot and VoiceLabs and consulting companies such as Assist, Notify.IO, Witlingo and Spoken Layer. We also created a collection of samples and voice user interface (VUI) resources or you can check out the integrations from our early access partners as they roll out over the coming weeks.

Introduction to Conversation Actions by Wayne Piekarski

Coming soon: Actions for Pixel and Allo + Support for Purchases and Bookings

Today is just the start, and we're excited to see what you build for the Google Assistant. We'll continue to add more platform capabilities over time, including the ability to make your integrations available across the various Assistant surfaces like Pixel phones and Google Allo. We'll also enable support for purchases and bookings as well as deeper Assistant integrations across verticals. Developers who are interested in creating actions using these upcoming features should register for our early access partner program and help shape the future of the platform.

Build, explore and let us know what you think about Actions on Google! And to say in the loop, be sure to sign up for our newsletter, join our Google+ community, and use the “actions-on-google” tag on StackOverflow.

Registering OAuth clients for Google Sign-In

Posted by Isabella Chen, Software Engineer, and Laurence Moroney, Developer Advocate

Starting with Google Play services 8.3, we did a major revamp of the Google Sign-In APIs, supporting both client and server auth. Behind the scenes, these APIs use OAuth 2.0 tokens to ensure secure authentication and authorization. To maintain security, we provide tools in the Google Developers Console to register the clients using these tokens.

In this post, we’ll discuss the important task of registering OAuth clients for Google Sign-In, and the tools that we offer to make this as easy as possible.

Here are some scenarios that might apply to you:

  1. Start by creating a project in the Google Developers Console, which registers the client app on your behalf.
  2. If you have a backend server in your project, you’ll need an OAuth client ID for it, too.
  3. And don't forget to register OAuth clients for other test and release versions of your app, too!

In this post, we’ll cover some details on this process and address common pitfalls.

Getting Started - Create a Project in the Google Developers Console.

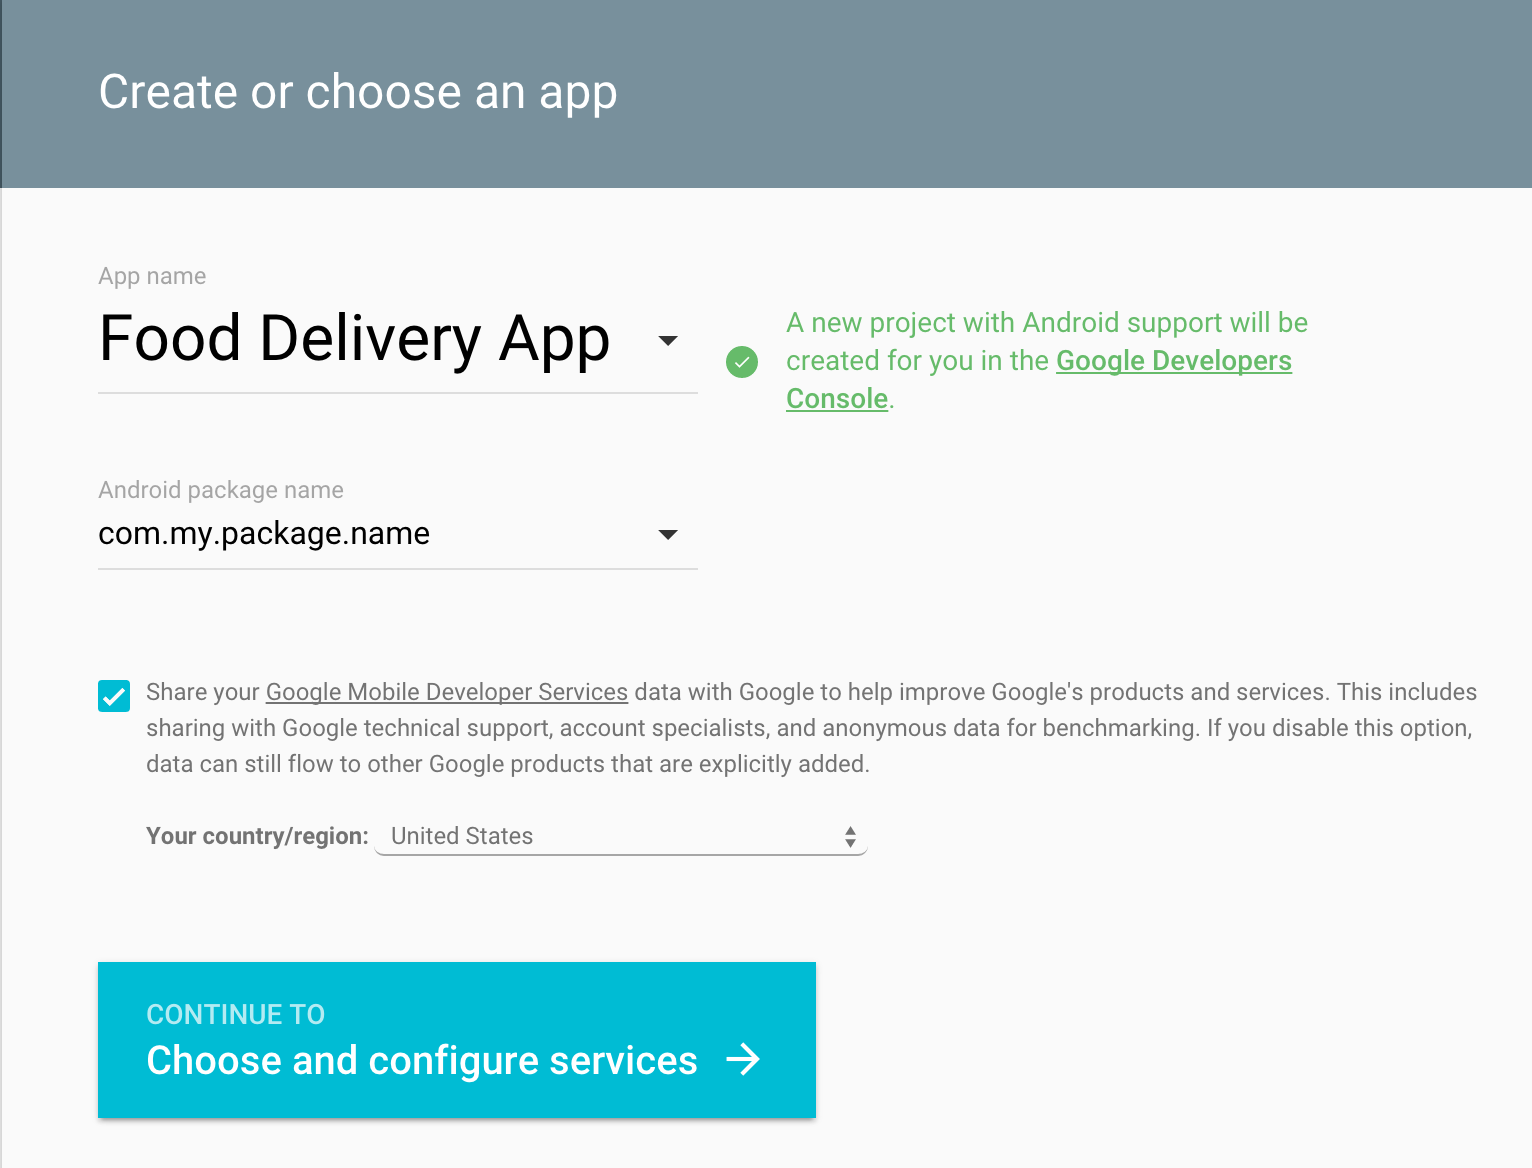
If you have not used Google Sign-In before, you can start integrating the API into your app by following the ‘Get a configuration file’ steps on this site. You’ll be taken to a setup wizard that will create an OAuth 2.0 client ID as shown in Figure 1.

Figure 1. Configuring your app

Once you’ve specified your app, you’ll be taken to a screen to choose and configure services such as Google Sign-In, Cloud Messaging or Google Analytics that you want your app to be able to use.

Choose Google Sign-In. In order to use it, you’ll need to get the SHA-1 of the signing certificate for your Android app. This can either be a debug or a release certificate, and for the purposes of this blog you’ll look at a debug one, but keep in mind that you’ll need to repeat this process for each package / certificate pair you end up using (described in the last section below).

You can get the debug SHA-1 using the keytool command like this:

keytool -list -v -keystore ~/.android/debug.keystore -alias androiddebugkey -storepass android -keypass android

Once you have your SHA-1, enter it as seen in Figure 2.

Figure 2. Enabling Google Sign-in

Now that your project is set up, you can get started with integrating the Sign-In API. But if you need to configure your project to work with a backend server or additional package name / keystores, keep reading the sections below.

Server Config - Ensure your server is registered within the same project.

If you have your own web or cloud server with data for your application, you’ll need OAuth credentials for your backend. Details on doing this can be found in the ID token and server auth code documentation.

Before using these flows, you’ll need to make sure you register your web server correctly in the Google Developers Console. Once there, you’ll be asked to select your project. See Figure 3.

Figure 3. Going directly to a project in the Google Developers Console.

Once you’ve selected your project, press the ‘Continue’ button, and you’ll go directly to the Credentials tab where all credential types are managed. Check the “OAuth 2.0 client IDs” section, and you will see the “Web client” and “Android client for com.my.package.name” that were created for you by the setup wizard. See Figure 4.

Figure 4. The Credentials Tab on the Developers Console - Web server OAuth client info

Take note of the Client ID for for your Web client, you’ll need it for both your app and server as illustrated below. (If you’ve created your project in the past and there’s no OAuth 2.0 client ID with Type “Web application”, then you will need to create one by selecting ‘New Credentials’ -> ‘OAuth client ID’.)

If you use an ID token flow for backend authentication, when you start developing your Android app, request an ID token in your GoogleSignInOptions, supplying the web client ID for your server:

GoogleSignInOptions gso =
    new GoogleSignInOptions.Builder(GoogleSignInOptions.DEFAULT_SIGN_IN)
        .requestIdToken(serverClientId)
  .requestEmail()
  .build();

And then on your server, set the same OAuth client ID for your web application to be the audience:

GoogleIdTokenVerifier verifier =
    new GoogleIdTokenVerifier.Builder(transport, jsonFactory)
        .setAudience(Arrays.asList(serverClientId))
        .setIssuer("https://accounts.google.com")
        .build();

Successful verification will allow you to authenticate and issue a session for this newly signed-in user.

Alternatively, if you are using the server auth code flow for backend access to Google APIs, request a server auth code in your GoogleSignInOptions on Android, again supplying the web client ID for your server:

GoogleSignInOptions gso =
    new GoogleSignInOptions.Builder(GoogleSignInOptions.DEFAULT_SIGN_IN)
        .requestScopes(new Scope(Scopes.DRIVE_APPFOLDER))
  .requestServerAuthCode(serverClientId)
  .requestEmail()
  .build();

And then on the server, both the OAuth client ID and the “Client secret” will be useful. The server SDK from Google can directly consume a downloaded JSON configuration file. You can click the download icon to download the JSON file (as shown in Figure 4) and use below code to construct GoogleClientSecrets:

GoogleClientSecrets clientSecrets =
    GoogleClientSecrets.load(
        JacksonFactory.getDefaultInstance(),
        new FileReader(PATH_TO_CLIENT_SECRET_FILE));

At which point you can access authenticated Google APIs on behalf of the signed-in user. Note that the “client secret” is really a secret that you should never reveal in your Android client.

Handling multiple environments - Registering other client IDs for your project.

Note that it can be common for apps to have different package names as well as different certificates (and thus SHA-1 keys) for various types of environment (such for different developers or test and release environments). Google uses your package name together with SHA-1 signing-certificate fingerprint to uniquely identify your Android application. It’s important to register every package name + SHA1 fingerprint pair in Google Developers Console.

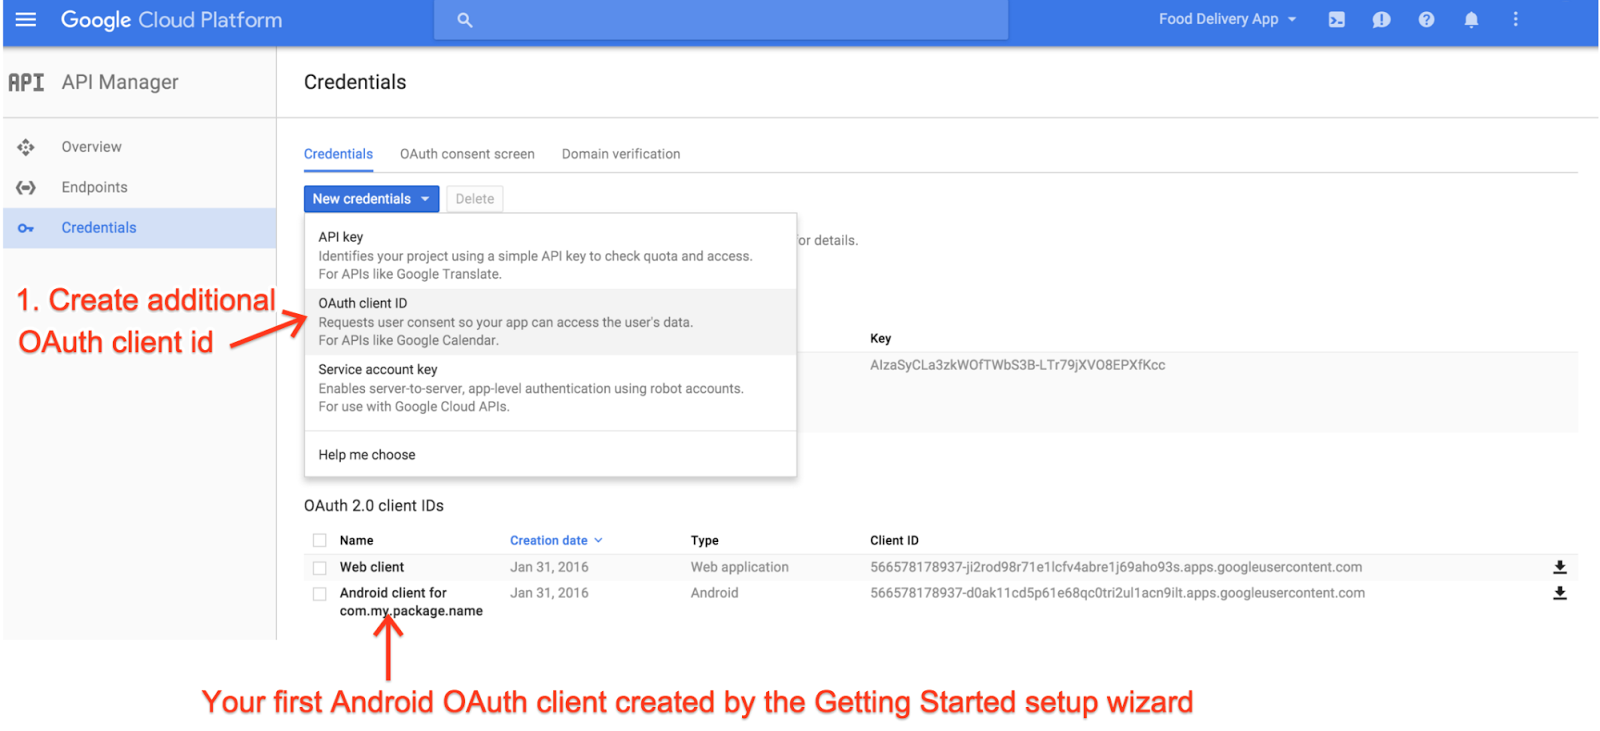
For example, to register the release version of this package, you can do so by selecting ‘New Credentials’ -> ‘OAuth client ID’, shown in Figure 5 below, and then following the steps to add the package name and production keystore SHA-1.

Figure 5. The Credentials Tab on the Developers Console - create additional OAuth client ID

Now you are ready to handle the different environments where your app might be running and release to your users!

Hopefully, this has been helpful to you in understanding how to register for OAuth keys to keep your apps and servers secure. For more information, check out the Google Developers homepage for Identity.