Posted by Wesley Chun (@wescpy), Developer Advocate, Google Cloud
| How to migrate the App Engine Users to Cloud Identity Platform |
- Run on 2nd generation App Engine runtimes
- Shift across to other serverless platforms, like Cloud Functions or Cloud Run (with or without Docker)
- Move to VM-based services like GKE or Compute Engine, or to other compute platforms
Understanding the overall migration
Overall, Module 21 features major changes to the Module 20 sample app, implementing a move from App Engine bundled services (NDB & Users) to standalone Cloud services (Cloud Datastore & Identity Platform). Identity Platform doesn't know anything about App Engine admins, so that must be built, requiring the use of the Cloud Resource Manager API. Apps dependent on Python 2 have additional required updates. Let's discuss in a bit more detail.
Migration "parts"
The following changes to the sample app are required:
- Migrate from App Engine Users (server-side) to Cloud Identity Platform (client-side)
- Migrate from App Engine NDB, the other bundled service used in Module 20, to Cloud NDB (requires use of the Cloud Datastore API)
- Use the Cloud Resource Manager* (via its API) to fetch the Cloud project's IAM allow policy to collate the set of App Engine admin users for the app.
- Use the Firebase Admin SDK to validate whether the user is an App Engine admin
- Migrate from Python 2 to 3 (and possibly back to Python 2 [more on this below])
*At the time of this writing, the Resource Manager documentation only features setup instructions for accessing the API from the lower-level Google APIs client library rather than the Resource Manager client library. To learn how to set up the latter, go to the Resource Manager client library documentation directly. The lower-level client library should only be used in circumstances when a Cloud client library doesn't exist or doesn't have the features your app needs. One such use case is Python 2, and we'll be covering that shortly.
Move from App Engine bundled services to standalone Cloud services
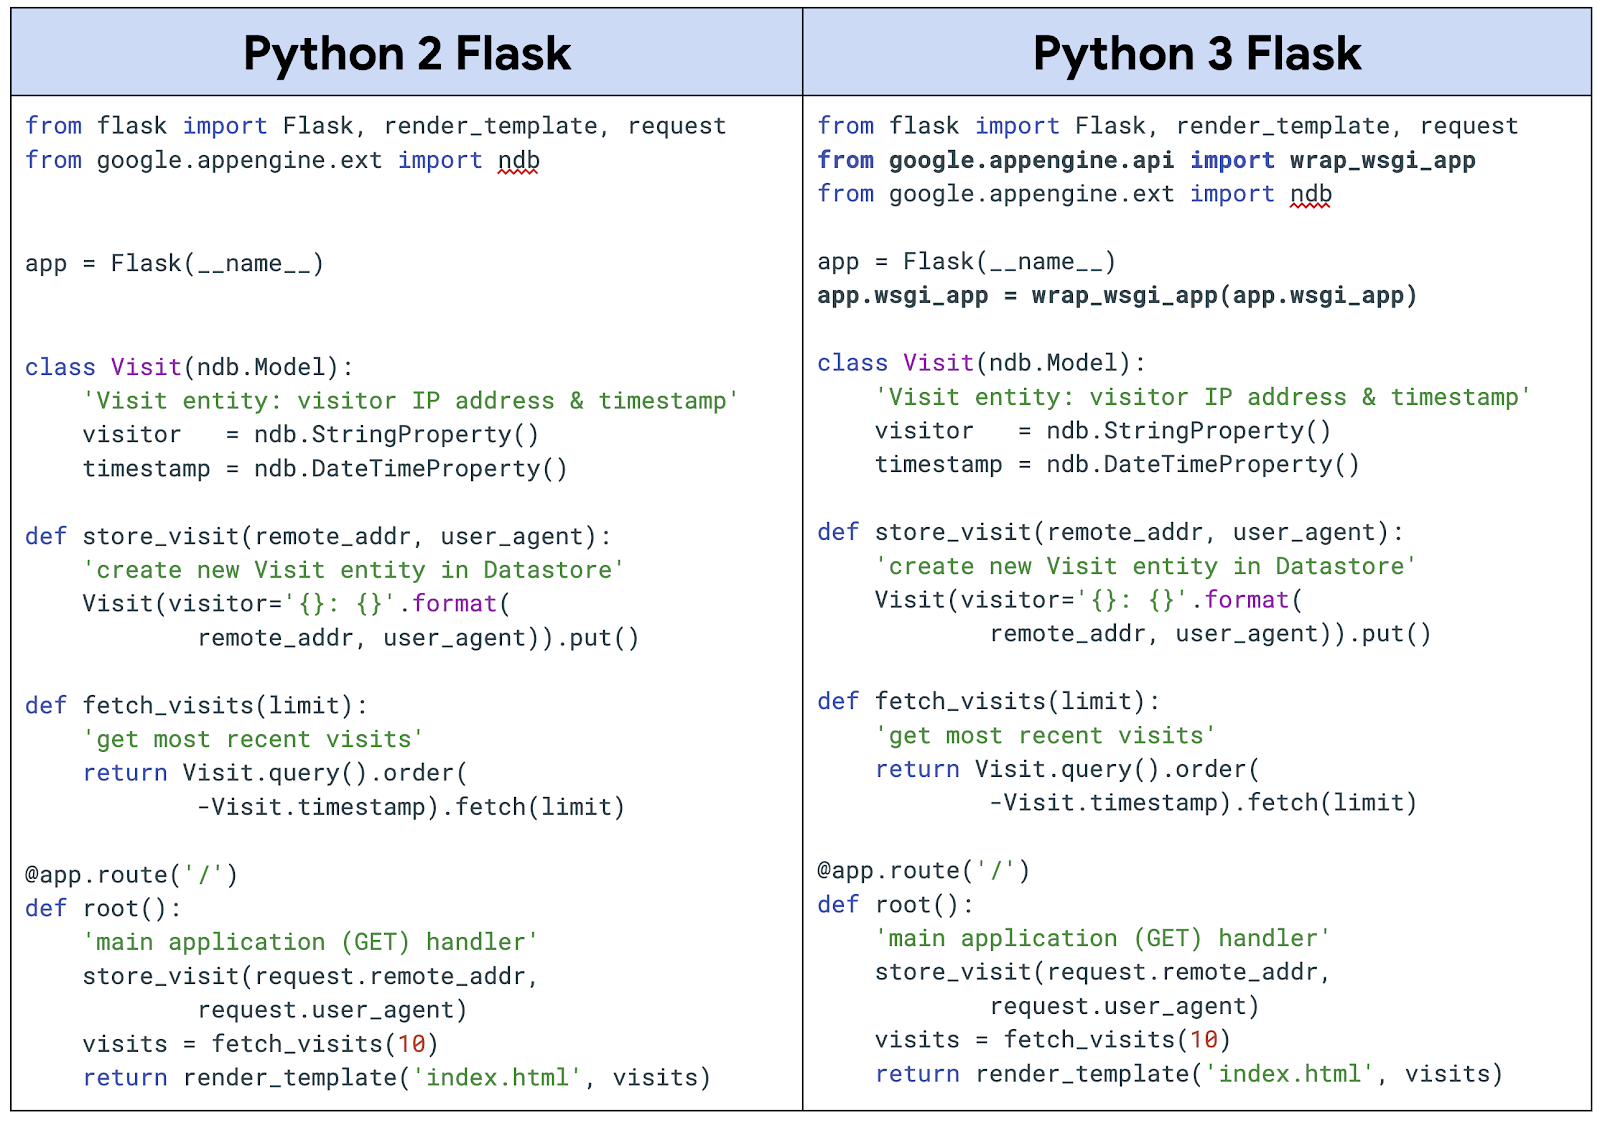
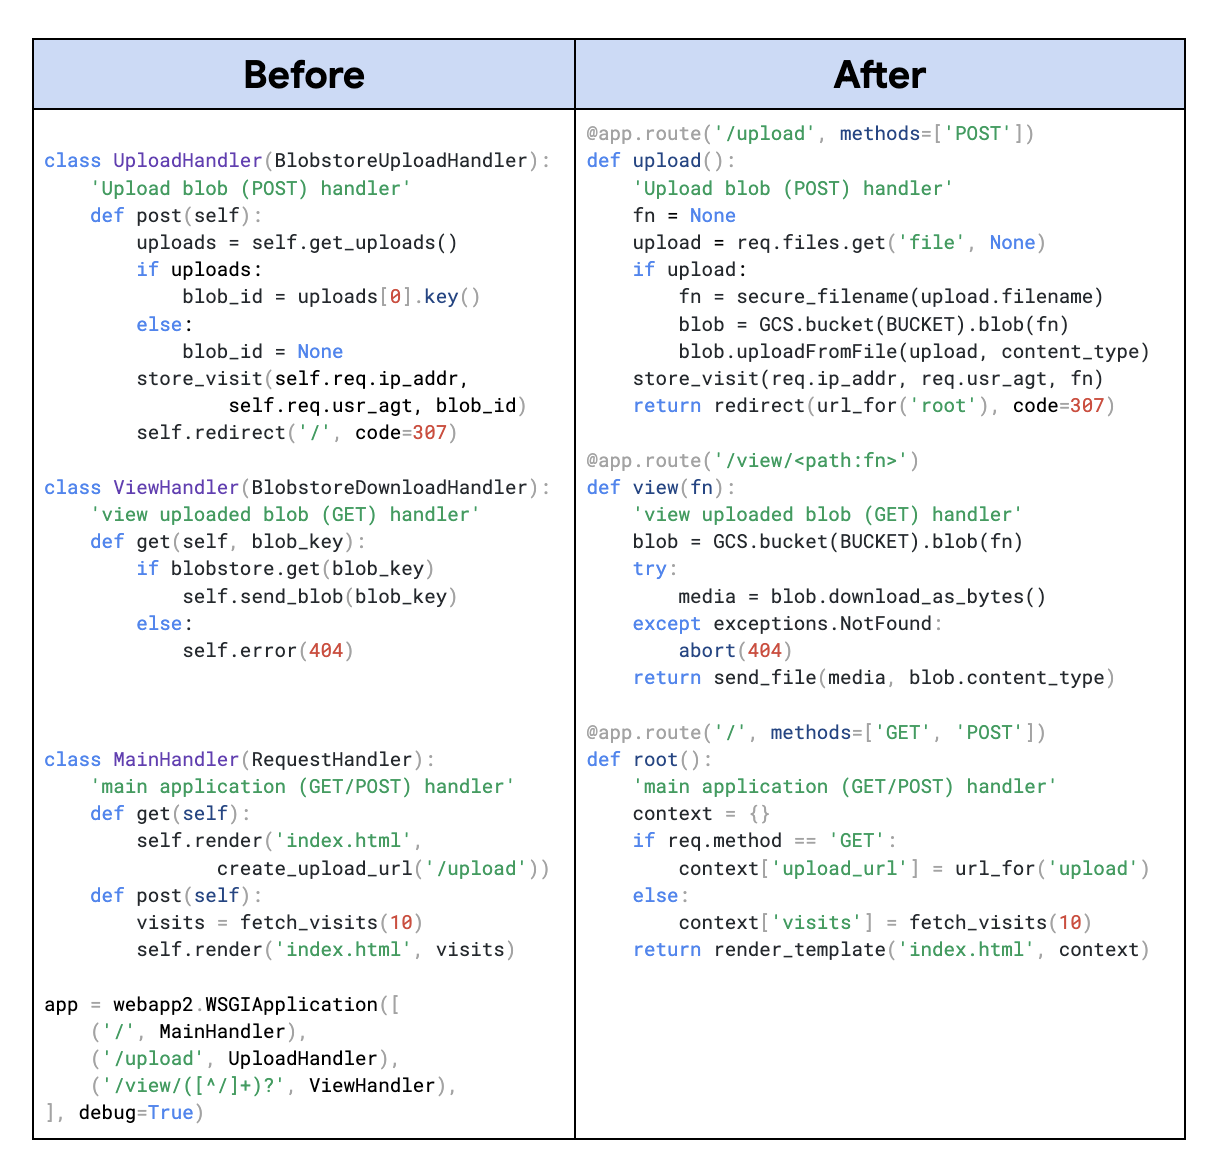
The NDB to Cloud NDB migration is identical to the Module 2 migration content, so it's not covered in-depth here in Module 21. The primary focus is on switching to Identity Platform to continue supporting user logins as well as implementing use of the Resource Manager and Firebase Admin SDK to build a proxy for recognizing App Engine admin users as provided by the Users service. Below is pseudocode implementing the key changes to the main application where new or updated lines of code are bolded:
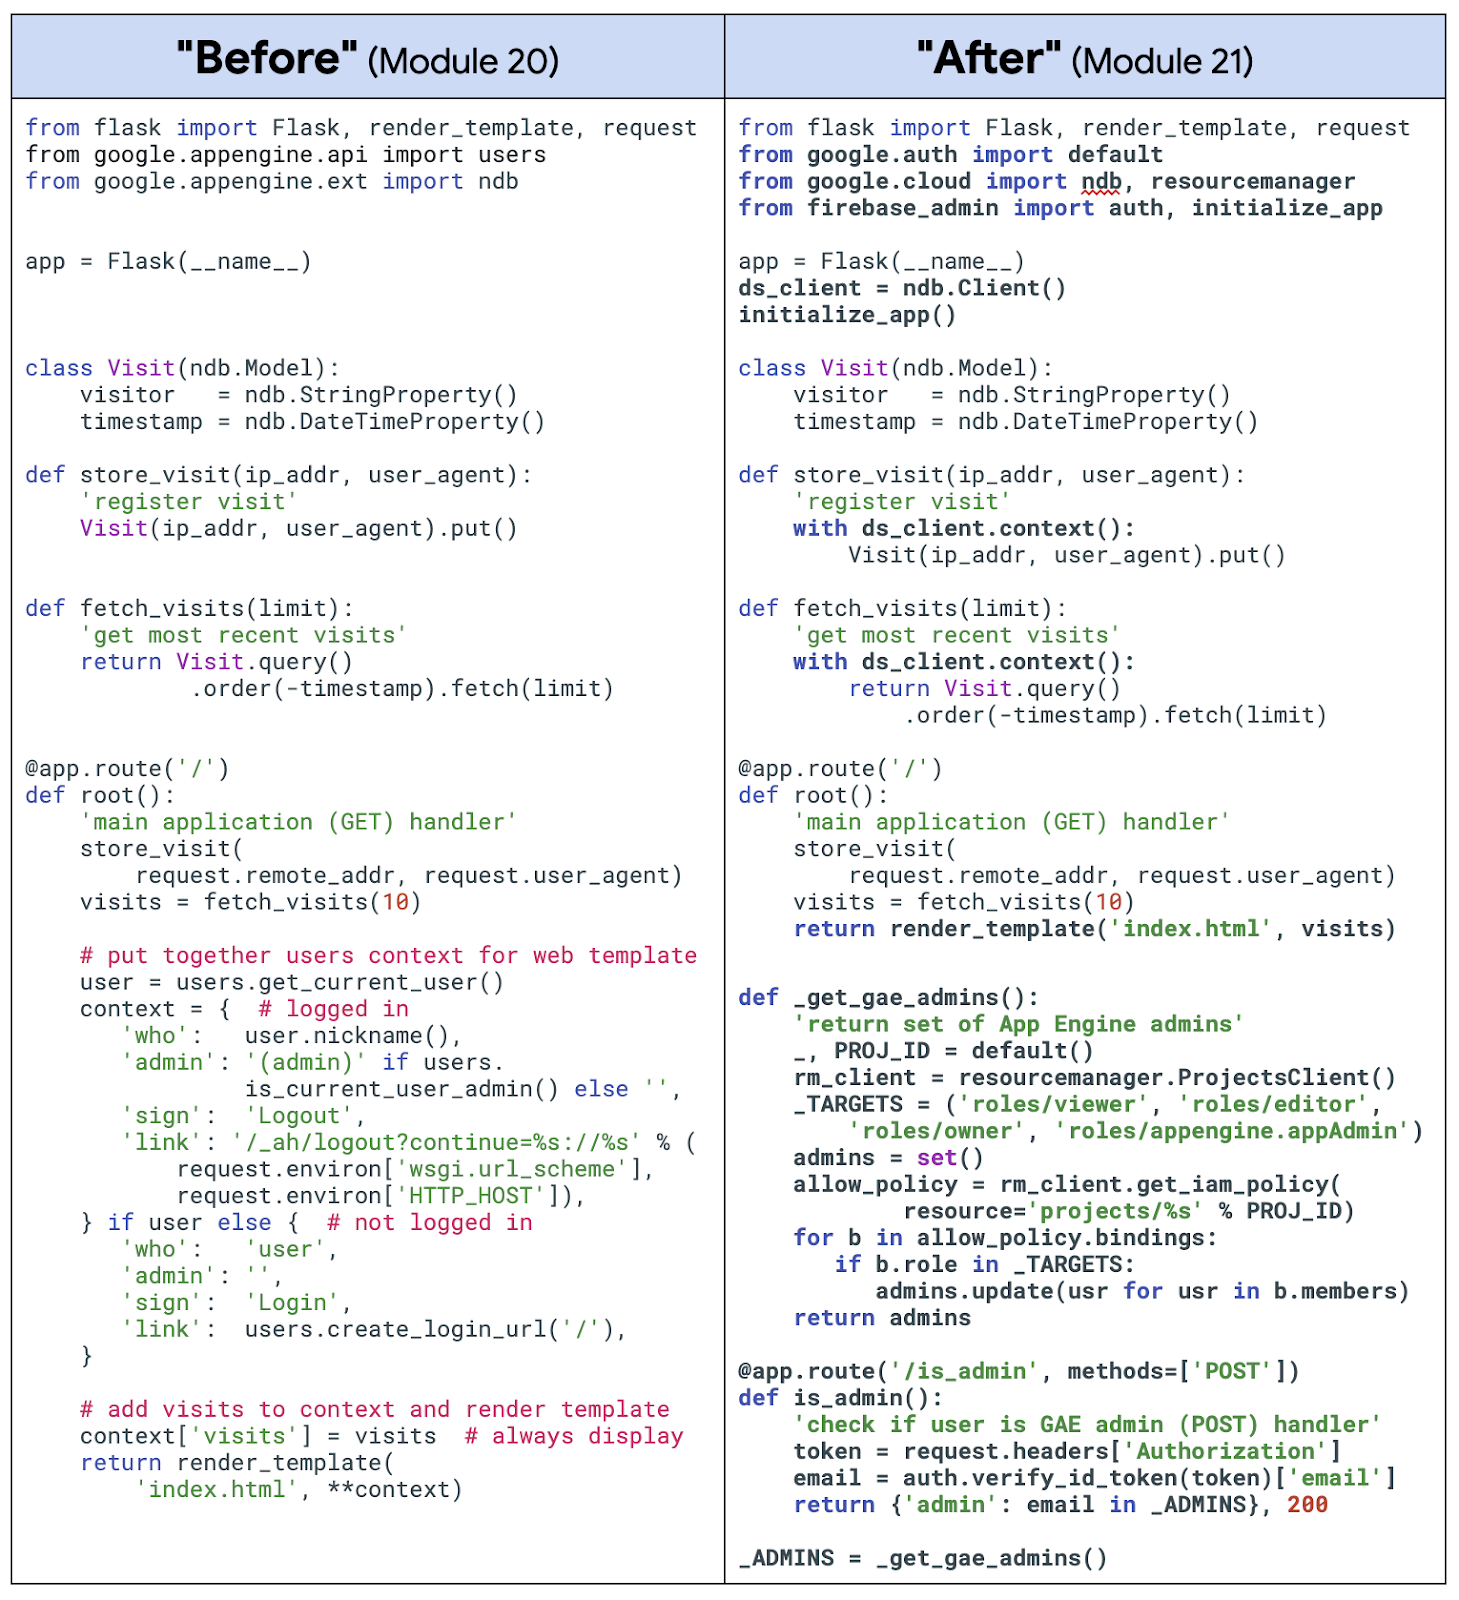 |
| Migrating from App Engine Users to Cloud Identity Platform(click to enlarge) |
The key differences to note:
- The server-side Users service code vanishes from the main application, moving into the (client-side) web template (not shown here).
- Practically all of the new code in the Module 21 app above is for recognizing App Engine admin users. There are no changes to app operations or data models other than Cloud NDB requiring use of Python context managers to wrap all Datastore code (using Python with blocks).
Complete versions of the app before and after the updates can be found in the Module 20 (Python 2) and Module 21 (Python 3) repo folders, respectively. In addition to the video, be sure to check out the Identity Platform documentation as well as the Module 21 codelab which leads you step-by-step through the migrations discussed.
Aside from the necessary coding changes as well as moving from server-side to client-side, note that the Users service usage is covered by App Engine's pricing model while Identity Platform is an independent Cloud service billed by MAUs (monthly active users), so costs should be taken into account if migrating. More information can be found in the Identity Platform pricing documentation.
Python 2 considerations
With the sunset of Python 2, Java 8, PHP 5, and Go 1.11, by their respective communities, Google Cloud has assured users by expressing continued long-term support of these legacy App Engine runtimes, including maintaining the Python 2 runtime. So while there is no current requirement for users to migrate, developers themselves are expressing interest in updating their applications to the latest language releases.
The primary Module 21 migration automatically includes a port from Python 2 to 3 as that's where most developers are headed. For those with dependencies requiring remaining on Python 2, some additional effort is required:
- The Resource Manager client library's final Python 2 release does not have the features needed to build the set of App Engine admin users, so use of the lower-level Google APIs client library is required. Developers will notice that lower-level client library setup and API access differ slightly from Cloud client library usage.
- Using 3rd-party packages requires some App Engine Python 2.7 built-in libraries (grpcio and setuptools), meaning additional changes to configuration files, app.yaml and appengine_config.py. There is no support for built-in libraries in the Python 3 runtime, so just list desired packages in requirements.txt, and those libraries will be automatically installed during deployment.
- Self-bundling (also known as "vendoring" or copying) of 3rd-party libraries is required for all Python 2 apps while being completely optional for Python 3.
Wrap-up
Module 21 features migrations of App Engine bundled services to appropriate standalone Cloud services. While we recommend users modernize their App Engine apps by moving to the latest offerings from Google Cloud, these migrations are not required. In Fall 2021, the App Engine team extended support of many of the bundled services to 2nd generation runtimes (that have a 1st generation runtime), meaning you don't have to migrate to standalone services before porting your app to Python 3. You can continue using App Engine NDB and Users in Python 3 so long as you retrofit your code to access bundled services from next-generation runtimes. Then should you opt to migrate, you can do so on your own timeline.


![Adding App Engine Task Queue pull task usage to sample app showing 'Before'[Module 1] on the left and 'After' [Module 18] with altered code on the right](https://blogger.googleusercontent.com/img/b/R29vZ2xl/AVvXsEjRVGVYc9fl4xI9xUpOUaAwXup8p-wUf5nbKllG7OYJSVAYSPVCGw7DU8EbMoTE3kBBgVZiICFvsn_7fHP2oymA_1ASKBrAE2Qt8PzCGAAkK7_WnyvAIEMKQUrxP8FSz3tGykLrlu9nyluN5vgEPrWZrBqIAalCoRmos169g9m9NHz3cGqQyych9eEG/s1600/Screen%20Shot%202022-11-29%20at%205.19.28%20PM.png)


![A cellphone screen demonstrating finding the language settings from system settings by selecting Settings → System → Languages & Input → App Languages → [Select the desired App] → [Select the desired Language]](https://blogger.googleusercontent.com/img/b/R29vZ2xl/AVvXsEigMMkDrk24GFhwQYTFL3SOe7BtcvUXhnudcyYkJE4um0woEr2aRZ78LqcP8_UaqoSJliwQmoBllEw44RwSYuPTaG372Oyorri8Q_qkaapDOrzkU6nR_kWh9pQTx6Jj6Tqmjb4VwqiPtn43bZsOoAQyQ1RZ9kLnhbEScICv-ApjTaPNS7Gd3L4HxJZu/s1600/image1.gif)