High performance and technical computing is all about scale and speed. Many applications, such as drug discovery and genomics, financial services and image processing require access to a large and diverse set of computing resources on demand. With more and faster computing power, you can convert an idea into a discovery, a hypothesis into a cure or an inspiration into a product. Google Cloud provides the HPC community with on-demand access to large amounts of high-performance resources with Compute Engine. But a challenge remains: how do you harness these powerful resources to execute your HPC jobs quickly, and seamlessly augment an existing HPC cluster with Compute Engine capacity?
To help with this problem, we teamed up with SchedMD to release a preview of tools that makes it easier to launch the Slurm workload manager on Compute Engine, and to expand your existing cluster when you need extra resources. This integration was built by the experts at SchedMD in accordance with Slurm best practices. Slurm is a leading open-source HPC workload manager used often in the TOP500 supercomputers around the world.
With this integration, you can easily launch an auto-scaled Slurm cluster on Compute Engine. The cluster auto-scales according to job requirements and queue depth. Once the Slurm cloud cluster is setup, you can also use Slurm to federate jobs from your on-premises cluster to the Slurm cluster running in Compute Engine. With your HPC cluster in the cloud, you can give each researcher, team or job a dedicated, tailor-fit set of elastic resources so they can focus on solving their problems rather than waiting in queues.
Let’s walk through launching a Slurm cluster on Compute Engine.
Step 1: Grab the Cloud Deployment Manager scripts from SchedMD’s Github repository. Review the included
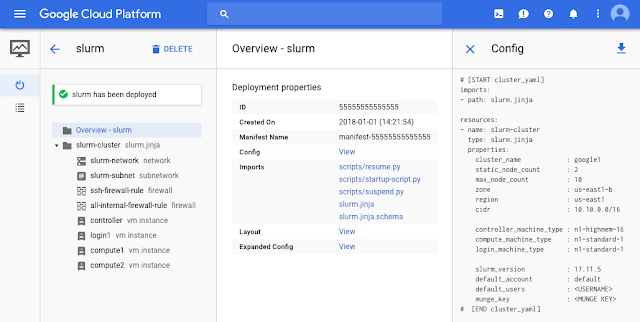
README.md for more information. You may want to customize the deployment manager scripts for your needs. Many cluster parameters can be configured in the included slurm-cluster.yaml file. At a minimum, you need to edit
slurm-cluster.yaml to paste in your munge_key and specify your GCP username in default_users and the Slurm version you want to use (e.g., 17.11.5). Step 2: Run the following command from the Cloud Shell or your local terminal with gcloud command installed:
gcloud deployment-manager deployments create slurm --config
slurm-cluster.yaml
Then, navigate to the Deployment Manager section of the developer console and observe that your deployment is successful.
Step 3: If you navigate to the Compute Engine section of the developer console, you’ll see that Deployment Manager created a number of VM instances for you, among them a Slurm login node. After the VMs are provisioned, Slurm will be installed and configured on the VMs. You can now SSH into the login node by clicking the SSH button in the console or by running
gcloud compute ssh login1 --zone=us-west1-a (Note: You may need to change the zone if you modified it in the slurm-cluster.yaml file.Once you’ve logged in, you can interact with Slurm and submit jobs as usual using sbatch. For example, copy the sample script below into a new file called
slurm-sample1.sh:#!/bin/bash
#
#SBATCH --job-name=hostname_sleep_sample
#SBATCH --output=out_%j.txt
#
#SBATCH --nodes=2
srun hostname
sleep 60
Then, submit it with:
sbatch slurm-sample1.shYou can then observe the job being distributed to the compute nodes using the
sinfo and squeue commands. Notice how if the submitted job requires more resources than initially deployed, new instances will be automatically created, up to the maximum specified in slurm-cluster.yaml. To try this, set #SBATCH --nodes=4 and resubmit the job. Once the ephemeral compute instances are idle for a period of time specified, they'll be deprovisioned.Note that for your convenience the deployment manager scripts set up NFS as part of the deployment.
Check out the included README for more information and if you need help getting started with Slurm check out the quick start guide or contact SchedMD.


