Author Archives: Jane Smith

New 2-Step Verification options for G Suite accounts

What’s changing 

We’re updating how 2-Step Verification works for G Suite. This will make new 2-Step Verification methods available for some devices, and update the 2-Step Verification user interface on mobile and desktop devices. There are three key impacts:

  • New 2-Step Verification interfaces 
  • Different screens on different browsers (Safari, Edge, etc.) 
  • Expanded Bluetooth security key support 


Who’s impacted 

Admins and end users

Why you’d use it 

We hope that these updates make 2-Step Verification easier to use. 2-Step Verification puts an extra barrier between your business and cybercriminals who want to access business data. Turning on 2-Step Verification is the single most important thing you can do to make your accounts more secure and protect your business.

How to get started 


Additional details 

New 2-Step Verification interfaces: You may see new illustrations, text, and instructions in the images, dialogs in the 2-Step Verification flows when using a bluetooth or usb security key. See images below for examples of the types of changes.

Different screens on different browsers: You may see different flows on Chrome, Safari, Firefox, Edge, and other browsers. Previously the service provider (Google) was responsible for showing these dialogs. Now the web browser is responsible. As a result, the flow may be different on each browser.

Expanded Bluetooth security key support: Bluetooth keys will start rolling out, and can be enabled with a flag on Linux.


The new 2-Step Verification screen on Google Chrome browser 


The old 2-Step Verification screen 

Helpful links 

Help Center: Protect your business with 2-Step Verification

Availability 

Rollout details 


G Suite editions
Available to all G Suite editions.

On/off by default? 
The updated user interface will be ON by default.

Stay up to date with G Suite launches

Dynamic email in Gmail (beta)

What’s changing

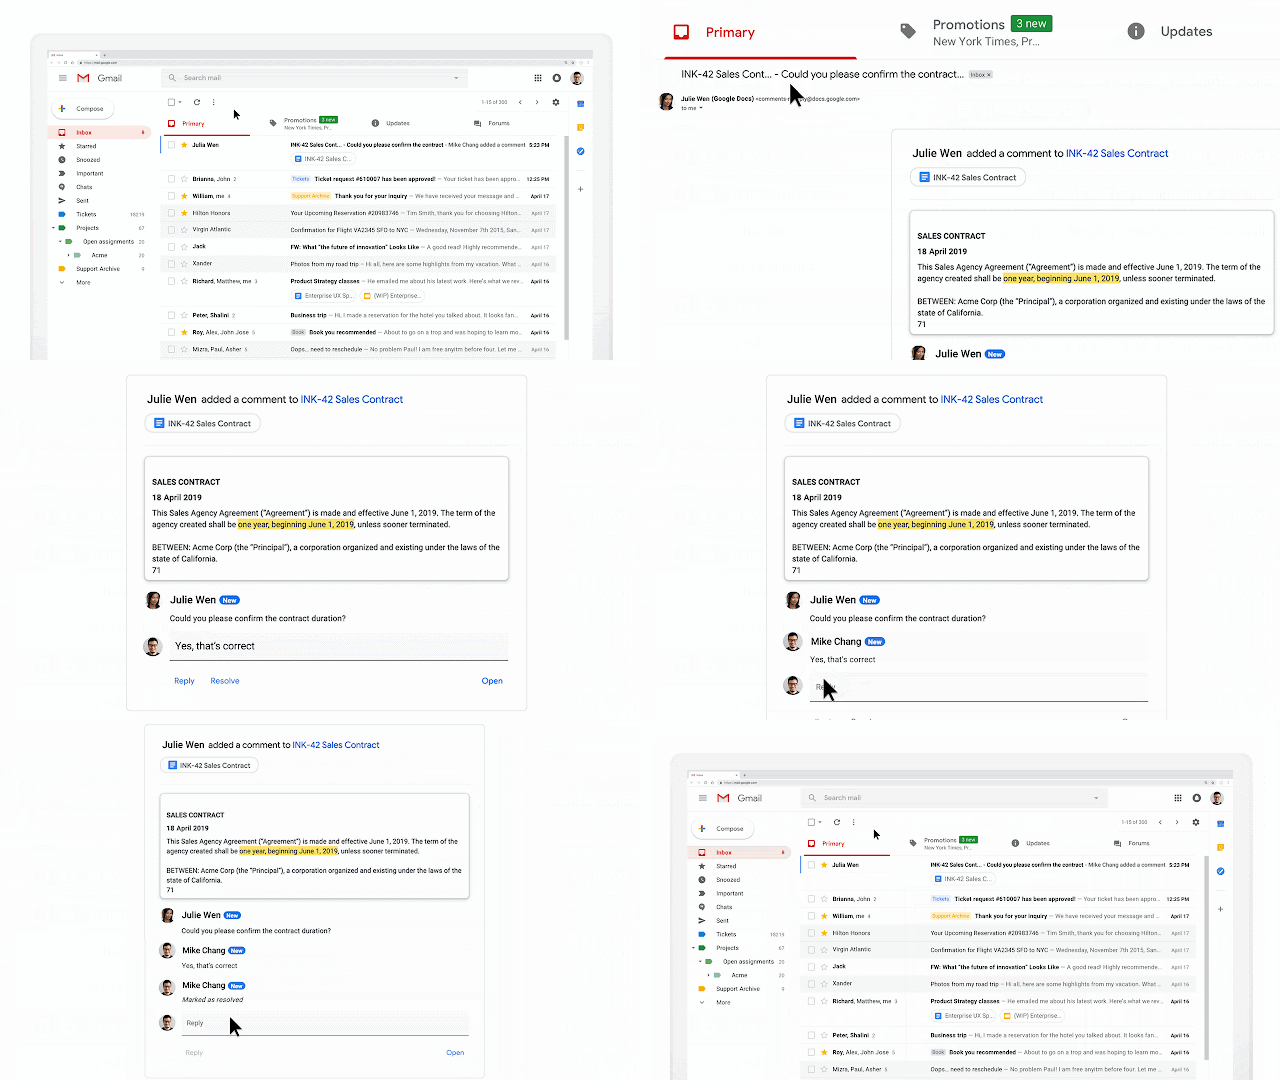
We’re opening a beta program for dynamic email in Gmail. Dynamic email allows email senders to embed AMP into messages themselves, making them more actionable and updating them with the most current information.

Who’s impacted

Admins and end users

Why you’d use it

Dynamic emails make emails more useful and interactive in Gmail. Your emails can stay up to date so you’re always seeing the freshest information, like seeing the latest comment threads from Docs, or taking actions, like filling out forms, or replying to comments inline directly from within the message itself.


How to get started

  • Admins: Dynamic email in Gmail Beta is available as an opt-in to all G Suite customers. Admins can opt-in to the beta by going to the Admin console and navigating to Apps > G Suite > Settings for Gmail > User settings. Here they will be able to select the option to Enable dynamic email.

  • End users: Once dynamic email is activated in the Admin console, users will begin seeing dynamic emails from senders who have adopted AMP for Email.

Additional details

This feature is currently only available in Gmail on the web, with mobile coming soon. Email senders who wish to send dynamic emails must register with Google before their messages appear for end users. For more information on how dynamic email works with Vault, check out the Help Center.

Helpful links


Availability

Rollout details


G Suite editions

  • Available to all G Suite editions

On/off by default?

  • This feature will be OFF by default and can be enabled by the admin via the Admin console.


Stay up to date with G Suite launches

New Hangouts Meet peripheral issue alerts and improved connectivity alerts

What’s changing

To provide admins better tools to improve the overall performance of their Hangouts Meet devices, we’ve introduced a new set of actionable alerts when issues with peripherals are detected. We’ve also made the alerts for detected connectivity/network issues actionable with richer information and direct access to the device information page. New information in the alerts include:


  • Device name
  • Location
  • Alert id (identical for open and close alerts)
  • Issue type (Connectivity or Peripheral)
  • Issue (Offline, Missing microphone, Missing camera, etc)
  • Issue opened timestamp
  • Issue closed timestamp (if closed)
  • Asset location (from the assigned calendar)
  • Annotated location (if set for the device)
  • Asset id (if set for the device)
  • Serial number
  • Direct link to the device page in Google Admin console


Example alerts — email
Open alert


Close alert


Example alert — text message
Open alert


For text message, alerting is only sent out when an issue is detected, not on close.

Who’s impacted

Admins only

Why you’d use it

The improved alerts provide additional information to help admins proactively manage their network and devices for improved availability and end-user experience.

How to get started


  • Admins: To enable the Hangouts Meet hardware alerts:
  1. In the Admin console, go to Devices > Google meeting room hardware > Settings and policies
  2. Select the organization for which you want to change the settings for alerts
  3. Enter contact details — email(s) and/or mobile phone number(s)
  4. Select delivery methods for connectivity status alerts and peripheral alerts: Click Save to apply the settings
  • End users: No action required

Additional information

Both alert types are optional and delivery can be enabled individually by email and/or text message (SMS) (US/Canada numbers only). The email format is intended for easy integration with automated ticketing systems.

Helpful links


Availability


G Suite editions

  • Available to all G Suite Editions.

On/off by default?

  • This feature will be OFF by default.

Stay up to date with G Suite launches
New Drive file suggestions in Chrome launching in beta

What’s changing 

We’re launching a beta program for a new feature that allows users to search for Google Drive files that they have access to when using the Chrome Omnibox (search/URL box). Users in the beta can now search for files in Drive by owner or type, where previously they could only search for a title or URL of a webpage. This feature is similar to what users see when searching for files in Google Drive.

Admins for G Suite Business, Enterprise, Education, Enterprise for Education, and Nonprofits can learn more and apply for the beta here.


Who’s impacted 

Admins only

Why you’d use it 

This feature will give users faster access to the files and data they need while searching in Google Chrome. Users will now be able to see Google Docs, Sheets, Slides, PDFs, and other file type suggestions from both “My Drive” and “Shared with Me” when searching in Chrome browser. This will help people get work done faster.

How to get started 

  • Admins: For more details and how to apply for the beta, see this form. 
  • End Users: No action required. 

Additional details 

This feature will be available to users signed into a Chrome profile on any operating system: Chromebook, Mac, Windows, etc.

Helpful links 

For more details and how to apply for the beta, see this form. 
Learn what sync settings users can manage and how they are managed. 
How to enable or disable chrome Sync. 

Availability 

G Suite editions 
  • Available to G Suite Business, G Suite Enterprise, G Suite for Education, G Suite Enterprise for Education, and G Suite for Nonprofits 
  • Not available to G Suite Basic. 

On/off by default? 
  • This feature will be ON by default for beta participants and can be controlled at the OU level.

Stay up to date with G Suite launches

An updated plan & resources for upcoming changes to Groups settings

What’s changing 

Based on your feedback following our previous announcement, Changes to Google Groups settings starting May 6, 2019, we’re making the following changes:


  • Additional improvements to the Groups Settings API to help you plan for and manage the changes (see more details below). 
  • “Post as the group” will remain a separate setting - it will not be merged as we previously stated. 
  • “New member posts are moderated” will remain an option for moderation - it will not be deprecated as we previously stated. 
  • “Take topics” will be merged into the content metadata settings


To help you plan for these changes, we’re also sharing a Google Sheet which can help identify what the new settings will be for a group. In addition, we’re changing the rollout schedule so the new settings will start to take effect in Scheduled Release domains on June 3, four weeks after Rapid Release domains.

Use our Help Center to see details of these changes and see how you can prepare for the update.

Who’s impacted 

Admins and end users

Why you’d use it 

We hope these resources will help you better understand and prepare for the changes to Groups settings.

How to get started 


Additional details 

Groups API improvements 
On March 25th, 2019, we’ll be updating the Groups Settings API. These updates align the API with the product changes we’re making (outlined in our previous announcement and this post) and mean it’s easier to use the API to prepare. API updates include:


  • All settings that are to-be merged will be exposed via the API. This means you can audit your current groups via API, and make changes to ensure new settings are inferred as you want them to be. 
  • New merged settings will be exposed via the API. This means you can query the new merged settings and ensure they are going to be inferred as expected. Note that It will be read-only (i.e. inferred value) until launch, at which point it will also support write. 
  • New bit for custom roles exposed. If you use custom roles, API queries may return incorrect values. The new bit will highlight if a group uses custom roles for one of the merged settings and so will help you identify groups that require manual review. 
  • New bit for collaborative inbox exposed. We will expose a new bit that represents whether collaborative inbox will be enabled for a group. If you expect your group to have collaborative inbox functionality (e.g. topic assignment), ensure that this bit is true. You may do this by enabling any of the collaborative inbox features. Note that it will be read-only (i.e. inferred value) until launch, at which point it will also support write. 
  • New bit for who can discover group exposed. We will expose a new bit that represents who the group will be visible to. This setting will replace show in group directory. Note that it will be read-only (i.e. inferred value) until launch, at which point it will also support write. 


See our Cloud blog post for more details on these API changes and how to use them.

“Post as the group” will not be merged into the content moderator setting 
Previously we stated that this setting would be merged. However, you told us that it was valuable and we should keep it separate, so we’re updating the plans and will not merge it.

“New member posts are moderated” will continue to be supported. 
The “New member posts are moderated” setting, exposed in the API as MODERATE_NEW_MEMBERS, will continue to be supported as a value for moderation.

“Take topics” will be merged with content metadata 
We previously suggested that “Take topics” would remain a standalone setting. However, this will now be merged as part of the content metadata settings.

New worksheet to help visualize changes
We’ve created this Google Sheet which will show you what the new settings will be for any group if you input the current settings. This can help you check the settings will be inferred as you want them.

Helpful links 


Availability 

Rollout details 


G Suite editions 
Available to all G Suite editions.

On/off by default? 
This feature will be ON by default.
Stay up to date with G Suite launches

Minor updates related to the Activity Dashboard in Editors and the Admin console

Quick launch summary 

We’re making two minor updates to verbiage found in the Activity Dashboard in Editors and related settings within the Admin console. As we launch more features to the Activity Dashboard, these updates will help keep things clear for both admins and end users.

In the Admin console: 
In the Activity dashboard settings, where it previously read “Access to activity dashboard” on the left hand navigation, it will now read “Access to view history.”


From here, Admins can set the ability for users to access Viewers and Viewer trend activity in the dashboard to ON/OFF. To learn more about file activity visibility, see this article in the Help Center.

In Editors: 
Within the Activity dashboard, the “View time” tab has been renamed to “Viewers.” From this tab, document owners can see the last time users with Edit access viewed the file and take action to follow-up. To learn more about view history in Docs, Sheets, and Slides, see this Help Center article. 

We’re also changing the icon for the Viewers tab — previously it was a clock, now it will be a person. This change is to better indicate the purpose of this tab, which is viewer history, not time viewers spent in the document.


Availability 

Rollout details
G Suite editions 
  • Available to all G Suite Editions.

Stay up to date with G Suite launches

It’s now easier to insert images in cells in Google Sheets

What’s changing  

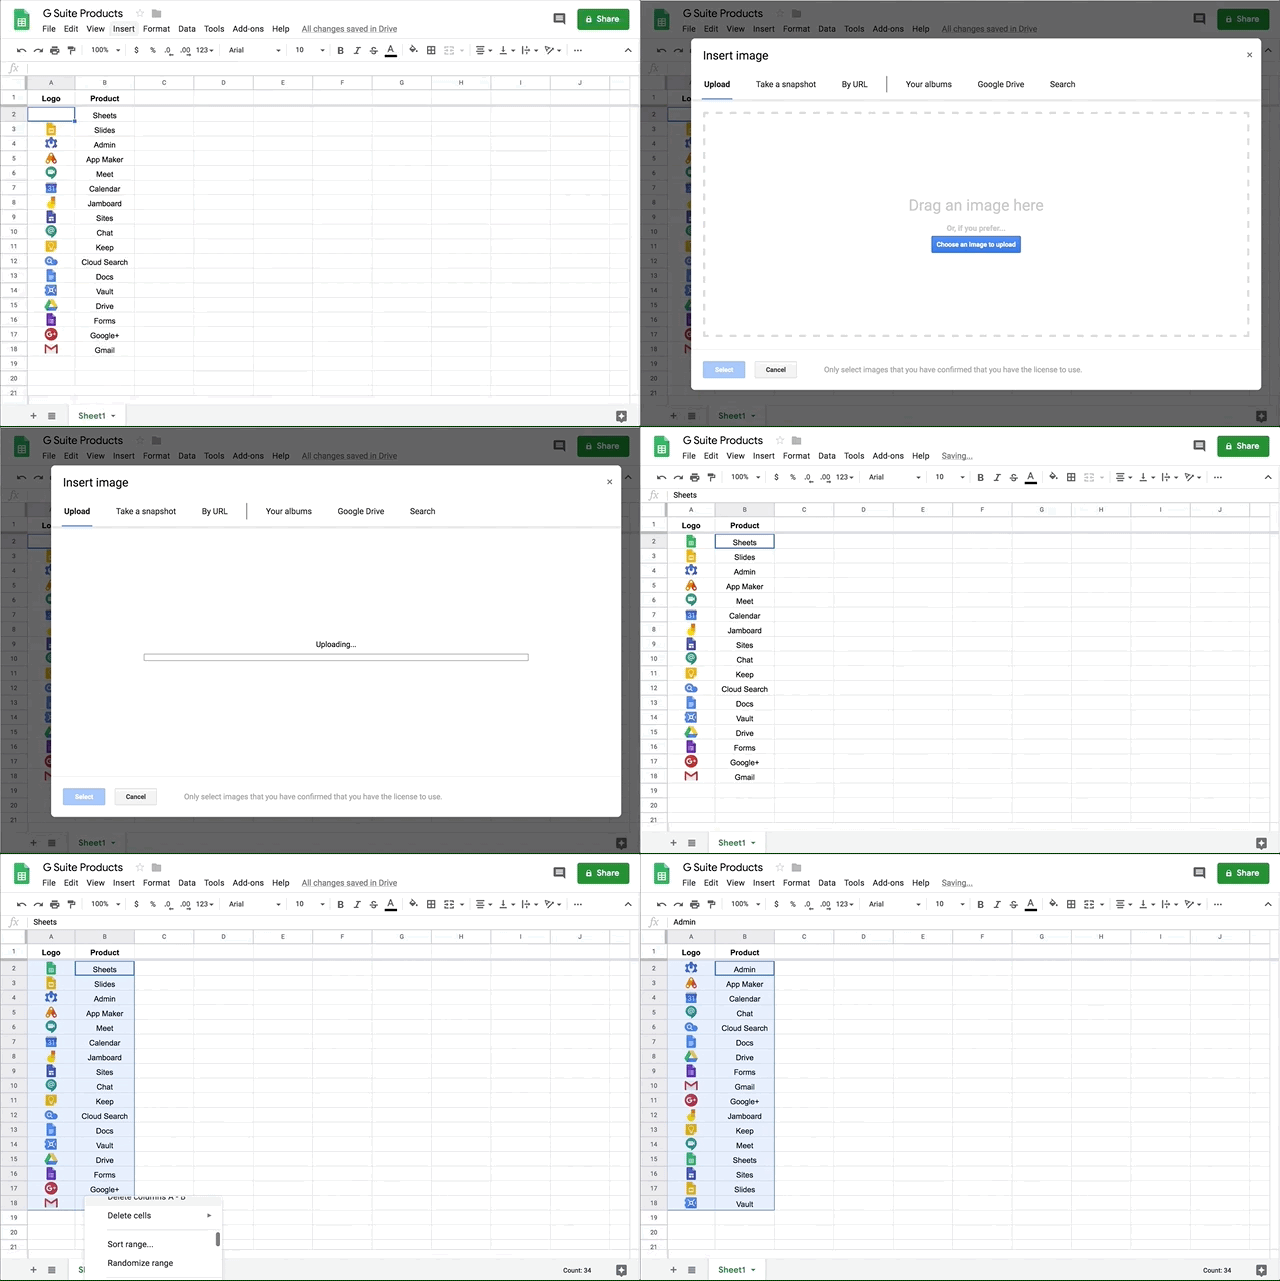
We’ve made it simpler to add images inside of cells in Google Sheets. Previously, it was only possible to insert publicly hosted images into a cell using the IMAGE function.

Now, you can insert any image, like those saved on your desktop or mobile device, into a cell by using the IMAGE function or the new option found inside the Insert menu.


Who’s impacted 

End users

Why you’d use it 

  • You’ve told us this feature would be helpful for many tasks like: 
  • Adding receipts to expense-tracking spreadsheets 
  • Adding icons to icon libraries 
  • Adding logos to better brand your resources 
  • Adding product images to inventory lists, and more. 

How to get started 

  • Admins: No action needed. 
  • End users: You can add images directly to cells in two ways on Desktop: 
    • Use the IMAGE() function 
    • Via the menu bar at the top of a Sheet: Insert > Image > Image in cell 
      • Select image from Drive or upload one. 

  • On Mobile: 
    • Tap once on a cell to select 
    • Tap again to bring up menu: Insert > Tap the “+” at the top of the screen > Image > Image in cell 
    • Select an image from the options presented to you. 

Additional details 

You can have multiple cells containing an image in a Sheet, but note that only one image per cell is possible at the moment. 

Images inside cells will be associated with a row and move along with the data—so, if you move rows, filter or sort them, the images will move with the content in the row, unlike previously when images would sit on top of the grid. 

Using the formatting and alignment tools, you can pin the image to a specific corner of the cell or set the alignment how you’d like. By default, images will align to the bottom left corner of the cell.

Helpful links 


Availability 

Rollout details 
G Suite editions 
  • Available to all G Suite Editions. 

On/off by default? 
  • This feature will be ON by default 

Set start times and import reminders in Tasks

What’s changing

We’re adding three highly-requested features to Tasks. You can now:
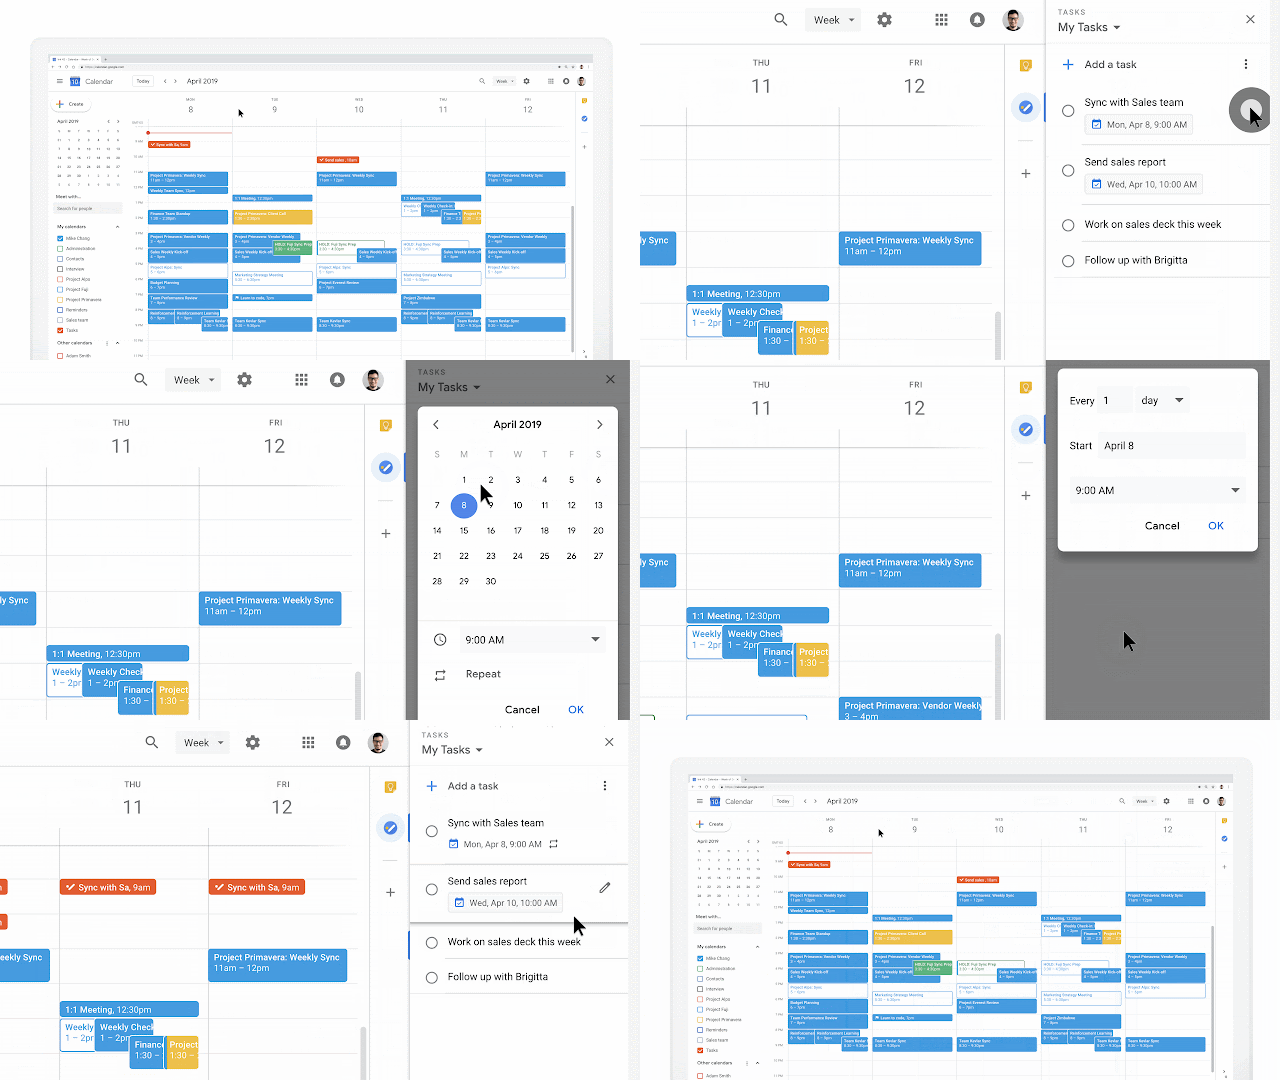
  • Set a date and time for your tasks and receive notifications
  • Create repeating tasks
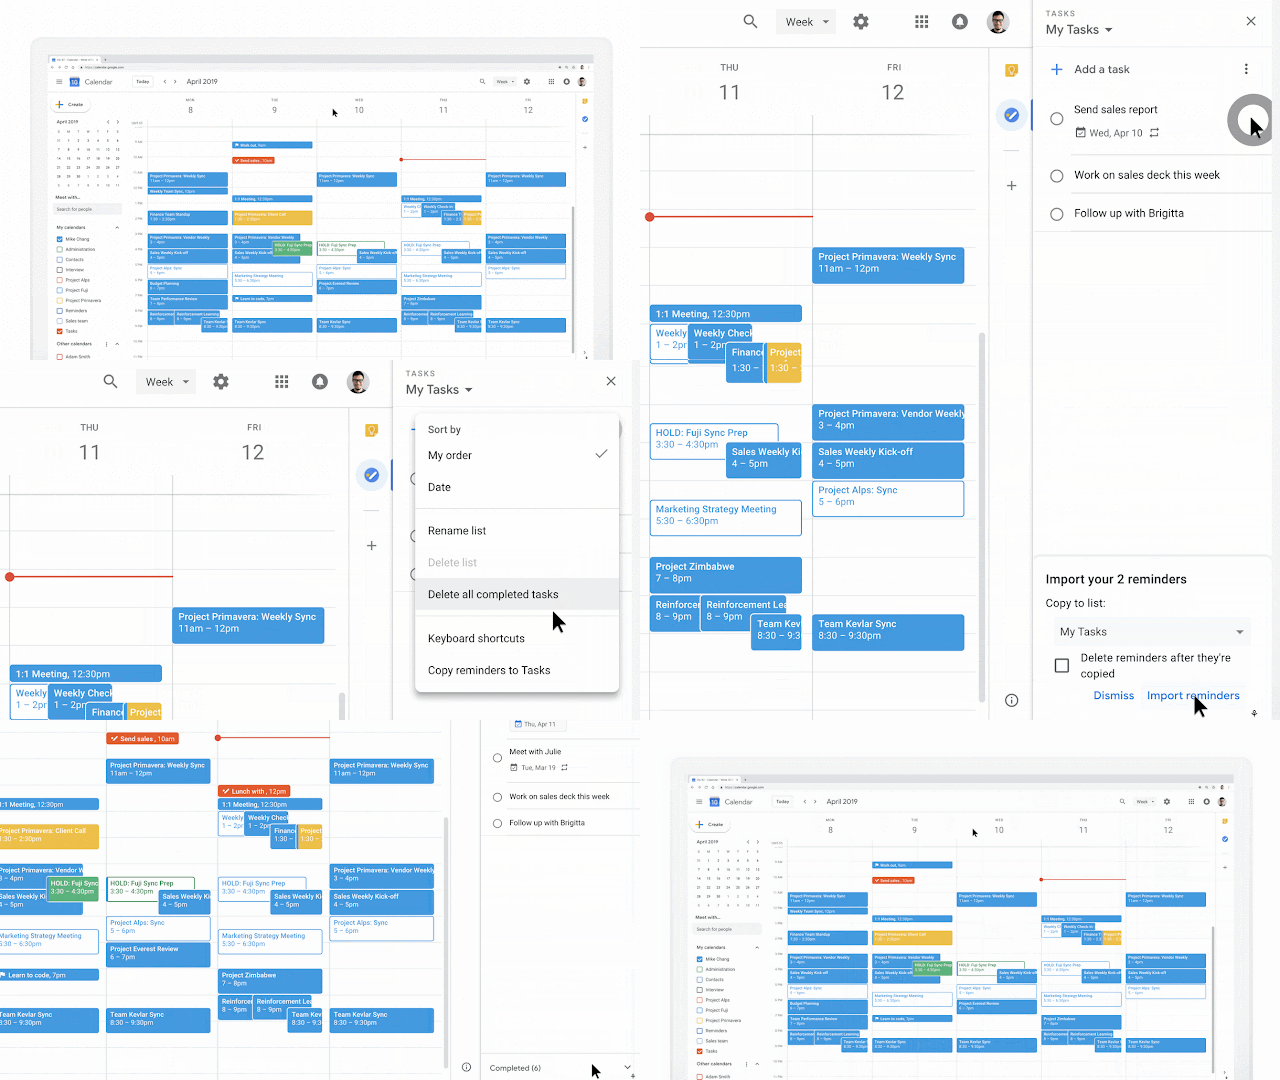
  • Import reminders into Tasks

Who’s impacted

End users

Why you’d use it

We’ve heard from you that you’d like Tasks to be the one destination to track what you need to do in G Suite. These features will help make sure all of your to-dos are in Tasks, and ensure that you can keep track of the deadlines associated with them. Additionally, importing reminders to Tasks can help your users if your organization is currently transitioning from Inbox to Gmail.

How to get started

  • Admins: No action needed
  • End users - Date/time and repeating tasks:
    • When you create or edit a task, you’ll now see a new “Add date/time” field.
    • After clicking on Add date/time, you can enter the date, time, and recurrence of this task.

  • End users - Import to tasks:
    • When you open Tasks on the web or your mobile app, you’ll see a prompt to copy your existing reminders over to Tasks. You can also trigger this manually by opening the overflow menu in the top right.
    • You’ll be able to select which list in Tasks you’d like to add them to, or create a new list.
    • You can also indicate whether or not you’d like these reminders to be deleted once they are copied.

Additional details

New time features
Every task now has two time-based properties, date and start time, that are available in the edit screen of each task.

These tasks will then show up in Google Calendar on the web at their specific time, as long as you have the “Tasks” calendar enabled on the left-hand side. If you’ve enabled mobile notifications, you'll also get notified for tasks at their scheduled dates and times in the Tasks mobile apps (Android/iOS). For tasks that have a date, but don’t have a time, you’ll get notifications at 9am local time.


If a task wasn’t marked as completed, you’ll get a second notification at 9am the day after a task was due.

Importing reminders into Tasks
This import tool will pull your reminders (from Inbox/Gmail, Calendar, or the Assistant) into Tasks.

When importing reminders into Tasks, we’ll copy over the title, date, time and recurrence of the reminder. Please note, reminders with locations associated will not be imported. Additionally, this is a one-time import and not a constant sync.

Availability

Rollout details
G Suite editions
  • Available to all G Suite editions

On/off by default?
  • Both features will be ON by default.
Stay up to date with G Suite launches

Work smarter with the new Priority page in Drive

Quick launch summary

We’re launching a new Priority page in Drive as a new way to help you stay focused and get work done. This page will help you access the files you need through a combination of suggestions and workspaces. With the new Priority page, not only are the most relevant files served up to you, but you can take action on them, as well as sort them into workspaces.

We hope this makes accessing your most important files easier and helps you work more efficiently. 

You can access the Priority page from the left-hand navigation panel in Drive. Some features you’ll see on the Priority page include:
  • Priority: 
    • Here you’ll see the documents we think are most relevant to you right now. These machine-learning-powered suggestions are based on various signals from your activity. On each suggested document, you can also take actions in line, without navigating to the doc in question, like replying to a comment or reviewing recent edits.
  • Workspaces: 
    • In Workspaces, you’ll be able to see intelligent suggestions of related content to group together for easier access— like multiple files related to the same project. 
    • You can also create your own personalized Workspaces collecting any files you have access to, including content stored in your My Drive and various Team Drives. 
      • Right-click on any file and select Add to Workspace to dynamically group files as you work.
    If users would like to make Priority their default home page, they can do so in their settings, which is accessible via the gear icon in the upper righthand corner.


    Availability 

    Rollout details 
    • Rapid Release domains: Extended Rollout (potentially longer than 15 days for feature visibility) starting on March 18, 2019. 
    • Scheduled Release domains: Extended Rollout (potentially longer than 15 days for feature visibility) starting on April 1, 2019. 
    G Suite editions 
    • Available to G Suite Basic, G Suite Business, and G Suite Enterprise. 
    • Coming soon for G Suite for Education, G Suite Enterprise for Education, and G Suite for Nonprofits.  
    On/off by default? 
    • This feature will be ON by default.

    Stay up to date with G Suite launches

    View Calendar event creators to easily swap meeting rooms

    Quick launch summary

    You can now see the creator of a meeting when looking at a “busy” block of time on a resource or room’s schedule in the “Find a time” grid view. Simply hover over the block to see the event creator’s name (even if the event is “Private.”)


    We’ve heard from you that being able to see who booked a room for a meeting is crucial in order to easily reach out to the creator to ask if they would be open to swap the room or change the meeting time.

    Please note, the information such as the description and title of the event will still be hidden to ensure no sensitive information is shared.

    Availability

    Rollout details


    G Suite editions

    • Available to all G Suite editions

    On/off by default?

    • This feature will be ON by default.

    Stay up to date with G Suite launches